As helpful as the spell checker might be, you can’t rely exclusively on it to catch every mistake. For example, if you type “lightening” when you mean “lightning,” or “metal” when you mean “mettle,” Pages won’t spot the error, since these words are all in the dictionary and spelled correctly. Only you (or another reader) can spot correctly spelled but misused words. But we all might be forgiven the occasional lapse when we forget which version of a word is correct for the context: Do I use “affect” or “effect” here? “Your” or “you’re”? “Compliment” or “complement”? Pages offers a set of tools in the Edit → Writing Tools submenu to help you answer those questions and also find lots more info about a word or phrase.
Your Mac comes with a full dictionary, complete with definitions, pronunciation, usage notes—the whole shebang. In fact, the Mac OS X Dictionary program gives you three volumes in one: The New Oxford American Dictionary, The Oxford American Writers Thesaurus, and the Apple Dictionary, which includes terms and definitions specific to Apple’s software and products.
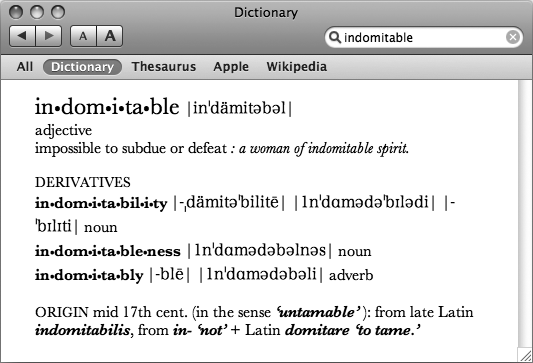
You can look up a word directly from your Pages document by highlighting it and then choosing Edit → Writing Tools → Look Up in Dictionary or Thesaurus” (or Control-click the word and, from the shortcut menu, choose Writing Tools → “Look Up in Dictionary or Thesaurus”). Pages launches the Dictionary program and flips you straight to the entry for your selected word in the dictionary, as shown in Figure 4-7. Click the appropriate tab to look up the word in the Apple dictionary or thesaurus—why settle for “bold” when you could say, “temerarious”?
Note
If your selection contains more than one word when you select “Look Up in Dictionary or Thesaurus,” Dictionary uses the first word or phrase that it recognizes from the selected passage.
Figure 4-7. Read up on a word’s meaning in the dictionary—or look up synonyms and antonyms in the thesaurus to find just the right word. Go straight to the word you want by highlighting it in Pages and choosing Edit → Writing Tools → “Look Up in Dictionary or Thesaurus.” Or type your word in the search box at the top right of the Dictionary window and press Return.
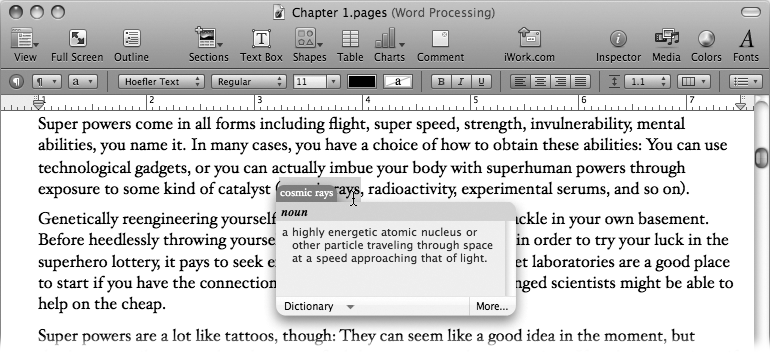
Your Mac knows an even niftier shortcut to the dictionary and thesaurus: Position your cursor over the word you want to define, hold down the Control and ⌘ keys, and tap the D key. A little window pops up with the definition of the word, as shown in Figure 4-8. The menu sticks around for as long as you continue to hold down the Control and ⌘ keys. You can even move your cursor from word to word, and Pages updates the definition to show you the meaning and pronunciation of the word under the cursor. When you’re done, release the Control and ⌘ keys, and your cursor returns to normal duty. (You can use this trick in lots of Mac programs, not just iWork.)
Figure 4-8. The pop-up dictionary shows you the definition of the word under your cursor when you hold down the Control and ⌘ keys and then press D. To switch to the thesaurus or Apple dictionary, choose it from the Dictionary pop-up at the bottom left. To open the entry in the full Dictionary program, click More in the bottom right.
Say that the simple definition of “cosmic rays” just doesn’t cut it, and imagine that you’re eager to soak up every detail about their origins in neutron stars and quasars. Hey, it could happen. And when it does, Pages gives you a few easy ways to find detailed information from the Web about any topic.
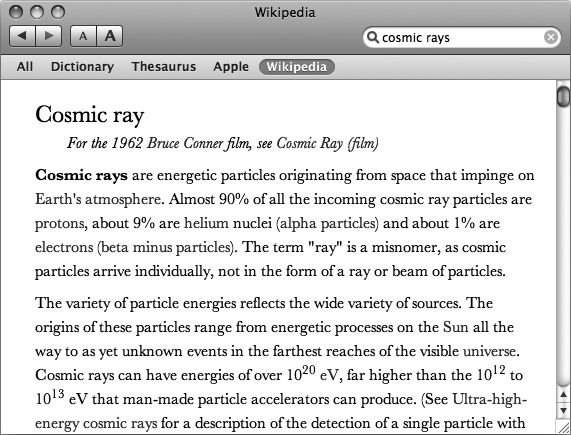
When you explored the Dictionary window, you might have spotted the Wikipedia tab in the Dictionary toolbar (this tab is available only in Mac OS X 10.5 or later). When you’re connected to the Internet, clicking that tab calls up the encyclopedia entry for your word or phrase from Wikipedia, the Web’s free volunteer encyclopedia. Just like looking up dictionary definitions, you can look up the encyclopedia entry for any term by highlighting it in your document and choosing Edit → Writing Tools → “Look Up in Dictionary or Thesaurus” and then clicking the Wikipedia tab, as shown in Figure 4-9.
Figure 4-9. The Dictionary program offers a Wikipedia tab, which lets you read the Wikipedia encyclopedia entry for any word or phrase.
If you prefer your Wikipedia in a browser window, you can instead select the term to look up, and choose Edit → Writing Tools → Search in Wikipedia. Pages opens the Wikipedia entry in your Web browser.
Pages offers a similar option to speed up a Google search. Highlight your search phrase and choose Edit → Writing Tools → Search in Google. Pages takes you straight to the Google search engine in your browser, displaying the results for your search term.
Sometimes, the answer lies within, or at least within your hard drive. Besides helping you pluck info from the Web, Pages can likewise help speed searches within your own computer. While writing a chapter on the practical benefits of telepathy for the modern hero, for example, it sure would be convenient to have that article you wrote for Telepathy Review about the new generation of precognition balms and lotions. If only you had the vaguest idea where you saved the file.
Happily, it doesn’t take a mind reader to find your document. Mac OS X lets you search for files on your computer using Spotlight, the system’s built-in search engine. Normally, you might launch a search by clicking the magnifying-glass icon at the top right of your screen, or by typing a word or phrase into the search box at the top right of any window in the Finder. But Pages gives you a slight head start by letting you launch a search from any text selection in your document. For example, to see if there’s a found document in your future, highlight the phrase precognition balms in your document and choose Edit → Writing Tools → “Search in Spotlight”. Pages launches a new Finder window listing all the files that contain those words.
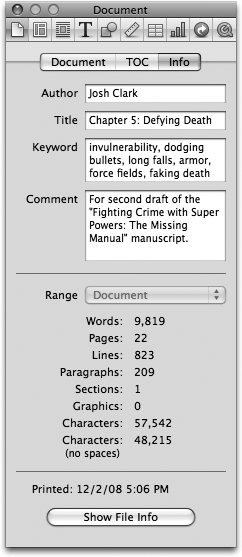
When you’re targeting your text to a certain word count or if you simply have a Rain Man-like fascination with numbers, Pages offers a wealth of statistics about your document. Under Pages’ standard settings, the page and word counts are always displayed at the bottom of your document window, but you can also check a slew of other statistics on the growth of your bouncing baby book in the Info tab of the Document Inspector (Figure 4-10). Pages takes you directly there when you click the word count at the bottom-left corner of the Document Window, or when you choose Edit → Writing Tools → Show Statistics.
Tip
If you’re distracted by the always-on display of your word count, turn it off in the Pages → Preferences window: Click the General button and turn off the “Show word count at window bottom” checkbox.
While you’re busy composing Great Thoughts, Pages constantly runs your numbers—lots of them. The Document Inspector counts just about everything in your document: words, pages, lines, paragraphs, sections, graphics, and individual characters. (If you need the character count with spaces omitted, Pages even throws that in, too.)
If you want the counts for just a specific passage of your document, just highlight the text to tally. The word count at the bottom right of the document window updates to show you how many words you’ve selected, along with the document’s overall total (“5 of 4,387 Words”). With text selected, the Document Inspector similarly zeroes in on your selection: The Range pop-up menu automatically switches to Selected, and the inspector shows you the counts for the highlighted text, with a slightly reduced number of categories: words, paragraphs, graphics, and characters. To go back to the figures for the full document, choose Document from the Range pop-up menu or click outside the selection to deselect the text (when there’s no text selection, Document is the only option).
Figure 4-10. The Document Inspector → Info tab displays statistics about your document. Fill in the author, title, keywords, and comments to help Spotlight find your file more easily. As you type, Pages updates the count of words, paragraphs, pages, and more. You can see these counts for any portion of your document by highlighting it; Pages automatically sets the Range pop-up menu to Selection and shows you the numbers for the selected text. Choose Document to go back to the full document stats.
The top of the Document Inspector → Info tab features four fields where you can describe your document: Author, Title, Keywords, and Comments. When you create a new document, these fields are always blank. You can leave them that way if you like, but filling them in makes it easier for Spotlight to find the document if you lose track of it later.
At the very bottom of the Document Inspector → Info tab, Pages displays the date the document was last printed (or “Never” if you haven’t gotten around to it). Click the Show File Info button and Pages opens a new Finder window with detailed info about the document file, including its size, location, and the dates it was created and last modified. (This is the same window that you see if you select the file on your desktop and choose File → Get Info in the Finder.)
Get iWork '09: The Missing Manual now with the O’Reilly learning platform.
O’Reilly members experience books, live events, courses curated by job role, and more from O’Reilly and nearly 200 top publishers.


