Chapter 4. Setting Up Version Control Using Subversion
An Introduction to Subversion
When it comes to version control tools, you will often be stuck with whatever happens to be in use in your organization, be it an open source solution like CVS (see Chapter 3) or one of the many commercial products. However, if you are free to choose your open source version control system (or SCM), Subversion is probably one of the best choices around.
Subversion (pronounced “Sub-Version,” for those who are interested in such details) is a relatively new product explicitly designed to overcome the historical shortfalls of CVS (see Chapter 3) and become the new standard in open source version control tools.[4] It is a superbly engineered piece of software, actively developed and maintained by paid staff from CollabNet. Although it does have a very CVS-ish feel to it, its underlying architecture is quite different, and it has a number of major improvements compared to its venerable predecessor.
In this section, we will run through some of the key improvements of Subversion when compared to CVS, and, in doing so, gain some insight into the Subversion architecture and philosophy.
Revision Numbers and Atomic Updates
Perhaps one of the most profound changes between CVS and Subversion is the way each system keeps track of changes.
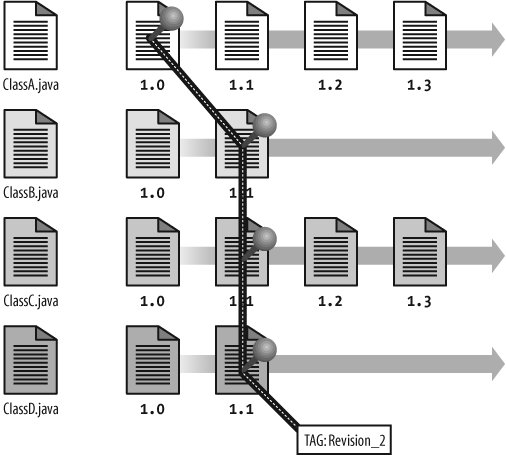
CVS keeps track of individual file versions. In CVS, when you commit a set
of changes, each modified file is updated separately. Tags can be used to
identify a snapshot of the repository at a particular point in time. This is
illustrated in Figure 4-1. Here we have a set of four
Java classes. When the developer adds these files to CVS, each will be
attributed a version number (1.0). Now our developer makes some
modifications to ClassB,
ClassC and ClassD, and
commits these changes to CVS. Each of these files will be updated on the
server and assigned a new version number: 1.1. Our developer may now be so
happy with this version that she adds a tag called (imaginatively)
“Revision_2.” Each file will be “tagged” with this label, making it easier
to fetch from the repository at a later date or from another machine.
Now that we can visualize how CVS does things, let’s look at one of the major weaknesses of this architecture. Suppose during a commit that someone else starts committing changes at the same time and a conflict occurs. In this case, some of the files will have been updated, but others will have been refused, which leaves the repository in an unstable state. If you kill the process, switch off your machine, or a street worker drills through your Internet connection, similar nasty things can occur. The CVS repository can be left in an unstable state until the street worker in question repairs the cable and lets you resolve any conflicts and complete your commit operation.
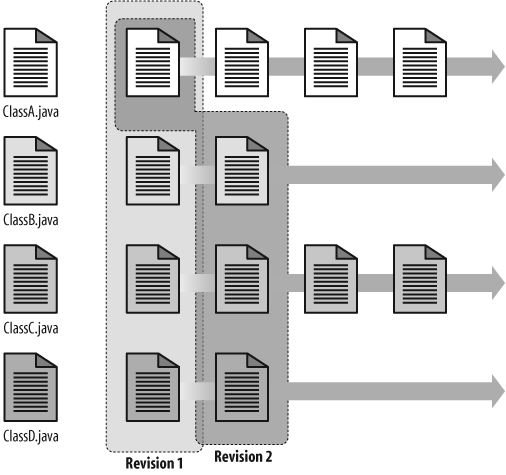
Subversion, by contrast, keeps track of revisions. A revision (or, more precisely, a revision tree) is a representation of the repository structure and contents at a given point in time. Revisions are the cornerstone of a powerful Subversion feature: atomic updates. Updating the Subversion repository is a bit like updating a relational database using transactions: when you commit a set of changes, you are guaranteed that either all of your changes have been integrated into the repository, or none at all have.
Behind the scenes, Subversion stores successive representations of the entire repository structure as a whole (see Figure 4-2). Each revision is identified by a unique number. When changes are committed, Subversion prepares a new repository structure incorporating the changes. If (and only if) every change is successfully integrated, a new repository tree will be created with a new revision number. So, in practice, either all of your changes are updated correctly in the repository, and you get a new revision number incorporating these changes, or none are, and you get to fix the problem and try again.
An offshoot of this strategy is that a given set of changes can be viewed as a distinct bundle. This notion is frequent among commercial SCM solutions but painfully absent from CVS.
In CVS, you can (and should) provide a message indicating the type of modification that you have made. You might put, for example, “Fixed bug number 123” or “Added support for the XYWZ file type.” This is all well and good, but you have no easy way of working out exactly which files were modified by this change, as the message is attached to each individual file.
Not so in Subversion. In Subversion, when you commit a set of changes, these changes are recorded for posterity as a single transaction, including (hopefully) an appropriate comment describing what they were for. The Subversion log function makes it easy to get a summary of the changes made in a particular revision, and why they were made, as shown here:
$ svn log -vr 5
------------------------------------------------------------------------
r5 | taronga | 2006-05-19 13:42:04 +1200 (Fri, 19 May 2006) | 1 line
Changed paths:
   M /trunk/src/main/java/com/wakaleo/jdpt/javalamp/CIServerPlugin.java
   M /trunk/src/main/java/com/wakaleo/jdpt/javalamp/JavaLamp.java
   M /trunk/src/main/java/com/wakaleo/jdpt/javalamp/plugins/ContinuumPlugin.java


New feature added: project status now appears in the menu for Continuum projects.
------------------------------------------------------------------------
Fast Branching and Tagging
CVS users will be familiar with the pain of tagging a big project under CVS. Because every single file must be individually tagged, the operation can be very time-consuming indeed. In Subversion, tagging a new version simply involves copying the current repository into another directory on the server. Subversion does not actually copy the whole directory content but simply makes a reference to the original version of the data. This is extremely fast, and takes very little disk space.
Branching is another important function in any version control system (see Using Tags, Branches, and Merges). In Subversion, creating a new branch uses exactly the same technique: when you create a new branch, Subversion simply copies the current repository into a special directory.
Lightweight Network Transactions
Subversion provides excellent network performance, even when dealing with large binary files. Subversion stores a local copy of the original repository files, and transmits only the difference between the original repository revision and the local changes. So, in Subversion, the quantity of data sent over the network is proportional to the size of your modifications, not to the size of your files.
This local copy also allows many operations, such as status, diff, and revert, to be done without accessing the server at all.
Handling Binary Files
CVS handles binary files very poorly. Not only are they sent over the network in their totality at each update, but each version is stored on the server in its complete form. This alone is enough to put you off storing big Word documents on a CVS server! Subversion, by contrast, was designed from the ground up to treat binary files with the same efficiency as text. Indeed, in Subversion, all files are internally stored as binary files, and only the binary differences between revisions are actually stored on the server. Subversion only distinguishes between binary and text files to avoid trying to merge binary files (see Forcing the File Type with svn:mime-type” in Using Properties).
Installing Subversion
With a bit of luck, you will be able to use a binary installation package adapted to your platform to install Subversion. This is the case with Windows, and also with many distributions of Linux. For Windows, you can download graphical installer packages for both Subversion and the Subversion Python bindings. You will need the Python bindings if you intend to install Trac (see Chapter 28) as well. Finally, if you intend to run Subversion with Apache on a Windows server, make sure that you use the installer package built against the version of Apache (2.0 or 2.2) that you are using.
For many distributions of Linux, there are prebundled installation packages available. On Ubuntu, for example, installing Subversion is as simple as running apt-get install with the appropriate packages:
$ sudo apt-get install subversion libapache2-svn
In some cases, you may need to build and install Subversion yourself. For example, if you want to install Trac on a Linux server, you might need to build Subversion with the correct Python bindings, or you may want to build and install the Apache modules so that you can use Subversion through your Apache server. Be warned that building Subversion from the source code is not always a simple task. The dependencies and configuration options are numerous and complex, and you can find detailed instructions regarding how to do this regarding the Subversion web site.[*] For example, the following listing gives some idea of the steps involved in installing Subversion 1.4.5 on a typical Linux box, with the Apache configuration and Python bindings configured correctly:
$ wget http://subversion.tigris.org/downloads/subversion-1.4.5.tar.gz
$ tar xvfz subversion-1.4.5.tar.gz
$ cd subversion-1.4.5
$ ./configure --prefix=/usr/local --enable-so --enable-rewrite \
   --with-susexec --enable-mods-shared=all  --with-apr=/usr/local/apache2 \
   --with-apr-util=/usr/local/apache2 --with-swig
$ make
$ make swig-py
$ sudo make install
$ sudo make install-swig-py
Subversion Repository Types
When you set up a new Subversion project, the first thing you need to decide is where to store the source code repository, and in what form.
In fact, Subversion users have the choice of two quite different storage systems for their repositories: either in a Berkeley DB database, or as a set of flat files. The latter is known in Subversion circles as FSFS[*] because it is effectively a filesystem built on the native filesystem.
For the history buffs, this is how this choice came about. In the beginning, Subversion used the Berkeley DB database engine. Berkeley DB is a nice fast, robust, fully transactional open source database designed to be embedded within an application (that is, there is no separate Berkeley DB database to maintain and administer). For many years, all Subversion repositories were based on a Berkeley DB database.
The Berkeley DB solution does have a few problems, however.
First, it has some major portability and architectural issues. A Berkeley DB database is absolutely not portable from one OS to another: you can’t simply duplicate a Subversion repository created under Linux and have it work under Windows, as you could do with CVS, for instance. Also, according to the Subversion authors, Berkeley DB database repositories don’t work well on a shared network drive, and don’t work at all under Windows 95/98. (OK, I’ve never heard of anyone nowadays setting up an SCM server on a Windows 95 box, but I thought you should know. Anyway…)
Second, it may get into trouble if the client suddenly crashes or is brutally cut off. If this happens, the Berkeley DB may end up stuck in an unstable and inaccessible state, and will have to be restored by a system administrator.
To get around these problems, the Subversion team released a new storage system in 2004, one based entirely on a flat file structure, and known as FSFS. In an FSFS repository, each revision tree (see “An Introduction to Subversion,” earlier in this section) is stored in a single file, in a special directory dedicated to this purpose. All the revisions are stored in this directory, as shown here:
$ ls -al /data/svn/training/db/revs/
total 172
drwxr-sr-x  2 taronga users   4096 2006-04-29 12:27 .
drwxr-sr-x  5 taronga users   4096 2006-04-29 12:27 ..
-rw-r--r--  1 taronga users    115 2006-04-25 10:46 0
-rw-r--r--  1 taronga users 103967 2006-04-25 10:50 1
-rw-r--r--  1 taronga users  29881 2006-04-29 10:25 2
-rw-r--r--  1 taronga users  10344 2006-04-29 11:11 3
-rw-r--r--  1 taronga users   4827 2006-04-29 12:27 4
One interesting thing about this directory listing is that the files keep getting smaller. “Aha!” I hear astute readers say, “Subversion must use some cunning incremental storage strategy!” Indeed it does. Subversion updates are highly optimized both in terms of disk space (only the modifications are stored, and in compressed form at that), and in terms of time and network load (the less data you transfer, the less time it takes).
Another interesting thing that Unix-literate readers will immediately note is that all the revision files are read-only, safe from anyone except a root administrator gone mad. Or a very clever hacker. Pretty safe, in any case. This can give some insight into Subversion’s transactional updating strategy: as we mentioned earlier, a revision contains the entire state of the project at a given point in time. When new files are added, or existing files are deleted, or the project source code is modified in some way, the existing revisions are never modified. Instead, an entirely new directory structure is built in a temporary directory, using the most recent revision plus the proposed changes. Once all the changes are committed, and if (and only if) no conflicts occurred, a new revision file is built using the delta between the previous revision and the new directory structure. This is Subversion’s way of guaranteeing atomic updates: either every modification you submit gets included in a new revision, or none do.
Another advantage of FSFS over Berkeley DB is that a user who simply requires read-only access to your repository-only has to have read access to the repository directory and files. If a Berkeley DB repository is used, all clients need physical read-write access to the repository. The security implications of this are quite major: with an FSFS repository, you can confidently provide anonymous access to your repository (see “Setting up a Subversion Server with svnserve” in Setting Up a Subversion Server with svnserve) with no risk to your repository files.
Because FSFS files are just ordinary files, you can store them anywhere you like. You can also transfer them from one operating system to another without modification, and shared network drives do not bother FSFS in the slightest. And it is also reportedly much more resilient to client interruptions or disconnections.
FSFS repositories are now the default option when creating new repositories in Subversion, and should be the preferred option for any new work.
Setting Up a Subversion Repository
Creating a Subversion repository is easy. All you need to do is use the svnadmin create command:
$ svnadmin create /path/to/repos
By default, this will set up an FSFS repository (see Subversion Repository Types) at the specified location. If you really need to, you can use the --fs-type option to specify a Berkeley Database backend:
$ svnadmin create --fs-type bdb /path/to/repos
To
give a concrete example, here is how I set up the repository for development
projects (called, appropriately enough, “dev-repos”) on my home machine, in a dedicated directory called
/data/svn:
$ svnadmin create /data/svn/dev-repos
Note that there is nothing fancy about the repository path: it’s just a plain old OS-dependent file path. On a Windows server, you would do something like this (note the backslashes):
C:\> svnadmin create C:\data\svn\dev-repos
You do need to be on the server where your repository is to be stored since it won’t work across a network connection.
You rarely have to delve into the details of the repository file structure. One exception is if you need to install some hook scripts, which are scripts triggered by certain repository events, such as creating a new revision. Nevertheless, it can be useful to know a little about how the repository directory is structured. The standard repository structure looks like this:
$ ls  /data/svn/dev-repos/
conf/  dav/  db/  format  hooks/  locks/  README.txt
Each directory serves a specific purpose:
- conf
This directory contains repository configuration files, such as the configuration files for svnserve (see Setting Up a Subversion Server with svnserve), Subversion’s custom repository server program.
- dav
This directory is reserved for use by Apache and mod_dav_svn, the Apache module which provides access to the repository using the WebDAV/DeltaV protocol.
- db
This directory is the real McCoy, the genuine article, the place where all your hours of slaving over a hot keyboard are stored for perpetuity—in other words, this is where the actual repository data is stored. The exact content will vary depending on the repository type, and you shouldn’t have to delve into this directory, except by curiosity. If you have an FSFS (see Subversion Repository Types) repository, for example, the revisions can be found in the form of numbered files in the db/revs directory, as illustrated here:
$ ls -al /data/svn/dev-repos/db/revs/
total 1100
drwxr-sr-x  2 taronga users   4096 2006-05-20 19:13 .
drwxr-sr-x  5 taronga users   4096 2006-05-20 19:13 ..
-rw-r--r--  1 taronga users    115 2006-05-11 19:51 0
-rw-r--r--  1 taronga users   6342 2006-05-11 22:23 1
-rw-r--r--  1 taronga users    696 2006-05-11 23:36 2
-rw-r--r--  1 taronga users   2591 2006-05-15 00:25 3
-rw-r--r--  1 taronga users 350309 2006-05-16 02:30 4
-rw-r--r--  1 taronga users 574211 2006-05-18 00:42 5
-rw-r--r--  1 taronga users  97501 2006-05-19 20:06 6
-rw-r--r--  1 taronga users  34294 2006-05-19 21:34 7
-rw-r--r--  1 taronga users   5434 2006-05-20 15:23 8
-rw-r--r--  1 taronga users    897 2006-05-20 15:24 9
- format
This is just a file containing the version number of the repository layout.
- hooks
This directory is where your hook scripts go. In a new repository installation, it will contain some useful script templates which can be used as the basis for your own scripts.
- locks
This directory is used by Subversion to keep track of locks of the versioned filesystem.
Although (or perhaps, because) creating repositories is so easy you should take some time to think about how you want to store your Subversion repository or repositories. Your friendly system administrator may have some thoughts on this question as well. You can create a single repository for all your projects, or a repository for each project or group of related projects. Creating a single company-wide project means that some metadata and repository configuration details (such as hook scripts) can be shared. From an administrator’s point of view, having all the data in one place arguably simplifies maintenance.
By contrast, different projects may have different needs, such as different access rights or different mailing lists to be updated. This is much easier to manage using several distinct repositories. Another minor disadvantage of the first approach is that revisions are shared for all projects, so your revision number will go up whenever anyone changes a project anywhere in the company, which may get people confused.
Setting Up a New Subversion Project
In general, a Subversion repository will contain many related projects. In fact, once you have a repository (see ???), creating a project in Subversion is also an easy task. However, before starting, you should think about your directory structures.
Over time, Subversion users have come up with a number of conventions concerning Subversion directory structures. These conventions actually make good sense, though they may surprise CVS users at first. The key issue is knowing where to store tags and branches. In Subversion, branches and tags (see ???) are performed by simply copying the current revision into another directory. So, the recommended Subversion directory structure is to create three subdirectories in the project root directory, as follows:
$ ls
  trunk/  tags/  branches/
The convention involves using each subdirectory for a (fairly obvious) purpose:
- trunk/
The trunk directory is where the main development work is stored.
- tags/
The tags directory contains project repository snapshots, identified by human-readable names such as “Release 1.0.”
- branches/
This directory contains named branches coming off the main development line.
However, this is just a convention, with the aim of making life simpler for the human users of the repository: Subversion will be happy with any directory structure.
The easiest way to create a new Subversion project is to create the empty directory structure in a temporary directory, and then to import this directory structure into the Subversion repository using the svn import command, as shown here.[*] Subversion naming conventions can be a bit surprising for the uninitiated, so let’s go through the process step-by-step. I start off in my home directory, where I create a temporary directory that I will use to set up an initial empty directory structure:
$ pwd
/home/john
$ mkdir svn-tmp
$ cd svn-tmp
$ mkdir myproject
$ mkdir myproject/trunk
$ mkdir myproject/branches
$ mkdir myproject/tags
We are going to use the Subversion repository in the /data/svn/dev-repos directory. This could be on a local disk or a remote drive. We refer to this directory using a Subversion URL (see Understanding Subversion Repository URLs). In this case the target directory is directly accessible, so we can use the “file://” URL prefix, followed by the path of the target directory. The svn import command “imports” files and/or directories from your local directory into the Subversion repository.
$ svn import . file:///data/svn/dev-repos -m "Initial repository structure"
Adding         myproject
Adding         myproject/trunk
Adding         myproject/branches
Adding         myproject/tags

Committed revision 1.
Windows users should note that the file path uses forward slashes, even if the repository is on a Windows server. Here we are using the standard URL-type path format that Subversion uses for almost all communication with the repository:
C:\> svn import . file:///c:/svn/dev-repos -m "Initial repository structure"
Adding         myproject
Adding         myproject\trunk
Adding         myproject\branches
Adding         myproject\tags
For simplicity, these examples use the “file:” protocol. Naturally, if you already have a remote Subversion server running, you can use any of the other network-based protocols (see Understanding Subversion Repository URLs) to import your project into the repository. Here, for example, we import the project onto a remote server via HTTP:
C:\> svn import . http://myserver/svn/dev-repos  -m "Initial repository structure"
Adding         myproject
Adding         myproject\trunk
Adding         myproject\branches
Adding         myproject\tags
Once this is done, your project has been created in the Subversion repository. You don’t need the temporary directory anymore, so you can safely delete it (although you might want to wait until you check out your working copy in the next article, just to be on the safe side). In the next section, we will look at how to obtain a working copy.
Checking Out Your Working Copy
Now that you have created your project in the Subversion repository, you need to obtain a working copy of the project. A common error for new Subversion users is to attempt to use the directory that they just imported as their working directory. This approach is natural, intuitive, and, unfortunately, wrong. Before you can actually use Subversion on your project, you need to obtain a working copy of your project, using the svn checkout command.
This is often the first thing you do when you start work on a new project that has been created by someone else, or when you check out the source code from an open source project.
First of all, you need to decide where your project is going to live on your disk. In this example, my projects are stored in a directory called projects, which is a subdirectory of my home directory:
$ mkdir ~/projects
Now you need to check out the actual project. Subversion is happy to let you check out any part of the repository you like. You can check out the whole project structure if you want, but you probably really only need one subdirectory: the main development branch (by convention called the trunk). Later on, you might want to create other directories for development branches, but for now, let’s just set up a working copy of the main development branch. To do this, you need to use the svn checkout command:
$ svn checkout file:///data/svn/dev-repos/myproject/trunk myproject
Checked out revision 1.
$ ls
  myproject/
Subversion just created a directory called myproject in your working directory. Inside, if you look closely, you will see a lone “.svn” directory. This directory contains everything Subversion needs to do its magic, and notably a pristine copy of the revision you checked out, which it will use, for among other purposes, to calculate the changes you’ve made when you commit your modifications to the server:
$ ls -al myproject
drwxrwxr-x    3 taronga users 4096 2006-05-20 21:15 ./
drwxr-xr-x  125 taronga users 4096 2006-05-20 21:15 ../
drwxrwxr-x    7 taronga users 4096 2006-05-20 21:15 .svn/
Subversion gives you a fair bit of flexibility as to where you check things out to. If you leave out the target directory, Subversion will simply create the final directory in the repository path in your current working directory:
$ svn checkout file:///data/svn/dev-repos/myproject
Checked out revision 1.
$ ls myproject
  branches/
  tags/
  trunk/
Note that in this case the branches and
tags directories are also downloaded,
which isn’t usually what we want.
You don’t have to checkout the whole branch either. Imagine you’re just working on the users’ manual, which is stored in the docs/users-manual directory. You can simply check out the subdirectory that you need, as shown here:
$ svn checkout file:///data/svn/dev-repos/myproject/trunk/docs/users-manual
Checked out revision 1.
$ ls
  users-manual/
Importing Existing Files into Subversion
When you create a new Subversion repository, you may already have some files that you want to import into your project. This is easy. First, make sure your project directory contains only the files you want to store on Subversion: no compiled files, no temporary files, and so on. Copy this directory into your working folder.
Now the tricky thing is to import your new project into the right place in the repository. What you will typically want to do is to import your files into the trunk subdirectory of your new project directory in the repository. So, when you import the files, you have to provide the full path, including the trunk subdirectory. The idea is to do something like the following:
$ svn import newproject file:///data/svn/dev-repos/newproject/trunk -m
"Initial Import"

Committed revision 3.
Here’s an example. In the following listing, I import a new project called JavaLamp into the subversion repository. Now I’ve already cleaned up the directory by removing the compiled classes, and copied the clean project directory into my working directory (~/dev-repos). The project already has some source code, so Subversion builds up the correct structure in the repository and adds all the project files recursively:
$ cd ~/dev-repos
$ svn import JavaLamp file:///data/svn/dev-repos/javalamp/trunk -m "Initial Import"
Adding         JavaLamp/src
Adding         JavaLamp/src/test
Adding         JavaLamp/src/test/java
Adding         JavaLamp/src/test/java/com
Adding         JavaLamp/src/test/java/com/wakaleo
Adding         JavaLamp/src/test/java/com/wakaleo/jdpt
Adding         JavaLamp/src/test/java/com/wakaleo/jdpt/javalamp
Adding         JavaLamp/src/test/java/com/wakaleo/jdpt/javalamp/JavaLampTest.java
...
Adding         JavaLamp/src/main/resources
Adding         JavaLamp/src/main/resources/META-INF
Adding         JavaLamp/src/main/resources/META-INF/MANIFEST.MF
Adding         JavaLamp/src/main/resources/images
Adding  (bin)  JavaLamp/src/main/resources/images/green-lavalamp.gif
Adding  (bin)  JavaLamp/src/main/resources/images/icon_success_sml.gif
Adding  (bin)  JavaLamp/src/main/resources/images/inqueue.gif
Adding  (bin)  JavaLamp/src/main/resources/images/continuum_logo_75.gif
Adding  (bin)  JavaLamp/src/main/resources/images/icon_error_sml.gif
Adding  (bin)  JavaLamp/src/main/resources/images/building.gif
Adding  (bin)  JavaLamp/src/main/resources/images/buildnow.gif
Adding  (bin)  JavaLamp/src/main/resources/images/checkingout.gif
...
Committed revision 4.
Astute readers will notice the “(bin).” This is just for information. Subversion basically detects which of your files are binary and which are text, based on their type. Subversion may attempt to merge conflicting text files but will never do so with binary files. Subversion does a pretty good job of detecting file types, but if you use some really obscure file formats, you may need to tell Subversion about it explicitly (see Forcing the File Type with svn:mime-type” in Using Properties).
We’re not quite done yet. Now we have a trunk directory, but nothing else. If we want to follow the recommendations of the Subversion community, we also need a branches directory and a tags directory. (In fact, we can always do that later, but let’s stick to the conventions for now.) You can checkout the contents of your repository using the svn list command:
$ svn list file:///data/svn/dev-repos/javalamp
trunk/
$ svn list file:///data/svn/dev-repos/myproject
branches/
tags/
trunk/
To add the missing directories, you just use the svn mkdir command, as follows:
$ svn mkdir file:///data/svn/dev-repos/javalamp/branches -m "Added branches"

Committed revision 5.

$ svn mkdir file:///data/svn/dev-repos/javalamp/tags -m "Added tags"

Committed revision 6.
This creates the two new directories directly on the server, without modifying anything on your local machine. Now, if you check the repository contents using the svn list command, you should get something like the following:
$ svn list file:///data/svn/dev-repos/javalamp
branches/
tags/
trunk/
Understanding Subversion Repository URLs
In Subversion, you use a special form of URLs to access repositories. Subversion repositories can be accessed through a variety of protocols, and it can come in handy to understand some of the finer points. This section describes the different protocols and how to use them.
The various types of Subversion URLs are listed in Table 4-1.
| URL Schema | Examples | Description |
| file:/// | file:///data/svn/dev-repos or file:///d:/svn/dev-repos | Direct access to a repository on a local disk. This is the only form that varies depending on the underlying OS. |
| http:// | http://svn.mycompany.com:9834/repos | Access to a repository over a standard HTTP connection using the WebDAV/DeltaV protocol. Behind the scenes you will find a →Subversion-friendly Apache server fitted out with a mod_dav_svn module (see Setting Up a WebDAV/DeltaV Enabled Subversion Server). This protocol has obvious advantages when it comes to crossing corporate firewalls and so forth. |
| https:// | https://svn.mycompany.com:9834/repos | Access to a repository over a secured HTTPS connection, also using a Subversion-friendly Apache server. |
| svn:// | svn://svn.mycompany.com:3690/dev-repos | Access to a repository via the proprietary protocol used by svnserve server (see ???). |
| svn+ssh:// | svn+ssh://svn.mycompany.com:3690/dev-repos | Secured access to a repository via the proprietary protocol used by svnserve server, with SSH tunnelling. |
The HTTP and svn-based URLs are pretty standard, and allow you to specify host names, and ports, as you would expect. Using the file:/// URLs is a bit more specific because you are dealing with a physical directory path on the local machine. You may have wondered why there are three slashes (“///”) at the start instead of two, as is the case with the other URL forms. This is because you are actually allowed to put a hostname in the URL, as with the other URL forms (e.g., file://localhost/data/svn/dev-repos). However, the only authorised hostname is “localhost,” so people tend to leave it out.
Also note that, because these are URLs, Windows paths use forward slashes rather than backslashes (file:///d:/svn/dev-repos and not file:///d:\svn\dev).
Working with Your Files
As with many tools, Subversion provides a rich set of functionalities. In practice, however, you can get by quite well if you only know a few key functions, which you will need on a daily basis. This article takes you through what you need to know to get by with Subversion in your everyday work.
Updating Your Work Directory
No man is an island, as someone once said.[*] Or, in this case, (almost) no developer works in isolation. If, like most of us, you work in a team, the first thing you will need to do before you start working is to update your local files with any changes made by your fellow developers. To do this, you run the svn update command:
$ svn update
U    src\main\java\com\wakaleo\jdpt\javalamp\plugins\ContinuumPlugin.java
D    src\main\resources\ApplicationResources.properties
A    src\main\resources\images\icon_success_sml.gif
A    src\main\resources\images\icon_error_sml.gif
A    src\main\resources\images\icon_warning_sml.gif
Updated to revision 7.
Subversion updates your local files, and gives you a summary of the modifications which it has performed. All of the files affected by changes in the repository are listed, each with a code indicating the type of modification. The main codes you will see, if all goes well, are the following:
- A
A new file has been added to the repository, and has been successfully transferred to your local working copy.
- D
A file has been deleted from the repository, and, as a result, from your local working copy.
- U
A file has been modified (updated) in the repository, and the modification has been correctly updated in your local working copy.
Updates do not always go according to plan, however. Suppose you do some work on your local copy, and then perform an update:
$ svn update
G    src\main\java\com\wakaleo\jdpt\javalamp\plugins\ContinuumPlugin.java
C    src\main\java\com\wakaleo\jdpt\javalamp\JavaLamp.java
Updated to revision 10.
There are some new codes here. Let’s see what they mean:
- G
Subversion has detected some modifications to this file on the server. However, Subversion was able to merge (merGe) them together and update your local copy with the new modifications, so you should be all right. This new file exists only in your local copy at the moment; you’ll need to commit it later to update the repository.
- C
Again, Subversion has detected some modifications on the server in a file that you have modified locally. However, this time there’s a conflict: Subversion can’t merge the two versions, so you’ll have to resolve the conflict yourself. We’ll see how to do this later on.
Working with Your Local Copy
Once you’ve updated your local directory, you can get on and do some work. You can work on existing files just as you would normally; Subversion will pick up the modifications when you decide to commit the files to the server. However, if you do any structural modifications—adding, moving, or deleting files or directories—Subversion will want to know about it.
- svn add
This command tells Subversion to add a new file or directory to the repository during the next commit. Adding a directory will also recursively add the directory contents (if need be, you can disable this function, and only add an empty directory to the repository by using the -N option). Note that nothing will actually be added to the repository until you run svn commit, as shown here:
$ svn add README.txt
A         README.txt
$ svn commit -m "Added a README file"
Adding         README.txt
Transmitting file data ..
Committed revision 11.
- svn copy
Duplicates a file or directory (including its contents), with a complete record of its change history and metadata. As with svn add, the operation is scheduled for the next commit:
$ svn copy README.txt README2.txt
A         README2.txt
- svn delete
Schedules a file or directory to be deleted in the next commit. Files will also be immediately deleted from the local working copy. Directories will not be deleted until the commit operation:
$ svn delete OLD_FILE.txt
D         OLD_FILE.txt
- svn move
Moves a file or directory to another location, while maintaining its change history. This is equivalent to doing a svn copy followed by an svn delete. Here is an example in which we rename a directory called lib directory to jars:
$ svn move lib jars
A         jars
D         lib\continuum-core-1.0.3.jar
D         lib\continuum-api-1.0.3.jar
D         lib\continuum-notifier-irc-1.0.3.jar
D         lib\continuum-notifier-msn-1.0.3.jar
D         lib\continuum-store-1.0.3.jar
D         lib\continuum-web-1.0.3.jar
D         lib\continuum-model-1.0.3.jar
D         lib\continuum-rpc-client-1.0.3.jar
D         lib\continuum-notifier-jabber-1.0.3.jar
D         lib\continuum-xmlrpc-1.0.3.jar
D         lib\continuum-notifier-api-1.0.3.jar
D         lib
If you are using the Subversion plugin for Eclipse (see Using Subversion in Eclipse), most of these operations will be done for you automatically when you modify, move, or delete files or directories from within the IDE.
Committing Your Work
At some point (preferably fairly often), you will decide that you are ready to update the repository with your latest and greatest changes.
It can be handy to run the svn status (see Seeing Where You’re At: The Status Command) command just to check what is about to be sent to the server. This command lists all the currently scheduled changes. It might look something like this:
$ svn status
A      INSTALL.txt
D      README-bis.txt
M      README.txt
If you get any conflicts here (code “C”), you could be in trouble; check out the article on resolving conflicts (see Resolving Conflicts) before proceeding. Otherwise, you are now ready to commit your changes by using the svn commit command:
$ svn commit -m "Added installation instructions and put a reference to
INSTALL.txt in README.txt"
Adding         INSTALL.txt
Deleting       README-bis.txt
Sending        README.txt
Transmitting file data ..
Committed revision 15.
It is a good habit to put a meaningful message to sum up the changes you are committing. Remember, one of the nice things about Subversion is that, when you commit a set of changes, they are recorded for posterity as a single atomic transaction. The changes are yours, and yours alone, so you might as well document them as they deserve!
If your comment is short and snappy, you can use the -m command-line option, as shown above. However, this should be reserved for small changes. If you take the time to write three or four lines of more detailed comments, it will pay itself off handsomely when you come back in a few months trying to refactor or fix obscure bugs.
If you don’t use the -m option, Subversion will open your favorite text editor and let you write away to your heart’s content. However, in some systems (such as Windows), no default editor is defined, so this won’t work. You can define your preferred text editor in the SVN_EDITOR environment variable. In Windows, for example, you can use notepad as the default editor by setting the SVN_EDITOR environment variable to notepad (see Figure 4-3):
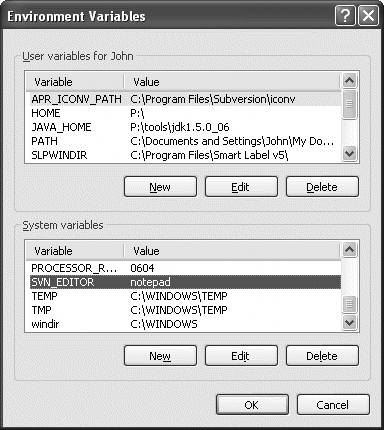
C:\> set SVN_EDITOR=notepad
Once you have committed your changes, it is a good practice to update your folders from Subversion, in order to avoid mixed revisions in your local working copy.
This is because of the way Subversion handles updates and commits. One of the underlying principles of Subversion is that when you commit your changes, you should not be obliged to update your local copy, and vice versa. This means that, at any point in time, it is possible to have a mixture of up-to-date, out-of-date, and modified files and directories. This is fine if you really know what you are doing, but it is easy to run into trouble if you’re not paying attention. For example, when you commit, the revision of the file in your working copy is updated, but the versions of the parent folders of that file are not updated. If you subsequently try to commit changes to the parent folder(s) (such as deleted files or metadata changes), those commits will be rejected.
Seeing Where You’re At: The Status Command
The svn status command is one of the more useful commands in the Subversion toolbox. In a nutshell, it lets you know what you’ve modified since the last time you synchronized your working copy with the latest version in the Subversion repository. This is a useful thing to do before committing your changes, since it gives you a quick summary of the work you’ve done, and it can help you to remember everything in the comment when you commit. A typical example is the following:
$ svn status
M      ch04.xml
A      figs/subversion-revisions.gif
D      figs/subversion-no-longer-used.gif
?      ch04.html
In this example, one file has been modified since the last file (M), one new file is to be added (A), and one is to be deleted (D). The question mark (?) indicates a file not currently under version control (see Using Properties for a way to hide files that you don’t want to appear in the status output). This is what you will use in most situations, but in fact the svn status command can tell you much, much more. Try svn status --help for a detailed description of the command.
You can also use this command to keep track of renamed or moved directories, when you use svn move or svn copy. This is best explained by an example. In the following listing, I rename a directory called resources as dist. This directory contains two files, INSTALL and README. Now, when I run svn status, I get something along the following lines:
$ svn move resources/ dist
A         dist
D         resources/INSTALL
D         resources/README
D         resources
$ svn status -v
               27       27 taronga      .
               27       24 taronga      ch25.xml
               33       33 taronga      ch04.xml
A  +            -       33 taronga      dist
   +            -       33 taronga      dist/INSTALL
   +            -       33 taronga      dist/README
...
D              33       33 taronga      resources
D              33       33 taronga      resources/INSTALL
D              33       33 taronga      resources/README
...
Astute readers will notice several things here:
The new directory is scheduled to be added (the “A” marker).
The files, in their new directory, as well as the new directory itself, are marked with a “+.” This shows that they are being added to the repository, but that they already have existing history data from their former life in another part of the repository.
The files are scheduled to be deleted in their old location (the “D” marker).
The files scheduled to be added are marked with a “+” in the fourth column, to indicate that they are all being added within the one operation.
If all these codes don’t make you dizzy, you can add the -v option (--verbose) to get more detailed information about every file in the project:
$ svn status -v
               27       27 taronga      .
               27       24 taronga      ch25.xml
M              31       31 taronga      ch04.xml
               27       24 taronga      bin
               27        5 koala        bin/count_words.sh
               27       24 koala        bin/book2html3
               27        5 taronga      bin/stripmarkup.xslt
               27       24 taronga      figs
               27       24 wombat       figs/continuum-build-history.gif
A              27       24 taronga      figs/subversion-revisions.gif
D              27       24 taronga      figs/subversion-no-longer-used.gif
...
So, what does all this mean? The first column contain the usual codes, which we saw earlier. The next column is the working revision, the revision your local file is based on. Then, we get the last revision in which a change was made to this file, and the user who made the last change.
One of the nice things about this command is that it doesn’t need to access the network to work: it simply compares your working files with the original copies of the files you checked out, which it has safely tucked away behind the scenes. But sometimes you would actually like to touch base with the repository and see if any of your local files need updating. To do this, you use the -u (--show-updates) option:
$ svn status -u
       *       27   dev/JavaLamp/src/main/java/com/wakaleo/jdpt/javalamp/JavaLamp.java
M              31   ch04.xml
A              31   figs/subversion-revisions.gif
D              31   figs/subversion-no-longer-used.gif
The asterisk in the first line means that another user has modified JavaLamp.java, and our local copy is out-of-date. In this case, Subversion will not let us commit our modifications before we update our local copy and resolve any conflicts.
If you want to know exactly what you’ve changed since your last update, you can use the svn diff command. Running this command with no parameters will compare your local copy with the original revision you checked out:
$ svn diff
Index: src/main/java/com/wakaleo/jdpt/javalamp/plugins/ContinuumPlugin.java
===================================================================
--- src/main/java/com/wakaleo/jdpt/javalamp/plugins/ContinuumPlugin.java
(revision 35)
+++ src/main/java/com/wakaleo/jdpt/javalamp/plugins/ContinuumPlugin.java
(working copy)
@@ -123,7 +123,7 @@
                                case NEW_BUILD:
                                case ALT_NEW_BUILD:
                                        statusInfo.setStatusMessage("New Build");
-                                       statusInfo.setStatusIcon(IN_PROGRESS_ICON);
+                                       statusInfo.setStatusIcon(NEW_BUILD_ICON);
                                        break;

                                case SUCCESSFUL:
So, in this case, we’ve just replaced IN_PROGRESS_ICON with NEW_BUILD_ICON. But what if we realize that this was an error, and we didn’t mean to touch this file at all? Just use the svn revert command, and you’ll get your untouched original back, as good as new:
$ svn revert src/main/java/com/wakaleo/jdpt/javalamp/plugins/ContinuumPlugin.java
Reverted 'src/main/java/com/wakaleo/jdpt/javalamp/plugins/ContinuumPlugin.java'
$ svn diff
$
Resolving Conflicts
When two users modify the same file, Subversion will try to merge the changes together. This often works well enough if the modifications occur in different parts of the file. If the modifications affect the same lines of code, or if the file in question is a binary file, Subversion may well throw in the towel and let you sort it out (see Using File Locking with Binary Files for more on how to use file locking to avoid conflicts with binary files). In this case, you’re on your own. Well, not quite. Subversion does give you some tools to work with.
Let’s work through an example. Suppose you want to update the INSTALL.txt file, to give it a sensible heading like the one shown here:
Installation instructions for the JavaLamp application
------------------------------------------------------
So you make the change to your local copy and commit. Often, this is the first warning of trouble you get: Subversion refuses your commit because someone else has already committed a more recent version since your last update:
$ svn commit -m "Added a nice new title for the installation instructions."
Sending        INSTALL.txt
svn: Commit failed (details follow):
svn: Out of date: '/trunk/INSTALL.txt' in transaction '21-1'
Fair enough, you might say, so let’s update:
$ svn update
C    INSTALL.txt
G    src\main\java\com\wakaleo\jdpt\javalamp\plugins\ContinuumPlugin.java
Updated to revision 21.
At this stage, Subversion can often fix the problem on its own by merging the two versions. In this case, two modifications could have caused a conflict, but one was successfully merged (“G”) by Subversion. The “C” next to INSTALL.txt, on the other hand, indicates an unresolved conflict. Now it’s up to you to fix it. In the unlikely event that you forget to resolve the conflict, Subversion will just refuse to commit until you fix the problem:
$ svn commit
svn: Commit failed (details follow):
svn: Aborting commit: 'C:\dev\AnotherJavaLamp\INSTALL.txt' remains in conflict
So, now we need to take a look at the file:
<<<<<<< .mine
Installation instructions for the JavaLamp application
------------------------------------------------------
=======
JavaLamp Installation instructions
----------------------------------

>>>>>>> .r21
One of the nice things about the Subversion notation is the “.mine” label, which lets you know the code coming from your version, and the “.r21” (in this case) label, which indicates the code coming from the revision on the server. In CVS, I always have to think twice to know which code is which. The next step is just to resolve the conflict by manually editing the file.
If you’re still not sure about the exact nature of the changes, Subversion provides a few files that may be of use:
$ ls INSTALL*
INSTALL.txt  INSTALL.txt.mine  INSTALL.txt.r20  INSTALL.txt.r21
The INSTALL.txt is the file we just looked at. The others are explained here:
- INSTALL.txt.mine
Your locally modified version (the one you tried to commit)
- INSTALL.txt.r20
The original version from your last update
- INSTALL.txt.r21
The latest version in the server repository
You need to make your corrections in the original file (INSTALL.txt); the other files are simply there to help you along the way. When you are happy with your corrections, you need to tell Subversion that you’re done by using the svn resolved command. This will remove the temporary files and enable commits on this file again:
$ svn resolved INSTALL.txt
Resolved conflicted state of 'INSTALL.txt'
$ ls INSTALL*
INSTALL.txt
$ svn commit -m "My changes are now correctly integrated"
Now you can commit your file in the usual way. The new revision will include your corrected version of the file.
One last thing: remember that a correct merge does not guarantee correct code. Modifications in one part of a file may affect code in another part of the file. Therefore, it is a good idea to review any merged code and run the corresponding regression tests before committing.
Using Tags, Branches, and Merges
Branching and tagging are central concepts in Configuration Management theory. Branching allows us parallel development work to be done on a separate set of files, while allowing work to continue on the main development line without interference. This is typically done in software projects near a release date, where one part of the team will work on bug fixes and code stabilization on the main development branch (or “trunk,” in Subversion terms), while another part of the team continues working on new modules, without putting the upcoming release version at risk. After the release, the new modules must be reintegrated (or “merged”) back into the principal development line.
A tag is simply a way of assigning a human-readable label to a given version (or, in Subversion terms, “Revision”) of a project. This is useful when you need to identify releases of your product for future reference.
Unlike most other SCM systems, Subversion has no distinct notion of branches or tags; for Subversion, both branches and tags are simply repository copies. As we will see, this has some advantages and some disadvantages.
Creating a new branch or tag is essentially the same operation in Subversion: you just copy the directory you want to branch or tag. And with Subversion, copying directories is fast and cheap, since you are essentially creating the Subversion equivalent of a symbolic link to the original revision.
In CVS, for example, each file must be individually tagged, one by one. Experienced CVS users will know the pain of tagging a big projects, where you can go off for a coffee, pizza, or even a four-course meal while waiting for the tagging to finish. In Subversion, by contrast, tagging is pretty much instantaneous. The most efficient way of doing this is copying the repositories on the server, as shown here:
$ svn copy -m "Tagging Release 1.0" file:///data/svn/dev-repos/javalamp/trunk
file:///data/svn/dev-repos/javalamp/tags/release-1.0

Committed revision 57.

$ svn list file:///data/svn/dev-repos/javalamp/tags
release-1.0/
You can also copy from the working copy, which is slightly different. When you copy from your working copy, you create a new revision, which includes all your current files in their current state, even uncommitted work. And just because you create a new revision doesn’t mean Subversion will commit your files behind your back; after the copy, your files stay in their uncommitted state.
This will be clearer with an example. In the following listing, we add a new file (README) and then create a tag called “Release-1.1-alpha” by copying our working copy to a revision of this name. As a rule, when you create a tag, you want to tag the entire project directory. The easiest way to do this is from the project root directory, where we can use the dot notation (“.”) to refer to the current directory:
$ svn add README
A         README
$ svn status
A      README
$ svn copy -m "Tagging Release 1.1-alpha" . \
  file:///data/svn/dev-repos/javalamp/tags/release-1.1-alpha
Committed revision 58.
So, now we have a new revision called “release-1.1-alpha” in the tags directory, which (take my word for it) contains our new README file.
$ svn list file:///data/svn/dev-repos/javalamp/tags
release-1.0/
release-1.1-alpha/
And lo and behold! The status of our files has not changed!
$ svn status
A      README
Now, in Subversion, the only difference between branches and tags is that branches are intended to be modified, and tags aren’t. A tag is just a copy of the repository at a given point in time. A branch is also a copy of the repository at a given point in time, but one that is used as the departure point for new development work. Suppose that we want to create a development branch for work on version 1.4 of our product. We just create a new copy in the branches directory on the server (of course, using the branches directory is just a convention, but it is one that makes good sense):
$ cd ~/projects/javalamp
$ svn copy . file:///data/svn/dev-repos/javalamp/branches/release-1.4-development  \
  -m "Creating Release 1.4 development branch"
Here we created a new branch of the whole project structure, working from the project root directory.
So, now we have just created a new development branch. We’re not quite ready to use it yet, however. If we commit work straight away, it will go to the main branch (the “trunk”). We need to switch to the new development branch. We do this, appropriately enough, by using the switch command, as shown here:
$ svn switch file:///data/svn/dev-repos/javalamp/branches/release-1.4-development
U    README.txt
Updated to revision 11.
This will update any files it needs to switch this directory to the release-1.4-development branch. From now on, any commits will go to our new branch.
At any point you can switch back to the main development trunk or to another branch:
$ svn switch file:///data/svn/dev-repos/javalamp/trunk
And if you’re not sure what branch you’re currently working with, running svn info can help:
$ svn info
Path: .
URL: file:///data/svn/svn-repository/dev-repos/javalamp/branches/release-
1.5-development
Repository Root: file:///data/svn/svn-repository/dev-repos
Repository UUID: 20b9c9b3-4814-0410-9739-d611b8f56fd3
Revision: 11
Node Kind: directory
Schedule: normal
Last Changed Author: taronga
Last Changed Rev: 10
Last Changed Date: 2006-06-06 21:28:21 +1200 (Tue, 06 Jun 2006)
Finally, you will probably want to merge your development branch back into the main trunk at some stage. You do this with the svn merge command, which, in its simplest form, will apply the differences between two branches to your current repository. Read that sentence again, because merging in Subversion is one of the less-intuitive functions.
First, switch to the development trunk, which is where we want our new code to be incorporated:
$ svn switch file:///data/svn/dev-repos/javalamp/trunk
Now, we need to work out exactly what we need to add to the main trunk. In fact, we need to add (merge) all the work done on the development branch from its creation up until now. In other words, you need to know where your development branch started and ended. One convenient way to do this is to use the svn log command on the development branch, using the --stop-on-copy option. This option will display log messages going back to the creation of the branch, which is exactly what we need:
$ svn log file:///data/svn/svn-repository/dev-repos/javalamp/branches
/release-1.5-development \
  --stop-on-copy

r16 | taronga | 2006-06-06 22:00:38 +1200 (Tue, 06 Jun 2006) | 1 line


------------------------------------------------------------------------
r15 | taronga | 2006-06-06 22:00:31 +1200 (Tue, 06 Jun 2006) | 1 line
.
.
.
r11 | taronga | 2006-06-06 21:59:08 +1200 (Tue, 06 Jun 2006) | 1 line

Creating development branch for version 1.4
------------------------------------------------------------------------
Looking at this, we can conclude that our branch went from revision 11 to revision 16. So, we need to apply the changes made between revisions 11 and 16 (the -r option) in the “release-1.4-development” branch to our current working copy. We run this command first using the --dry-run option: this simply lists the changes that would be applied by this merge so that we know what we’re getting ourselves into. In this rather contrived case, only the README has changed:
$ svn merge --dry-run \
  -r 11:16 \
  file:///data/svn/svn-repository/dev-repos/javalamp/branches/release-1.4-development
G    README.txt
So, now we can commit the changes:
$ svn merge -r 11:16 \
  file:///data/svn/svn-repository/dev-repos/javalamp/branches/release-1.4-development
G    README.txt
$ svn commit -m "Merged branch release-1.4-development into trunk"
Sending        README.txt
Transmitting file data .
Committed revision 18.
One thing to be wary of is merging file or directory name changes. This is something that Subversion has trouble coping with. For example, suppose that Joe decides to rename a directory called “someDirectory” to “newDirectory:”
$ svn move someDirectory/ newDirectory
A         newDirectory
D         someDirectory/file1
D         someDirectory/file2
D         someDirectory/file3
D         someDirectory
$ svn status
D      someDirectory
D      someDirectory/file1
D      someDirectory/file2
D      someDirectory/file3
A  +   newDirectory
Meanwhile, on another machine, Jill decides to rename this same directory to “brandNewDirectory”:
$ svn move someDirectory/ brandNewDirectory
A         brandNewDirectory
D         someDirectory/file1
D         someDirectory/file2
D         someDirectory/file3
D         someDirectory
$ svn status
D      someDirectory
D      someDirectory/file1
D      someDirectory/file2
D      someDirectory/file3
A  +   brandNewDirectory
Now Jill commits her changes:
$ svn commit -m "Rename someDirectory to brandNewDirectory"
Deleting       someDirectory
Adding         brandNewDirectory
Meanwhile, back at the ranch, Joe commits his changes. Somewhat suprisingly, Subversion does not object. It simply deletes the old directory and then puts it back under its new name:
$ svn commit -m "Rename someDirectory to newDirectory"
Deleting       someDirectory
Adding         newDirectory
Now, when you update, you will find two equivalent directories in the repository:
$ svn update
Adding         brandNewDirectory
Adding         brandNewDirectory/file1
Adding         brandNewDirectory/file2
Adding         brandNewDirectory/file3
$ ls
...
newDirectory
brandNewDirectory
This is because of the way that Subversion renames files and directories, and, unfortunately, there isn’t really much you can do to avoid it.
Rolling Back to a Previous Revision
One important thing that you often need to do with a version control system is to undo changes by rolling back to a previous version. Suppose, for example, that you spend a few days working on your favorite project. You make some changes, add some files, and so on. You commit your changes into the code repository several times as you go. Then, in a flash of genius, you realize that you’ve got it all wrong, irreparably wrong. (As a rule, this flash of genius will arrive around 4 p.m. on a Friday, before a planned demonstration on Monday.) The only thing to do is to rollback your changes and return to a previous, stable version.
So how do you do this in Subversion? The simplest way is to use the svn merge command (see Using Tags, Branches, and Merges) to undo your changes. The trick is to merge backward, so that the older version takes precedence over the more recent (incorrect) changes.
Let’s go through an example.
First, I add a class to a project, delete another, and modify yet another class. Here’s what happens when I commit these changes:
$ svn commit -m "Changes we will regret later"
Sending        src\main\java\com\wakaleo\maven\plugin\schemaspy\SchemaSpyReport.java
Adding         src\main\java\com\wakaleo\maven\plugin\schemaspy\util\DatabaseHelper.
               java
Deleting       src\main\java\com\wakaleo\maven\plugin\schemaspy\util\JDBCHelper.java
Transmitting file data ..
Committed revision 11.
So far so good. However, some time (and several revisions) later, I decide that these changes are going nowhere. I want to go back to good old revision 10, and start over again. To do this, just merge backward, starting with revision 14, back to revision 10. In practice, this will undo each change done since revision 10, which, it so happens, is exactly what we want:
$ svn merge -r 14:10 https://wakaleo.devguard.com/svn/maven-plugins
/maven-schemaspy-plugin/trunk
U    src\main\java\com\wakaleo\maven\plugin\schemaspy\SchemaSpyReport.java
D    src\main\java\com\wakaleo\maven\plugin\schemaspy\util\DatabaseHelper.java
A    src\main\java\com\wakaleo\maven\plugin\schemaspy\util\JDBCHelper.java
At this stage, my local copy will be back to where it was in revision 10. Now I just commit the changes to the repository:
$ svn commit -m "Back to revision 10"
Sending        src\main\java\com\wakaleo\maven\plugin\schemaspy\SchemaSpyReport.java
Deleting       src\main\java\com\wakaleo\maven\plugin\schemaspy\util\DatabaseHelper
               .java
Adding         src\main\java\com\wakaleo\maven\plugin\schemaspy\util\JDBCHelper.java
Transmitting file data .
Committed revision 15.
Revision 15 will be identical to revision 10. Note that you will not have erased all traces of your erroneous commits; because it is a version control system, Subversion likes to keep track of all the versions, even the incorrect ones.
Using File Locking with Binary Files
In any development project of any size, there will be times when two people want to modify the same file at the same time. The risk is that one developer may overwrite the changes of the other, which has the potential to cause delays, lost code, and unnecessary bloodshed among irate team members. In the version control world, there are two schools as to how to deal with this.
- Using file locking
In this approach, only one person can modify a given file at any given time. When a user checks out a file, it becomes unmodifiable for all other users. This approach guarantees that your changes will not be overwritten inadvertently by another user, but potentially at the cost of slowing down development work by making it impossible for more than one developer to work on a given file at the same time. Indeed, there are many cases in which it is quite legitimate for several users to modify the same file simultaneously; for example, adding distinct localised messages into the same properties file. File locking can also create maintenance headaches, as files may become or remain locked unnecessarily, for instance, if a user goes on vacation without checking in his work.
- Using file merging
File merging is a more flexible approach. Any number of users can check out a local copy of a file in the repository, and modify it on their machine. The first user to complete his or her modifications updates the repository. When the next developer tries to commit his or her changes, they will be informed that the file has been updated on the repository, and needs to be updated (see Seeing Where You’re At: The Status Command). So, they update their local copy of the file. If the changes were in different parts of the code, Subversion can merge the two versions automatically. If the changes modify the same lines of code, it’s up to the user to sort them out manually (see Resolving Conflicts).
By default, Subversion uses the second approach. It is a tried-and-true approach that has worked well for many years in the open source world. It has only one major problem: although it works well with text files (in which conflicts are fairly easy to display and to resolve), it is poorly adapted to binary files. You can’t merge two versions of an image or a sound recording, for example. So, if two people are working on the same image at the same time, someone is in for some lost work. In these cases, it would sometimes be nice to be able to lock a file so that other users don’t waste their time trying to modify it themselves.
As of version 1.2 of Subversion, the svn lock command lets you do just that:
$ svn lock images/product-logo.gif
'product-logo.gif' locked by user 'taronga'.
Now if you run svn status, you will see a “K,” which indicates that this file has been locked locally:
$ svn status
     K images/product-logo.gif
You can obtain more details by using svn info:
$ svn info images/product-logo.gif
Path: images/product-logo.gif
Name: images/product-logo.gif
URL: file:///data/svn/java-power-tools/trunk/images/product-logo
Repository UUID: 087d467d-7e13-0410-ab08-e4ad2953aa79
Revision: 35
Node Kind: file
Schedule: normal
Last Changed Author: taronga
Last Changed Rev: 24
Last Changed Date: 2006-05-21 19:39:59 +1200 (Sun, 21 May 2006)
Text Last Updated: 2006-05-22 19:14:31 +1200 (Mon, 22 May 2006)
Properties Last Updated: 2006-05-22 19:13:54 +1200 (Mon, 22 May 2006)
Checksum: 2152f30f8ec8a8d211f6c136cebd60fa
Lock Token: opaquelocktoken:31af1e64-8614-0410-9df7-cf255c995479
Lock Owner: taronga
Lock Created: 2006-05-24 22:42:24 +1200 (Wed, 24 May 2006)
Lock Comment (1 line):
This picture needs some nicer colors.
Notice the last five lines. This lets everyone know who has locked the file, when it was locked, and (because everyone always adds a message when they lock a file) why it was locked. If another user runs svn status (with the -u option to check with the server), they will get a line containing an “O,” which means that another user has locked the file, as shown here:
$ svn -u status
     O         37   images/product-logo.gif
Status against revision:     37
If the user forgets to check the status, or insists on modifying or deleting the file, the operation will be politely refused when the user attempts to commit her modifications:
$  svn delete images/product-logo.gif
D         images/product-logo.gif
$  svn commit -m ""
svn: Commit failed (details follow):
svn: Can't create directory '/data/svn/java-power-tools/db/transactions/37-1.txn':
Permission denied
Once the developer has finished working on the image, they commit their changes. Committing automatically releases all current locks in the committed file set, even if the locked files were not modified. This is designed to promote good developing practices: it encourages developers to lock files only for short periods, as well as serving to limit the number of files a user locks at any one time.
You can also use svn unlock to release the file without committing, if you locked a file by mistake, for example:
$ svn unlock images/product-logo.gif
'product-logo.gif' unlocked.
Breaking and Stealing Locks
Administrators of course have absolute power over their repositories, and a minor measure such as locking files will not resist a determined administrator very long. There are occasionally times when a user forgets to commit their modifications before going on holidays. In situations such as this, the administrator may have to intervene and manually unlock the file.
The first step is to verify which files have been locked, and by whom. The svnadmin lslocks lists the active locks on a given repository:
$ svnadmin lslocks /data/svn/dev-repos
Path: /trunk/images/product-logo.gif
UUID Token: opaquelocktoken:f9366d36-8714-0410-8278-b1076b57a982
Owner: taronga
Created: 2006-05-24 23:41:13 +1200 (Wed, 24 May 2006)
Expires:
Comment (0 lines):
The administrator can use the svnadmin rmlocks command to manually remove any offending locks, as shown here:
$ svnadmin rmlocks /data/svn/dev-repos /trunk/images/product-logo.gif
Removed lock on '/trunk/images/product-logo.gif'.
The other way to get around an unwanted lock is to steal it. This is, of course, terribly unethical, and so should be used with caution. But if you really need to (say, your administrator went on vacation, too), here’s how you do it.
Suppose that your boss just asked you to modify the product logo, as it needs a few more bright yellow stripes. You better lock the file before you do any work on it:
$ svn lock images/product-logo.gif
svn: Path '/trunk/images/product-logo.gif' is already locked by user
'bill' in filesystem '/data/svn/dev-repos/db'
Uh oh, looks like Bill’s forgotten to commit his changes before he left for Fiji last week. OK, we’ll just unlock it ourselves:
$ svn unlock file:///data/svn/java-power-tools/trunk/images/product-logo.gif
svn: User 'taronga' is trying to use a lock owned by 'bill'
in filesystem '/data/svn/dev-repos/db'
OK, no more Mister Nice Guy. If we use the --force, we can move just about anything (apologies to Yoda):
$ svn unlock --force file:///data/svn/java-power-tools/trunk/images/product-logo.gif
'product-logo.gif' unlocked.
And, indeed, this did the job. Now the file is unlocked, and we can lock it ourselves and get the job done.
When Bill gets back from Fiji, he is in for a surprise. As soon as he tries to commit, he will get a nasty error message (see below). He can find out more using svn status -u. If the lock has just been removed, Subversion will display the “B,” or “broken,” status code. If, in addition, another user has locked the file out, he will see the “T” (sTolen) code, indicating that his lock has been forcefully replaced by that of another user:
$ whoami
bill
$ svn images/product-logo.gif
Deleting       images/product-logo.gif
$ svn commit -m "Didn't want this file anyway"
svn: Commit failed (details follow):
svn: User root does not own lock on path '/trunk/figs/subversion-revisions.gif'
(currently locked by taronga)
$ svn status -u images/product-logo.gif
D    T         37   images/product-logo.gif
Status against revision:     39
Running svn -u status will simply let you know that another user has stolen your lock and possibly modified the file. To reestablish the situation, you need to run svn update. If you have also changed the file locally, you may end up with a conflict, as shown here (note the “C” flag):
$ svn update
C B         39   images/product-logo.gif
Making Locked Files Read-Only with the svn:needs-lock Property
Unlike more strict lock-based version control systems that physically prevent users from modifying a locked file, even on their own machines, the default Subversion approach to locking is not foolproof. If a user locks a file, she is guaranteed that it will remain untouched by other users (except perhaps for the occasional mad administrator…). However, there is still the risk that another user may work for three days to redo your product logo in a brilliant new shade of purple, only to discover that the file has been locked by the developer down the corridor. One way to avoid this is to convince users to check the status and to lock binary files before starting any work on them. If this practice is respected, the system is quite robust. However, it does require some discipline, and it may be difficult to enforce.
Another approach is to use a special property, svn:needs-lock. All you have to do is to assign this property to a file (any value will do), and it will become read-only. To make it read-write, a user needs to lock the file. When the lock is released, the file becomes read-only again:
$ cd ~john/projects/javalamp
$ svn propset svn:needs-lock 'true' images/product-logo.gif
property 'svn:needs-lock' set on 'images/product-logo.gif'
$ svn commit -m "This is a binary file which needs to be locked to modify."
Transmitting file data .
Committed revision 40.
$ svn update
At revision 40.
$ ls -al images/product-logo.gif
-r-xr-xr-x  1 taronga users 12943 2006-05-22 19:14 images/product-logo.gif
Here we have updated the property and committed the change to the repository. Note that when you set a property on a file, you refer to the local copy of the file. In the above example, we did this from the project root, but you can actually do it from any directory.
Once we update our local work copy; the file is placed in read-only mode. If we want to modify the file, we need to lock it first:
$ svn lock images/product-logo.gif
'product-logo.gif' locked by user 'taronga'.
$ ls -al images/product-logo.gif
-rwxr-xr-x  1 taronga users 12943 2006-05-22 19:14 images/product-logo.gif
Now, when we commit our modifications, the lock will be automatically released and the file will revert to read-only:
$ svn commit -m "Changed colours to suite new company look"
Sending        images/product-logo.gif
Transmitting file data .
Committed revision 41.
$ ls -al images/product-logo.gif
-r-xr-xr-x  1 taronga users 12943 2006-05-22 19:14 images/product-logo.gif
Using Properties
One of the more innovative aspects of Subversion is the ability to assign and version metadata that you associate with files or directories. This metadata can take the form of just about anything you want, from simple text values to binary objects. The possibilities are virtually unlimited, and you can have a great deal of fun building complicated (and sometimes incomprehensible) build scripts using custom properties.
However, without going this far, there is a lot of added value to be had simply by using standard out-of-the-box Subversion properties. In this section, we will look at some of the more useful built-in Subversion properties.
Preserving the Executable Flag using svn:executable
On Unix systems, you can define a file as an “executable,” meaning it can be executed directly from the command line. The concept does not exist in other operating systems such as Windows. Subversion provides the svn:executable property to cater to this. If you assign a value (any value) to this property for a given file, Subversion will make this file executable whenever you check it out in a compatible operating system:
$ svn propset svn:executable "true" INSTALL
property 'svn:executable' set on 'INSTALL'
Forcing the File Type with svn:mime-type
The svn:mime-type property plays an important role in Subversion. Although Subversion stores all files internally as binary files for performance reasons, Subversion needs to distinguish between text files, which can be merged, and true binary files, which can’t. When you add a file, Subversion will try to automatically detect any binary files you add. Subversion will assign the value “application/octet-stream” to the svn:mime-type property for these files. You can always use the svn propget command to verify their mime-type:
$ svn add *
Adding  (bin)  icon.jpg
Adding  (bin)  plan.mpp
Adding  (bin)  stakeholders.xls

$ svn propget svn:mime-type *
icon.jpg - application/octet-stream
plan.mpp - application/octet-stream
stakeholders.xls - application/octet-stream
There are two main uses for this property. First, Subversion will not attempt to merge changes in binary files. When you update your working copy, if there is a newer version of a binary file on the server, it will simply replace your current one. If you have modified the file locally, Subversion will generate three distinct files, and place the file in an unresolved status, as shown below. It is up to you to decide which copy is correct, and to resolve the conflict manually using svn resolve:
$ svn status -u
M      *        4   logo.jpg
$
$ ls -al
drwxrwxr-x    3 taronga users 118,775 2006-05-20 21:15 logo.jpg
drwxrwxr-x    3 taronga users  38,590 2006-05-20 21:15 logo.jpg.r5
drwxrwxr-x    3 taronga users  76,560 2006-05-20 21:15 logo.jpg.r6

$ svn resolved logo.jpg
Subversion will also use the mime-type property when it serves files out to WebDAV clients through Apache, using the “Content-type:” HTTP header attribute. This can help your browser know the best way to display the file.
Making Subversion Ignore Files with svn:ignore
In the real world, working directories tend to contain files that you don’t want to place in the Subversion repository, such as temporary files, IDE project files, logfiles, or generated files. For example, when writing this book, I often generate HTML files from the docbook source code. In some places and projects, HTML files would be legitimate source code, but not here. Because Subversion has no way of knowing which files you don’t need in the repository, and which you have forgotten to add, Subversion will nevertheless display all of these files with a “?” whenever you run svn status.
The svn:ignore property lets you get around this. It lets you specify a list of file patterns which will be ignored by Subversion projects. It takes a file containing a list of file patterns separated by new lines. Consider the following:
$ svn status -v
?                                       tomcat.log
?                                       ch01.html
?                                       ch02.html
?                                       ch03.html
?                                       ch01.xml.bak
                8        8 John         .
                9        9 John         .ignore
                8        3 John         ch01.xml
                9        9 John         ch02.xml
                8        5 John         ch03.xml
This directory contains logfiles, backup files, and html files that you don’t want cluttering up your Subversion status reports. To get around this, you create a file (here it’s called .ignore), which contains the file patterns that you want to exclude:
*.html
*.log
*~
*.bak
Now just set the svn:ignore property of this directory to the “.ignore” file:
$ svn propset svn:ignore -F .ignore .
property 'svn:ignore' set on '.'

$ svn status -v
 M              8        8 John         .
                9        9 John         .ignore
                8        3 John         ch01.xml
                9        9 John         ch02.xml
                8        5 John         ch03.xml
Note that you assigned this property to a directory, it is not recursive. If you want to apply this property to an entire directory tree, you need to use the -R option:
$ svn propset svn:ignore -RF .ignore .
property 'svn:ignore' set (recursively) on '.'
Handling OS-Specific End-of-Lines with svn:eol-style
By default, Subversion will not modify your file contents in any way, shape, or form, except when merging text files. So, if you commit a file created in Unix, and then check it out under Windows, you will end up with Unix end-of-lines (a single line feed character) in a Windows environment (where end of lines are represented by a carriage return followed by a line feed character), and vice versa. Some tools may react badly to this. Under Unix, you may see lots of “^M” characters if you edit a file under VI, for example.
You can make Subversion convert line feeds to the appropriate OS-specific value using the svn:eol-style property. The most useful value accepted by this property is “Native,” which tells Subversion to adapt the end-of-line characters to the target OS. Three others, “CR,” “LF,” and “CRLF,” force Subversion to always provide a certain type of end-of-line character, whatever the operating system.
Change History in Subversion: Logging and Blaming
Subversion has a couple of handy ways of checking the change history of a file or repository.
The svn log command can be used to obtain a short history of all changes ever done to the repository:
$ svn log
------------------------------------------------------------------------
r427 | john | 2007-04-11 16:42:09 +1200 (Wed, 11 Apr 2007) | 1 line

Added draft contributions for SchemaSpy material
------------------------------------------------------------------------
r426 | john | 2007-04-04 16:41:48 +1200 (Wed, 04 Apr 2007) | 1 line
...
If you add the “-v” (--verbose) option, you get a detailed summary of each commit, including the files modified in each commit:
$ svn log -v
------------------------------------------------------------------------
r427 | john | 2007-04-11 16:42:09 +1200 (Wed, 11 Apr 2007) | 1 line
Changed paths:
   A /java-power-tools/trunk/src/ch-XX-schemaspy.xml
   D /java-power-tools/trunk/src/contrib/kalali/SchemaSpy/image-1.png
   D /java-power-tools/trunk/src/contrib/kalali/SchemaSpy/image-2.png
   D /java-power-tools/trunk/src/contrib/kalali/SchemaSpy/image-3.png
   A /java-power-tools/trunk/src/contrib/kalali/SchemaSpy/schemaspy-image-1.png
   A /java-power-tools/trunk/src/contrib/kalali/SchemaSpy/schemaspy-image-2.png
   A /java-power-tools/trunk/src/contrib/kalali/SchemaSpy/schemaspy-image-3.png
...
And if you need to narrow the history to a single revision, or a small range of revisions, you can use the -r (--revision) option. Here are a few examples:
$ svn log -vr HEAD          # What was modified in the latest version on the server?[*]

$ svn log -vr {2006-05-25}  # What was modified in the last revision before
                        the 25th of May 2006?

$ svn log svn log -vr 10:15 # What was modified between revisions 10 and 15
If you run svn log from within a particular directory, it will only list the revisions in which a file in this directory (or one of its subdirectories) has been modified:
$ cd ~projects/java-power-tools/src/sample-code/spitfire
$ svn log
------------------------------------------------------------------------
r436 | john | 2007-05-07 12:47:23 +1200 (Mon, 07 May 2007) | 1 line


------------------------------------------------------------------------
r410 | john | 2007-03-24 13:14:55 +1200 (Sat, 24 Mar 2007) | 1 line


------------------------------------------------------------------------
r406 | john | 2007-03-19 07:36:14 +1200 (Mon, 19 Mar 2007) | 1 line
...
You can also display the history of a particular file, either by using the local copy or by providing a full repository path:
$ svn log README.TXT
------------------------------------------------------------------------
r438 | john | 2007-05-07 12:54:07 +1200 (Mon, 07 May 2007) | 1 line


------------------------------------------------------------------------
r437 | john | 2007-05-07 12:48:05 +1200 (Mon, 07 May 2007) | 1 line


------------------------------------------------------------------------
r436 | john | 2007-05-07 12:47:23 +1200 (Mon, 07 May 2007) | 1 line


------------------------------------------------------------------------
r344 | john | 2007-01-04 16:10:01 +1300 (Thu, 04 Jan 2007) | 1 line
Another command that can come in handy is the svn blame command (you can also use the synonyms svn praise or svn annotate, depending on how you feel at the time). This command displays the current contents of a file, with, to the side of each line, the last person to have modified this line and the revision in which the last modification was made:
$ svn blame INSTALL.txt
    22     taronga Installation instructions for the JavaLamp application
    22     taronga ------------------------------------------------------
    25     bill    Installing JavaLamp is a long and difficult task,
    28     toni    And writing the documentation involves many steps and many people.
Setting Up a Subversion Server with svnserve
Subversion also comes with a lightweight server called svnserve, which can be used to provide network access via the proprietary svn and svn+ssl protocols. Svnserve is easier to configure and offers higher performance than accessing Subversion via Apache. It works equally well in both Windows and *NIX environments.
You can start up the svnserve as a standalone server process from the command line, as follows:
$ svnserve --daemon --root /data/svn
The --daemon (or -d) option tells svnserve run as a background process. The --root (or -r) option lets you specify the repository root path. If provided, URL paths will be relative to this directory. Although optional, it is good practice to provide this path, because in this case the svnserve process cannot access anywhere outside this path.
The default port is 3690, but if you need to change this, you can use the --listen-port option. The --listen-host can be used to define the interface that svnserve listens on. You can use either a regular hostname or an IP address.
Logically enough, the svnserve process needs to have read/write access on this directory. One way of doing this is to create a user and a group, both called svn. This user should have ownership of the Subversion repository directory. You could do this, as root, as follows:
# chown -R svn:svn /data/svn
# chmod -R 775 /data/svn
Then execute svnserve as this user.
You can do a quick check to see if the server is functioning correctly by running svn list using a svn URL, as shown here:
$ svn list svn://localhost/dev-repos
branches/
trunk/
Of course, on a real server, you would typically set up the svnserve process to run as a service. This varies from system to system, and if you’ve gotten this far, you’re probably big enough to work this out for yourself.
Now that svnserve is running, you can now check out a project:
$ svn co svn://localhost/dev-repos/javalamp/trunk  JavaLampRemote
A    remoteJavaLamp\INSTALL.txt
A    remoteJavaLamp\src
A    remoteJavaLamp\src\test
A    remoteJavaLamp\src\test\java
A    remoteJavaLamp\src\test\java\com
A    remoteJavaLamp\src\test\java\com\wakaleo
A    remoteJavaLamp\src\test\java\com\wakaleo\jdpt
...
By default, anyone can checkout a project from the repository, but only authorized users can submit modifications. If you try to modify something (say the README.txt file), your attempt will be refused:
$ svn commit -m "A remote update of README.txt"
svn: Commit failed (details follow):
svn: Authorization failed
Basic authorizations are managed individually for each repository. As of Subversion 1.3, you can also manage fine-grained path-orientated authorizations using the authz-db option, or you can just set up a repository for each project.
First of all, you need to configure the svnserve server. The server configuration for svnserve is stored in the conf/svnserve.conf file (so for our javalamp repository, you would find this file at /data/svn/javalamp/conf/svnserve.conf). A typical configuration file might look like this:
[general]
anon-access = read
auth-access = write
password-db = passwd
realm = JavaLamp Repository
authz-db = authz
- anon-access
This field determines repository access for anonymous users. This can be read, write, or none.
- auth-access
This field determines repository access for authorised users. This can be read, write, or none, although the last option would be a bit silly.
- password-db
This indicates the file (as a relative path) where the user accounts are configured.
- realm
The realm is a human-readable name that describes the “authentication namespace” covered by this configuration. It appears when users are asked for their passwords, and is used to locally cache password values. I generally just give it a name related to the name of the repository.
- authz-db
If present, this field points to a configuration file that contains rules for path-based access control.
Next, you need to set up user accounts. You configure authorizations in the repository’s conf/passwd file (so for our javalamp repository, you would find this file at /data/svn/javalamp/conf/passwd ). The format of this file is quite simple: it contains one section labeled [users], which contains user accounts, one on each line, of the form USERNAME = PASSWORD.
[users]
taronga = secret1
bill = secret2
toni = secret3
Now, when you commit your modifications for the first time, Subversion will prompt you for a password. User credentials are cached on the local disk, so from then on, whenever you commit from this working copy using the username option, Subversion will recognize you automatically:
$ svn commit --username taronga -m "A remote update of README.txt"
Authentication realm: <svn://localhost:3690> JavaLamp Repository
Password for 'taronga': *******
Sending        README.txt
Transmitting file data .
Committed revision 23.
If you need fine-grained authentication rules, you can set up an authz-db file as well. This file format is compatible with the mod_authz_svn authorization files used for the Apache WebDAV configuration (see Setting Up a WebDAV/DeltaV Enabled Subversion Server). The file contains an optional section labeled [groups], where user groups can be defined, followed by a list of repository path sections. Each section is labeled by a repository path, and contains a set of authorization rules. Each rule associates a user or group of users with an authorization level, which can be read-write (“w”), read-only (“r”), or no access at all (“”).
In the following example, Bill has exclusive read-write access on the bin directory, and all other users are forbidden access. The web_dev group (Taronga and Toni) have read-write access on the src directory, whereas all other users have read-only access. The last rule is a general catch-all rule that states that if no other rule applies, all users (even anonymous users) have read-only access:
[groups]
web_dev = taronga, toni

[javalamp:/trunk/bin]
bill = rw
* =

[javalamp:/trunk/src]
@web_dev  = rw
* = r

[/]
* = r
Now let’s see this in action. Suppose Toni tries to modify a file in the bin directory. According to the rules we just defined, only Bill can modify files here. So, when she tries to commit, she will get an error along the following lines:
$ svn commit --username toni -m "Updating bin scripts."
Authentication realm: <svn://localhost:3690> JavaLamp Repository
Password for 'toni': *******
Sending        bin\javalamp.bat
Transmitting file data .svn: Commit failed (details follow):
svn: Access denied
If Bill does the same thing, Subversion will offer no resistance because he has read-write access on this directory:
$ svn commit --username bill -m "Updating bin scripts."
Authentication realm: <svn://localhost:3690> JavaLamp Repository
Password for 'bill': *******
Sending        bin\javalamp.bat
Transmitting file data .
Committed revision 29.
Using a svnserve server can be a good option if you need to provide access to a Subversion repository over a secure network environment such as a company LAN or over a VPN network. It is fast and easy to install, and offers fairly low-effort maintenance, even when you take into account the fact that user accounts need to be maintained by hand.
Setting Up a Secure svnserve Server
The svnserve server is not a particularly security-oriented solution: in particular, file contents are sent over the network in unsecured form, and passwords are stored in unencrypted form on the server. As such, it is not well suited to publishing a repository over an unsecured network or over the Internet, for example. If security is an issue in your environment, it is worth knowing that svnserve supports SSH tunneling via the svn+ssh protocol.
To make svnserve use SSH tunneling, you simply use the “svn+ssh” from the client machine. No demon process needs to be running on the server: instead, an SSH tunnel is created for each server access and the svnserve command is run on the server machine through the SSH tunnel. When SSH tunneling is used, svnserve does not use the password database that we saw earlier (see ???). Instead, users need to have a physical account on the server, with authorization to login to the repository server using SSH.
User rights are determined by physical access to the repository directory: a user with read access to a repository directory on the server will only have read access to the repository, whereas a user with read-wight access to a repository directory will have read and write access to the repository. An easy (if rudimentary) way to do this is to define read-write access to the Subversion repository for the “svn” group. This way, members of the “svn” group have read and write access to the repository, whereas all other users have read-only access.
Whenever you access the server, you will be prompted for a password, as illustrated here:
$ svn list svn+ssh://svnserver.mycompany.com//data/svn/dev-repos/myproject
Password:
branches/
tags/
trunk/
Note that, by default, the full repository path must be provided (like when we used the “file:” protocol).
Accessing an svnserve server through SSH tunneling is pretty simple to set up, and is certainly secure. On the down side, it is not particularly flexible, and doesn’t allow the fine-grained access rules you get with the other network access mechanisms. The ssh+svn tunneling mechanism also has an annoying habit of re-requesting passwords because they are not cached on the local machine, and a new ssh tunnel is created for each operation.
System administrators may prefer this approach, for example, if they do not want to have to manage a WebDAV access, and users already have system accounts on the server.
Setting Up a WebDAV/DeltaV Enabled Subversion Server
If you want to provide access to your Subversion repository via Internet, setting up WebDAV access may well be the solution of choice. WebDAV (Web-based Distributed Authoring and Versioning) is an extension of the HTTP protocol designed to allow users to collaboratively create and modify documents on a remote server. DeltaV is an extension of WebDAV, which provides versioning and version control services. WebDAV access has many things going for it: it is standard, widely used, well supported by many operating systems, and is based on the very ubiquitous HTTP/HTTPS protocol. It is widely supported by most modern operating systems (Figure 4-4, for example, shows a WebDAV access to the repository of one of the Apache projects under KDE in Linux).
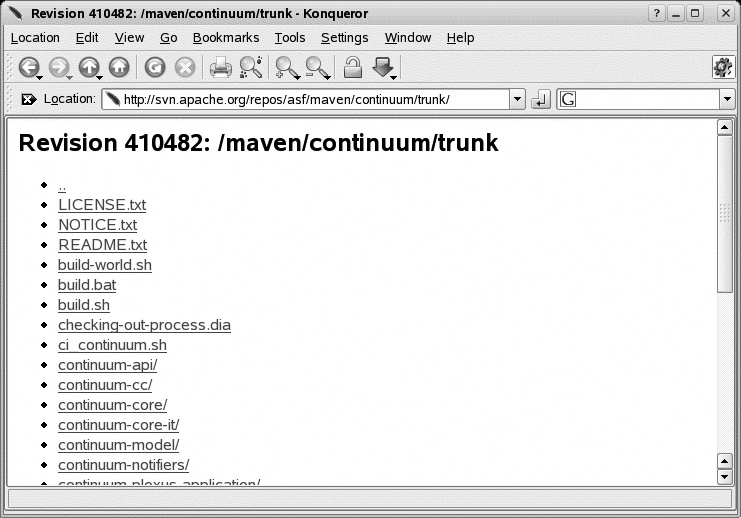
Subversion uses the robust Apache web server to provide repository access via WebDAV/DeltaV. Here, we’ll see how to set up an Apache server to do this.
First, you will need an installation of Apache 2.0 or better, with the mod_dav module (mod_dav is included with most distributions of Apache nowadays; if not, you may have to compile and install Apache with the right configuration options yourself). You also need the mod_dav_svn module, which is Subversion’s mod_dav plug-in. If Apache is already installed when you install Subversion, the Subversion installer will have a go at updating the Apache configuration files correctly. Still, it is wise to check. The Apache configuration file is called httpd.conf, and its exact location will vary depending on your OS and how Apache was installed. On Unix machines, it can often be found at /usr/local/apache2/conf/httpd.conf or /etc/apache2/http.conf. On Windows machines, you will usually find it in the Apache installation directory (something like C:\Program Files\Apache Group\Apache2\conf).
To access Subversion via Apache, you will need the mod_dav_svn and mod_authz_svn modules to be loaded with a LoadModule directive:
LoadModule dav_svn_module     /path/to/modules/dir/mod_dav_svn.so
LoadModule authz_svn_module   /path/to/modules/dir/modules/mod_authz_svn.so
Again, the path to the modules directory can vary depending on your Apache installation. Subversion provides these modules during the installation process and (with a bit of chance) will correctly configure your httpd.conf file if it can find one. Just make sure Subversion has put them in the right place. If not, or if you install Apache after installing Subversion, you can always do it yourself using the files provided in the Subversion installation directory.
Once you have the modules installed, you need to configure your repository using the Location directive. The Location directive provides WebDAV access to a particular Subversion repository or group of repositories. It tells Apache where your repository is stored, what URL it should be mapped to, and other such details. A minimal Location directive, which will give public access to your repository via WebDAV (and allow you to test your WebDAV installation) is shown here:
<Location /repos>
  DAV svn
  SVNPath /data/svn/dev-repos
</Location>
On a Windows machine, you just have to provide a Windows-friendly directory path, enclosed in double-quotes if there are any spaces:
<Location /repos>
  DAV svn
  SVNPath "c:/svn/dev-repos"
</Location>
You can also narrow access down to a particular project within your repository, as shown here, where access is limited to a particular project called “javalamp”:
<Location /javalamp>
  DAV svn
  SVNPath /data/svn/dev-repos/javalamp
</Location>
This can be a good option. If you need to manage several different and unrelated projects. Simply add several <Location> entries like this one in your repository, one for each project. This makes it easier to set up separate Apache-based security configurations for each project.
Add this at the end of your Apache configuration file and restart the server. Now, you should be able to connect to your repository via a standard WebDAV client, using a URL like http://myrepositoryserver.mycompany.com/repos. Most modern operating systems integrate WebDAV interfaces nowadays (see Figure 4-5).
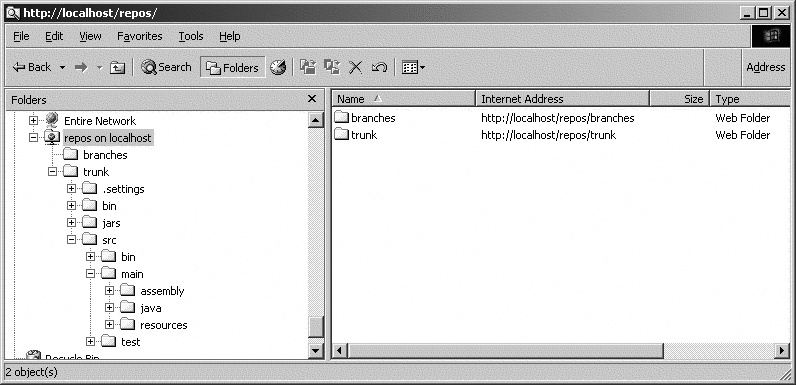
But, of course, that is just icing on the cake. What we really want is to access our repository using an HTTP URL. Nothing could be easier! In the following example, we check out our project from the WebDAV repository, and, just for good measure, modify something in the README.txt file and commit it back:
C:\> svn co http://localhost/repos/trunk webdavProject
A    webdavProject\src
A    webdavProject\src\test
A    webdavProject\src\test\java
A    webdavProject\src\test\java\com
A    webdavProject\src\test\java\com\wakaleo
A    webdavProject\src\test\java\com\wakaleo\jdpt
...
Checked out revision 29.
...
C:\> svn commit -m "Updated a WebDAV project"
Sending        README.txt
Transmitting file data .
Committed revision 30.
Another useful trick if you have all your repositories in the same directory is to provide access to the root directory, using the SVNParentPath directive:
<Location /repos>
  DAV svn
  SVNParentPath /data/svn
</Location>
In this case, you use URLs that include the repository name as well, as shown here:
$ svn checkout http://localhost/repos/dev-repos/dev/javalamp/trunk webdavProject2
A    webdavProject\src
A    webdavProject\src\test
A    webdavProject\src\test\java
A    webdavProject\src\test\java\com
...
Note that here WebDAV access is provided to each individual repository (e.g., http://localhost/repos/dev) and not to the root directory (http://localhost/repos). If you try to access the root directory through a WebDAV client, your request will be rejected.
Now that we have the basic access working, we can start thinking about security issues. You probably don’t want your repository to be modifiable by everyone on the Internet, or even everyone in your company. There are several ways of restricting access to your WebDAV-enabled repository. The simplest and most widely accepted is HTTP Basic authentication, where the browser prompts for a username and password before allowing access to the repository. You can set this up as follows:
<Location /repos>
    DAV svn
    SVNParentPath /data/svn
    AuthType Basic
    AuthName "Subversion repository"
    AuthUserFile "/data/svn/svn-auth-file"
    Require valid-user
</Location>
Let’s look at the new options that we’ve added here:
- AuthType
The AuthType indicates the type of HTTP authentication, which can be either “Basic” or “Digest.” Basic authentication works with most client browsers, but is, well, basic, as far as security goes. Digest authentication is accepted by fewer browsers (although most modern browsers will still work fine), but offers better security. More on this later.
- AuthName
AuthName is the (arbitrary) name of your authentication domain, which is typically used when prompting for passwords.
- AuthUserFile
User accounts are stored in a special file which is specified in the AuthUserFile directive.
- Require
This tells Apache when the authentication mechanism should be used.
You set up and manage user accounts using the htpasswd (or htpasswd2, depending on your distribution) tool delivered with the Apache server. This tool is pretty basic, but easy to use. The following listing shows how you would create two users. The -c option in the first line tells htpasswd to create a new file:
# htpasswd2 -cm /data/svn/svn-auth-file john
New password: ****
Re-type new password: ****
Adding password for user john
# htpasswd2 -m /data/svn/svn-auth-file mike
New password: **** R
e-type new password: ****
Adding password for user mike
If you want to specify the password in the command line, rather than prompting for it, you can use the -b option. This can come in handy if you need to write a script to create many users:
$ htpasswd2 -bm /data/svn/svn-auth-file jack secret
And, finally, if you need to delete a user, just use -D:
$ htpasswd2 -D /data/svn/svn-auth-file jack
Now you’re ready to go. Users can still check out the project without restriction, but if they commit any modifications, they will be prompted for a username and password.
The valid-user parameter in the above example means that only authenticated users can access the repository in any way. Users need a proper account both to checkout code and to commit changes. This is a fairly strict policy, and does not always match your needs. Sometimes, for example, you would like to give all users read-only access, but only allow authenticated users to modify the code. One of the easiest ways to do this is to use the Apache <LimitExcept> directive to allow the read-only HTTP access methods (GET, PROPFIND, and so on) for nonauthenticated users, and require authentication for the read-write access methods such as POST. An example of such a configuration is shown here:
<Location /svn/repos>
    DAV svn
    SVNParentPath /data/svn
    AuthType Basic
    AuthName "Subversion repository"
    AuthUserFile "/data/svn/svn-auth-file"
    <LimitExcept GET PROPFIND OPTIONS REPORT>
        Require valid-user
    </LimitExcept>
</Location>
Actually, Basic HTTP authentication is not very secure, since passwords can be sniffed on the network without too much trouble. If your users have reasonably modern browsers and/or WebDAV client software, you should use Digest authentication, which is more secure. Using Digest authentication, passwords are never stored or transmitted in user-readable form but are transmitted using a one-way encryption technique (MD5, to be precise).
To use Digest authentication, you need to make sure that the auth_digest_module is activated in the Apache configuration file (in many installations it isn’t by default). You should have something along the following lines in your Apache configuration file:
LoadModule auth_digest_module modules/mod_auth_digest.so
You need to change the Location directive in your Apache configuration file as follows:
<Location /repos>
    DAV svn
    SVNParentPath /data/svn
    AuthType Digest
    AuthName "Subversion repository"
    AuthDigestDomain /repos/
    AuthDigestFile /data/svn/svn-digest-auth-file
    Require valid-user
</Location>
The “AuthDigestDomain” indicates the URL path you want to protect, and “AuthDigestFile” indicates the user account file. Digest authentication does not use the same user account file as Basic authentication. You manage user accounts using the htdigest (or htdigest2) tool, as shown here:
# htdigest2 -c /data/svn/svn-digest-auth-file "Subversion repository" john
Adding password for john in realm Subversion repository.
New password: ****
Re-type new password: ****
Now just restart the Apache server. Clients won’t notice any difference, but passwords will now be transmitted in MD5 form.
Setting Up a Secure WebDAV/DeltaV Server
Although Digest authentication provides a reasonable level of security, and is often quite sufficient for a secured enterprise network or VPN, for example. However, it will not resist the efforts of a determined hacker, and is not suitable if you need to communicate sensitive data across the Internet. True security in a web environment requires HTTPS encryption. Configuring Apache SSL configuration and managing SSL certificates is beyond the scope of this book, but is well documented elsewhere, such as on the Apache web site.
Customizing Subversion with Hook Scripts
Subversion is a very flexible tool, and it is easy to extend its features to suit your particular environment. For example, you might want to send a mail on each commit, update your issue tracking system, or even to force users to include a reference to a bug number in their commit message.
Subversion hooks allow you to do this sort of thing. Subversion hooks allow you to trigger arbitrary actions whenever a particular event (typically a commit) occurs in the repository. The hook scripts live in the hooks directory of your Subversion repository. When you install Subversion, there will be a number of sample scripts already provided, indicated by the “.tmpl” suffix:
# cd /data/svn/repos
# ls
conf  dav  db  format  hooks  locks  README.txt
# ls hooks
post-commit.tmpl  post-revprop-change.tmpl  pre-commit.tmpl  pre-revprop-change.tmpl
start-commit.tmpl
post-lock.tmpl    post-unlock.tmpl          pre-lock.tmpl    pre-unlock.tmpl
The events are fairly intuitive. For example, the pre-commit script is run just before a commit happens, and the post-commit just afterward. Subversion supports five hooks, which are each used for different purposes:
- start-commit
This script is run just before a commit transaction begins, and is typically used to prevent a commit from happening at all if some condition is not met. If this script returns a nonzero result, the commit will not take place.
- pre-commit
This script is run when the commit is ready to happen, but just before it actually takes place. You can use this script to enforce constraints; you might want to require that developers include a reference to an issue in your issue tracking system in the commit message, for example. If this script returns a nonzero result, the commit will be aborted.
- post-commit
This script is invoked after the transaction has been processed and once a new revision has been created. You would typically use this script to send notification messages or to update your issue tracking system, for example.
- pre-revprop-change
This script is executed just before a revision property is modified. Because revision properties are not versioned, this can be used if necessary to add some extra security checks.
- post-revprop-change
This script is run just after a revision property has been modified. Like the post-commit hook, this is typically used for notification purposes.
The simplest way to activate a script is simply to duplicate one of the template files and remove the “.tmpl” suffix. On a Unix machine, make sure the script is executable. And on Windows, you will need to add an executable extension such as “.bat.”
You can write Subversion hook scripts in any language, although Python and plain old shell scripts seem to be popular options. There are also many useful scripts are available on the Internet (see, in particular, http://svn.collab.net/repos/svn/trunk/tools/hook-scripts/ and http://svn.collab.net/repos/svn/trunk/contrib/hook-scripts/).
There are many practical applications for Subversion hook scripts. Some useful applications of hook scripts are described here:
- Sending email nofitications
One common notification technique is to send an email notification to all team members whenever someone commits code. This is a fairly commonly used approach for distributed projects. Actually, in most cases, you’re probably better off letting a Continuous Build server take care of this kind of automation, and only send mail when a build fails.
- Updating your issue management system
This is a very useful integration techique. If developers include references to issue numbers, you can get Subversion to update the corresponding issues in your issue tracking system. We look at how to update a Trac issue in Updating Trac Issues from Subversion. For users of the popular JIRA issue management system, no script was available at the time of writing, but a JIRA plug-in is available that polls the Subversion logs and updates any issues accordingly (see http://confluence.atlassian.com/display/JIRAEXT/JIRA+Subversion+plugin).
- Enforcing coding practices
The pre-commit hook can be used to enforce particular coding or development practices. For example, you might want to make sure there are no tab characters in the source code files, or that every log message contains at least one reference to an issue in your issue management system. This is a more proactive (and aggressive!) approach than using static analysis tools such as Checkstyle (see Chapter 21).
Installing Subversion As a Windows Service
If you have to install Subversion on a Windows server, you’ll probably want to install it as a service. Unfortunately, this feature doesn’t come out of the box with the Windows Subversion installation package: you have to set it up yourself.
Magnus Norddahl[*] has written a small Windows service wrapper utility called SVNService, which can be used to install Subversion as a Windows service. Download the package, place the executable file (SVNService.exe) in the same directory as your subversion executable, and set up the service as follows:
C:\> SVNService -install -d -r d:\svn-repository
An alternative approach is to use the generic Windows InstSrv and SrvAny tools, which come with the Windows Server Resource Toolkits. First, you need to set up a new Windows service by running InstSrv. You need to provide the name of the service you want to create (say “svnserve,” just to be original), and the full path of the Srvany.exe:
C:\>InstSrv svnserve "C:\Program Files\Windows Resource Kits\Tools\srvany.exe"
The service was successfuly added!

Make sure that you go into the Control Panel and use
the Services applet to change the Account Name and
Password that this newly installed service will use
for its Security Context.
Now you need to configure the service in the Windows registry (see Figure 4-6). Open the Registry Editor, go to HKEY_LOCAL_MACHINE\SYSTEM\CurrentControlSet\Services\svnserve, add a Parameters Key and two String Values:
Application, which indicates the full path to your svnserve executable
AppParameters, in which you place the command-line parameters you would normally pass to svnserve (such as “-d -r D:\svn\repository”)
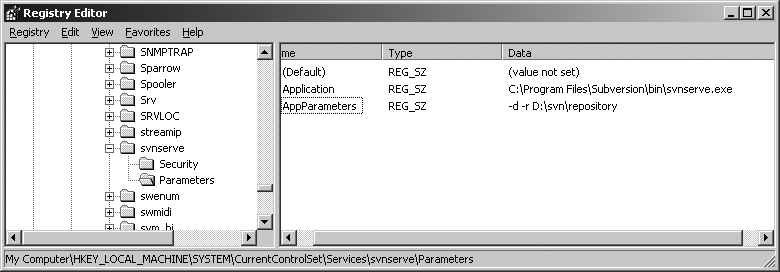
Now you should have a new Windows service. By default, the service will start up automatically when you reboot the server. You can start (or stop) the service manually in the Services administration screen (see Figure 4-7) or using the NET START and NET STOP commands at the command line, as follows:
C:\>net start svnserve
The svnserve service is starting.
The svnserve service was started successfully.

C:\>net stop svnserve

The svnserve service was stopped successfully.
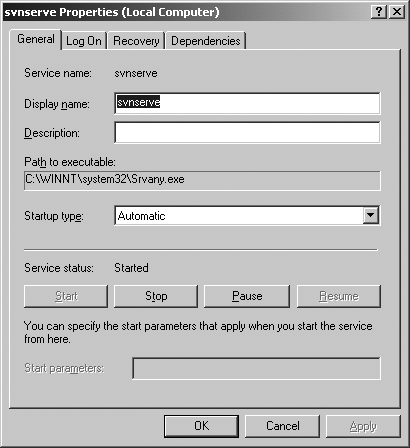
Backing Up and Restoring a Subversion Repository
If you are in charge of administering a Subversion repository; it can come in handy to know how to back it up. The svnadmin dump command lets you do just that: it generates a portable (although not very readable) format that you can use to restore your precious repository if disaster strikes. This is also recommended procedure when upgrading to a new version of Subversion.
The following line will dump the whole repository into a file called svn-backup:
$ svnadmin dump /data/svn/dev-repos > svn-backup.
* Dumped revision 0.
* Dumped revision 1.
* Dumped revision 2.
...
* Dumped revision 30.
* Dumped revision 31.
Of course, you can gain some space (I gain around 25% on my repository) by compressing the backup format with a tool like gzip:
$ svnadmin dump /data/svn/dev-repos | gzip -9 > svn-backup.gz
To rebuild your repository after a disaster, or after an upgrade, you need to recreate your repository and then load the backed-up repository data using svnadmin load:
$ svnadmin create /data/svn/dev-repos svn-backup
$ svnadmin load /data/svn/dev-repos <
<<< Started new transaction, based on original revision 1
     * adding path : book.xml ... done.
     * adding path : ch04.xml ... done.
     * adding path : ch25.xml ... done.

------- Committed revision 1 >>>

<<< Started new transaction, based on original revision 2
...
If you compressed the backup file as shown above, you can also restore the repository directly from the compressed file as shown here:
$ gunzip -c svn-backup.gz | svnadmin load /data/svn/dev-repos
Using Subversion in Eclipse
Subversion integrates quite smoothly into the Eclipse IDE. There are currently two open source plug-ins available providing Subversion integration in Eclipse. It is worth noting that there is also an Eclipse project (in incubation at the time of writing) aiming at provided integrated Subversion support in Eclipse (see http://www.eclipse.org/subversive/). However, at the time of this writing, Subversive is younger and less mature than Subclipse, so we will focus on Subclipse.
Installing Subclipse
You install Subclipse from the Subclipse update site at http://subclipse.tigris.org/update_1.2.x for Eclipse 3.2 or higher, in the usual way via the Install/Update window (see Figure 4-8).
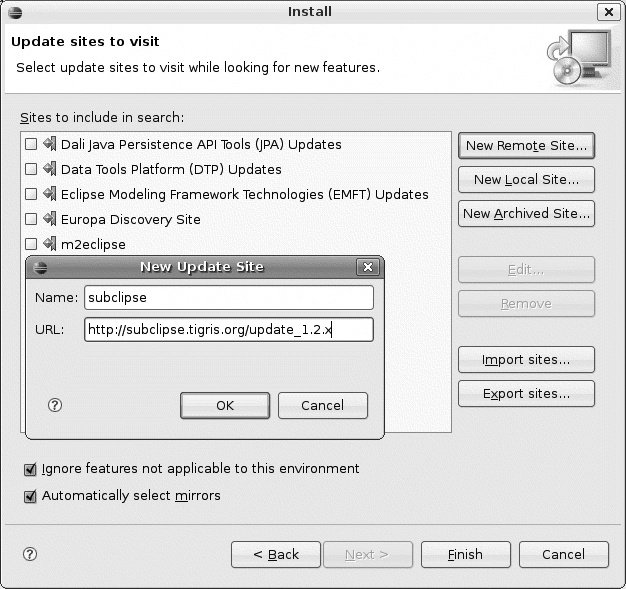
Depending on your OS, you may need to do some configuration in the Preferences screen (see Figure 4-9). The most important choice is the SVN Interface. Subclipse supports two ways of accessing the Subversion server: JavaSVN and JavaHL. The JavaSVN interface is a pure Java Subversion interface, which is reported to be faster than, and to support a few more features than JavaHL. At the time of writing, it did not support file:// protocol. The JavaHL Interface is a native library provided with the Windows installation of Subclipse, and which does support the file:// protocol. However, on a non-Windows platform, you will have to find and compile JavaHL on your own. I guess you can’t have your cake and eat it too…
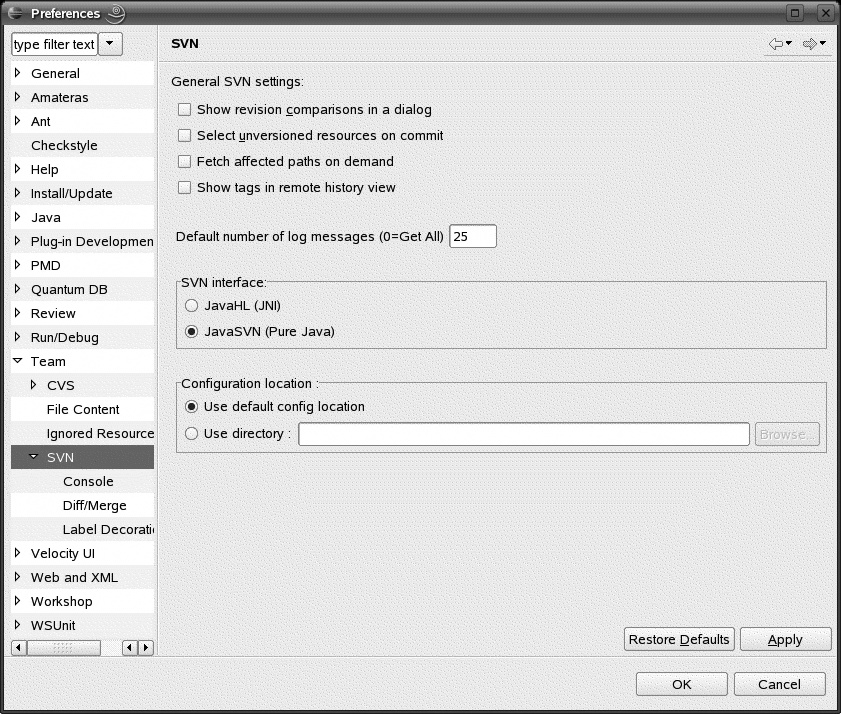
Defining a Repository
The first thing you will need to do is set up some repositories in. Open the “SVN Repository” view, and select in the contextual menu (see Figure 4-10). All you need to provide is the Subversion repository URL.
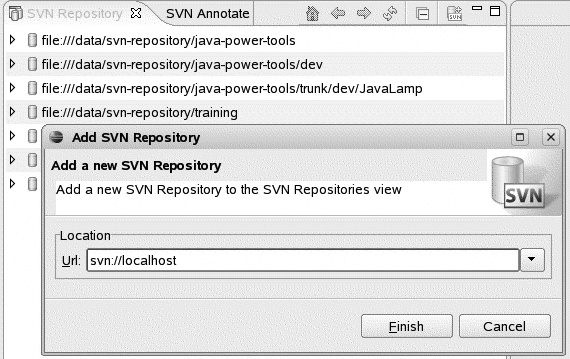
The “SVN Repository” view can be useful for other tasks as well (see Figure 4-11). Using the contextual menu, you can checkout project directories, import local directories into the repository, or export them to your local machine, and even create branches or move directories.
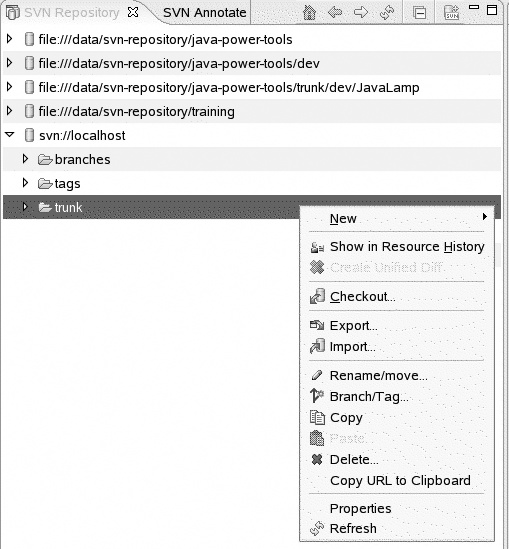
Adding a New Project to the Repository
If your project is brand new, or if it hasn’t been placed in the Subversion repository yet, you will need to import it into the repository. You just open the Share window (right click, Team, Share Project…) (see Figure 4-12). You will need to provide the URL of your Subversion repository, or use one of the existing repositories.

Once you have specified the repository and the project name, you indicate the files and directories you want to place in the repository and provide an initial comment (see Figure 4-13). This lets you easily create a Subversion repository project containing just the project source code, even if your project directory contains generated classes, temporary files, or other unnecessary artifacts.
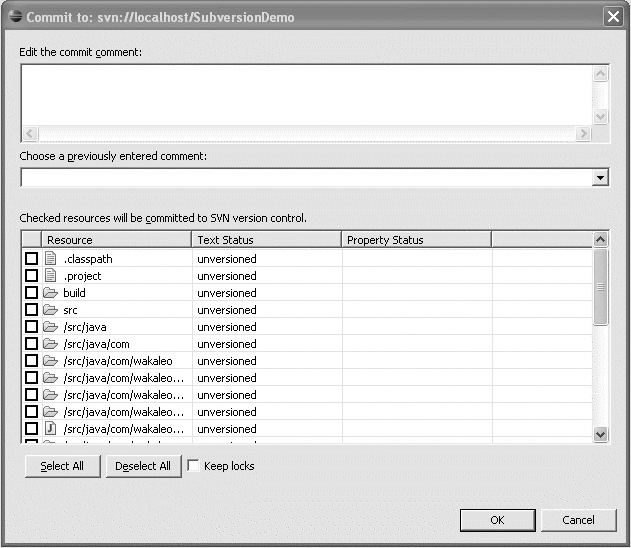
Now you should have a fully operational Subversion project up and running. Check out the Team menu now (see Figure 4-14), and you will see the a range of available Subversion commands.
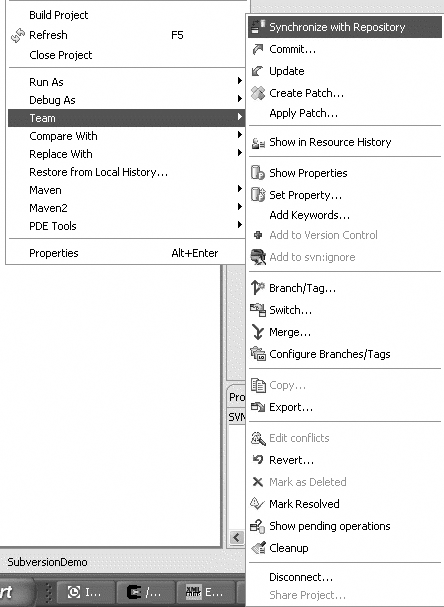
Creating a Project from the Subversion Repository
Subclipse makes it easy to check out a Subversion project into your Eclipse workspace. In the New Project window (), open the Subversion menu entry and select “Checkout Projects from SVN” (see Figure 4-15).
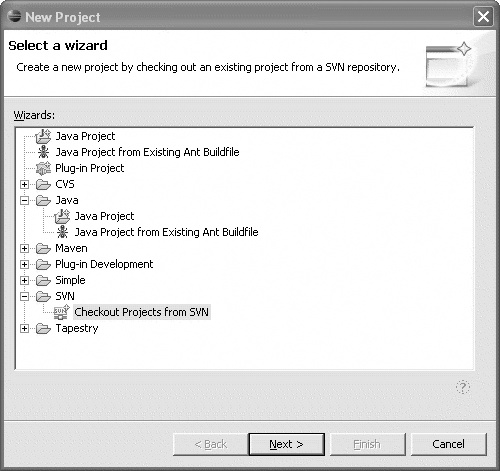
You will need to provide the Subversion repository URL. Then Eclipse will list the projects stored in this repository (see Figure 4-16). Choose the directory you want to check out (typically, you will be creating a project from the main trunk of your project).
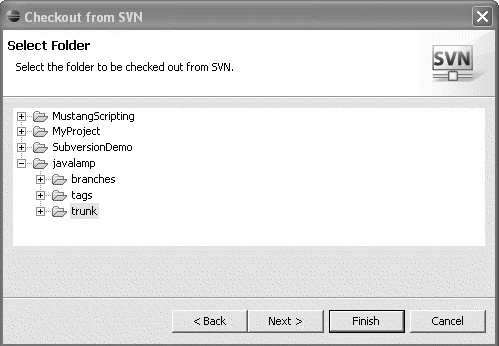
Once you have chosen the directory, you can either checkout the repository contents directly into your Eclipse workspace (“Check out as a project in the workspace”) or you can create a new project using one of the other project types based on the repository contents (“Checkout as a project configured using the New Project Wizard”). The latter option is better for Java projects, because you can then use the Eclipse project template that you’re used to. In both cases, you will still need to update the project build path, because Eclipse can’t work out where the Java source code is before checking out the project source code.
If you have created an Eclipse project using a directory that has already been checked out of a Subversion repository, you can also use the “Team→Share Project” command in the contextual menu to enable Subversion features within Eclipse for this project.
Working with Files
Most of the main Subversion commands are available through the “Team” contextual menu (see Figure 4-14). From here, you can update your project and commit changes, along with more advanced functions such as branching and merging. The “Synchronize with Repository” option essentially lets you do an update and a commit at the same time, by comparing your local modifications with any changes in the repository (see Figure 4-17), and selectively incorporate the repository modifications into your local copy. When you are satisfied, you can safely update and commit your changes to the repository. This approach is safer and more efficient than waiting for conflicts to occur and fixing them afterward.
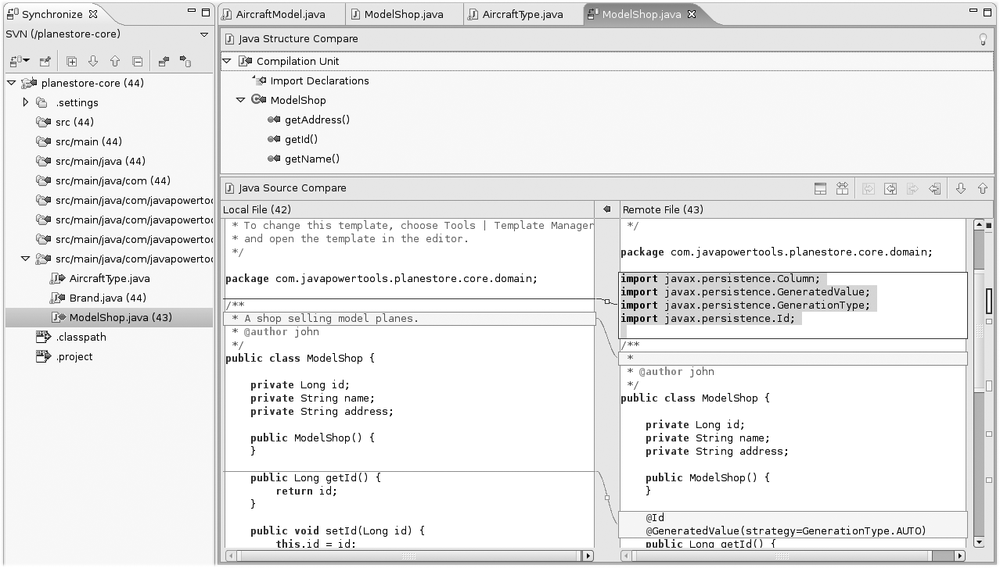
Keeping Track of Changes
Locally modified files are easy to see in the Eclipse. Both modified files and their containing directories are visually flagged, making them easy to locate. You can list the modifications made to a file or group of files using the “Show History” option. You can also use “Show Annotation” to visualize what user made each modification in the file’s history.
Branching and Merging
Subclipse provides good support for branching and merging operations. You can create a new branch or tag easily using the “Branch/Tag” menu option. Switching over to a different development tag or branch (see Using Tags, Branches, and Merges) is also fairly straightforward. Go to the project root directory and select “Team→Switch to another branch/tag” in the contextual menu. In both cases, a Browse button lets you select the branch or tag you need, without having to remember the exact spelling.
You can merge changes done in another branch using the “Merge” option (see Figure 4-18). This is not a particularly simple window, reflecting the fact the merges in Subversion are powerful but not especially intuitive. The most important thing to get right here is the initial revision number, which indicates the point in time from which changes in the branch will be included into your workspace. The “Show Log” button can help here.
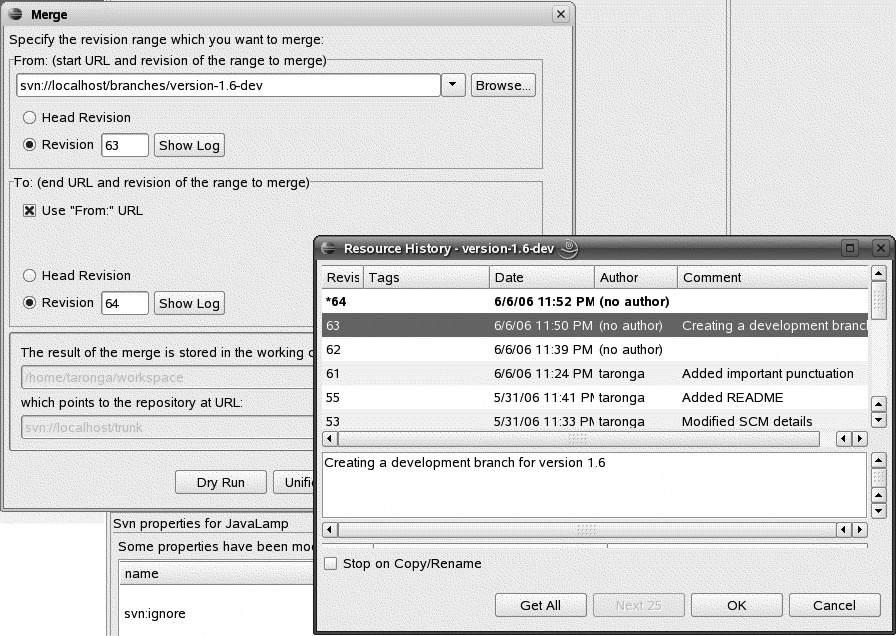
To roll back to a previous revision (see Rolling Back to a Previous Revision), you simply start from the Head revision, and provide the revision number to which you want to return in the “To” field, (see Figure 4-19). Once the rollback is completed, you need to submit your new version to update the repository.
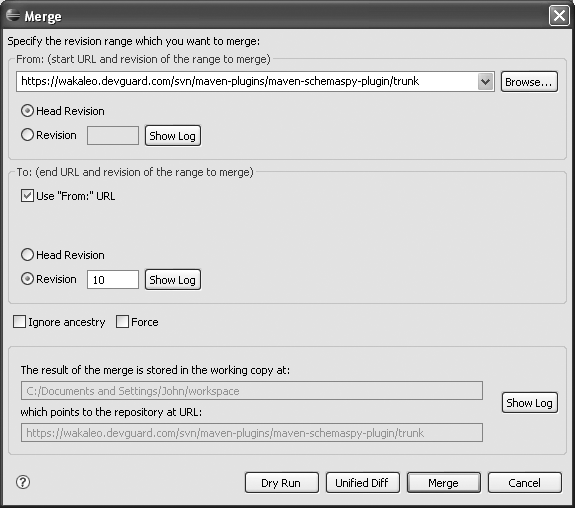
Using Subversion in NetBeans
NetBeans provides some excellent Subversion integration features, which we will look at here.
Installing Subversion Support
Subversion support is not installed in NetBeans 5.5 by default: you need to install it through the Update option. Open the “Tools→Update Center” and make sure the “NetBeans Update Center” option is ticked. Then, in the “NetBeans Update Center” choices, choose “Subversion” (see Figure 4-20). Step though the installation process.
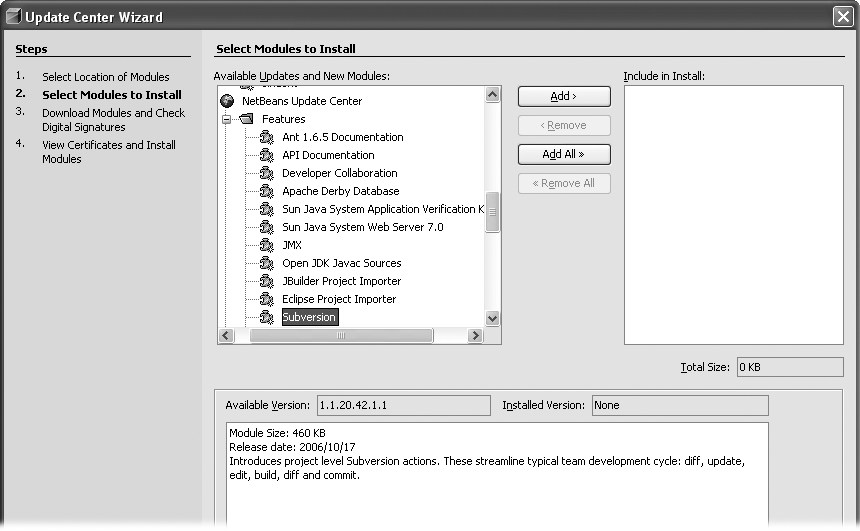
When you’re done, a new “Subversion” menu will appear in the main menu bar. Most of the principal Subversion commands are available, either from the main menu, or from the contextual menu for commands relating to a specific file or directory.
In NetBeans 6, both Subversion and CVS are supported out of the box in the “Versioning” menu. The rest of this section will look at the NetBeans 6 Subversion integration.
Creating a Subversion-Based Project
If you want to create a new project by downloading source code from a Subversion repository, NetBeans makes life very easy. Open the “Subversion→Checkout” menu (see Figure 4-21). Here, you provide the URL of the Subversion repository you need to checkout. Once you specify your local directory, NetBeans will proceed to download the entire project into the target directory and set up a corresponding NetBeans project in your workspace.
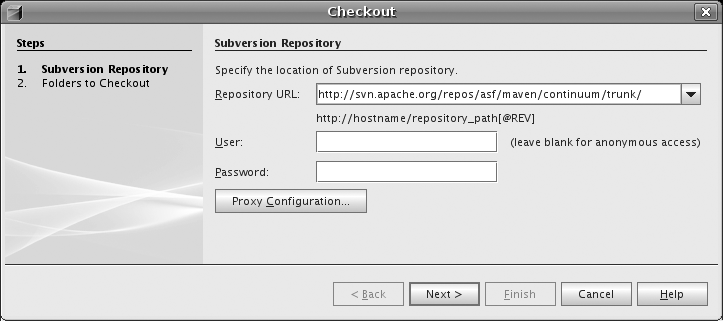
Once the source code has been downloaded, NetBeans will recognize and correctly configure a corresponding NetBeans project for both Ant and Maven-based projects (if you have the Maven extensions installed, that is). If it does not recognize the project structure, you can create a new project based on the new working directory using the normal Project Creation Wizard.
Working with Your Files
NetBeans does a good job of integrating Subversion into the everyday work environment of a NetBeans developer. Update and commit operations can be performed on files or directories using the contextual menu (see Figure 4-22). When you commit your changes, NetBeans will list modified files as well as any new files that you might have forgotten to add manually.
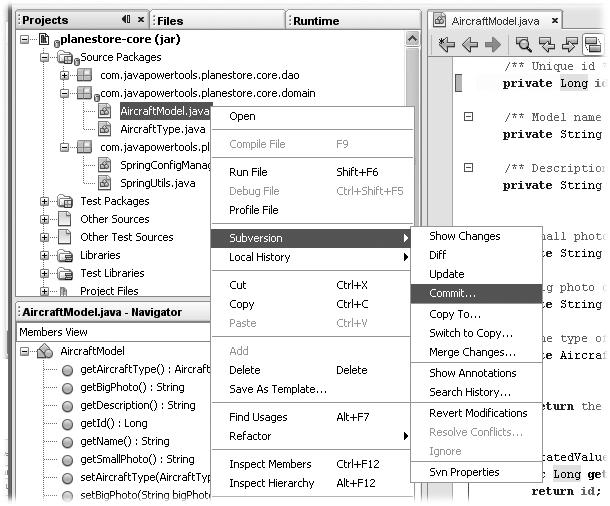
Conflicting files are displayed in red (see Figure 4-23). One convenient way of resolving these conflicts is to use the visual “diff” editor that we will, discuss below (see Figure 4-24). Once the conflict is sorted out, you can use the “Resolve Conflicts” contextual menu option to declare the conflict fixed and commit the new version of the file.
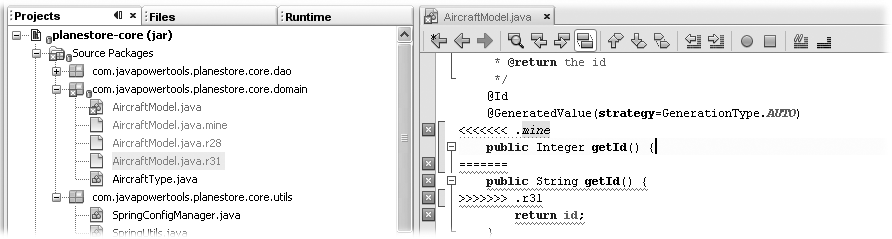
Keeping Track of Changes
It is fairly easy to keep track of changes you have made in your local copy. Modified files are highlighted in blue and listed in the “Subversion” window, which you can open via the “Subversion→Show Changes” contextual menu, or by selecting the “Window→Versioning→Subversion” menu option. Like Eclipse and TortoiseSVN, the directories containing the modified files are flagged (a blue drum indicates modifications, whereas a red drum indicates conflicting files). You can compare versions in an interactive visual tool (see Figure 4-24). This view not only displays the differences between files but also allows you to selectively restore particular changes in the file (using the small arrow icons in the margin of the Base source code window).
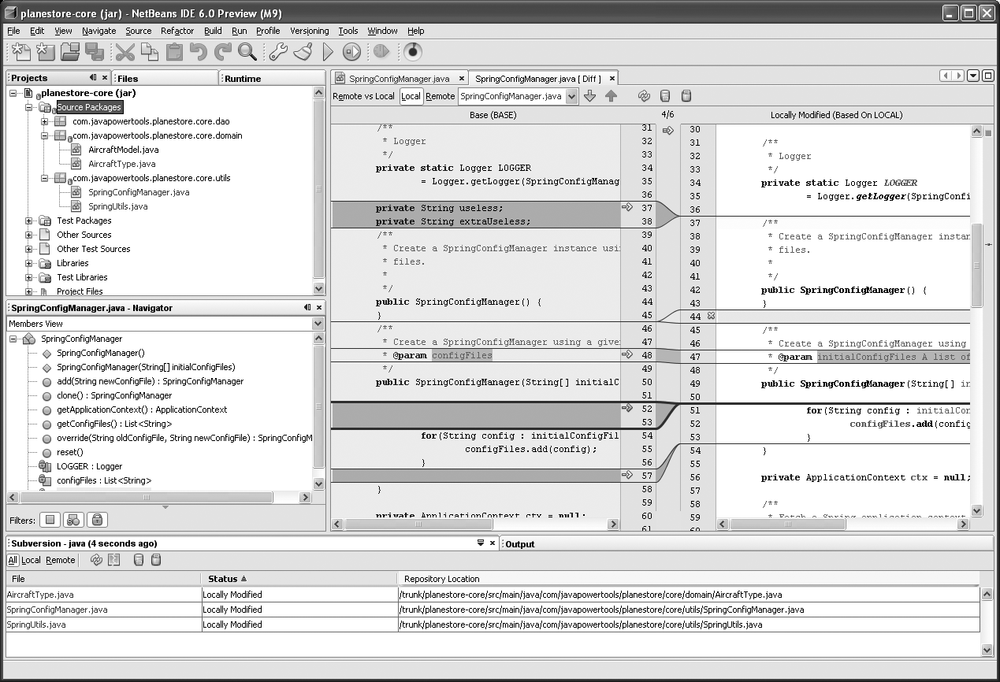
There are also other ways of keeping track of changes. The “Show Annotations” menu option will run the svn annotate command, displaying when and by whom each line of a file has been modified. The “Search History” option, which has no native Subversion equivalent, lets you search the Subversion history for log messages containing a particular text and/or changes made by a particular user.
Branching and Merging
As we have seen, branching and tagging in Subversion is essentially the same operation; a cheap directory copy (see Using Tags, Branches, and Merges). You can create new tags and branches in NetBeans using the “Copy To…” menu option. This opens a window where you can select the new branch or tag location by browsing the repository (see Figure 4-25). You also have the option of switching directly to the new copy, which is convenient if you are creating a new branch. Alternatively, you can switch to the new branch at any time using the “Switch To Copy…” menu option.
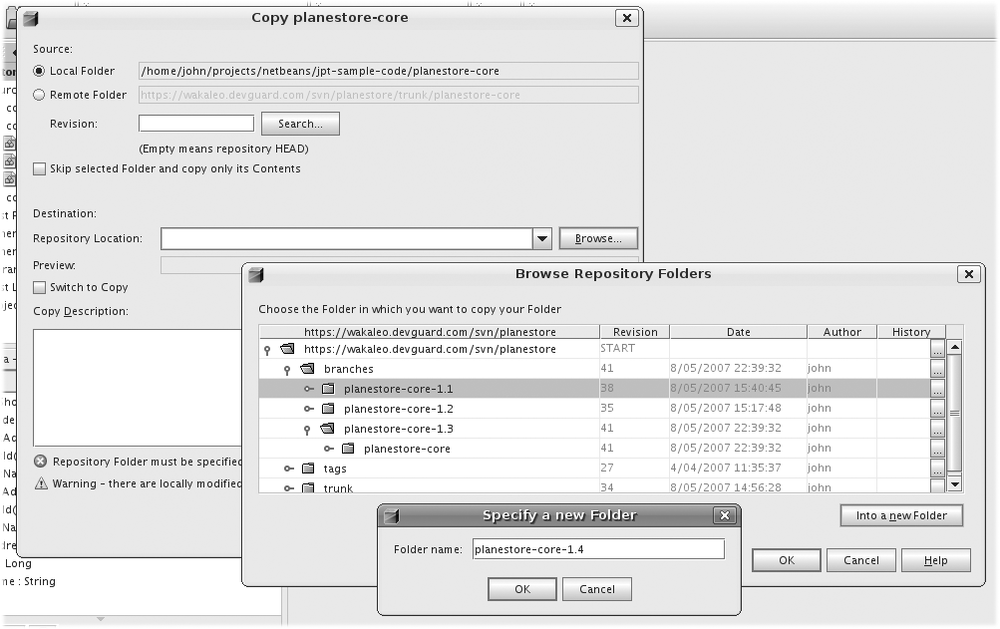
After you have worked on a separate development branch for a time, you will generally need to integrate your changes into the main development trunk. When it is time to merge your changes back into the main trunk, you can do this directly from within NetBeans. Switch to your main (target) branch (typically the trunk). This is the code base into which you want to incorporate your modifications. Then select “Merge Changes” in the Subversion menu. This will open a window where you select the branch containing your modifications. You can merge all the changes from a particular date or revision (using the “Merge From One Repository Folder” option), or, as shown in Figure 4-26, all the changes since the creation of the branch. This largely will depend on whether this is the first time you have merged code from this development branch.
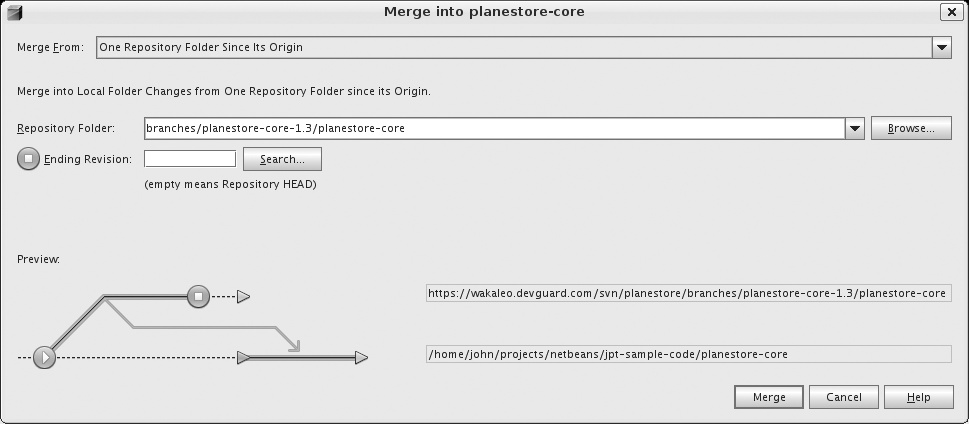
Once you have merged your modifications into the main trunk in this way, you will still have to commit the changes to the repository.
You can use this technique to roll back changes (see Rolling Back to a Previous Revision). Choose “One Repository Folder” in the “Merge From” drop-down list, and set the Ending Revision to the revision to which you want to roll back (see Figure 4-27). You can leave the Starting Revision field empty, as, in this case, the rollback process will start with the HEAD revision. Then, when you’re done, you need to commit your changes to the repository.
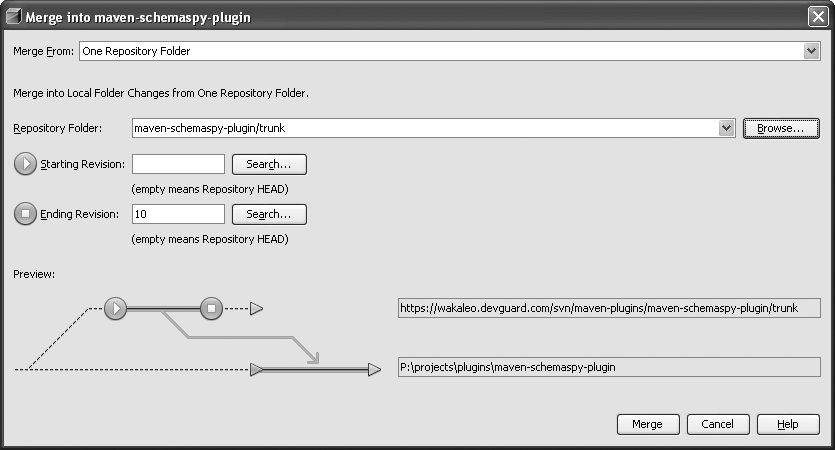
Using Subversion in Windows
There are several Subversion clients for Windows, but one of the better ones is TortoiseSVN, a free open source tool from Tigris (http://tortoisesvn.tigris.org/). Using TortoiseSVN, Subversion integrates seamlessly into a Windows desktop environment. TortoiseSVN lets you access virtually all the Subversion commands via a graphical client interface, directly from within Windows Explorer (see Figure 4-28). In addition to a slick graphical interface, TortoiseSVN offers nice-to-have features such as spell checking and contextual help in the comments fields.
Like Subversion, TortoiseSVN is a very rich product, as can be gleaned by the number of commands available in the contextual menu (see Figure 4-28). Here, we will look at how TortoiseSVN can make life easier for Windows-based Subversion users, concentrating on a few of the most commonly used features.
Using TortoiseSVN in Windows Explorer
One of the key features of TortoiseSVN is its strong integration with Windows Explorer (see Figure 4-28). You don’t have to run a client application: just open a Windows Explorer window.
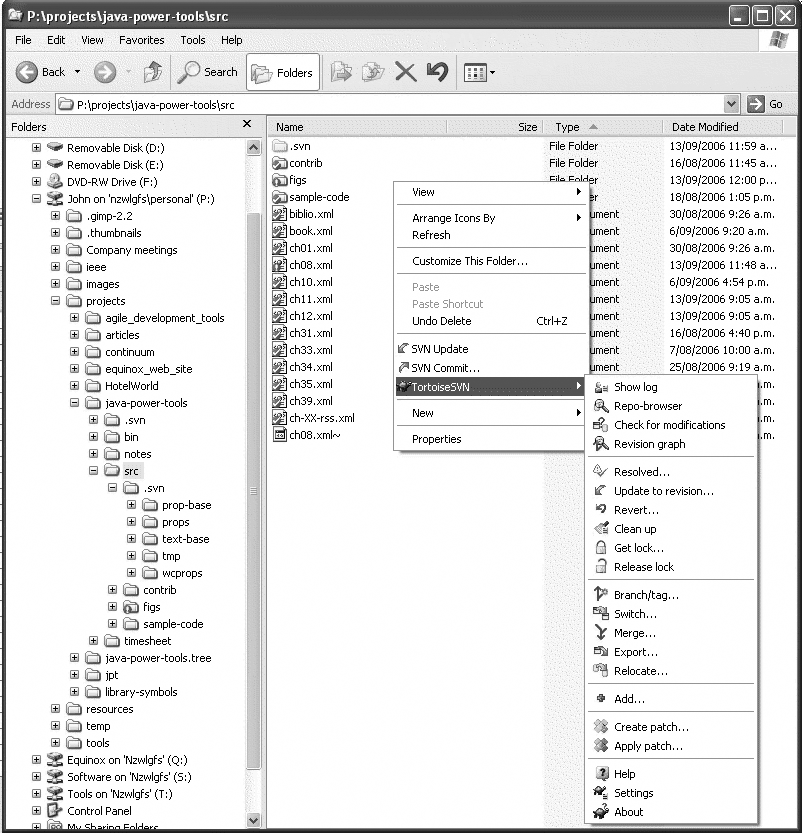
Virtually all of the Subversion commands are available via the contextual menu, either directly for updates or commits, or in the “TortoiseSVN” submenu for everything else. TortoiseSVN uses intuitive icon overlays to let you see at a glance the status of each file: a green tick indicates an up-to-date file, a red exclamation mark indicates a modified file (or a directory containing a modified file), a red cross indicates an item scheduled for deletion, and so on.
If your project is on a network drive or a removable drive (in fact, pretty much anything other than your standard built-in disk drives), you may not see the icon overlays at first. Open the “TortoiseSVN→Settings” dialog and go to “Look and Feel→Icon Overlays.”
If you are working on a remote repository through a proxy server, you will need to configure this, too. You can set proxy settings in the “Network” entry of the “TortoiseSVN→Settings.”
Importing a New Project into the Repository
When you create a new project using Subversion, one of the first things you need to do is to import the project into your Subversion repository (see Importing Existing Files into Subversion). Doing this using TortoiseSVN is quite simple. Once you have set up your basic project directory structure, use the contextual menu in Windows Explorer (see Figure 4-29). You will need to specify the URL of your Subversion repository (or select one in the list of previously used repositories), and provide an (optional but recommended) comment.
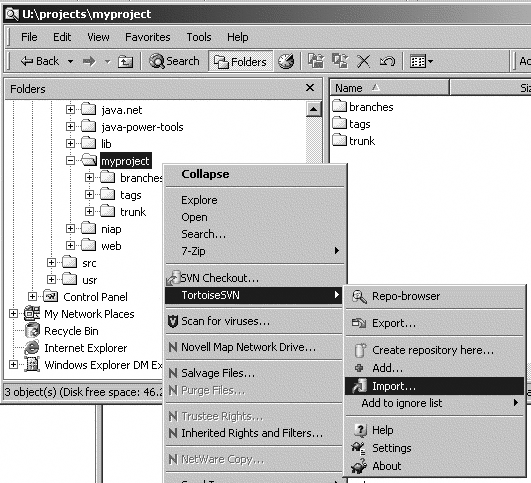
Arguably, one of the quirks of Subversion is that, once you have imported the project, you still need to checkout a working copy of your project to actually be able to do anything useful.[*] This is also the case when you are using TortoiseSVN. We look at how to do this using TortoiseSVN next in Obtaining a Working Copy.”
Obtaining a Working Copy
Once your project is safely stored in the Subversion repository, you need to obtain a working copy on your local machine. You can do this using the “TortoiseSVN→Checkout” menu option in the contextual menu. First, specify the URL of the Subversion repository you want to checkout (see Figure 4-30).
You need to specify the checkout directory, which is where the working copy will be created. This directory should be empty (or nonexistent). One common error is to try to check out into the directory that you just imported into Subversion. This is a bad idea for two reasons. First of all, it won’t work. Subversion will refuse to overwrite your existing files with its own versioned copies. Second, in most cases, you will probably want your working directory to be confined to the “trunk” directory, rather than having the whole directory structure, including the trunk, branches, and tags. It is easy enough to switch to other branches or tags later on using the “switch” command.
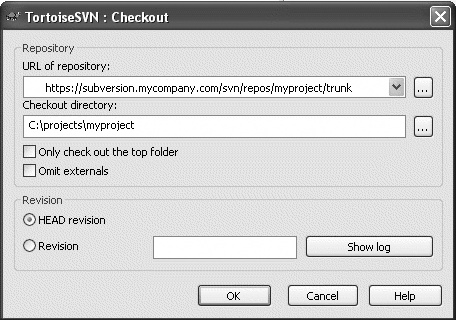
Committing Your Changes with TortoiseSVN
Once you have obtained a working copy, TortoiseSVN lets you use Subversion in an intuitive way, directly from the contextual menu. When you are ready to commit your changes, make sure your working copy is up-to-date with any recent changes committed by other developers (see Updating Your Working Copy,” later in this section). Then select the project directory in Explorer and choose the “SVN Commit” option in the contextual menu.
Committing changes is one of the places where TortoiseSVN makes life a lot easier, and it can help you to avoid many a silly mistake or forgotten file. Indeed, forgetting to commit (or update) a file is a very effective way to annoy fellow developers and interrupt their work with inexplicable compilation errors.
The TortoiseSVN commit dialog (see Figure 4-31) lists any modified files (including added or deleted ones) as well as any unversioned ones. It is a good idea to run through the unversioned files carefully before committing your changes, since this can often reveal files that should have been added to Subversion. If you find you have forgotten to add a file, just check the file in the list and it will be added during the commit.
Sometimes you will be unsure why a particular file appears in the list of modified files. If you are unsure of the changes made to a file, you can visualise the changes done using the Compare with base command, or display the history of modifications made by using Show log. If you think this file has been modified by mistake, you can always Revert back to the repository version.
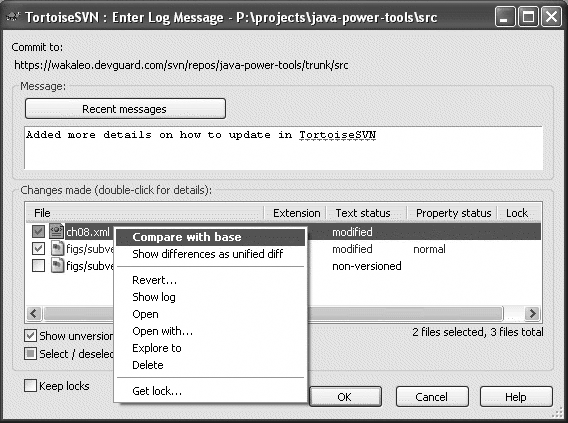
Finally, you should also include a (hopefully) meaningful message with your commit. TortoiseSVN provides a few nice features to help here, including a spellchecker and a list of previously used messages.
Updating Your Working Copy
Updating your working copy from the repository in TortoiseSVN is simple, just select the project directory in Explorer and select the “SVN Update” command in the contextual menu. Updated files are listed as they would be on the command line (see Working with Your Files), but with color-coding to highlight the nature of the changes: black for normally updated files, green for merges, purple for newly added files, dark red for deleted files, and bright red for conflicts.
Exploring the Repository
One nice feature in TortoiseSVN is the Repository Browser. This lets you explore the repository structure directly on the Subversion server without needing to check out any files (see Figure 4-32).
If you need to rename, create, or move directories, working directly on the Subversion server is considerably faster and easier than working with your local copy and committing your changes. The Repository Browser also lets you create new folders, delete or rename existing files or folders, or move files or folders using drag-and-drop.
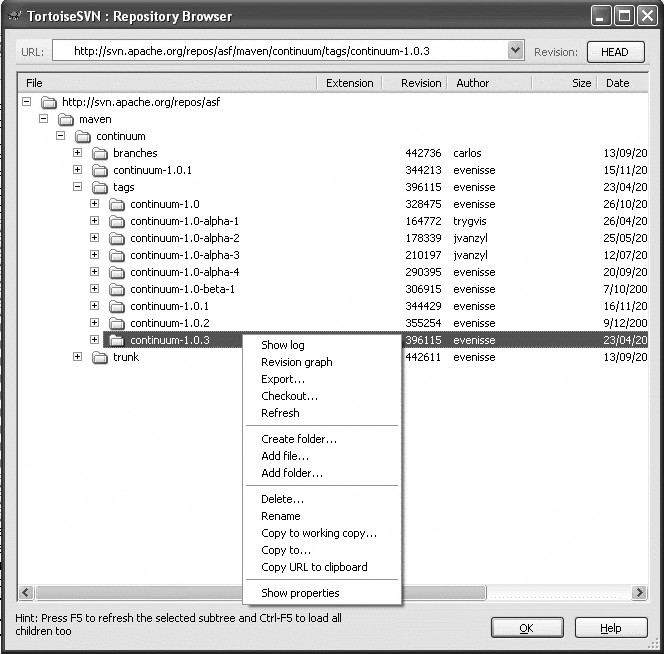
One thing that Subversion is not particularly good at doing is keeping track of the relationship between tags, branches and versions. In TortoiseSVN, you can use the revision graph to display a visual treelike representation of this structure (see Figure 4-33). You can display a revision graph in the Repository Browser, or directly from Explorer using “TortoiseSVN→Revision Graph….” The graph shows when branches or tags where added to (green boxes) or deleted from (red boxes) the main trunk, and lets you display details about a revision (author, date, log messages, and so on). If you select two revisions in the graph, you can also compare them, which is useful for comparing branches or releases.
The only inconvenient thing with revision graphs is speed. A revision graph is a complicated thing to build, requiring a fair bit of analysis by TortoiseSVN to sort out the links, and it can take some time to build for nontrivial projects, especially over a slow Internet connection. Exact times will obviously vary depending on project size, network speed, lunar cycles, and various other factors, but a large, remotely hosted open source project with over 11,000 revisions takes 15 minutes or so to process on my machine.
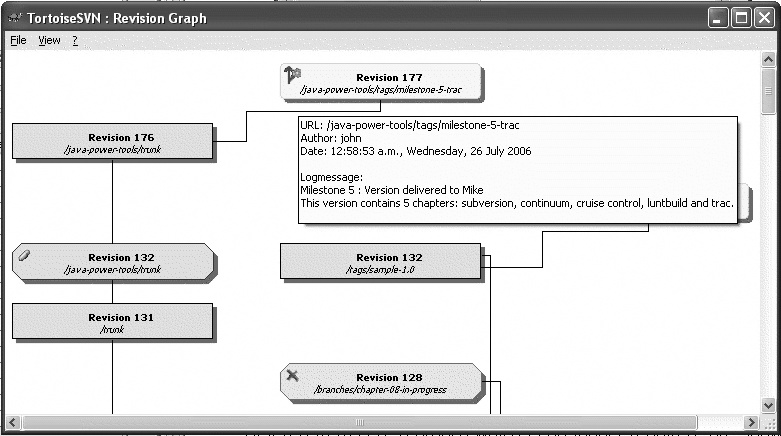
Defect Tracking and Change Control
Subversion, like many other similar tools, is often referred to as an SCM, or Software Configuration Management, tool. Strictly speaking, this is not the case. For people in the Configuration Management (CM) business, the term Software Configuration Management refers to solutions that provide, in addition to version control, features such as defect and change request tracking. These tools should be able to tell you which particular version of code fixed a particular bug (provided that the developers bother to mention this minor detail in their commit messages, of course).
Subversion has no built-in issue management solution as such. However, other issue management solutions do integrate well with Subversion. One good example is Trac (see Chapter 28), a wiki-like issue tracking system closely integrated with Subversion which lets you browse the Subversion repository, keep track of committed modifications, and create links to change sets or individual versions of files from within issues and project documentation.
Using Trac, you can browse the Subversion repository (see Figure 4-34), viewing not only the current version but also the revision history associated with each file or directory. You can also review at a glance the differences between different versions of a file. Intuitive hyperlinking makes navigating through the source code repository an easy task.
Issue tracking becomes a particularly powerful tool when you can associate tickets with version control change sets and with particular files in the version control system. For example, when a developer commits her corrections for a particular issue, she can record the corresponding change set and even links the affected files. Later on, when a QA staff member (or another developer) reviews this issue, she can easily visualize all the relevant information, included what version contains the corrected code, what were the developers comments, what files were affected, and even the exact changes made. All this information can be viewed from within the same web interface (see Figure 4-35).
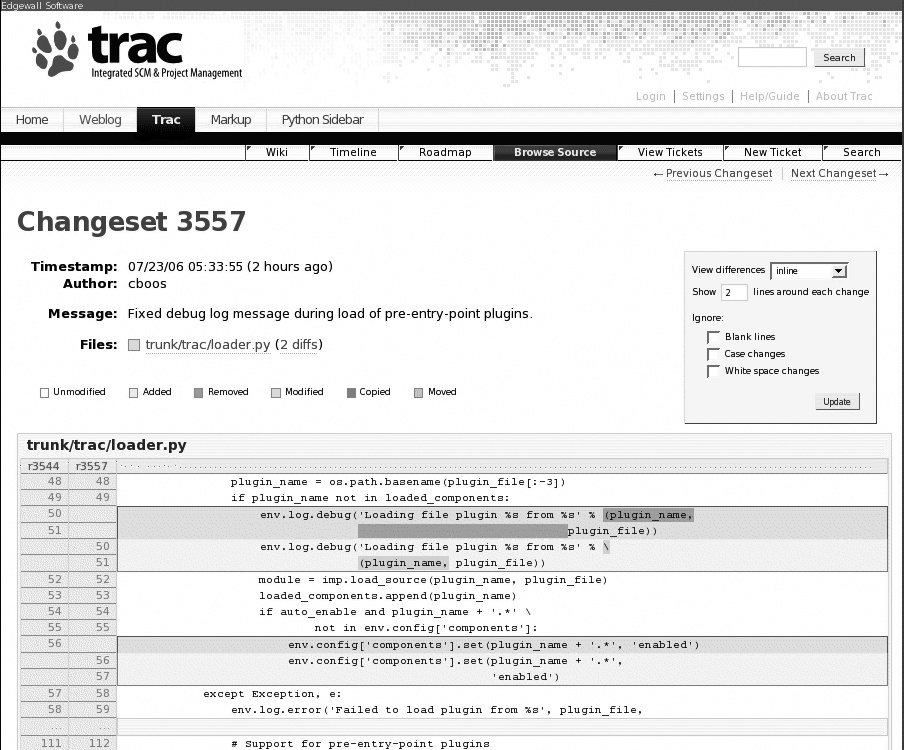
Using Subversion in Ant
There are times when you may want to access your Subversion repository from within your Ant script. For example, this can be useful when writing bootstrap scripts to set up a project environment. The <svn> task, developed by Tigris.org, allows you to do just that. So, without further ado, we will see how to install and use this plug-in in your Ant scripts.
Installing the <svn> Task
The <svn> task is not
part of the default Ant distribution: you have to download the latest
version from the Tigris.org web site.[*] Download and unzip the latest version. Now you need to declare
the <svn> task in your build file,
using the <taskdef> tag. For this
to work, Ant will need the appropriate JAR files: you can either add the JAR
files in the lib directory into your Ant
lib directory, or refer directly to these jars in the <taskdef> classpath, as shown
here:
    <taskdef name="svn" classname="org.tigris.subversion.svnant.SvnTask" >
        <classpath>
            <fileset dir="${svnant.home}/lib">
              <include name="**/*.jar"/>
            </fileset>
        </classpath>
    </taskdef>
Note that the <svn> task requires Subversion to be installed on the local machine; it will use either a native JNI library called JavaHL if it can find one, or use the command line directly.
The <svn> task lets you do almost anything you could do with Subversion from the command line (with the notable exception of the svn log command, which was not implemented at the time of writing). In SvnAnt, subversion commands are implemented as nested elements of the <svn> task, in a fairly intuitive way. In the rest of this section, we will go though how to perform a few common Subversion tasks with this library.
Checking Out a Project
A common requirement is to be able to check out the full source code of a project using a bootstrap script. This can make it easier for users to set up the project, without having to remember the details of where the repository is stored, what branch to check out, and so on. You can checkout a project to a local directory using the <checkout> option, as shown here:
      <svn username="${svn.username}" password="${svn.password}">
          <checkout url="http://svnserver.mycompany.com/svn/repos/myproject/trunk"
                    revision="HEAD"
                    destPath="myproject" />
      </svn>
Updating Code from the Repository
In Subversion, the svn update command updates your local project to match the latest version on the server. You can do the same thing in Ant using the <update> tag:
      <svn username="${svn.username}" password="${svn.password}">
          <update dir="${basedir}" />
      </svn>
Exporting a Directory Structure
In Subversion, the export command lets you download a “clean” copy of the project file structure, devoid of all those unsightly “.svn” directories. This is useful when you are preparing a distribution containing source code, for example:
      <svn username="${svn.username}" password="${svn.password}">
          <export srcUrl="http://svnserver.mycompany.com/svn/repos/myproject/trunk"
                  revision="HEAD"
                  destPath="export"/>
      </svn>
You can also use the srcPath attribute instead of srcUrl to specify the physical directory path of the repository.
Creating a New Tag
In a build process, it is sometimes useful to be able to automate the process of building, deploying, and tagging a new release. In Subversion, tagging a particular revision essentially involves making a new lightweight copy of that revision (see Using Tags, Branches, and Merges). With SvnAnt, you can use the <copy> tag to do this directly from within the build process. In the following example, we create a new tag for a nightly snapshot, and then proceed to build and deploy this tag:
<target name="nightly-release">
<!-- Tag current build -->
<tstamp />
<svn username="john" password="srr&srb">
<copy srcUrl="http://svnserver.mycompany.com/svn/repos/myproject/trunk"
revision="HEAD"
destUrl="http://svnserver.mycompany.com/svn/repos/myproject/tags
/myproject-snapshot-${DSTAMP}-${TSTAMP}"
message="Nightly build"/>
</svn>
<!-- Build and deploy nightly release using this tag -->
...
</target> Conclusion
As far as open source version control solutions go, Subversion is an excellent choice. It is modern and efficient by design, and some of its features, such as atomic updates, and optimized network traffic, place it technically ahead of many well-known commercial solutions. It integrates well with both Eclipse and NetBeans. Subversion is well documented, particularly for an open source product. Subversion’s main weakness lies in tracking branches and merges, which it does not handle by itself; you need to do this yourself by carefully tracking your merges in the log messages. This can be a downer for big projects and/or undisciplined developers.[*] Nevertheless, it is used by the open source community for many very large projects, and it is arguably one of the best, if not the best, open source version control tool.
[4] Version Control tools such as Subversion, CVS, ClearCase, and so forth are often referred to as SCM (Software Configuration Management) tools. Strictly speaking, most of these tools are actually Version Control tools. Configuration Management is a broader topic, including defect and change control and tracking, traceability, and so on.
[*] Pronounced “Fuzz-Fuzz,” according to people who should know.
[*] I’ll be using the Unix file syntax for the rest of the chapter. If you are working on a Windows machine, just replace “file:///data/svn/dev-repos” with “file:///c:/data/svn/dev-repos” (with forwardslashes, not backslashes).
[*] *It was John Donne, actually, but this is not particularly relevant for the subject under discussion.
[*] In Subversion, HEAD indicates the latest (most recent) version on the server.
[*] In fact, this is actually quite logical: you generally import your entire directory structure, branches, tags, and all, whereas your working copy is usually confined to the trunk directory.
[*] This is true of Subversion 1.4. The upcoming release, Subversion 1.5, comes with powerful support for merge tracking, which rectifies most if not all of these issues.…
Get Java Power Tools now with the O’Reilly learning platform.
O’Reilly members experience books, live events, courses curated by job role, and more from O’Reilly and nearly 200 top publishers.

