The Syntax Breakdown
Before we consider any code, it might be a good idea to get a visual sense of the program flow. Figure 5.5 illustrates the basic flow from beginning to end. Basically, you begin by creating your image form and setting the specs for each rollover. Then you can toggle back and forth between previewing, making changes, and generating the code. When you see what you like, copy and paste the generated code.
ImageMachine has three files: a frameset page and two content pages.
The frameset is named index.html, and contains
files nav.html and
base.html. index.html has
neither JavaScript nor any surprises. Brace yourself; here are all
nine staggering lines, shown in Example 5.1.
Example 5-1. index.html
     1  <HTML>
     2  <HEAD>
     3  <TITLE>ImageMachine</TITLE>
     4  </HEAD>
     5  <FRAMESET ROWS="105, *" FRAMEBORDER="0" BORDER="0">
     6    <FRAME SRC="nav.html" NAME="nav" SCROLLING=NO>
     7    <FRAME SRC="base.html" NAME="base">
     8    </FRAMESET>
     9  </HTML>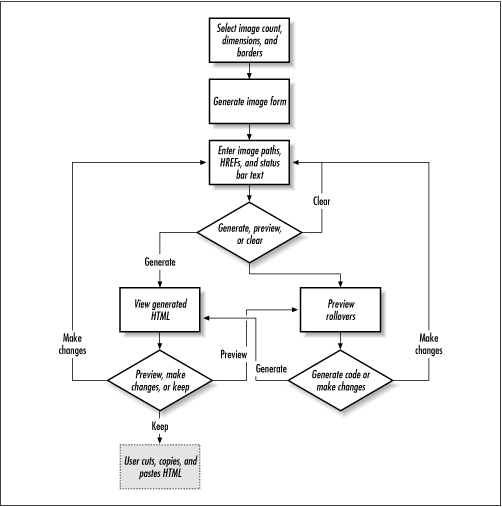
Figure 5-5. The ImageMachine logic
If you look at base.html, you’ll see more
static HTML. Before we get to nav.html, shown in
Example 5.2, it’s important to understand a
few things about the code you’re about to see. It’s long
(400+ lines) and somewhat hard to read, but not all that complicated.
Example 5-2. nav.html
1 <HTML> 2 <HEAD> 3 <TITLE>ImageMachine</TITLE> 4 <SCRIPT LANGUAGE="JavaScript1.2"> 5 6 var platform = navigator.platform; 7 var lb ...
Get JavaScript Application Cookbook now with the O’Reilly learning platform.
O’Reilly members experience books, live events, courses curated by job role, and more from O’Reilly and nearly 200 top publishers.

