Chapter 4. Configuring Your Jenkins Server
Introduction
Before you can start creating your build jobs in Jenkins, you need to do a little configuration, to ensure that your Jenkins server works smoothly in your particular environment. Jenkins is highly configurable, and, although most options are provided with sensible default values, or are able to find the right build tools in the system path and environment variables, it is always a good idea to know exactly what your build server is doing.
Jenkins is globally very easy to configure. The administration screens are intuitive, and the contextual online help (the blue question mark icons next to each field) is detailed and precise. In this chapter, we will look at how to configure your basic server setup in detail, including how to configure Jenkins to use different versions of Java, build tools such as Ant and Maven, and SCM tools such as CVS and Subversion. We will look at more advanced server configuration, such as using other version control systems or notification tools, further on in the book.
The Configuration Dashboard—The Manage Jenkins Screen
In Jenkins, you manage virtually all aspects of system configuration in the Manage Jenkins screen (see Figure 4-1). You can also get to this screen directly from anywhere in the application by typing “manage” in the Jenkins search box. This screen changes depending on what plugins you install, so don’t be surprised if you see more than what we show here.
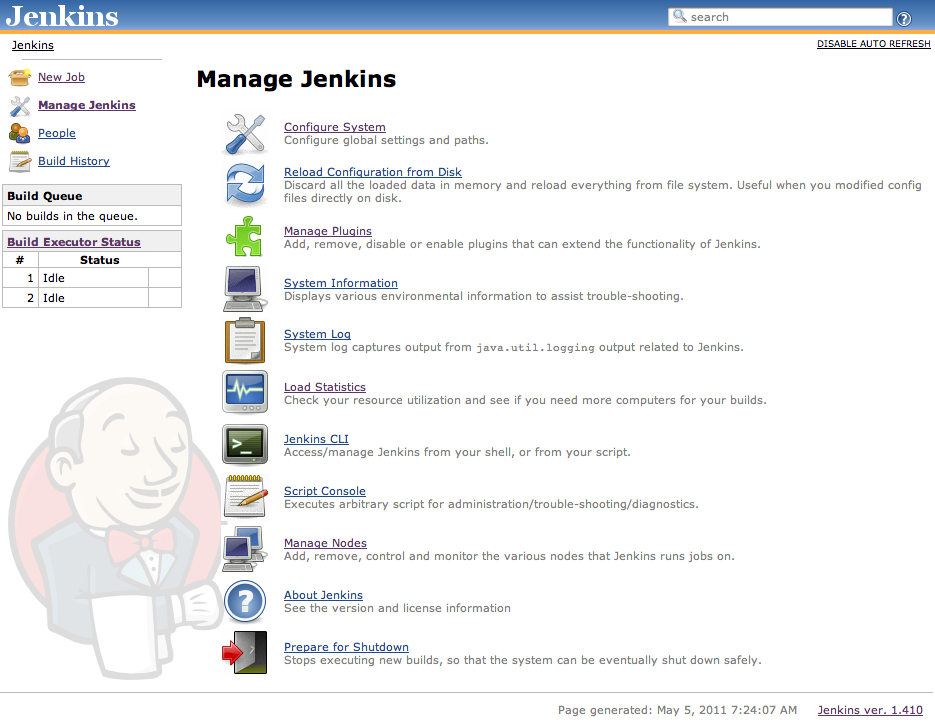
This screen lets you configure different aspects of your Jenkins server. Each link on this page takes you to a dedicated configuration screen, where you can manage different parts of the Jenkins server. Some of the more interesting options are discussed here:
- Configure System
This is where you manage paths to the various tools you use in your builds, such as JDKs, and versions of Ant and Maven, as well as security options, email servers, and other system-wide configuration details. Many of the plugins that you install will also need to be configured here—Jenkins will add the fields dynamically when you install the plugins.
- Reload Configuration from Disk
As we saw in the previous chapter, Jenkins stores all its system and build job configuration details as XML files stored in the Jenkins home directory (see The Jenkins Home Directory). It also stores all of the build history in the same directory. If you are migrating build jobs from one Jenkins instance to another, or archiving old build jobs, you will need to add or remove the corresponding build job directories to Jenkins’s builds directory. You don’t need to take Jenkins offline to do this—you can simply use the “Reload Configuration from Disk” option to reload the Jenkins system and build job configurations directly. This process can be a little slow if there is a lot of build history, as Jenkins loads not only the build configurations but also all of the historical data as well.
- Manage Plugins
One of the best features of Jenkins is its extensible architecture. There is a large ecosystem of third-party open source plugins available, enabling you to add extra features to your build server, from support for different SCM tools such as Git, Mercurial or ClearCase, to code quality and code coverage metrics reporting. We will be looking at many of the more popular and useful plugins throughout this book. Plugins can be installed, updated and removed through the Manage Plugins screen. Note that removing plugins needs to be done with some care, as it can sometimes affect the stability of your Jenkins instance—we will look at this in more detail in Migrating Build Jobs.
- System Information
This screen displays a list of all the current Java system properties and system environment variables. Here, you can check exactly what version of Java Jenkins is running in, what user it is running under, and so forth. You can also check that Jenkins is using the correct environment variable settings. Its main use is for troubleshooting, so that you can make sure that your server is running with the system properties and variables you think it is.
- System Log
The System Log screen is a convenient way to view the Jenkins log files in real time. Again, the main use of this screen is for troubleshooting.
You can also subscribe to RSS feeds for various levels of log messages. For example, as a Jenkins administrator, you might want to subscribe to all the ERROR and WARNING log messages.
- Load Statistics
Jenkins keeps track of how busy your server is in terms of the number of concurrent builds and the length of the build queue (which gives an idea of how long your builds need to wait before being executed). These statistics can give you an idea of whether you need to add extra capacity or extra build nodes to your infrastructure.
- Script Console
This screen lets you run Groovy scripts on the server. It is useful for advanced troubleshooting: since it requires a strong knowledge of the internal Jenkins architecture, it is mainly useful for plugin developers and the like.
- Manage Nodes
Jenkins handles parallel and distributed builds well. In this screen, you can configure how many builds you want. Jenkins runs simultaneously, and, if you are using distributed builds, set up build nodes. A build node is another machine that Jenkins can use to execute its builds. We will look at how to configure distributed builds in detail in Chapter 11.
- Prepare for Shutdown
If you need to shut down Jenkins, or the server Jenkins is running on, it is best not to do so when a build is being executed. To shut down Jenkins cleanly, you can use the Prepare for Shutdown link, which prevents any new builds from being started. Eventually, when all of the current builds have finished, you will be able to shut down Jenkins cleanly.
We will come back to some of these features in more detail later on in the book. In the following sections, we will focus on how to configure the most important Jenkins system parameters.
Configuring the System Environment
The most important Jenkins administration page is the Configure System screen (Figure 4-2). Here, you set up most of the fundamental tools that Jenkins needs to do its daily work. The default screen contains a number of sections, each relating to a different configuration area or external tool. In addition, when you install plugins, their system-wide configuration is also often done in this screen.
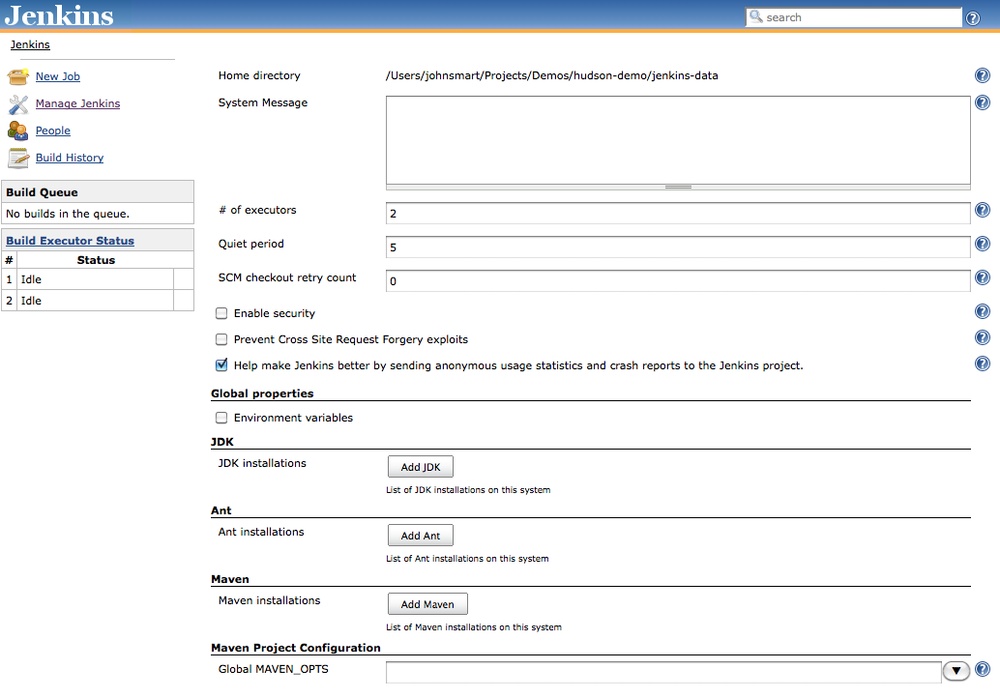
The Configure System screen lets you define global parameters for your Jenkins installation, as well as external tools required for your build process. The first part of this screen lets you define some general system-wide parameters.
The Jenkins home directory is displayed, for reference. This way, you
can check at a glance that you are working with the home directory that
you expect. Remember, you can change this directory by setting
the JENKINS_HOME environment
variable in your environment (see The Jenkins Home Directory).
The System Message field is useful for several purposes. This text is displayed at the top of your Jenkins home page. You can use HTML tags, so it is a simple way to customize your build server by including the name of your server and a short blurb describing its purpose. You can also use it to display messages for all users, such as to announce system outages and so on.
The Quiet Period is useful for SCM tools like CVS that commit file changes one by one, rather than grouped together in a single atomic transaction. Normally, Jenkins will trigger a build as soon as it detects a change in the source repository. However, this doesn’t suit all environments. If you are using an SCM tool like CVS, you don’t want Jenkins kicking off a build as soon as the first change comes in, as the repository will be in an inconsistent state until all of the changes have been committed. You can use the Quiet Period field to avoid issues like this. If you set a value here, Jenkins will wait until no changes have been detected for the specified number of seconds before triggering the build. This helps to ensure that all of the changes have been committed and the repository is in a stable state before starting the build.
For most modern version control systems, such as Subversion, Git or Mercurial, commits are atomic. This means that changes in multiple files are submitted to the repository as a single unit, and the source code on the repository is guaranteed to be in a stable state at all times. However, some teams still use an approach where one logical change set is delivered in several commit operations. In this case, you can use the Quiet Period field to ensure that the build always uses a stable source code version.
The Quiet Period value specified here is in fact the default system-wide value—if required, you can redefine this value individually for each project.
You also manage user accounts and user rights here. By default, Jenkins lets any user do anything. If you want a more restrictive approach, you will need to activate Jenkins security here using the Enable Security field. There are many ways to do this, and we look at this aspect of Jenkins later on (see Chapter 7).
Configuring Global Properties
The Global Properties (see Figure 4-3) section lets you define
variables that can be managed centrally but used in all of your build
jobs. You can add as many properties as you want here, and use them in
your build jobs. Jenkins will make them available within your build job
environment, so you can freely use them within your Ant and Maven build
scripts. Note that you shouldn’t put periods (“.”) in the property names,
as they won’t be processed correctly. So ldapserver or ldap_server is fine, but not ldap.server.
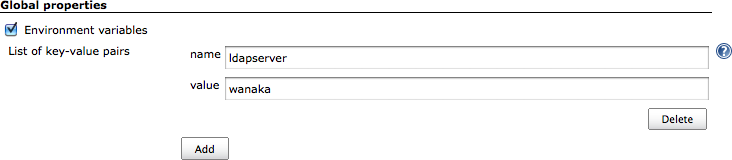
There are two ways you typically use these variables. Firstly, you
can use them directly in your build script, using the ${key} or $key notation (so ${ldapserver} or $ldapserver in the example given above. This is
the simplest approach, but means that there is a tight coupling between
your build job configuration and your build scripts.
If your script uses a different property name (one containing dots,
for example), you can also pass the value to your build script in the
build job configuration. In Figure 4-4 we pass the ldapserver property value defined in Figure 4-3 to a Maven build job. Using
the -D option means that this value
will be accessible from within the build script. This is a flexible
approach, as we can assign the global properties defined within Jenkins to
script-specific variables in our build scripts. In Figure 4-4, for example, the ldapserver property will be available from
within the Maven build via the internal ${ldap.server}
property.

Configuring Your JDKs
Historically, one of the most common uses of Jenkins has been to build Java applications. So Jenkins naturally provides excellent built-in support for Java.
By default, Jenkins will build Java applications using whatever version of Java it finds on the system path, which is usually the version that Jenkins itself is running under. However, for a production build server, you will probably want more control than this. For example, you may be running your Jenkins server under Java 6, for performance reasons. However, your production server might be running under Java 5 or even Java 1.4. Large organizations are often cautious when it comes to upgrading Java versions in their production environments, and some of the more heavyweight application servers on the market are notoriously slow to be certified with the latest JDKs.
In any case, it is always a wise practice to build your application using a version of Java that is close to the one running on your production server. While an application compiled with Java 1.4 will usually run fine under Java 6, the inverse is not always true. Or you may have different applications that need to be built using different versions of Java.
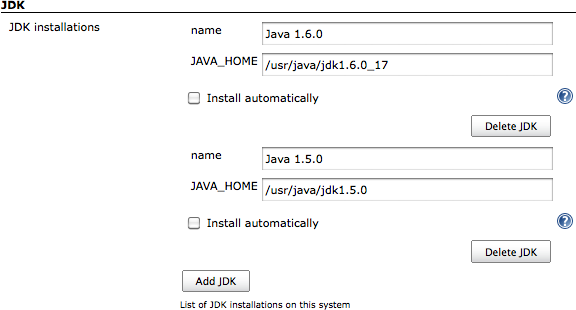
Jenkins provides good support for working with multiple JVMs. Indeed, Jenkins makes it very easy to configure and use as many versions of Java as you want. Like most system-level configuration, we do this in the Configure System screen (see Figure 4-2). Here, you will find a section called JDK which allows you to manage the JDK installations you need Jenkins to work with.
The simplest way to declare a JDK installation is simply to supply
an appropriate name (which will be used to identify this Java installation
later on when you configure your builds), along with the path to the Java
installation directory (the same path you would use for the JAVA_HOME variable), as
shown in Figure 4-5. Although you need to type
the path manually, Jenkins will check in real time both that the directory
exists and that it looks like a valid JDK directory.
You can also ask Jenkins to install Java for you. In this case, Jenkins will download the JDK installation and install a copy on your machine (see Figure 4-6). The first time a build needs to use this JDK, Jenkins will download and install the specified version of Java into the tools directory in the Jenkins home directory. If the build is running on a new build agent that doesn’t have this JDK installed, it will download and install it onto the build agent machine as well.
This is also a great way to configure build agents. As we’ll see later on in the book, Jenkins can delegate build jobs to other machines, or build agents. A build agent (or “slave”) is simply another computer that Jenkins can use to run some of its builds. If you use Jenkins’s Install automatically option, you don’t need to manually install all the JDK versions you need on the build agent machines—Jenkins will do it for you the first time it needs to.
By default, Jenkins proposes to download the JDK from the Oracle website. If your Jenkins installation is behind a proxy server, you may need to configure your proxy settings to ensure that Jenkins can access the external download sites (see Configuring a Proxy). Another option is to provide a URL pointing to your own internal copy of the JDK binaries (either in the form of a ZIP or a GZip-compressed TAR file), stored on a local server within your organization. This lets you provide standard installations on a local server and makes for faster automatic installations. When you use this option, Jenkins also lets you specify a label, which will restrict the use of this installation to the build notes with this label. This is a useful technique if you need to install a specific version of a tool on certain build machines. The same approach can also be used for other build tools (such as Maven and Ant).
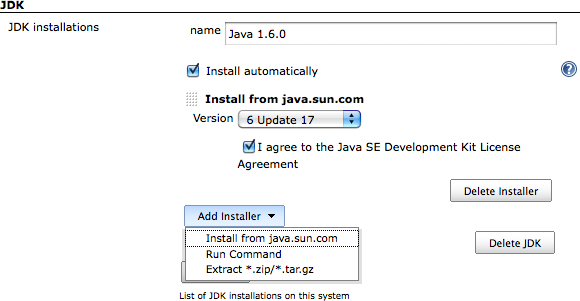
The automatic installer will not work in all environments (if it can’t find or identify your operating system to its satisfaction, for example, the installation will fail), but it is nevertheless a useful and convenient way to set up new build servers or distributed build agents in a consistent manner.
Configuring Your Build Tools
Build tools are the bread-and-butter of any build server, and Jenkins is no exception. Out of the box, Jenkins supports three principal build tools: Ant, Maven, and the basic shell-script (or Batch script in Windows). Using Jenkins plugins, you can also add support for other build tools and other languages, such as Gant, Grails, MSBuild, and many more.
Maven
Maven is a high-level build scripting framework for Java that uses notions such as a standard directory structure and standard life cycles, Convention over Configuration, and Declarative Dependency Management to simplify a lot of the low-level scripting that you find in a typical Ant build script. In Maven, your project uses a standard, well-defined build life cycle—compile, test, package, deploy, and so forth. Each life cycle phase is associated with a Maven plugin. The various Maven plugins use the standard directory structure to carry out these tasks with a minimum of intervention on your part. You can also extend Maven by overriding the default plugin configurations or by invoking additional plugins.
Jenkins provides excellent support for Maven, and has a good understanding of Maven project structures and dependencies. You can either get Jenkins to install a specific version of Maven automatically (as we are doing with Maven 3 in the example), or provide a path to a local Maven installation (see Figure 4-7). You can configure as many versions of Maven for your build projects as you want, and use different versions of Maven for different projects.
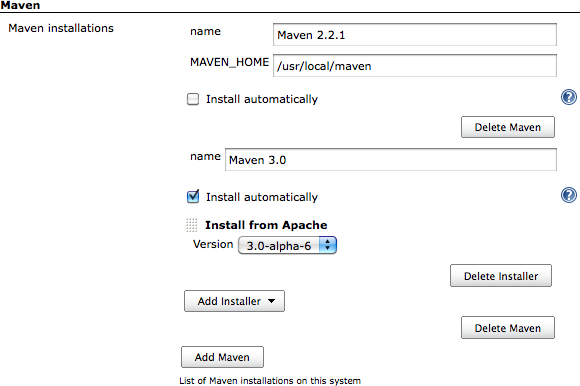
If you tick the Install automatically checkbox, Jenkins will download and install the requested version of Maven for you. You can either ask Jenkins to download Maven directly from the Apache site, or from a (presumably local) URL of your choice. This is an excellent choice when you are using distributed builds, and, since Maven is cross-platform, it will work on any machine. You don’t need to install Maven explicitly on each build machine—the first time a build machine needs to use Maven, it will download a copy and install it to the tools directory in the Jenkins home directory.
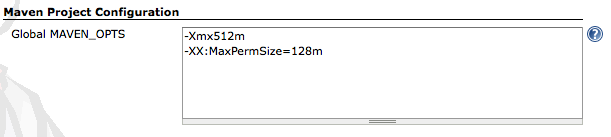
Sometimes you need to pass Java system options to your Maven build
process. For instance it is often useful to give Maven a bit of extra
memory for heavyweight tasks such as code coverage or site generation.
Maven lets you do this by setting the MAVEN_OPTS variable.
In Jenkins, you can set a system-wide default value, to be used across
all projects (see Figure 4-8). This comes
in handy if you want to use certain standard memory options (for
example) across all projects, without having to set it up in each
project by hand.
Ant
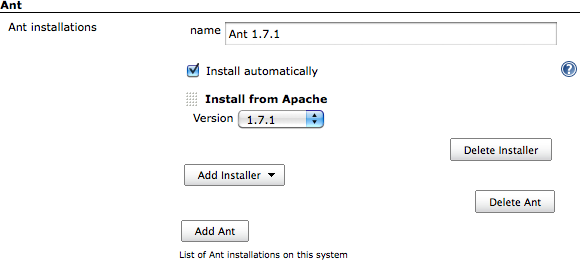
Ant is a widely-used and very well-known build scripting language for Java. It is a flexible, extensible, relatively low-level scripting language, used in a large number of open source projects. An Ant build script (typically called build.xml) is made up of a number of targets. Each target performs a particular job in the build process, such as compiling your code or running your unit tests. It does so by executing tasks, which carry out a specific part of the build job, such as invoking javac to compile your code, or creating a new directory. Targets also have dependencies, indicating the order in which your build tasks need to be executed. For example, you need to compile your code before you can run your unit tests.
Jenkins provides excellent build-in support for Ant—you can invoke Ant targets from your build job, providing properties to customize the process as required. We look at how to do this in detail later on in this book.
If Ant is available on the system path, Jenkins will find it. However, if you want to know precisely what version of Ant you are using, or if you need to be able to use several different versions of Ant on different build jobs, you can configure as many installations of Ant as required (see Figure 4-9). Just provide a name and installation directory for each version of Ant in the Ant section of the Configure System screen. You will then be able to choose what version of Ant you want to use for each project.
If you tick the Install automatically checkbox, Jenkins will download and install Ant into the tools directory of your Jenkins home directory, just like it does for Maven. It will download an Ant installation the first time a build job needs to use Ant, either from the Apache website or from a local URL. Again, this is a great way to standardize build servers and make it easier to add new distributed build servers to an existing infrastructure.
Shell-Scripting Language
If you are running your build server on Unix or Linux, Jenkins lets you insert shell scripts into your build jobs. This is handy for performing low-level, OS-related tasks that you don’t want to do in Ant or Maven. In the Shell section, you define the default shell that will be used when executing these shell scripts. By default, this is /bin/sh, but there are times you may want to modify this to another command interpreter such as bash or Perl.
In Windows, the Shell section does not apply—you use Windows batch scripting instead. So, on a Windows build server, you should leave this field blank.
Configuring Your Version Control Tools
Jenkins comes preinstalled with plugins for CVS and Subversion. Other version control systems are supported by plugins that you can download from the Manage Plugins screen.
Configuring Subversion
Subversion needs no special configuration, since Jenkins uses native Java libraries to interact with Subversion repositories. If you need to authenticate to connect to a repository, Jenkins will prompt you when you enter the Subversion URL in the build job configuration.
Configuring CVS
CVS needs little or no configuration. By default, Jenkins will look for tools like CVS on the system path, though you can provide the path explicitly if it isn’t on the system path. CVS keeps login and password details in a file called .cvspass, which is usually in your home directory. If this is not the case, you can provide a path where Jenkins can find this file.
Configuring the Mail Server
The last of the basic configuration options you need to set up is the email server configuration. Email is Jenkins’s more fundamental notification technique—when a build fails, it will send an email message to the developer who committed the changes, and optionally to other team members as well. So Jenkins needs to know about your email server (see Figure 4-10).
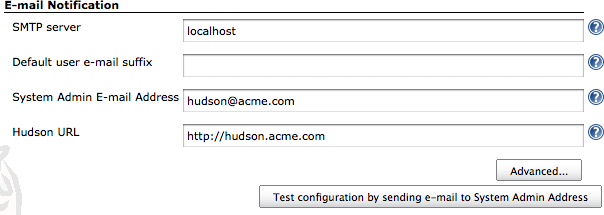
The System Admin email address is the address from which the notification messages are sent. You can also use this field to check the email setup—if you click on the Test configuration button, Jenkins will send a test email to this address.
In many organizations, you can derive a user’s email address from their login by adding the organization domain name. For example, at ACME, user John Smith will have a login of “jsmith” and an email address of “jsmith@acme.com”. If this extends to your version control system, Jenkins can save you a lot of configuration effort in this area. In the previous example, you could simply specify the default user email suffix of acme.com and Jenkins will figure out the rest.
You also need to provide a proper base URL for your Jenkins server (one that does not use localhost). Jenkins uses this URL in the email notifications so that users can go directly from the email to the build failure screen on Jenkins.
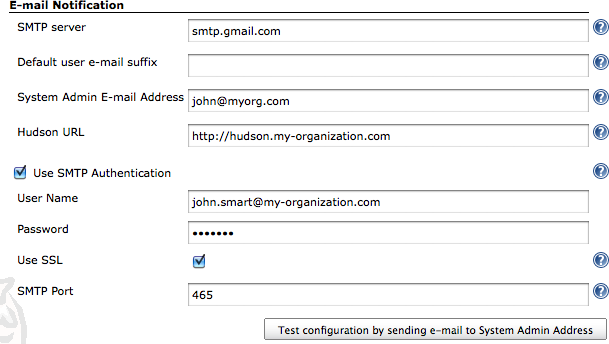
Jenkins also provides for more sophisticated email configuration, using more advanced features such as SMTP authentication and SSL. If this is your case, click on the Advanced button to configure these options.
For example, many organizations use Google Apps for their email services. You can configure Jenkins to work with the Gmail service as shown in Figure 4-11. All you need to do in this case is to use the Gmail SMTP server, and provide your Gmail username and password in the SMTP Authentication (you also need to use SSL and the non-standard port of 465).
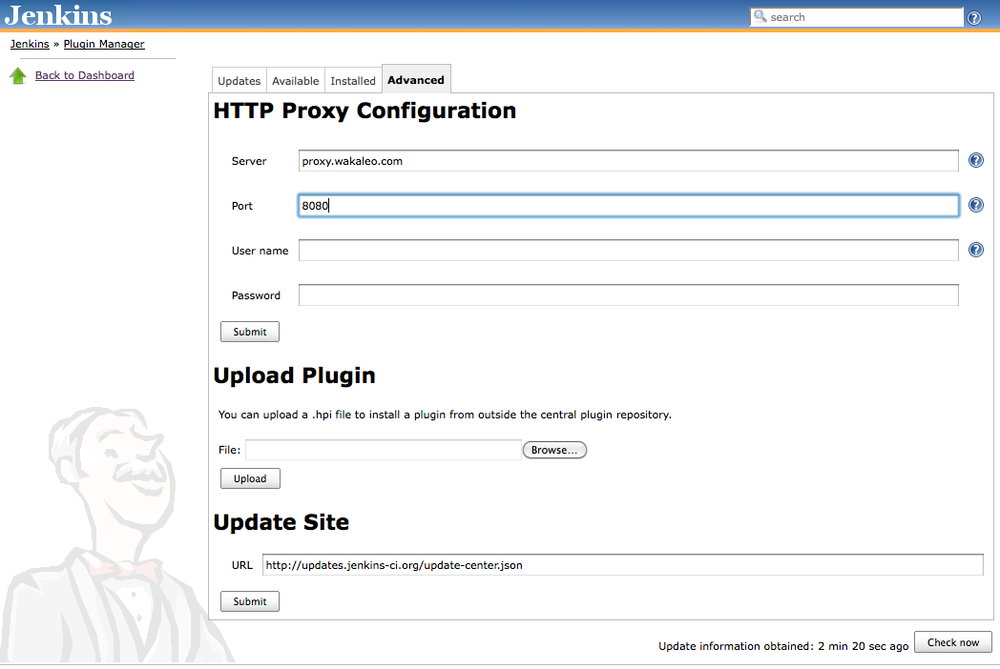
Configuring a Proxy
In most enterprise environments, your Jenkins server will be situated behind a firewall, and will not have direct access to the Internet. Jenkins needs Internet access to download plugins and updates, and also to install tools such as the JDK, Ant and Maven from remote sites. If you need to go through an HTTP proxy server to get to the Internet, you can configure the connection details (the server and port, and if required the username and password) in the Advanced tab on the Plugin Manager screen (see Figure 4-12).
If your proxy is using Microsoft’s NTLM authentication scheme, then you will need to provide a domain name as well as a username. You can place both in the User name field: just enter the domain name, followed by a back-slash (\), followed by the username, such as “MyDomain\Joe Bloggs”.
Finally, if you are setting up Proxy access on your Jenkins build server, remember that all of the other tools running on this server will need to know about the proxy as well. In particular, this may include tools such as Subversion (if you are accessing an external repository) and Maven (if you are not using an Enterprise Repository Manager).
Conclusion
You don’t need a great deal of configuration to get started with Jenkins. The configuration that is required is fairly straightforward, and is centralised in the Configure System screen. Once this is done, you are ready to create your first Jenkins build job!
Get Jenkins: The Definitive Guide now with the O’Reilly learning platform.
O’Reilly members experience books, live events, courses curated by job role, and more from O’Reilly and nearly 200 top publishers.

