EX4200 switches support clustering of up to ten 4200 chassis into a single Virtual Chassis (VC), which provides significant High Availability (HA) benefits in addition to simplified network management. VC capabilities are included in the base 4200 model. A VC can be built incrementally, which means you can grow the VC by adding one or more switch chassis at any time, until the 10-chassis limit is reached, and you can mix and match any EX4200 model as part of the same VC. This capability means an enterprise can start at a modest scale with a single 4200 chassis, and then expand into a full-blown VC offering a local switching capacity of 1.36 Tbps/1.01 Bpps, with 128 Gbps of throughput for switching within the VC.
The topics covered in this chapter include:
EX VC operation and deployment designs
Configuration, operation, and maintenance
VC deployment case study
The EX4200 VC is an exciting concept. By simply attaching a few rear-panel cables, you can turn any mix of 10 standalone 4200s into a single logical entity that both simplifies management and increases resiliency to hardware- and software-related faults.
The individual member switches comprising a VC can be any type of EX4200, with any mix of supported power supply units (PSUs), Power over Ethernet (PoE) options, and uplink modules. A fully blown VC can offer 480×1 GE and 20×10 GE ports with 128 Gbps of full duplex (FD) switching capacity between any pair of adjacent nodes. When desired, you can use ports on either the 2×10 GE or 4×1 GE uplink modules to form a VC Extension (VCE), which, as its name implies, supports extended distances (up to 400 meters) between VC members.
Here are some key VC capabilities and functional highlights:
You can interconnect from 2 to 10 EX4200s to operate as though they are a single chassis.
Management is simplified via a single management interface, a common JUNOS software version, a single configuration file, and an intuitive chassis-like slot and module/port interface numbering scheme.
The design is simplified through a single control plane and the ability to aggregate interfaces across VC members.
Increased availability and reliability is available through N:1 redundant routing engines. Also, JUNOS supports Graceful Restart, Graceful Routing Engine Switchover, and Non-Stop Routing (GR, GRES, and NSR).
Performance and flexibility accommodate a grow-as-you-go design with no upfront investment in costly chassis hardware.
At this time, Link Aggregation Control Protocol (LACP)/aggregated Ethernet (AE) across multiple VCs is not supported. Member links of a bundled interface can be housed in different switch members within a VC, however.
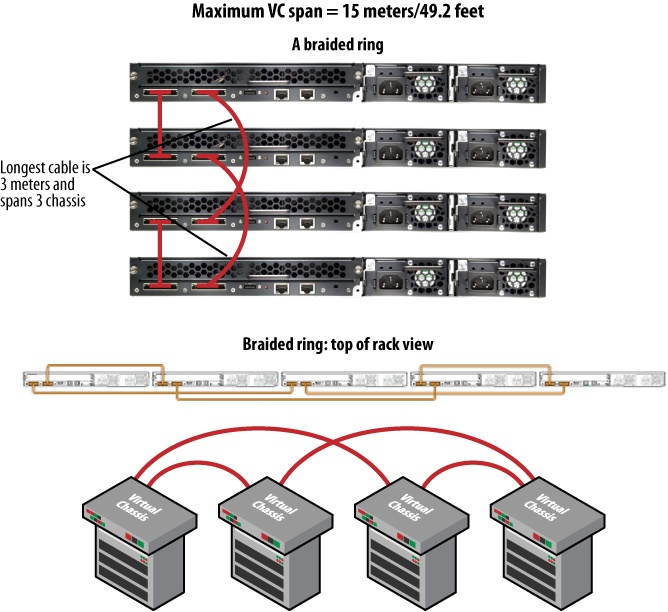
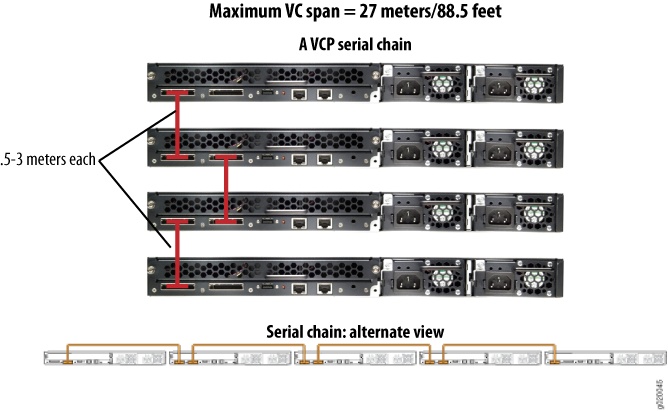
Each EX4200 ships with a .5-meter Virtual Chassis Port (VCP) cable; VCP cables are also available in 1- and 3-meter lengths. This 3-meter length limit is the only restriction on physical member placement, and with some of the creative cabling schemes discussed later, a VCP ring can be built spanning some 13.5 meters (~44 feet), which is quite a respectable distance and more than suitable for a typical top-of-rack deployment scenario. A VC design based on a chain extends this distance to some 27 meters (88.5 feet), but such a design comes at the cost of a 50% reduction in VC trunk bandwidth and reduced reliability, as there is no tolerance for single VCP cable faults in such an arrangement.
Note
The VCP cables use a 68-pin connector and are considered proprietary, and therefore are available only through Juniper Networks and its authorized resellers. The user manual provides pin outs for the VCP cables, however.
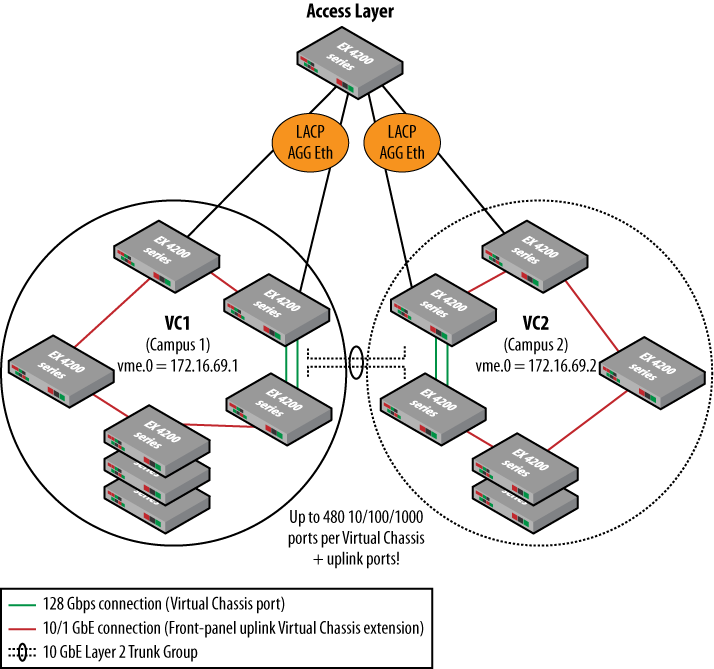
Interchassis distances greater than 6 meters require use of a VCE, which has the disadvantages of requiring uplink module hardware, and the resulting reduction in trunk capacity, as determined by the speed of the uplink module used (e.g., 20 Gbps with 2×10 GE or 2 Gbps with 2×1 GE ports). Currently, the maximum supported VCE distance is 500 meters. Figure 4-1 illustrates these key VC capabilities.
Figure 4-1 shows two EX4200 VCs. Within each VC, some switches are not collocated, hence the use of both VCP ring cabling and VCEs to tie in the remote switches to the main VC location. The VCEs could be 10 GE or 1 GE front-panel uplinks, and uplink speed can be mixed and matched within a single VC. In this example, the two VCs are interconnected using a Layer 2 Redundant Trunk Group (RTG), which is a Juniper proprietary link redundancy scheme that provides rapid failover convergence without the need for Spanning Tree Protocol (STP) given its primary/forwarding/secondary blocking operation. An RTG is similar in functionality to Cisco’s flexlink feature. If desired, you can define an AE link to add additional inter-VC bandwidth, but depending on interconnection specifics, STP may be required to prevent loops.
A key aspect of Figure 4-1 is that each VC is associated with a single virtual management IP address that represents the entire VC cluster, thereby greatly simplifying network management. Lastly, note that an access layer switch is shown being dual-homed to each VC using an AE bundle. Such an AE link can contain from two to eight members, yielding as much as 80 Gbps, with added redundancy, as the Ethernet bundle can survive the loss of individual member links until the minimum link threshold is crossed; the minimum number of member links can be set to the range of 1 to 8 inclusive.
Note
Getting the 80 Gbps aggregated link mentioned previously on an EX4200 requires use of a four-node VC, with each member having a 2×10 GE uplink module. Recall that an AE bundle can span members within a chassis, allowing you to define an eight-member bundle that uses both 10 GE uplink ports on all four members. For large-scale 10 GE aggregation scenarios, consider an MX platform.
Also, note that each VC member can contain an uplink module, yielding a maximum of forty 1 GE or twenty 10 GE uplink ports per VC, in addition to the 480 GE ports supported in a single VC (each of the 10 member chassis can support 48 front-panel GE ports).
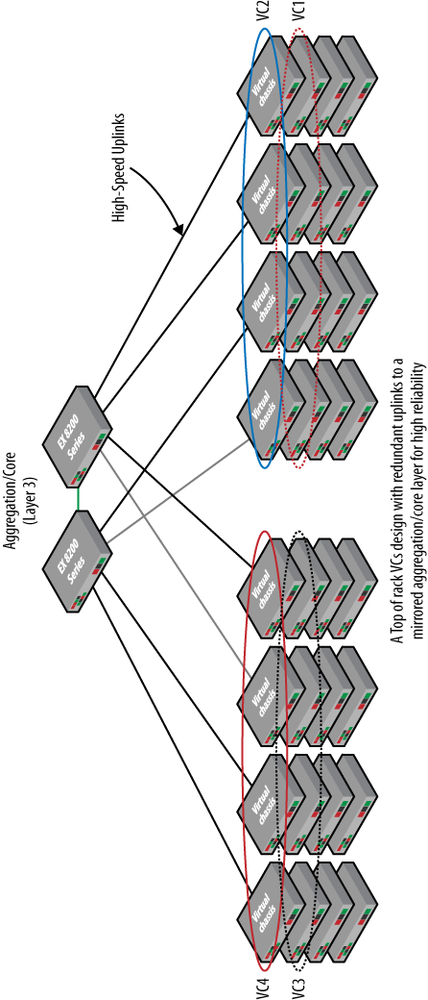
Figure 4-2 provides another VC deployment example.
Figure 4-2 shows a dual-VC design based on a top-of-rack deployment scenario. In this example, the access layer VCs are in turn dual-homed into a redundant aggregation/core layer to eliminate single points of failure (assumes redundant power feeds) for maximum reliability and uptime. The single IP address used to manage and configure each VC greatly simplifies network management and support activities.
Virtual Chassis Design and Deployment Options provides tips on how to get maximum bang from the limited length of VCP cables, and details design options that combine VCP and VCE links to optimize both performance and VC coverage area.
The heart of Juniper VC technology is the Juniper proprietary link state (LS) Virtual Chassis Control Protocol (VCCP). VCCP functions to automatically discover and maintain VC neighbors, and to flood VC topology information that permits shortest-path switching between member switches using either internal or external (VC trunk) switch paths.
VCCP is not user-configurable, and operates automatically on the rear-panel VC ports. VCCP also operates over uplink ports when they are configured as VCE ports.
As with any LS protocol, the net effect is that VCCP rapidly detects and reacts to changes in the VC topology to ensure maximum connectivity over optimal paths in the face of VC moves and additions, because of switch or VC backbone failures. The loop-free switching topology that results from the Shortest Path First (SPF) calculations allows VCCP to “do the right thing” in almost any VC topology cabling scheme imaginable.
VCCP uses a link metric that’s scaled to interface speed when calculating its SPF tree. Load balancing is currently not supported; a single best path is installed for each known destination, even though multiple equal-costs paths may exist.
As mentioned previously, a VC consists of any 2 to 10 EX4200 switches. Within each VC, there are three distinct roles: master routing engine (RE), backup RE, and Line Card Chassis (LCC):
- Master RE
The master RE runs the VC show, so to speak, by actively managing the VC switch members as far as VC operations go, and as importantly, by maintaining the master copy of the switching/routing table (RT). Because this table is in turn copied to each remaining VC member, the master RE controls overall packet and frame forwarding based on the operation of its switching and routing protocols. Within a VC, hardware-related commands are normally executed on the master RE, which then conveys the instructions and results over an internal communications path. Virtual console and Out of Band (OoB) management capability is also available, again via the master RE and its internal communications channels to all VC members. When a new switch member attempts to join a VC, the master RE is responsible for determining its compatibility with the VC and the resulting assignment of a member ID and VC role.
A functional VC must contain a master RE. You can configure mastership parameters that ensure a deterministic election behavior, or rely on the built-in tiebreaking algorithms, which ultimately favor the first switch powered up. We provide details on mastership election in a later section.
- Backup RE
The backup RE, as its name implies, is the second most-preferred switch member that stands ready to take over chassis operations if the current master RE should meet an untimely demise. With default parameters, the backup RE is the second switch that is powered up in the VC. At a minimum, the backup RE maintains a copy of the active configuration (through use of
commit
              synchronize
on the master RE); if GR is enabled, the backup RE also maintains copies of the forwarding table (FT) to enable Non-Stop Forwarding (NSF) through a GRES event. Alternatively, with NSR enabled both the FT and control plane state—for example, Open Shortest Path First (OSPF) adjacency status or STP and learned Media Access Control (MAC) address state—are mirrored to provide a truly hitless GRES experience.- LCC
An LCC is any switch member that is not currently acting as the master or backup RE. This may simply be because it was the third through tenth switch member powered up, meaning it could one day become a master or backup RE, or because a configuration constraint bars it from any such ascendancy. An LCC accepts (and stores) its member ID from the current master, and then proceeds to perform as instructed with regard to hardware operations and FT entries. The LCC runs only a subset of JUNOS. For example, it does not run the chassis control daemon (
chassid).The receipt of exception traffic—for example, a newly learned MAC address or local hardware error condition—results in intrachassis communications between that switch member and the master RE, which may then mirror the change to the backup RE when GR or NSR is enabled. After processing the update, any related actions, such as updating the FT or taking a failed piece of hardware offline, are then communicated back to affected member switches, thereby keeping everything tidy and in sync within the VC.
When an EX4200 is powered on and attached to a VC, it determines whether it should be master, and if not it’s assigned the next available member ID. The assigned member ID is displayed on the front-panel LCD. When powered up as a standalone switch, the member ID is always 0. A VC master assigns member IDs based on various factors, such as the order in which the switch was added to the VC. Generally speaking, as each switch is added and powered on, it receives the next available (unused) member ID unless the VC configuration specifically maps that switch’s serial number to a specific value.
Promoted stability ID assignments are sticky, meaning that the ID is not automatically reused if the corresponding switch is removed from the VC. A later section describes how you can clear or recycle VC switch member IDs when desired.
The member ID distinguishes the member switches from one another, and is used to:
The switch member ID is a logical function and is independent of any particular VC member role, or physical location along a VC ring or chain. Although it is a best practice to have the master RE assigned ID 0, this is not mandatory.
You can designate the role (master, backup, or LCC) that a member switch performs within a VC by explicitly configuring its mastership priority. The priority ranges from 1 to 255, and larger values are preferred. The mastership priority value has the greatest influence over VC mastership election, and so is a powerful knob. The default value for mastership priority is 128. The current best practice is to assign explicit priority values for the master and backup roles, which should be the same, and should be set to the highest value (255) to avoid preemption after a GRES and to then ensure that any new LCC members have an explicit priority configured before they are attached to the VC. These procedures are described in detail in a later section and are intended to prevent undesired master RE transitions.
The default parameters ensure that even with no explicit configuration the VCP protocol will correctly detect and assign chassis member roles, such that there will be a master and a backup RE, and one or more LCCs if at least three member switches are present. Variations among switch models, such as whether the switch has 24 or 48 ports, have no impact on the master election process. The steps of the master election algorithm are:
Choose the member with the highest user-configured mastership priority (255 is the highest possible value).
Choose the member that was master the last time the VC configuration booted (retained in each switch’s private configuration).
Choose the member that has been included in the VC for the longest period of time, assuming there was at least a one-minute uptime difference; the power-up sequence must be staggered by a minute or more for uptime to be factored.
Choose the member with the lowest MAC address, always a guaranteed tiebreaker.
All members in a VC share a common Virtual Chassis Identifier (VCID) that is derived from internal parameters and is not directly configurable by the user. Various VC monitoring commands display the VCID as part of the command output.
Although it’s clear that you can form a functional VC by simply slapping together 10 EX4200 switches (via their VC ports) with default configurations, such an arrangement is generally less than ideal. For example, you need to configure a virtual management interface to avail yourself of the benefits of a single IP management entity per VC, N:1 RE redundancy may not be desired, and you may wish to exert control over which members provide what VC functions, perhaps to maximize reliability in a given design. Later sections provide VC design guidelines that promote high levels of reliability while also alleviating potential confusion through explicit configuration of VC member roles.
This section details various VC design options and alternatives that you should carefully factor before deploying a VC in your network. Although the physical topology of the VC is a significant component of a VC’s design, several aspects of a VC’s operation can be controlled through configuration. This section explores VC topology and configuration options, with a focus on current best practices relating to overall VC design and maintenance.
In many cases, the basic choice of a VC topology is determined by the degree of separation between VC switch members. The approach used for a single closet will likely differ for a top-of-rack design in a data center, and both differ from a VC design that extends over a campus area (multiple wiring closets). In addition, some designs promote optimal survivability in the event of VC backplane faults, a design factor that is often overlooked.
It is worth pointing out that the Juniper VC architecture is such that local switching between the chassis front-panel ports, to include the uplinks, does not involve use of the VC trunks. As a result, when EX4200 switches are interconnected as part of a VC, each individual switch is still capable of local switching at the maximum standalone switching capacities detailed in Chapter 2. Therefore, in a 10-member VC where all traffic is locally switched, the maximum total switching capacity is 1.36 Tbps (10×136 Gbps), with an aggregate throughput of 1.01 billion packets per second!
As described in Chapter 2, each EX4200 chassis has two rear-panel VCPs. Each VCP operates at 32 Gbps FD, which translates to 64 Gbps of throughput when you consider that a single VCP can be simultaneously sending and receiving 32 Gbps of traffic. The combined throughput of both VCPs is therefore 128 Gbps, or 64 Gbps FD. Note that the maximum FD throughput for any single flow between a sender and receiver that are housed on different VC switch members is 32 Gbps.
When deployed in the recommended ring topology, each VC member could be simultaneously switching among its front-panel and uplink ports, while also sending and receiving 128 Gbps of traffic (64 Gbps per VCP) to and from other VC members. When interconnected as a chain, or as a result of a VCP ring break, trunk capacity is reduced to 64 Gbps at the ends, while the switches in the middle still enjoy the ability to use both VCP ports.
Note that the actual VCP throughput is a function of the ingress and egress points associated with the traffic being switched (or routed), both locally and by other VC members. This is in part because currently EX switches do not support load balancing or congestion avoidance across VC trunks; for each destination, a given switch installs a single best path as determined by the lowest VCCP path metric to reach the switch associated with that destination. In the event of a metric tie, the first path learned is installed and used exclusively, until the VCCP signals a topology change, resulting in a new SPF calculation and subsequent update to the shortest path tree.
A VCP ring offers 128 Gbps of throughput capacity between any two member switches, but usage patterns and SPF switching between ring members may prevent any two members from being able to use the full 128 Gbps VC trunk capacity. Similarly, aggregate VC throughput can be higher than 128 Gbps when traffic patterns are carefully crafted to prevent congestion by having each pair of adjacent switches sink each other’s traffic, which effectively yields an aggregate throughput potential of n×64 Gbps, where n is the number of member switch adjacencies in the VCP ring topology.
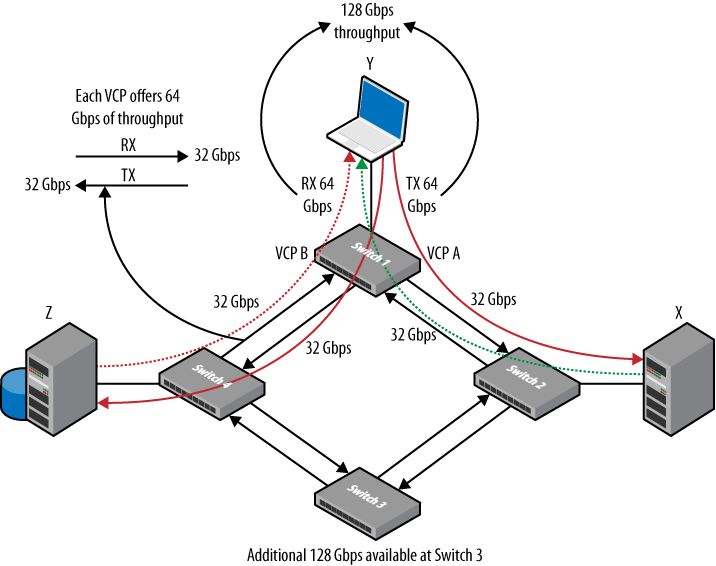
To help demonstrate this traffic dependency, consider the VC topology shown in Figure 4-3.
Given the VC ring topology, a total of 128 Gbps of VC switching capacity is available between member switches. However, because two VCP ports are used to instantiate the VC ring, only 64 Gbps of capacity is available in each direction.
Figure 4-3 shows a somewhat simplified scenario involving 64 Gbps of traffic arriving at Switch 1, of which 32 Gbps is destined to Address X on Switch 2, while the remaining 32 Gbps is for Address Z on Switch 4. Given the topology shown in Figure 4-2, and knowledge that the VCP installs routes to other destinations based on path metric, it’s safe to assume that Switch 1 directs 32 Gbps of traffic out its VCP A port on to Switch 2 while simultaneously sending the 32 Gbps of traffic to Switch 4 via its VCP B port. The next result is a total of 64 Gbps of traffic leaving Switch 1, which is split over its two VCP ports and effectively consumes all available transit trunk bandwidth at Switch 1, given that each VCP port operates at 32 Gbps FD.
Because the VCP ports are FD, at this same time both Switch 2 and Switch 4 can be sending 32 Gbps of traffic to Destination Y on Switch 1. In this state, the trunk bandwidth between Switch 1, Switch 2, and Switch 4 is consumed, and there is a total of 128 Gbps of traffic being switched, which is the stated VC trunk capacity.
However, because the traffic that is sent by Switch 1 is pulled off the ring at both Switch 2 and Switch 4, the traffic sent by Switch 1 to Address X and Address Z does not consume VC trunk bandwidth between Switch 2, Switch 3, and Switch 4. It’s therefore possible to switch an additional 128 Gbps of traffic, as long as this traffic is confined to sources and destinations on Switch 2, Switch 3, and Switch 4. In this somewhat contrived scenario, a total of 256 Gbps of traffic is switched over the VC ring. This is truly a case of the “under-promise and over-deliver” philosophy users have come to expect from Juniper Networks gear.
Although the previous example shows how you may get more than 128 Gbps of throughput over a VC ring, there are situations where the VC topology and traffic patterns are such that congestion occurs on some VC trunk segments, while other segments are otherwise idle. For example, if a source on Switch 3 were to send 32 Gbps to Destination Y on Switch 1, rather than some destination on Switch 4 or 2, we have the case of the VC link between Switch 3 and Switch 4 remaining idle (assumes that the VCCP at Switch 3 has installed the path through Switch 2 to reach Switch 1), while a total of 64 Gbps of traffic, 32 Gbps sourced by Source X at Switch 2 and another 32 Gbps from the remote Switch 3, begins queuing up for the 32 Gbps VCP port linking Switch 2 to Switch 1.
Generally speaking, there are two ways to form VCP connections: via a ring, and via a braid. The differences primarily deal with how many switches are spanned by the longest VCP cable used. We examine these options in the next section.
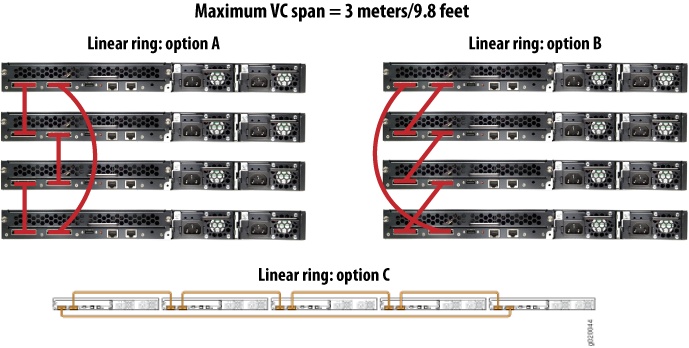
The most direct way to form a VCP ring is to simply connect each switch to the next, with the last switch in the VC tied back to the first, as shown in Figure 4-4.
This type of linear ring cabling is best suited to a single-rack deployment, given that the maximum separation between VC members is limited to 3 meters/9.8 feet (the maximum supported VCP cable length). All three VCP cabling arrangements in Figure 4-4 are functionally identical. The approaches are termed a linear ring because the flow of traffic is sequential, passing through each switch until it—or, more correctly, some other traffic inserted by another switch—loops back at the end of the ring to start its journey anew at the first switch. Figure 4-4 also provides a top-of-rack equivalent that is spaced horizontally.
VC cable can be arranged in many ways; the takeaway here is that VCP ports just work: as long as each switch is connected to the next and the last switch is tied to the first, a functional VCP ring will form.
As stated previously, the longest supported VCP cable is only 3 meters, or some 9.8 feet. However, with some creative cabling, it’s possible to create a ring that spans as much as 15 meters/49.2 feet. This respectable distance brings a VC ring topology into the realm of many multirack/data center deployment scenarios. Figure 4-5 depicts such braided ring cabling at work.
The key to the braided VC ring is that the longest VCP cable now spans only three switch members. Where desired, you can form a braided ring using a mix of short and long cables to save money, given that a short VCP cable ships with each EX4200 switch. As before, Figure 4-5 also provides a horizontally oriented top-of-rack equivalent. Trying to trace the packet flow through a braided ring can be a bit confusing, but overall performance and VCCP operation remain unchanged, and things simply work. In this example, the top switch sees the third switch as its VCP B neighbor, and packets take a somewhat convoluted path as they wind their way around the ring, sometimes being sent to a physically adjacent neighbor (at the ring’s ends) and other times being sent past the physically adjacent member switch and onto the VCCP neighbor at the other end of the VCP cable.
The final VCP cabling option is a serial chain. Figure 4-6 shows this arrangement.
The obvious advantage to the serial chain is the ability to achieve the largest possible VC diameter, which is now some 27 meters/88.5 feet. The equally obvious downside is the use of a single VCP port at each switch, which halves the total VC trunk throughput to 64 Gbps. Another significant drawback is the lack of tolerance to any VCP cable fault, which results in a bifurcated VC, and the potential for unpredictable operation, given that a split VC is currently not supported.
VCE topologies are formed by setting one or more ports on the
(optional) uplink module to function in VCCP mode. Oddly, this is done
with an operational rather than a configuration mode command, in the
form of a request virtual-chassis
vc-port statement, as we describe in a later section. Once
placed into VCCP mode the related port cannot be used for normal
uplink purposes until the VCE mode is reset. You can configure all
uplink module ports as VCEs, and you can also mix and match normal and
VCE modes on a per-port basis.
VCE functionality is supported on both the 2×10 GE and 4×1 GE uplink modules, and a mix of 1 GE and 10 GE VCE links can be used as part of an extended VCE design. It should be noted that even the rear-panel VCP ports, which offer an aggregate 128 Gbps of throughput, can become congested in some cases. Therefore, careful thought should be given before attempting to deploy a VC design incorporating 1×GE uplink ports because of the obvious potential for serious performance bottlenecks should there be a significant amount of interswitch member traffic over these links.
You can use any type of supported optics modules (SFP/XFP) and fiber for VCE links, but the maximum supported distance is currently limited to 500 meters. Although this may not reflect the maximum distance the related optics can drive, at 500 meters per VCE link, and with as many as 9 such links in a 10-member serial VC chain configuration, you are talking 4,500 meters (14,763 feet), which is some serious VC-spannage indeed!
A VCE-based topology can be either a ring (recommended), or a serial bus, as we described for VCP-based topologies earlier. Because even a 10× GE port represents reduced bandwidth, and due to the increased probability of a fault occurring on an extended length of fiber optic cable, you should always deploy a VCE ring topology, and should never rely on a single VCE to tie together to remote member clusters. A pure VCE ring configuration requires two VCE ports, and therefore consumes all uplink ports when using the 2×10 GE uplink module. However, a hybrid VCP/VCE design can allow the benefits of a ring topology while using only a single VCE port in some cases.
A VC design based solely on VCE links is considered rare; the far more common case is a single- or multiple-rack deployment using only VCP ports, as this eliminates the need for uplink ports and their related SFPs, and also yields maximum performance with plug-and-run simplicity. Recall that a VCP ring can span 15 meters, and a VCP chain can extend up to 27 meters, distances that bring most data center and top-of-rack designs well within reach.
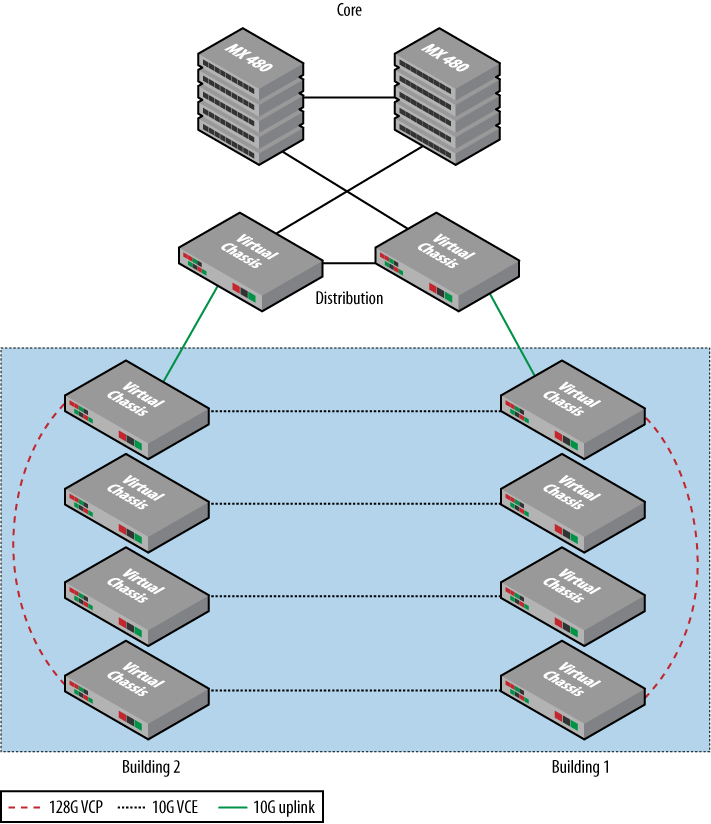
By combining VCP and VCE ports as part of your VC design, you can achieve the best of both worlds: high-speed VCP-based and local switching within a wiring closet and lower-speed VCE-based trunks linking the closets together. Figure 4-7 shows such a design.
In this example, the VCE links are shown as 10 GE, but 1 GE links could be substituted with no change in core functionality. Note how some of the VC members use only VCP ports, whereas other switch members use both VCP and VCE ports. An advantage of this design is that it preserves one of the two supported 10 GE uplinks for use in, well, uplinking non-local traffic to the distribution layer, where it’s then sent to the core or to other distribution layer nodes as needed. The use of two VCE links between different VC members provides added capacity and redundancy in the event of VCE link failure. You can use as many parallel VCE links as desired to maximize these characteristics.
When deploying an extended VC, give careful thought to typical and projected traffic patterns. Where possible, you should follow the 80/20 rule, which is to say that ideally 80% of traffic is locally switched, which in this case refers to not having to be trunked over relatively low-bandwidth VCE links. Recall that local switching capacity is unaffected, and therefore remains wire-speed for intraswitch traffic. If the majority of traffic can be kept local to each member switch, bandwidth on the VC trunks is not a significant factor. The design shown in Figure 4-7 is optimized when most of the traffic is switched within that closet/VCP wiring domain, as this takes advantage of local switching and the high-speed VCP links.
This section focuses on packet flow through a VC, during both normal and VCP link failure conditions. Note that Chapter 3 details Layer 2 and Layer 3 packet flows within a standalone EX switch. Here the focus is on VC topology discovery and communications between switch members making up a VC.
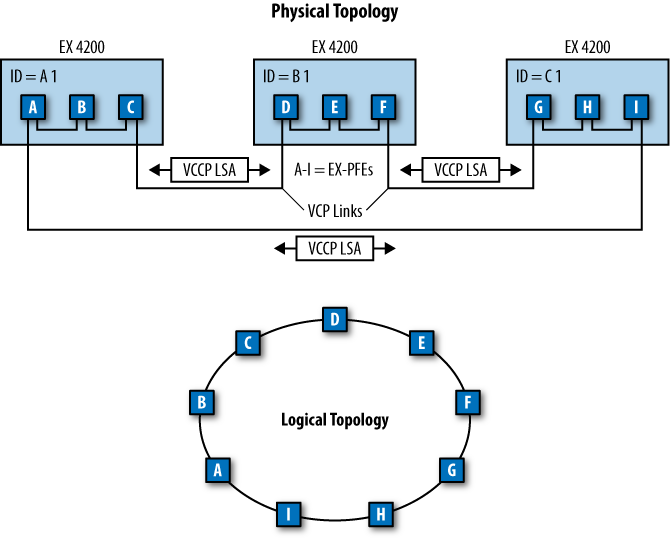
When a VC is brought up, each member switch floods VCCP packets over its VC trunk ports. Although proprietary, it can be said that VCCP is based on the well-known Intermediate System to Intermediate System (IS-IS) routing protocol. VCCP automatically discovers VC neighbors, builds adjacencies with these neighbors, and then floods link state packets (LSPs) to facilitate automatic discovery of the VC’s topology, as well as rapid detection and reaction to changes in the VC topology due to a switch or VC trunk failure. Figure 4-8 illustrates this process in the context of a VC comprising three switch members arranged in a VCP-based ring topology.
In this example, each member switch is a 48-port model, and therefore contains three EX-PFEs that work together to drive the 48 front-panel 1× GE ports, the optional uplink ports, as well as the internal and external VC trunks. Each PFE is identified as A–I, and each switch member is identified by a member ID, here shown as A1, B1, and C1. Note that in Figure 4-8, the B, E, and H entities are EX-PFE application-specific integrated circuits (ASICs) that have only internal or front-panel links.
Figure 4-8 also shows the resulting logical topology that is formed through the VC ring cabling. Note that a break in the VCP ring creates a serial chain, and a resulting halving of VC trunk bandwidth for destinations near the break, as their maximum VC bandwidth drops to 64 Gbps given the single communications path at the ends of the chain. Because each VC trunk segment operates point to point, those switches that are still connected by two functional VCP segments could still send and receive as much as 128 Gbps of traffic—for example, 32 Gbps (FD) to and from each adjacent neighbor. But if this traffic is destined for the ends of the chain, all VC trunk bandwidth is consumed, and the switches at either end of the break are each limited to 64 Gbps of switching throughput.
Because each switch member is using two VCP ports, there are two communications paths to choose from for any given destination; for example, member A1 can send out the VCP port connected to PFE B, or it can send out its other port to I. The destination-to-port mapping at any given time is a function of each switch’s SPF calculation, as described next.
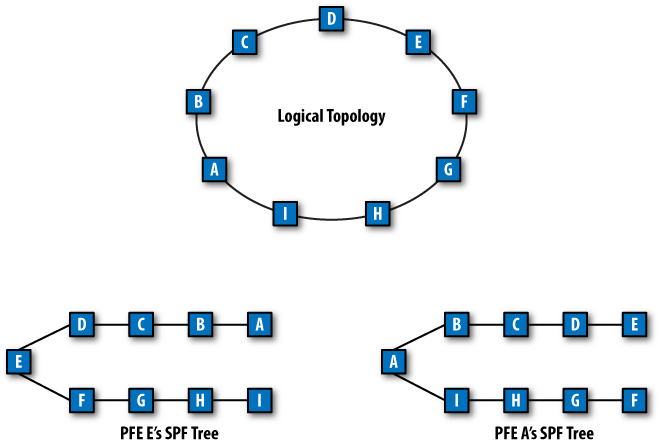
Figure 4-9 shows how the example’s logical topology is in turn viewed as a source-rooted SPF tree at each EX-PFE to all other PFE destinations in the VC.
Once the VC topology has stabilized, and all PFEs have sent and received each other’s VCCP link state advertisements (LSAs), the result is a replicated link state database (LSDB) at each PFE. Changes to the VC topology are rapidly communicated by flooding updated VCCP LSPs, which in turn trigger new SPF runs at each PFE as an updated SPF tree is calculated.
Currently, load balancing is not supported. In the event of a hop-count tie, the winner is selected with preference to the PFE associated with the lowest member ID. Figure 4-9 shows the result for PFEs E and A, and depicts how their respective SPF trees reach the other PFEs that comprise the VC. The lack of load balancing results in a single forwarding next hop for each PFE destination. However, although there is no load balancing to a specific PFE, load balancing is possible to different PFE destinations. This is because VCPs are always in a forwarding state for some subset of the VC’s PFE destinations, such that one port is used as the forwarding next hop for one-half of the VC’s destinations and vice versa. Based on Figure 4-9, we see that packets in PFE A that need to be switched toward a destination housed on PFE D are sent out the upper VCP link toward PFE B over the internal VC trunk within switch member A1.
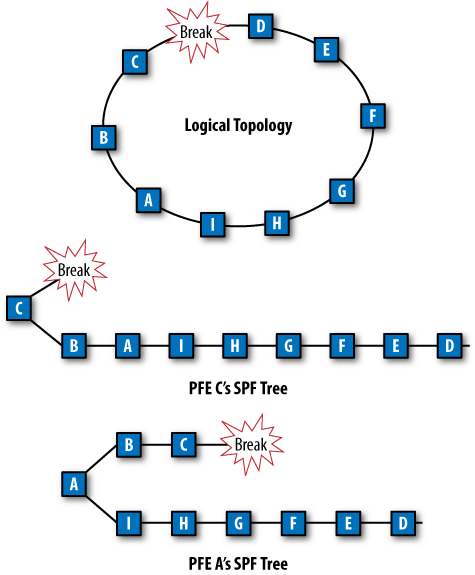
A topology change in the form of a ring break triggers a new SPF recalculation by all PFEs. For those stations adjacent to the break, the result is that the surviving VCP port is used to forward to all remaining PFE destinations. Figure 4-10 shows this state.
Figure 4-10 shows an updated SPF tree for PFE C, which is adjacent to the break, and A, which is shielded from the break through its adjacent PFE neighbors B and C. Because this is a ring rather than a switch break, all PFEs and all destinations remain reachable, albeit at reduced VC trunk capacity, as described previously. A similar situation results in the event of a VC switch member failure, except that the PFEs associated with the failed switch are no longer reachable and are removed from the VC’s topology. Connectivity to remaining PFEs continues, and based on design redundancy, connectivity to endpoints can reconverge through an alternative path.
It should be noted that VC switch member roles are not affected by changes in VC topology or costs to reach a given PFE. A switch member’s VC role is linked to its member ID and associated priority. Thus, a member switch need only remain reachable for it to retain its current VC role. As a result, only the failure of the current master, or two VCP trunk failures that serve to isolate the master from the rest of the VC, can result in the need to promote a backup RE to the role of master RE.
When two VC trunk failures occur between two pairs of adjacent
member switches, the result can be a bifurcated VC. In such a state,
PFEs that were formerly part of the same VC lose contact. This can
result in multiple master REs becoming active, each feeding its VC
members with a copy of the VC configuration file, which can result in
unpredictable and even network-disruptive behavior. In this example,
in addition to both VCs potentially forwarding the same traffic, this
condition also results in a duplicated IP management address; recall
that the single vme.0 address is
shared by all members in a VC, but we now have two VCs running the
same configuration, which includes the virtual management
address.
It’s rare to actually encounter this condition, because it requires the simultaneous failure of two VC switch members, or two VC trunk cable segments between two different pairs of adjacent VC members. Given the relative infrequency of this failure mode, and the complexity of making things work in such a state, a bifurcated VC is currently not supported. With that said, the best practice in a vertical VC design has the master RE at either the top or the bottom, and the desired backup RE in the middle so that it’s equidistant from either end. The rationale is that in the event of a bifurcation there is maximum probability that each of the split VCs will continue to operate using one of the two RE-capable switch members; this is especially important when deploying a redundancy scheme that permits only two of the VC members to function in the RE role.
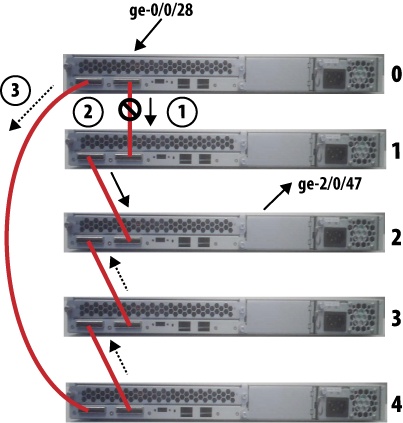
This section details packet processing in a number of different scenarios. Figure 4-11 provides a macro view of VC packet forwarding.
As described previously, VC member discovery results in an SPF
tree rooted at each EX-PFE that is optimized on the path metric and,
in the case of a VCP ring, points to one of two VC port interfaces for
forwarding between member switches within the VC. In this example, a
source on Switch 0’s ge-0/0/28
interface is sending to a destination on Switch 2’s ge-2/0/47; Sequence Number 1 and the related
solid arrows show the prefailure forwarding state, which—being based
on path metric optimization—has Switch 0 forwarding toward Switch 2
through its VCP link to Switch 1 with a hop count of 2.
Note
When all interfaces have the same bandwidth, as is the case here, the SPF result is effectively based on hop count.
At step 2, the VCP cable between Switch 0 and Switch 1 suffers a fault, resulting in flooding of updated VCCP LSAs. After the new VC topology has stabilized, the updated calculation at Switch 0 causes it to begin forwarding toward Switch 2 via its VCP link to Switch 4, shown at step 3. The dashed arrows show that the remaining switches have also converged on the new topology, with the result being a sane forwarding path that, albeit no longer at three hops, permits ongoing communications between the source and destination VC interfaces.
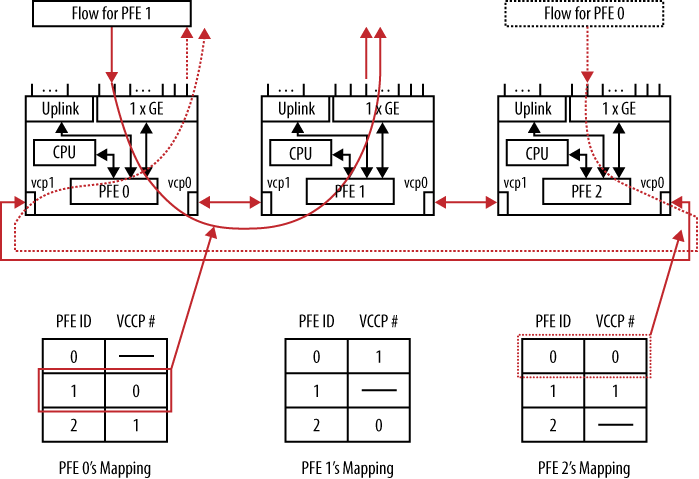
This section builds on the previous, high-level example of interswitch packet flow by detailing how unicast and multicast packet flows are processed within each switch and its respective EX-PFEs. Figure 4-12 starts the discussion with a unicast flow for a known source and destination address.
Figure 4-12 shows a somewhat simplified VC consisting of three EX switches, with each switch member having a single PFE. In this example, the switch member ID and PFE ID are the same, and range from 0 to 2. The three switches are connected in a ring, and each switch’s PFE to VCP port mapping is shown. This is a function of a hop-count-optimized SFP run at each member switch given that all interface metrics are the same.
Figure 4-12 shows two simultaneous unicast flows. The solid flow ingresses at Switch 0 and egresses at Switch 1, and the dashed flow begins at Switch 2 and terminates at Switch 0. The MAC address to switch member/PFE ID mapping is assumed to be in place, meaning that both the Source MAC (SMAC) and Destination MAC (DMAC) addresses for both flows have been learned and the appropriate TCAM entries are in place and are used to map a MAC address to a destination PFE. In a normal case, many MAC addresses can map to the same PFE ID, and therefore to the same forwarding VCP next hop.
The highlighted entry in Switch 0’s mapping table shows its mapping of Switch ID 1 to its VCP port 0, and the solid line shows the resulting unicast flow. In similar fashion, the dashed line at Switch 2 highlights the mapping table entry that causes it to use its VCP 0 to reach PFE 0.
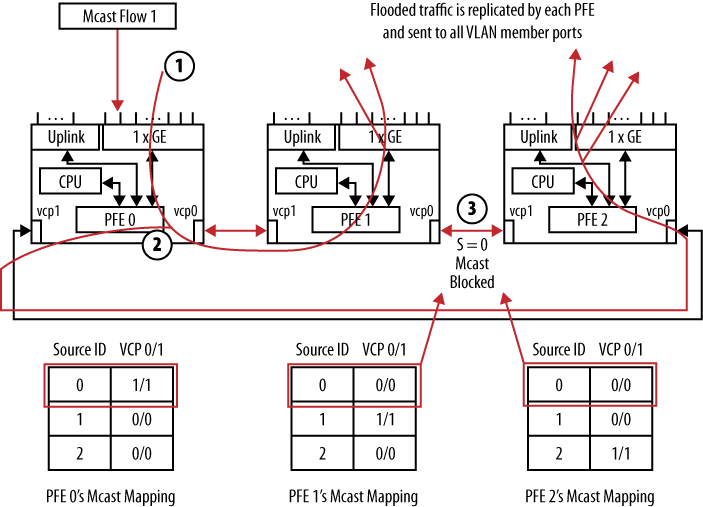
Multicast, broadcast, or unknown DMAC address flows require special handling, as they must be flooded within the VC while taking safeguards to ensure that endless packet loops/broadcast storms do not occur. This is because such flows need to be flooded to all ports associated with the ingress port’s virtual LAN (VLAN). This causes such traffic to be flooded to all remote PFEs, which may or may not have local VLAN members resulting in the decision to either replicate and forward, or discard, respectively. The lack of a Time to Live (TTL) field in Ethernet frames makes a forwarding loop particularly nasty and can easily bring a Layer 2 network to a grinding halt. Figure 4-13 details how EX-PFEs solve this problem.
The key to preventing broadcast storms is the use of a source ID mapping table in each PFE that ensures that a single copy of each flooded frame is received by every PFE within the VC. Step 1 in Figure 4-13 shows a single multicast stream sourced at Switch 0. The highlighted source ID mapping tables show how each switch forwards the associated traffic. Switch 0’s locally originated traffic is flooded out through both its VCP 0 and VCP 1 ports at step 2. This traffic, when received by PFEs 1 and 2, results in blocking at Switch 1’s VCP 0 port, and also at Switch 2’s VCP 1 port, which is shown in step 3.
The result is that each switch/PFE in the VC receives a single copy of each flooded frame, where specifics determine whether local replication or discard is appropriate for its front-panel ports. Forwarding of this traffic out the remaining VCP port to another PFE is constrained by a source ID mapping table built within each PFE that is based on VCCP exchanges and the resulting topology database. Changes in the VC topology trigger VCCP updates and a resulting modification to the source ID mapping tables to ensure continued connectivity.
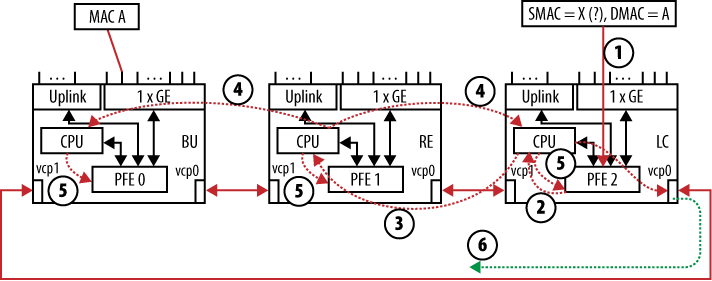
Figure 4-14 expands on the preceding discussion with details of the flow of exception traffic within a VC.
Exception traffic refers to packets that need to be shunted out of the ASIC fast path and up to the RE for processing that is outside the realm of pure packet forwarding. For example, when in Layer 2 bridging mode, each SMAC address must be learned so that forwarding decisions based on the DMAC can be intelligently made. When in Layer 3 mode, a similar exception flow occurs for certain IP packets—for example, those with a source route or Router Alert (RA) option, or in the case of traffic that is addressed to the switch itself.
Note
Exception flows are rate-limited and policed within both the
PFE and the RE to prevent the lockout of critical control plane
processes during periods of abnormally high levels of exception
traffic, such as might occur during a denial of service (DoS)
attack. You can view exception traffic statistics, including policed
drops, using the output of the show pfe
statistics and show system
statistics commands.
Figure 4-14 details how an unrecognized SMAC address results in the need to redirect traffic to the control plane for additional processing. Things start at step 1, when a frame is received with a known DMAC address of A but an unknown SMAC address of X. The ingress PFE performs both SMAC and DMAC lookups for each frame as part of its Layer 2 forwarding and learning functions. Upon seeing the unknown SMAC, the frame is shunted out of the ASIC forwarding path and into the control plane, where it is sent to the local switch’s RE at step 2 in Figure 4-14. At step 3, the LC switch constructs a notification message from the buffered frame’s particulars. The notification is then sent to the VC’s master RE using the SPF between the ingress switch’s CPU and the master RE. The path chosen can contain both internal PFE-PFE and external VCP links, as shown in this example.
Step 4 has the VC’s RE perform the needed accounting and admission control functions. For example, a MAC limit parameter may be set that prevents this SMAC from being learned, or perhaps a Layer 2 firewall filter is in place that indicates this SMAC should be blocked. Assuming no forwarding restrictions exist, the master RE sends an update to all PFEs in the VC, which is shown at step 5. This update instructs all PFEs to update their TCAM with the newly learned SMAC. Things conclude at step 6 when the ingress switch reinjects the previously buffered frame back into the local PFE complex, where it’s now switched toward the egress PFE, and then toward the egress port, based on the frame’s DMAC, using the SPF between the two PFEs. When the frame is received by the egress switch, which functions as a backup RE in this example, no additional learning/intra-VC communications are needed because the SMAC was programmed into all PFEs back at step 5, so the egress PFE simply forwards the frame out the port associated with Destination A.
This section detailed the architectural and design aspects of the EX4200 VC. With an understanding of VC member roles, member ID, and mastership priority, in addition to VCP topologies and cabling schemes, you are no doubt ready to move on to the act of configuring and maintaining a VC. You are in luck, because the next section provides this very information.
Get JUNOS Enterprise Switching now with the O’Reilly learning platform.
O’Reilly members experience books, live events, courses curated by job role, and more from O’Reilly and nearly 200 top publishers.
