Chapter 4. Installing and Beginning Use of Android Tools
In this chapter, you will learn how to set up your environment for Android development. We’ll go beyond just listing where you can download the software, and will cover some of the best practices in getting set up. We’ll look at choices for development operating systems as well as the Android tools available. You will see the good, the bad, and the ugly of the various tool and platform choices that you’re about to make (or that someone else has already made for you).
By the end of this chapter, you will have your entire development environment set up. You’ll be able to write a Hello World application, build it, and run it on the emulator (or a physical device, if you want).
Note
We use ~ to refer to your home directory. On Mac OS X, that’s typically something like /Users/marko. On Linux, it would be /home/marko, on Windows Vista and 7, it would be C:\Users\marko, and on Windows XP it would be C:\Documents and Settings\marko. To keep things simple and consistent, we’re going to use Unix-style forward slashes and not Windows backslashes to denote file path separators.
So, if you’re on Windows, just change ~ to C:\Users\ YourUserName and / to \. Other than that, everything should be pretty much the same for different operating systems, regardless of whether you use OS X, Linux, or Windows.
Installing Java Development Kit
Android development is based on Java language, tools, and libraries. So one of the first requirements is that you install Java on your machine. Before proceeding, you may want to check whether you already have Java, and whether it’s an up-to-date version. To do this, open your command-line terminal:
In your terminal, type java -version and press Enter. If the Java runtime environment is set up, you should see a version number. Make sure it is 1.6 or greater.
Next, type javac -version to check whether you have a Java compiler installed. You should see a version number of 1.6 or greater as well. Example 4-1 shows an example of the desired outcome.
[marko:~]> java -version java version"1.6.0_31"Java(TM)SE Runtime Environment(build 1.6.0_31-b04-413-10M3623)Java HotSpot(TM)64-Bit Server VM(build 20.6-b01-413, mixed mode)[marko:~]> javac -version javac 1.6.0_31
If you pass these two tests, you can proceed to Installing the Android SDK. Otherwise, continue.
Mac users can install Java directly from the Software Update app. Linux users may have an automated package installation utility, depending on the Linux flavor. Windows users should install it via a download from the official Oracle site. You want the Java Development Kit (JDK) Standard Edition (SE), version 1.6 or later.
Java comes as a Runtime Environment (JRE) and Development Kit (JDK). To program for Java, you need the JDK, which includes the Runtime Environment. The JRE on its own is good only for running existing Java code.
Java also ships in three editions: Standard Edition (JavaSE), which is your basic Java; Enterprise Edition (JavaEE, also known as J2EE), which is a bloated enterprise superset of libraries and tools; and Mobile Edition (JavaME), which is used by some mobile devices, but not by Android devices. What you need is Java SE.
Regarding versions, Android was initially based on Java version 1.5, a.k.a. Java 5. Since Gingerbread, it has been upgraded to Java 1.6, a.k.a. Java 6. So, version 1.6 is what you want. Note that as of right now, Java 1.7 or Java 7 is not fully supported by Android, nor does Android need any Java 7 features. So if possible, stay away from it. If you must use it, you can make it work for Android by setting it to behave as Java 1.6 (in Eclipse, go to Preferences → Java → Compiler and set the Compiler compliance level to 1.6 or above).
After you download Java Development Environment Standard Edition 1.6 or later for your appropriate operating system, you can usually set it up just by running the automated installation script. Repeat the command-line terminal tests discussed at the beginning of this section to make sure the installation was successful and you have the right version of Java installed.
Installing the Android SDK
The Android Software Development Kit (SDK) is necessary to develop applications for Android. The SDK comes with a set of tools as well as a platform where you can run programs and see it all work. You can download the Android SDK for your particular platform from the Android SDK Download page.
Once you download it, unzip (or on Linux, untar) it into a folder that is easy to get to. Further examples in the book will assume your SDK is in the folder ~/android-sdk. If it’s in a different location, use that location instead of ~/android-sdk. For example:
- Windows
- C:\apps\android-sdk-windows
- Linux
- /home/YourUserName/android-sdk-linux_86
- Mac OS X
- /Users/YourUserName/android-sdk-mac_86
Tip
For Windows users, we strongly recommend choosing directories whose names contain no spaces. This is because we’ll be doing work on the command line and spaces just complicate things. Because the Windows XP home directory is in C:\Documents and Settings, we would recommend putting android-sdk in a top-level directory that you create, such as C:\apps.
However, on Windows Vista or 7, you can simply extract android-sdk into C:\Users\YourUserName.
Setting Up a PATH to Tools
The major tools in the Android SDK are located in two folders. Because we’re going to use these tools from the command line, it is very helpful to add your ~/android-sdk/tools/ and your ~/android-sdk/platform-tools/ directories to your system PATH variable. This will make it easier to access your tools without having to navigate to their specific location every single time.
Details for setting up the PATH variable depend on the platform; see step 2 of the document Installing Android SDK.
Installing Eclipse
Eclipse is an open source collection of programming tools originally created by IBM for Java. Nowadays, most developers in the Java community favor Eclipse as their Integrated Development Environment (IDE) of choice. Eclipse lives at http://eclipse.org.
Eclipse has a lot of time-saving features, which we’ll be pointing out as we continue. Keep in mind that, although powerful, Eclipse tends to be very resource hungry, so you might want to restart it once a day if it starts running sluggishly.
Although you can do Android development with any text editor or IDE, most developers seem to be using Eclipse, and thus that’s what we use in this book.
Tip
If you choose not to use Eclipse, please refer to “Setting Up an Existing IDE”.
In May 2013, at Google I/O, the Android team announced it would move away from Eclipse to a new standard platform based on Gradle. Some time will pass before the tools are stable, though, so we recommend you use the existing Eclipse platform for now.
Download Eclipse. We recommend Eclipse IDE for Java Developers (not the twice-as-large Eclipse for Java EE Developers). You can install it in any directory you’d like.
Eclipse Workspace
Eclipse organizes all your work by projects. All your projects are placed in a workspace, which is a location you choose. So, your decision about where to put your workspace is significant. We recommend ~/workspace as a simple place for your code. On Windows, however, we recommend storing your workspace in a directory that doesn’t have spaces in it (they complicate anything you might do at the command line). C:\workspace is a good choice for Windows users.
Setting Up Android Development Tools
After installing Eclipse and the ADK, you need to set up Android Tools for Eclipse. The instructions are as follows:
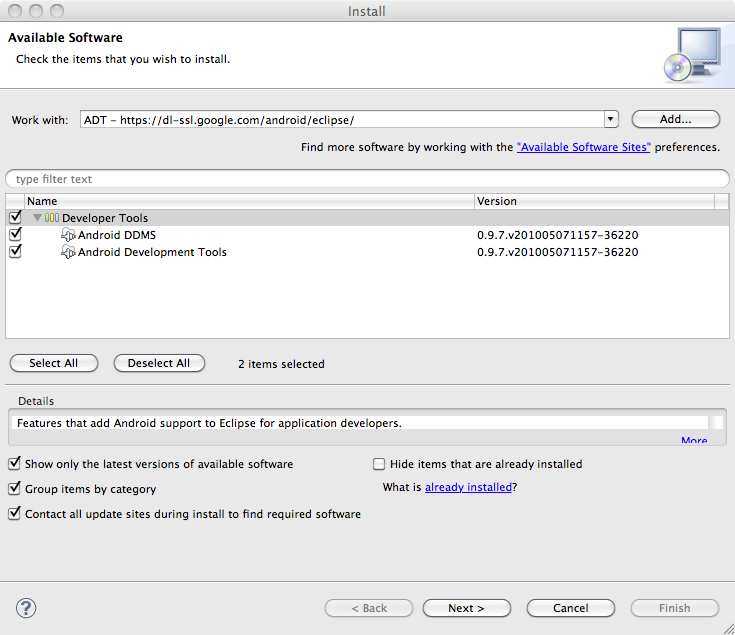
- Start Eclipse, then select Help → Install New Software (see Figure 4-1).
- In the Available Software dialog, click Add.
- In the Add Site dialog that appears, enter a name for the remote site (for example, “Android Plugin”) in the Name field.
-
In the Location field, enter this URL:
https://dl-ssl.google.com/android/eclipse/. - Click OK.
- Back in the Available Software view, you should now see Developer Tools added to the list. Select the checkbox next to Developer Tools, which will automatically select the nested tools Android DDMS and Android Development Tools. Click Next.
- In the resulting Install Details dialog, the Android DDMS and Android Development Tools features are listed. Click Next to read and accept the license agreement and install any dependencies, then click Finish.
- Restart Eclipse.
Note
If you have trouble downloading the plug-in, you can try using “http” in the URL instead of “https” (https is preferred for security reasons).
Tip
Eclipse is a very feature-rich development environment with many useful shortcuts and features. To help you pick up Eclipse features in the shortest time possible, we recommend watching Dan Rosen’s video tutorial Introduction to Eclipse - Driving Java Productivity. It’s only 30 minutes long and will likely save you hours as you venture into Android development.
Hello World!
To make sure everything is set up properly, we’re going to write a simple Hello World program. As a matter of fact, there’s not much for us to write, but a lot to understand. This is because Eclipse will create the project shell for us from some predefined templates.
Creating a New Project
In Eclipse, choose File → New → Android Project. Sometimes (especially the first time you run Eclipse) the Android tools may not be appear there right away. They should show up in the future after you’ve used them for the first time. If Android Project is not an option under File → New, choose Other and look for Android Project in there.
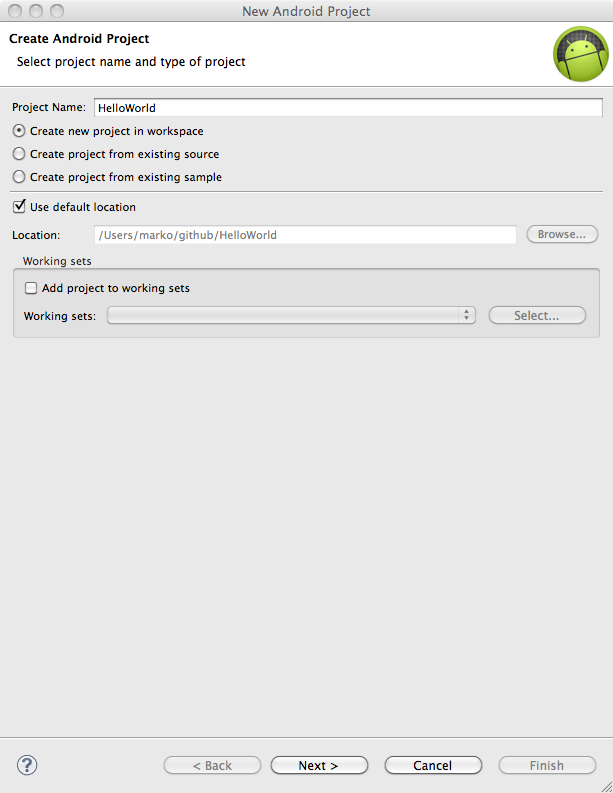
In the New Android Project dialog window (Figure 4-2), fill out the following:
-
Project name is an Eclipse construct. Eclipse organizes everything into projects. A project name should be one word. We like to use the CamelCase naming convention here. For this example, type
HelloWorld. Click Next.
- Choose the build target, which tells the build tools which version of the Android platform to build the app for. Here you should see a list of available platforms and add-ons you have installed as part of your SDK. Pick one of the newer ones, such as Android 4.x (but don’t choose the targets named Google APIs—those are Google’s proprietary extensions to the Android platform). For our purposes, we’ll stick to Android Open Source versions of the Android platform. Click Next.
-
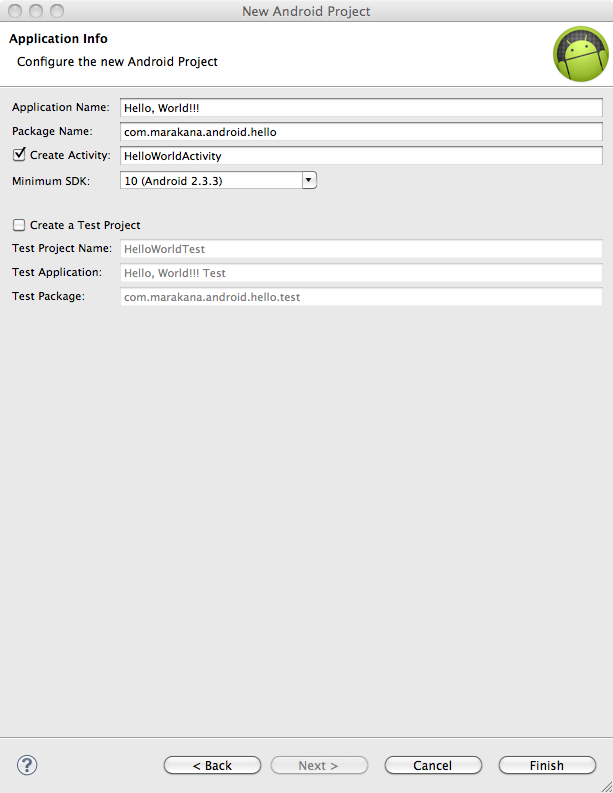
Fill out your project properties. The application name is the plain English name of your application. Enter something like
Hello, World!!!. -
The package name is a Java construct. In Java, all source code is organized into packages. Packages are important because, among other things, they control which objects are visible to Java classes in your project. In Android, packages are also important for application signing purposes. Your package name should be the reverse of your domain name with optional subdomains. We might use
com.example.calculatorif we were building a calculator app and our domain name was example.com. This example usescom.marakana.android.hello, but you should choose a unique domain name. -
You can optionally specify an activity. We haven’t covered activities yet (you’ll learn about them in Chapter 7), but think of them as corresponding to the various screens in your application. An activity is going to be represented by a Java class, so its name should adhere to Java class naming conventions: start with an uppercase letter and use CamelCase to separate words. Here, therefore, type
HelloWorldfor your activity name. - The minimum SDK version is the minimum version of Android—represented by its API level—that is required for the device to run this application. You want this number to be as low as possible (depending on your business requirements for your app) so that your app can run on as many devices as possible. We’ll put 10 here to represent Android 2.3.3, which is the oldest significant version of Android. See Android’s section on platform versions for the most current data.
After you fill out the form as shown in Figure 4-3, click Finish, and Eclipse will create your project.
Anatomy of an Android Project
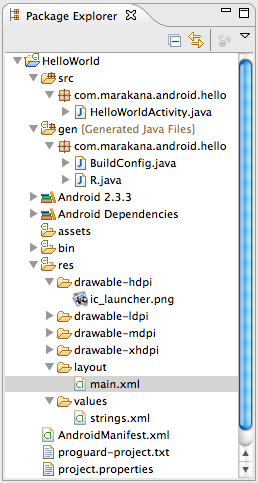
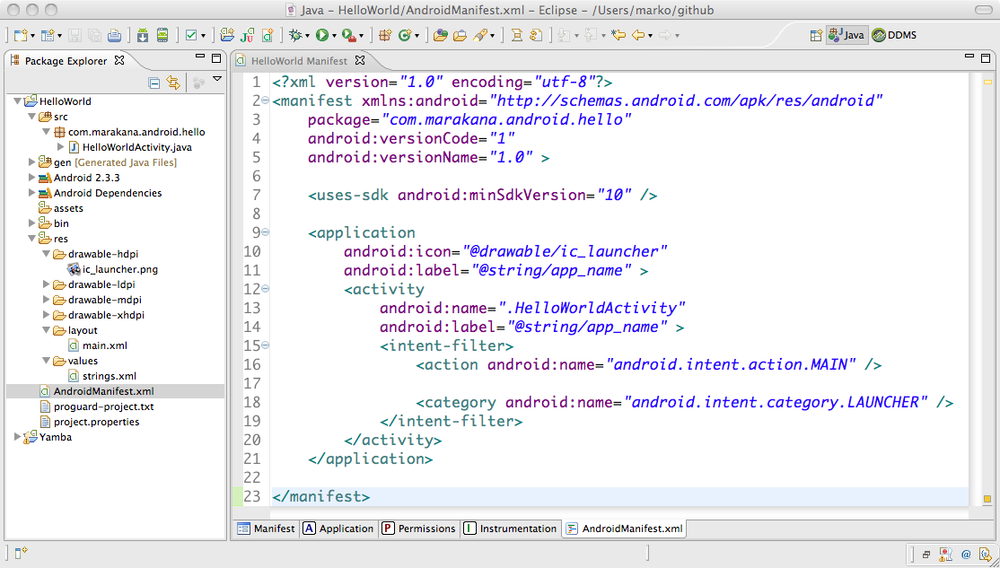
You have created a Hello World project, but so far you haven’t written much. Yet Eclipse has created a whole new project populated with numerous files. The directory structure with all these files can be viewed in Eclipse’s Package Explorer window (Figure 4-4). These boilerplate files represent a structure of a typical Android project. In this section, we’ll review its major parts.
Android Manifest File
The manifest file glues everything together. It explains what the application consists of, what all its main building blocks are, what permissions it requires, and so on. To look at its contents, double-click the AndroidManifest.xml file in Eclipse’s Package Explorer window.
Certain types of XML resources are specific to Android. Eclipse recognizes these special resources and opens those files in an Android-specific view rather than showing you the raw source code of that file.
Some people find this fill-in-the-form interface intuitive and easier to use. For the most part, we prefer the raw source of the file, because it is easier to see the entire content at once, and easier to explain what we’re doing.
In order to see the raw source, when opening those “known” XML resources, look for a tab that appears at the bottom of each file’s window. In case of the AndroidManifest.xml file, the bottom tab bar contains Manifest, Application, Permissions, Instrumentation, and AndroidManifest.xml tabs. These are different views of the same source file, and it’s the Eclipse attempt at providing hand-holding in editing the file itself. In order to get to the actual source of the file, choose the AndroidManifest.xml tab on the bottom right, as shown in Figure 4-5.
Example 4-2 contains the source code of this file.
<?xml version="1.0" encoding="utf-8"?><manifestxmlns:android="http://schemas.android.com/apk/res/android"package="com.marakana.android.hello"android:versionCode="1"android:versionName="1.0"><uses-sdkandroid:minSdkVersion="10"/><applicationandroid:icon="@drawable/ic_launcher"android:label="@string/app_name"><activityandroid:name=".HelloWorldActivity"android:label="@string/app_name"><intent-filter><actionandroid:name="android.intent.action.MAIN"/><categoryandroid:name="android.intent.category.LAUNCHER"/></intent-filter></activity></application></manifest>
Going forward, we’ll assume you have basic understanding of XML file structure. In a nutshell, this file is used to declare basic information about your app, such as:
- The package under which it’s registered
- The version of the app, both code and name
- The Android SDK that it is targeting and requiring in order to run
- The permissions that it uses in order to run (the user gets asked to grant them at install time)
- Custom permissions that it declares and may require from other components
- The application and all its main building blocks: activities, services, providers, and receivers
An Android Manifest file is usually about one to two screens in length in a medium-sized application. You will find yourself editing this file whenever you create a new component, need to use a permission, or similar changes to the environment of the app.
Next, we’ll look at some of the resources that are created for our Hello, World project.
String Resources
Moving up the list of significant files created from the boilerplate template for a new Android project, the first resource file, strings.xml, is located in the res/values/ folder of your project.
This is another XML file that contains all the text that your application uses: for example, the names of buttons, labels, default text, and similar types of strings. This is the best practice for separating the concerns of various files, even if they are XML files. In other words, layout.xml is responsible for the layout of widgets, but strings.xml is responsible for their textual content (see Example 4-3).
Just as with the Manifest file, you can view this file with the so-called Android Localization Files Editor, or you look at the raw source code by clicking the values/strings.xml tab on the bottom right. Again, we prefer the source code view so you can see the entire file in its entirety.
<?xml version="1.0" encoding="utf-8" standalone="no"?><resources><stringname="hello">Hello World, HelloWorldActivity!</string><stringname="app_name">Hello, World!!!</string></resources>
The strings resource file is simply a set of name-value pairs, where the name is the name of a string resource and the value is its actual text. By referring to strings by their made-up names, we can later change the actual value without changing any of our Java code. This is an important feature, because any changes to code would require additional testing of the application before releasing it to the user base.
Additionally, by using a name rather than the actual value, we can provide multiple sets of values for the same string resource. In other words, the same text could be provided in multiple languages. We’ll explore this feature in more detail in Alternative Resources. For now, it’s good to know you can have multiple versions of the strings.xml file for each language you want your app to be supported in. The Android OS will automatically determine the most appropriate “language pack” to use, or will just revert to default one in case there’s nothing that matches user’s preferred locale.
Layout XML Code
Next up is the res/layout folder, containing the main.xml file. This is an XML file declaring the layout of our screen.
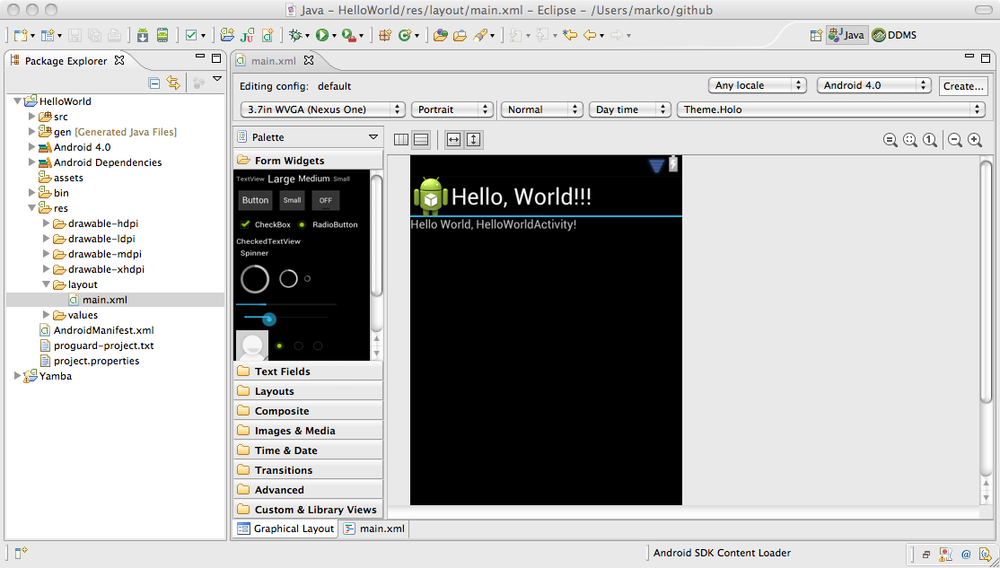
As before, there are two ways to look at this file: graphically and as the raw XML. When working with layouts, graphical view can be a very valuable tool. There you can drag and drop various widgets on the screen, move them around, and right-click particular component to set one of numerous properties. The graphical layout for our basic main.xml file is shown in Figure 4-6.
As before, you can click the bottom-right tab to see the actual source code of this file, as shown in Example 4-4.
<?xml version="1.0" encoding="utf-8"?><LinearLayoutxmlns:android="http://schemas.android.com/apk/res/android"android:layout_width="fill_parent"android:layout_height="fill_parent"android:orientation="vertical"><TextViewandroid:layout_width="fill_parent"android:layout_height="wrap_content"android:text="@string/hello"/></LinearLayout>
You can think of this XML file as an HTML page. It declares the components of a single screen in our Android app. Just as tools such as Adobe’s Dreamweaver allow you to create a web page in What-You-See-Is-What-You-Get (WYSIWYG) mode as well as in raw HTML view, Eclipse lets you use both graphical layout view as well as edit the raw XML source code.
Drawable Resources
Next, the list of files in our Hello World project in the Eclipse Package Explorer is a set of drawable folders. They are also resources, but this time they are images. If you expand all these various drawable folders, you’ll notice that they all contain the ic_launcher.png file. This is the icon that appears in the Launcher app that we click to launch our application.
The reason that we have three or four separate folders is that each one is for a different density of the screen. So drawable-hdpi will be used when the app is running on a device with a high-density screen (240 dots per inch), drawable-mdpi is used on medium screens (160 dpi), and drawable-ldpi is used on low-density screens (80 dpi). And although it appears they all contain the same image, the images are actually different sizes, so that on various screens they appear correct, taking into account number of pixels available per inch.
This is an example of how alternative resources work. The same functionality is available to all other resources as well. We briefly discussed this in String Resources and will cover it in more detail in Alternative Resources.
The R File
We are finally making it up to the world of Java files. The gen folder is where all the auto-generated files are located. For now, R.java is the only significant one, with BuildConfig.java being introduced in later versions of the Ice Cream Sandwich release of tools (ADK R18).
The R file is the glue between the world of Java and the world of resources (see Example 4-5). It is an automatically generated file, and as such, you never modify it. It is recreated every time you change anything in the res directory; for example, when you add an image or modify an XML file.
You don’t need to look at this file much in the future. We will use the data in it quite a bit, but we’ll use Eclipse to help us refer to values stored in this file.
/* AUTO-GENERATED FILE. DO NOT MODIFY.** This class was automatically generated by the* aapt tool from the resource data it found. It* should not be modified by hand.*/packagecom.marakana;publicfinalclassR{publicstaticfinalclassattr{}publicstaticfinalclassdrawable{publicstaticfinalinticon=0x7f020000;}publicstaticfinalclasslayout{publicstaticfinalintmain=0x7f030000;}publicstaticfinalclassstring{publicstaticfinalintapp_name=0x7f040001;publicstaticfinalinthello=0x7f040000;}}
This file represents a set of various pointers that allow Java to locate app resources at runtime. The entire file, including the obscure values, is automatically generated by an SDK tool called aapt and has little value to humans. We’ll see later on how we use this file, starting with the Java source code in the following section.
Java Source Code
At the top, we finally have our Java code, which drives everything. It represents the core logic behind our application. As such, it is the main starting point of our app execution.
Example 4-6 contains the source of our Java code representing the Hello World activity; in other words, the logic behind the single screen that we have in our app.
packagecom.marakana.android.hello;importandroid.app.Activity;importandroid.os.Bundle;publicclassHelloWorldActivityextendsActivity{/** Called when the activity is first created. */@OverridepublicvoidonCreate(BundlesavedInstanceState){super.onCreate(savedInstanceState);setContentView(R.layout.main);}}
What goes on in this file will become much more apparent later on. For now, just notice that we’re subclassing the Activity class, which we included from the Android framework.
So now that we’ve covered all the significant files that make up the Hello World project, we’re ready to test-drive this application.
Building the Project
Thus far, we haven’t talked about how to build our project. In a traditional software project, at some point you have to compile it, link it with other libraries, and finally create a shippable product that users can install and run.
Eclipse actually takes care of much of the build process for you. This is because, by default, the Build Automatically feature is enabled under the File → Project menu. If it’s not, you may want to enable it, because it is usually a very useful feature. When Build Automatically is on, every time you change any file, or anything in your project, Eclipse automatically rebuilds the application. The by-products of this build are under the bin folder in your project. If you look under the bin folder, you will find the following:
- classes folder
- This is where your Java source code is compiled into Java byte code, or .class files.
- classes.dex file
- Once your Java is compiled, it is recompiled once again into the Dalvik byte code, and classes.dex is the archive containing all those recompiled Dalvik classes. We talked about this process in Android and Java.
- res folder
- This is where any binary resources are copied over, such as images, movies, and audio clips.
- resources.ap_ file
- This file is an archive of all the XML resource files encoded in an efficient and easy-to-parse format.
- HelloWorld.apk
- This is our final shippable product. The APK (Android Package) file represents our application in its entirety. It is the archive containing all the Dalvik executable code and all the resources, as well as the Android Manifest file that describes the application’s metainformation.
Now that we have the final shippable product in the form of our HelloWorld.apk file, we’re ready to execute it on an Android device.
Android Emulator
The Emulator is a tool that ships with Android SDK. It allows you to run any number of Android Virtual Devices (AVDs) right on your computer without needing a real Android device for development purposes. The Emulator not only opens Android app development to way more programmers, but it also makes the whole program-deploy-test cycle shorter, making the Android development more enjoyable.
Tip
A simulator and an emulator sound very similar, but are fundamentally different. To emulate means to imitate the machine executing the binary code. So, an emulator is sort of like a virtual machine. A simulator merely simulates the behavior of the code at a higher level. Android SDK ships with a true emulator, based on QEMU.
An Emulator Versus a Physical Phone
For the most part, running your application on the emulator is identical to running it on a physical phone. That is because the emulator is an actual code emulator, meaning it runs the same code base as the actual device, all the way down to the machine layer.
There are some notable exceptions, mostly things that are just hard to virtualize, such as sensors. Other hardware-related features, such as telephony and location services, can be simulated in the emulator.
Unless otherwise noted, we’re going to be agnostic to the fact that your code may be running on a real devices versus an emulated device.
Note
Until the Honeycomb version of Android, the Emulator was reasonably fast, and for the most part we’d prefer testing our code on the emulated device versus the real one. With Honeycomb, the Emulator became extremely slow and painful to use. This mostly has to do with lack of multicore support and lack of GPU support that real devices enjoy and that are missing from the Emulator. The Android team realized this shortcoming and, since later versions of Ice Cream Sandwich (ADT R18), the Emulator supports GPU, making it substantially faster. It is, once again, enjoyable to test development code on it.
To use the emulator, we’ll have to create an Android Virtual Device (AVD). The easiest way to do that is to start Android Virtual Device tool in Eclipse.
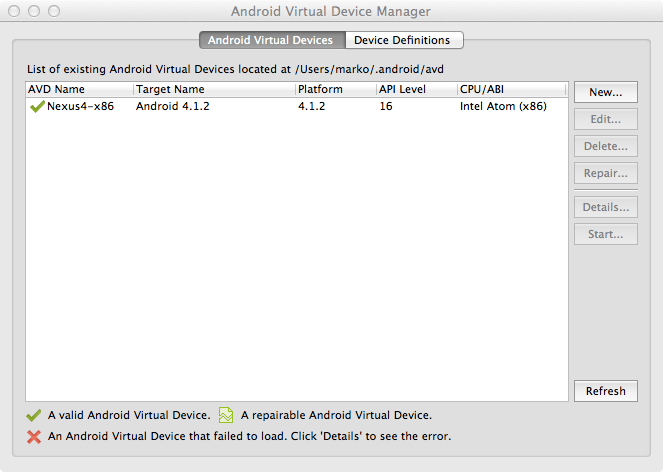
To create a new AVD, start the Android Virtual Device Manager. You can start this tool from Eclipse by clicking the ![]() icon or by choosing Window → AVD Manager in the Eclipse menu bar. You should get a dialog window that looks similar to Figure 4-7.
icon or by choosing Window → AVD Manager in the Eclipse menu bar. You should get a dialog window that looks similar to Figure 4-7.
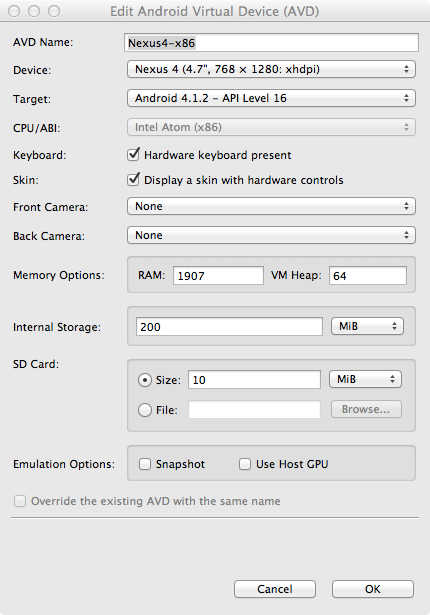
From within the Android Virtual Device Manager window, choosing New pops up a Create New AVD dialog window (see Figure 4-8). In this dialog, specify the parameters for your new AVD. The name can be any name you choose. The target designates which version of Android you want installed on this particular AVD. The list of possible targets is based on platforms and add-ons that you have installed into your SDK. If you don’t have any targets, go back to the Android SDK and AVD Manager window and choose the “Available packages” tab to install at least one platform, for example, Android 4.1 (API level 16).
Each AVD can have an SD card. You can just specify a number here for your built-in card, in megabytes. The skin is the look and feel of your device as well as its form factor. The Hardware option lets you fine-tune what this AVD does and doesn’t support.
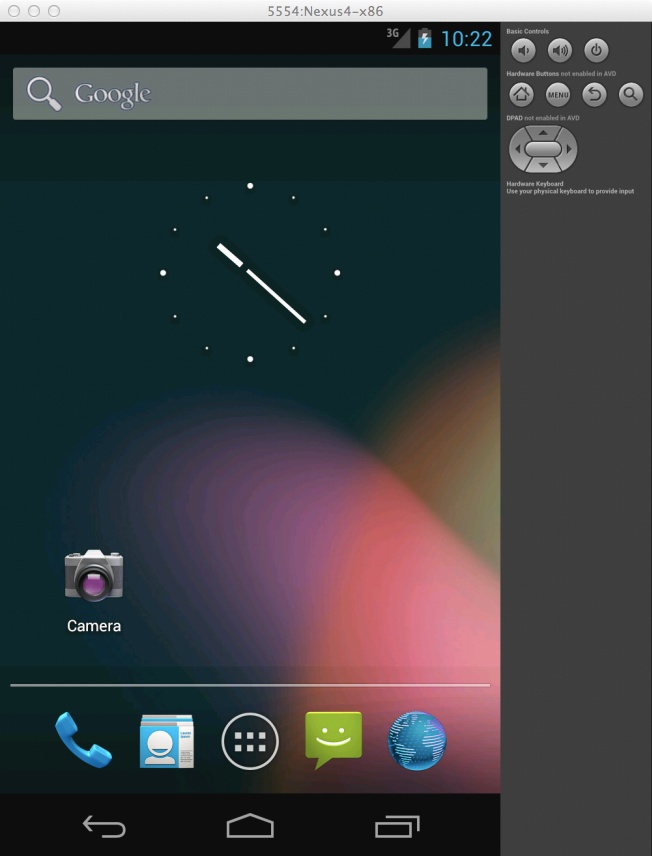
Once you are done with this dialog, you will have a new Android Virtual Device in your list. Go ahead and start it by clicking Start and then Launch, and an emulator will pop up (see Figure 4-9).
Summary
Setting up the Android development environment basically involves setting up Java, Android SDK, and Eclipse with Eclipse tools for Android (ADT). Once you have set up your development environment, a good way to test that everything is working is to use Eclipse to create a simple Hello, World project and run it in the emulator. If that runs fine, you are almost certain that your system is set up and ready for further development.
By now, you should have a general knowledge of what makes up an Android application and what the major parts are. In the following chapter, we’ll look at how to architect an Android app using Android’s main building blocks.
Get Learning Android, 2nd Edition now with the O’Reilly learning platform.
O’Reilly members experience books, live events, courses curated by job role, and more from O’Reilly and nearly 200 top publishers.
