Chapter 4. AngularJS Controllers
AngularJS controllers are at the center of AngularJS applications and are probably the most important component to understand. Controllers are not always clearly defined in some JavaScript client-side frameworks, and that tends to confuse developers who have experience with MVC frameworks. That is not the case with AngularJS. AngularJS clearly defines controllers, and controllers are at the center of AngularJS applications.
Almost everything that happens in an AngularJS application passes through a controller at some point. Dependency injection is used to add the needed dependencies, as shown in the following example file, which illustrates how to create a new controller:
/* chapter4/controllers.js - a new controller */varaddonsControllers=Âangular.module('addonsControllers',[]);addonsControllers.controller('AddonsCtrl',Â['$scope','checkCreds','$location','AddonsList','$http','getToken', ÂfunctionAddonsCtrl($scope,checkCreds,$location,AddonsList,Â$http,getToken){   Âif(checkCreds()!==true){     Â$location.path('/loginForm');   Â}   Â$http.defaults.headers.common['Authorization']=Â'Basic '+getToken();   ÂAddonsList.getList({},    Âfunctionsuccess(response){     Âconsole.log("Success:"+ÂJSON.stringify(response));         Â$scope.addonsList=response;     Â},     Âfunctionerror(errorResponse){      Âconsole.log("Error:"+ÂJSON.stringify(errorResponse));               Â}   Â);   Â$scope.addonsActiveClass="active";}]);
In this code, we first create a new module named addonsController by making a call to the module method of angular. On the second line, we create a new controller named AddonsCtrl by calling the controller method of the addonsControllers module. Doing that attaches the new controller to that module. All controllers created in the controllers.js file will be added to the addonsControllers module.
Also notice the line console.log("Success:" + JSON.stringify(response)). Most modern browsers have accompanying developer tools that give developers easy access to the JavaScript console. This line uses the JSON.stringify method to log the JSON thatâs returned from the web service to the JavaScript console. Developers can easily use the JavaScript console to troubleshoot REST service issues by viewing the JSON logged in the success callback function, or in the error callback function if a service call fails.
Most developer tools and some IDEs, like NetBeans, also include JavaScript debuggers that allow developers to place breakpoints in both the success and error callback functions. Doing so allows the developer to take a fine-grained approach to troubleshooting REST services. Quite often, the developer can resolve otherwise complex REST service issues very quickly by using a JavaScript debugger.
The following code is an excerpt of the previous file. It shows how we use dependency injection to add dependencies to the new controller. This code shows $scope, checkCreds, $location, AddonsList, $http, and getTokens as dependencies for the new controller. We have already covered the $scope briefly. For now itâs not important what the other dependencies actually represent; you only need to understand they are required by the new controller:
/* chapter4/controllers.js excerpt *//* using dependency injection */['$scope','checkCreds','$location','AddonsList','$http','getToken',ÂfunctionAddonsCtrl($scope,checkCreds,$location,AddonsList,Â$http,getToken){}
This controller plays a major role in the application in which it was defined. Controllers really have two primary responsibilities in an application. We will take a look at those responsibilities in more detail in the next section.
Initializing the Model with Controllers
AngularJS controllers have two primary duties in an application. First, controllers should be used to initialize the model scope properties. When a controller is created and attached to the DOM, a child scope is created. The child scope holds a model used specifically for the controller to which it is attached. You can access the child scope by using the $scope object.
Create a copy of the Chapter 2 project and name it AngularJsHelloWorld_chapter4. We will use this new project for the rest of this chapter. You can also download the project from the GitHub project site.
Model properties can be added to the scope, and once added they are available inside the view templates. The controller code shown here illustrates how to add two properties to the scope. After adding the customer name and customer number to the scope, both are available to the view and can be accessed with double curly braces:
/* chapter4/controllers.js excerpt */helloWorldControllers.controller('CustomerCtrl',['$scope',functionCustomerCtrl($scope){Â$scope.customerName="Bob's Burgers";$scope.customerNumber="44522";}]);
Now add the new controller, CustomerCtrl, to your projectâs controllers.js file. We will make several additions to the controllers.js file in this chapter.
The following view template code shows how to access the newly added model properties inside the view template. All properties that need to be accessed from the view should be added to the $scope object:
<!-- chapter4/partials/customer.html --><div><b>Customer Name:</b>{{customerName}}</div><div><b>Customer Number:</b>{{customerNumber}}</div>Â
Now add a new HTML file under the partials folder and name it customer.html. Replace the generated code with the code just shown.
Adding Behavior with Controllers
The second primary use for controllers is adding behavior to the $scope object. We add behavior by adding methods to the scope, as shown in the following controller code. Here, we attach a changeCustomer method to $scope so that it can be invoked from inside the view. By doing this, we are adding behavior that allows us to change the customer name and customer number:
/* chapter4/controllers.js excerpt */helloWorldControllers.controller('CustomerCtrl',['$scope',functionCustomerCtrl($scope){$scope.customerName="Bob's Burgers";$scope.customerNumber=44522;Â// add method to scopeÂ$scope.changeCustomer=function(){$scope.customerName=$scope.cName;$scope.customerNumber=$scope.cNumber;};}]);
Add the changeCustomer method shown here to the CustomerCtrl controller defined in your controllers.js file.
The following code shows the customer.html file and the changes needed in the view to make use of the new behavior that was just added. We add two new properties to the model by using ng-model="cName" and ng-model="cNumber". We use ng-click="changeCustomer();" to invoke the new changeCustomer method that is attached to the scope:
<!-- chapter4/partials/customer.html --><div><b>Customer Name:</b>{{customerName}}</div><div><b>Customer Number:</b>{{customerNumber}}</div><form><div><inputtype="text"ng-model="cName"required/></div><div><inputtype="number"ng-model="cNumber"required/></div><div><buttonng-click="changeCustomer();">Change Customer</button></div></form>Â
Modify the customer.html file to include the new form defined here.
Once the changeCustomer method is invoked, the new properties are attached to $scope and available to the controller. As you can see, we simply assign the two new properties bound to the model back to the original two properties, customerName and customerNumber, inside the changeCustomer method. Both ng-model and ng-click are AngularJS directives. We will cover directives in detail in Chapter 9.
Controller Business Logic
Controllers are used as just demonstrated to add business logic to an application. Business logic added in the controller, however, should be specific to the view associated with that one controller and used to support some display logic functionality of that one view. Any business logic that can be pushed off the client-side application should be implemented as a REST service and not actually inside the AngularJS application.
There is one caveat to this concept, however: REST services must have a response time of two (2) seconds or less. Long-running services will only cause delays in the UI and make for a bad user experience. Meeting the two-seconds-or-less rule requires having REST services that are properly designed and running on a backend system that scales well to load demand changes. There are other concerns related to mobile applications, but we will cover those in Chapter 7 and Chapter 8.
Business logic that canât be placed in REST services but needs to be available to multiple controllers should not be placed in the controller but should instead be placed in AngularJS non-REST services. In Chapter 8, we will cover business logic services in more detail. Business logic that is placed in the controller should be simple logic that relates only to the controller in which it is defined. Placing too much business logic inside an AngularJS application would be a bad design decision, however.
Presentation Logic and Formatting Data
Presentation logic should not be placed inside the controller but instead should be placed in the view. AngularJS has many features for DOM manipulation that help you avoid placing presentation logic in the controllers. The controller is also not the place where you should format data. AngularJS has features especially designed for formatting data, and thatâs where data formatting should take place. Some of those features will be covered in detail in the next chapter.
Form Submission
Now we will look at how form submissions are handled in AngularJS using controllers. The following code for the newCustomer.html file shows the view for a new form. Create a new HTML file under the partials folder and replace the generated code with the code listed here:
<!-- chapter4/partials/newCustomer.html --><formng-submit="submit()"ng-controller="AddCustomerCtrl"><div><inputtype="text"ng-model="cName"required/></div><div><inputtype="text"ng-model="cCity"required/></div><div><buttontype="submit">Add Customer</button></div></form>
As you can see, we use standard HTML for the form with nothing really special except the directives. The directive ng-submit binds the method named submit, defined in the AddCustomerCtrl controller, to the form for form submission. The ng-model directive binds the two input elements to scope properties.
Two or more controllers can be applied to the same element, and we can use controller as to identify each individual controller. The following code shows how controller as is used. You can see that addCust identifies the AddCustomerCtrl controller. We use addCust to access the properties and methods of the controller, as shown:
<!-- chapter4/partials/newCustomer.html (with controller as) --><formng-submit="addCust.submit()"ng-controller="AddCustomerCtrl as addCust"><div><inputtype="text"ng-model="addCust.cName"required/></div><div><inputtype="text"ng-model="addCust.cCity"required/></div><div><buttonid="f1"type="submit">Add Customer</button></div></form>
The following code shows the AddCustomerCtrl controller and how we use it to handle the submitted form data. Here we use the path method on the AngularJS service $location to change the path after the form is submitted. The new path is http://localhost:8383/AngularJsHelloWorld_chapter4/index.html#!/addedCustomer/name/city.
Add this code to the controllers.js file:
/* chapter4/controllers.js */helloWorldControllers.controller('AddCustomerCtrl',['$scope','$location',functionAddCustomerCtrl($scope,$location){$scope.submit=function(){$location.path('/addedCustomer/'+$scope.cName+"/"+$scope.cCity);};}]);Â
Thatâs all that is needed to handle the form substitution process. We will now look at how we get access to the submitted values inside another controller.
Using Submitted Form Data
The app.js file shown next includes the new route definitions. Modify the app.js file in the Chapter 3 project and add the new routes. Make sure your file looks like the file shown here:
/* chapter4/app.js *//* App Module */varhelloWorldApp=angular.module('helloWorldApp',['ngRoute','helloWorldControllers']);helloWorldApp.config(['$routeProvider','$locationProvider',function($routeProvider,$locationProvider){$routeProvider.when('/',{templateUrl:'partials/main.html',controller:'MainCtrl'}).when('/show',{templateUrl:'partials/show.html',controller:'ShowCtrl'}).when('/customer',{templateUrl:'partials/customer.html',controller:'CustomerCtrl'}).when('/addCustomer',{templateUrl:'partials/newCustomer.html',controller:'AddCustomerCtrl'}).when('/addedCustomer/:customer/:city',{templateUrl:'partials/addedCustomer.html',controller:'AddedCustomerCtrl'});$locationProvider.html5Mode(false).hashPrefix('!');}]);
You can see there are two path parameters, customer and city, for the addedCustomer route. The values are passed as arguments to a new controller, AddedCustomerCtrl, shown in the following excerpt. We use the $routeParams service in the new controller to get access to the values passed as path parameter arguments in the URL. By using $routeParams.customer we get access to the customer name, and $routeParams.city gets us access to the city:
/* chapter4/controllers.js excerpt */helloWorldControllers.controller('AddedCustomerCtrl',['$scope','$routeParams',functionAddedCustomerCtrl($scope,$routeParams){$scope.customerName=$routeParams.customer;$scope.customerCity=$routeParams.city;}]);
Add the new controller, AddedCustomerCtrl, to your controllers.js file now.
The code for our new addedCustomer template is shown next. Once again, we use AngularJS double curly braces to get access to and display both the customerName and customerCity properties in the view:
<!-- chapter4/addedCustomer.html --><div><b>Customer Name:</b>{{customerName}}</div><div><b>Customer City:</b>{{customerCity}}</div>
To add the template to the project, create a new HTML file in the partials folder and name it addedCustomer.html. Replace the generated code with the code just shown. Note how simple it is to submit forms with AngularJS. Simplicity is one of the factors that makes AngularJS a great choice for any JavaScript client-side application project.
JS Test Driver
The rest of this chapter will cover setting up a test environment and testing AngularJS controllers. NetBeans has a great testing environment for both JS Test Driver and Karma. We will focus first on setting up JS Test Driver for unit testing. We will then take a look at Karma for unit testing. To begin, do the following:
- Download the JS Test Driver JAR.
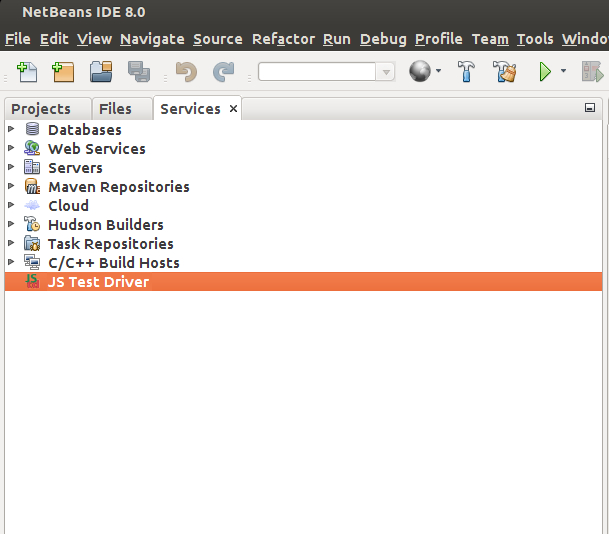
- In the Services tab, right-click âJS Test Driverâ and click âConfigureâ (see Figure 4-1).
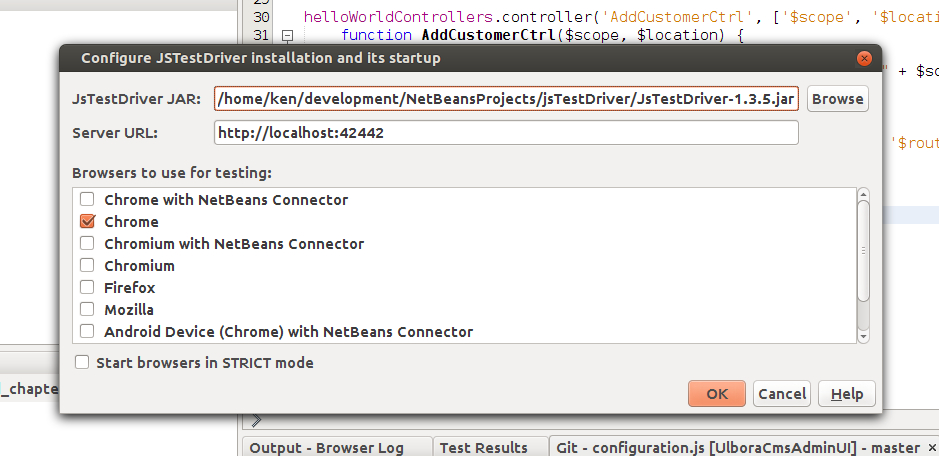
- Select the location of the JS Test Driver JAR just downloaded and choose the browser of your choice (see Figure 4-2).
- Right-click the project node, then click âNewâââOtherâââUnit Tests.â
- Select âjsTestDriver Configuration Fileâ and click âNext.â
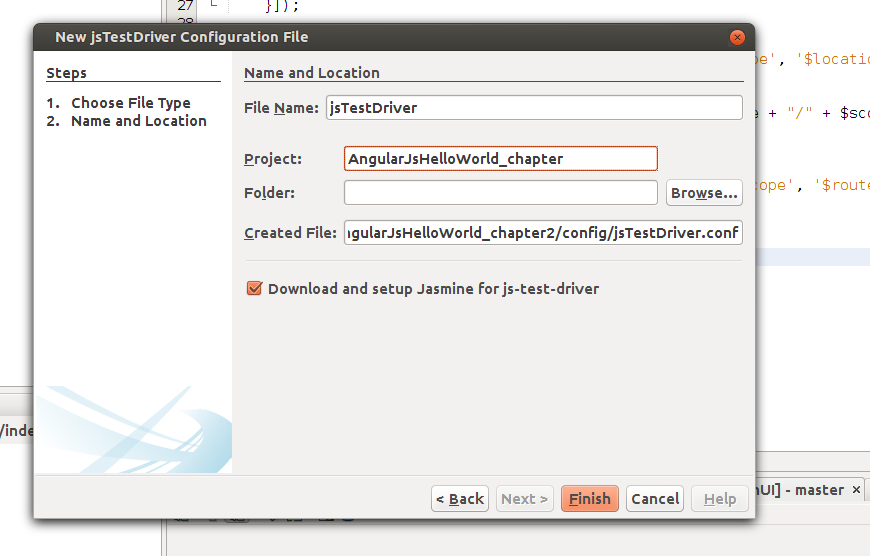
- Make sure the file is placed in the config subfolder, as shown in Figure 4-3.
- Make sure the checkbox for âDownload and setup Jasmineâ is checked.
- Click âFinish.â
- Right-click the project node, click Properties, and select âJavaScript Testing.â
- Select âjsTestDriverâ from the drop-down box.

Figure 4-1. Right-click âJS Test Driverâ in the Services tab

Figure 4-2. Select your browser(s)

Figure 4-3. Make sure the file is created in the config subfolder
The following code shows the JS Test Driver configuration file. Inside the file, we specify the server URL that is used by JS Test Driver. We also specify the needed library files in the load section of the file, along with the locations of our JavaScript files and test scripts:
/*  chapter4/jsTestdriver.conf */

server: http://localhost:42442
load:
- test/lib/jasmine/jasmine.js
- test/lib/jasmine-jstd-adapter/JasmineAdapter.js

- public_html/js/libs/angular.min.js
- public_html/js/libs/angular-mocks.js
- public_html/js/libs/angular-cookies.min.js
- public_html/js/libs/angular-resource.min.js
- public_html/js/libs/angular-route.min.js
- public_html/js/*.js

- test/unit/*.js
exclude:
Notice weâve added angular-mocks.js to the list of required AngularJS library files. That file is needed for unit testing AngularJS applications. So, before continuing, add the angular-mocks.js file to the js/libs folder.
Creating Test Scripts
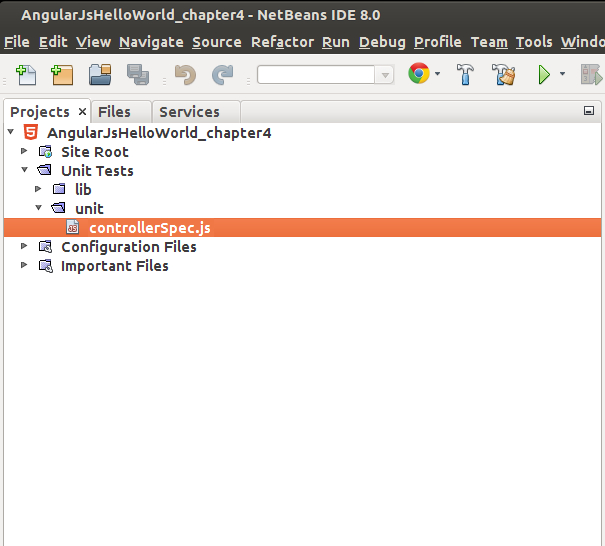
Next, create a new JavaScript file in the unit subfolder of the newly created Unit Test folder, as shown in Figure 4-4. Name the new file controllerSpec.js.

Figure 4-4. Create the controllerSpec.js file in the unit subfolder
The contents of the controllerSpec.js file are shown next. Our test script filename will end with Spec. The file specifies a standard set of unit tests commonly used to test AngularJS controllers. Notice that we have a test for each of our controllers defined in the controllers.js file:
/* chapter4/controllerSpec.js *//* Jasmine specs for controllers go here */describe('Hello World',function(){beforeEach(module('helloWorldApp'));describe('MainCtrl',function(){varscope,ctrl;beforeEach(inject(function($rootScope,$controller){scope=$rootScope.$new();ctrl=$controller('MainCtrl',{$scope:scope});}));it('should create initialed message',function(){expect(scope.message).toEqual("Hello World");});});describe('ShowCtrl',function(){varscope,ctrl;beforeEach(inject(function($rootScope,$controller){scope=$rootScope.$new();ctrl=$controller('ShowCtrl',{$scope:scope});}));it('should create initialed message',function(){expect(scope.message).toEqual("Show The World");});});describe('CustomerCtrl',function(){varscope,ctrl;beforeEach(inject(function($rootScope,$controller){scope=$rootScope.$new();ctrl=$controller('CustomerCtrl',{$scope:scope});}));it('should create initialed message',function(){expect(scope.customerName).toEqual("Bob's Burgers");});});});
This test script uses Jasmine as the behavior-driven development framework for testing our code. We will use Jasmine for all our test scripts in this book.
Here is the complete controllers.js file:
/* chapter4/controllers.js */'use strict';/* Controllers */varhelloWorldControllers=angular.module('helloWorldControllers',[]);helloWorldControllers.controller('MainCtrl',['$scope',functionMainCtrl($scope){$scope.message="Hello World";}]);helloWorldControllers.controller('ShowCtrl',['$scope',functionShowCtrl($scope){$scope.message="Show The World";}]);helloWorldControllers.controller('CustomerCtrl',['$scope',functionCustomerCtrl($scope){$scope.customerName="Bob's Burgers";$scope.customerNumber=44522;$scope.changeCustomer=function(){$scope.customerName=$scope.cName;$scope.customerNumber=$scope.cNumber;};}]);helloWorldControllers.controller('AddCustomerCtrl',['$scope','$location',functionAddCustomerCtrl($scope,$location){$scope.submit=function(){$location.path('/addedCustomer/'+$scope.cName+"/"+$scope.cCity);};}]);helloWorldControllers.controller('AddedCustomerCtrl',['$scope','$routeParams',functionAddedCustomerCtrl($scope,$routeParams){$scope.customerName=$routeParams.customer;$scope.customerCity=$routeParams.city;}]);Â
Tip
To save time, you can download the Chapter 4 code from GitHub. For a complete guide to JavaScript testing in NetBeans, see the documentation at on the NetBeans website.
Testing with JS Test Driver
Now to actually test the controllers weâve defined, just right-click the project node and select âTestâ from the menu. If your project is configured correctly, you should see a success message for all three controllers that were tested. If you have any issues with the test results, go back over the configuration files and validate that all your files match those listed in this chapter. If you continue to have problems, download and run the source code from the project site.
Testing with Karma
Karma is a new and fun way to unit test AngularJS applications. We will use Karma here to test the controllers that we tested earlier.
Installing Karma
Karma runs on Node.js, as mentioned in Chapter 2, so first you must install Node.js if itâs not already installed. Refer to nodejs.org for installation details for your particular operating system. Youâll also need to install the Node.js package manager (npm) on your system. npm is a command-line tool used to add the needed Node.js modules to a project.
Now, in the root of the Chapter 4 project, create a JSON file named package.json and add the following content. The package.json file is used as a configuration file for Node.js:
{ Â"name":"package.json", Â"devDependencies":{   Â"karma":"*",   Â"karma-chrome-launcher":"*",   Â"karma-firefox-launcher":"*",   Â"karma-jasmine":"*",   Â"karma-junit-reporter":"*",   Â"karma-coverage":"*" Â}}
Open a command-line window on your system, and navigate to the root of the Chapter 4 project. You should see the package.json file when you list out the files in the folder.
Type this command to actually install the Node.js dependencies defined in the package.json file:
npm install
Now install the Karma command-line interface (karma-cli) by typing the following command:
npm install -g karma-cli
Warning
Make sure to record the location where karma-cli was installed. You will need the location later in this chapter.This command installs the command-line tool globally on your system.Â
All the Node.js dependencies specified in the package.json file will be installed under the node_modules folder inside the project root folder. If you list out the files and folders, you should see the new folder. You wonât be able to see the new folder inside NetBeans, however.
Karma Configuration
Next, create a new Karma configuration file named karma.conf.js inside the project test folder. Do the following:
- Right-click the project in NetBeans.
- Select âNewâââOtherâââUnit Tests.â
- Create a new Karma configuration file inside the test folder.
Edit the new karma.conf.js file and add the following code:
/* chapter4/karma.conf.js */module.exports=function(config){ Âconfig.set({   ÂbasePath:'../',   Âfiles:[     Â"public_html/js/libs/angular.min.js",     Â"public_html/js/libs/angular-mocks.js",     Â"public_html/js/libs/angular-route.min.js",     Â"public_html/js/*.js",     Â"test/**/*Spec.js"   Â],   Âexclude:[   Â],   ÂautoWatch:true,   Âframeworks:[     Â"jasmine"   Â],   Âbrowsers:[     Â"Chrome",     Â"Firefox"   Â],   Âplugins:[     Â"karma-junit-reporter",     Â"karma-chrome-launcher",     Â"karma-firefox-launcher",     Â"karma-jasmine"   Â] Â});};
Now do the following to set Karma as the test framework:
- Right-click the project.
- Select âProperties.â
- Select âJavaScript Testingâ from the list of categories.
- Select âKarmaâ as the testing provider.
- Select the location of the karma-cli tool installed earlier.
- Select the location of the karma.conf.js file just created.
- Select âOK.â
Running Karma Unit Tests
Now to actually run the unit tests (using the test specification written earlier) under Karma, right-click the project and select âTestâ from the menu. Karma will start. You should see both Chrome and Firefox browser windows open. The NetBeans test results window should open and display three passed tests for Chrome and three passed tests for Firefox.
If you get any error messages or failed tests, go back over this section and verify that you completed all the configurations and installations. You can also download the Chapter 4 code from the GitHub project site.
End-to-End Testing with Protractor
Protractor is a new test framework for running end-to-end (E2E) tests. Protractor lets you run tests that exercise the application as a user would. With Protractor E2E testing, you can test various pages, navigate through each page from within the test script, and find any potential defects. Protractor also integrates with most continuous integration build systems.
Installing Protractor
Like Karma, Protractor is a Node.js-based test framework. The Protractor team recommends installing Protractor globally. To do so, open a command-line window and type the command:
npm install -g protractor
Protractor relies on WebDriverJS, so we will also use this command to update WebDriverJS with the latest libraries:
webdriver-manager update
Configuring Protractor
Next, we will create a Protractor configuration file for our project. Create a new JavaScript file named conf.js under the test folder of the Chapter 4 project. Enter the code shown here in the new file:
/ *chapter4/conf.js */exports.config={seleniumAddress:'http://localhost:4444/wd/hub',specs:['e2e/Hw-spec.js']};
Creating Protractor Test Specifications
Now we need to create a Protractor test specification. Do the following:
- Create a new folder under the test folder of the project and name it e2e.
- Create a new JavaScript file inside the new e2e folder and name it Hw-spec.js.
Now copy the code shown here into the new Hw-spec.js file:
/* chapter4/Hw-spec.js Protractor test specification */describe("Hello World Test",function(){Â Âit("should test the main page",function(){Â Â Â Âbrowser.get(Â"http://localhost:8383/AngularJsHelloWorld_chapter4/");Â Â Â Âexpect(browser.getTitle()).toEqual("AngularJS Hello World");Â Â Â Â Â Â Â Â Âvarmsg=element(by.binding("message")).getText();Â Â Â Âexpect(msg).toEqual("Hello World");Â Â Â Â Â Â Â Â Â Â Â Â Â Âbrowser.get(Â"http://localhost:8383/AngularJsHelloWorld_chapter4/#!/show");Â Â Â Âexpect(browser.getTitle()).toEqual("AngularJS Hello World");Â Â Â Â Â Â Â Â Âvarmsg=element(by.binding("message")).getText();Â Â Â Âexpect(msg).toEqual("Show The World");Â Â Â Â Â Â Â Â Â Â Â Â Â Âbrowser.get("http://localhost:8383/AngularJsHelloWorld_chapter4/#!/addCustomer");Â Â Â Â Â Â Â Â Â Â Â Â Â Â Â Â Âelement(by.model("cName")).sendKeys("tester");Â Â Â Âelement(by.model("cCity")).sendKeys("Atlanta");Â Â Â Âelement(by.id("f1")).click();Â Â Â Â Â Â Â Â Â Â Â Â Â Âbrowser.get("http://localhost:8383/AngularJsHelloWorld_chapter4/#!/addedCustomer/tester/Atlanta");Â Â Â Â Â Â Â Â Âvarmsg=element(by.binding("customerName")).getText();Â Â Â Âexpect(msg).toEqual("Customer Name: tester");Â Â Â Â Â Â Â Â Âvarmsg=element(by.binding("customerCity")).getText();Â Â Â Âexpect(msg).toEqual("Customer City: Atlanta");Â Â});});
Running Protractor
Now that the Selenium Server is running, we can run our Protractor tests. Open a new command window, navigate to the root of the Chapter 4 project, and type this command:
protractor test/conf.js
You should see a browser window open. You should then see the test script navigate through the pages of the Chapter 4 application. If you watch the browser window closely, you will see the script enter values in the form that adds a new customer. When the Protractor script has finished, the browser window will close.
You should see results like the following in the command window when the Protractor script completes. The number of seconds that it takes the script to finish will vary depending on your particular system:
Finished in 3.368 seconds
1 test, 6 assertions, 0 failures
Note
For more information on testing with Protractor, see the project site on GitHub. Protractor has a complete set of documentation to help you get started.Conclusion
Unit testing AngularJS controllers allows us to validate the basic functionality of each controller. For now, our tests are very simple. Testing a controller that retrieves data from a REST service, for example, would be a more complex task.
End-to-end testing is a bit more involved, and can be designed to completely exercise the entire application. For now, our E2E tests are also simple. E2E tests help to identify software defects early in the development process when used with CI build systems.
Weâll be doing more testing in the next chapter, where we focus on AngularJS views.
Get Learning AngularJS now with the O’Reilly learning platform.
O’Reilly members experience books, live events, courses curated by job role, and more from O’Reilly and nearly 200 top publishers.

