Create the Travel Advisor Interface
In creating the interface of Travel Advisor, you’ll be exercising the capabilities of Interface Builder much more than you did with Currency Converter. Here is an overview of the steps you’ll take in this section to complete the Travel Advisor interface:
Create the application project.
Open the application’s nib file.
Customize the application’s window.
Add text fields, labels, and buttons to the window.
Add a form object to the window.
Group the user interface objects.
Add a text view.
Add and configure a table view.
Add an image to the interface.
Add a menu and menu items.
Add formatters.
Make connections for interfield tabbing and printing.
Test the interface.
Get Started
You should be familiar with many of the objects on the Travel Advisor interface because you’ve encountered them them in Chapter 7. Figure 10.4 points out the objects that are new to you in this tutorial.
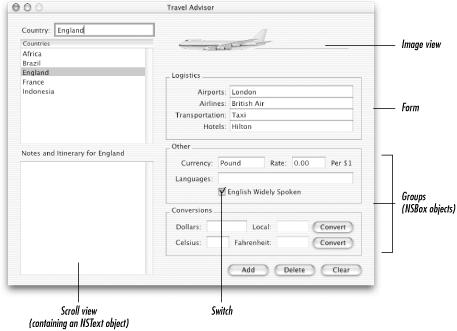
Figure 10-4. New interface elements
Create the Application Project
Start by creating a new project for the application.
Start Project Builder.
Choose New Project from the File menu.
In the New Project panel, select the Cocoa Application project type and click the Next button.
Name the application
Travel Advisor.If you wish, click Set to select a location to save the project in a specific location of your choice. To use the default location, go on to step 6.
Click Finish.
Customize the Application ...
Get Learning Cocoa now with the O’Reilly learning platform.
O’Reilly members experience books, live events, courses curated by job role, and more from O’Reilly and nearly 200 top publishers.

