Chapter 4. Nonpersistent Client-Side Remote Shared Objects
Sharing Data on Multiple Connections
The first time I encountered the remote shared object I thought it had to be the most important contribution to the Internet since the invention of the browser. That opinion has changed little over the years, especially in the case of any application that needs to send data and interact with others in a “live” situation.
So what are shared objects and what are they used for? Shared objects are objects that can be displayed and controlled on one browser and seen on another. So if you have an application that displays text using a text input field, you can display that text in both your own browser as well as in all others that are looking at the same application. Besides text, you can move movie clips on one screen, and they move on other screens. You can click a button on one browser to launch an event on all browsers using shared objects.
When a shared object is set up in a Flash Media Server 3 application, it sets up a “subscription” that others who have launched the same application automatically subscribe to. Think of shared objects as magazines and everyone who logs on gets a subscription to the magazine. The “magazines” are delivered in the form of real-time data. So, if you’re sending (sharing) the text in a text field, as soon as you enter the data, it’s seen on the remote computer.
Persistent and Nonpersistent Shared Objects
Nonpersistent shared objects are something like variables. When you quit an application, all of the values in the variables disappear. They do not persist. In the same way, the data in a nonpersistent shared object is lost as soon as users leave the application.
Persistent shared objects are more like data in a database. The data from persistent shared objects is stored on the server’s hard drive, and hence, persist. When you have data that you need to access from different sites, persistent shared objects are very handy. However, this chapter deals only with nonpersistent shared objects. In Chapter 8, where more advanced shared objects concepts are discussed, both server-side and persistent shared objects will be examined.
Uses of Nonpersistent Remote Shared Objects
While any list of nonpersistent remote shared objects will fall far short of their possible uses, the following gives you an idea of how they can be used:
Remotely controlled slide show.
Text chat.
Games with opponents at different sites.
DJ application where songs are remotely selected and played.
A doorbell.
A live online auction.
Customer service application.
With these applications in mind, let’s look at how to create and use shared objects with FMS3.
Instantiating Remote Shared Objects
This chapter will demonstrate three different remote shared objects with minimal code. The first is a pointer that lets you point to any location on another person’s page. This kind of pointer can come in handy if you’re making a presentation to a remote location and you have to point out different things to the audience. Second, you will see how to make a minimal text chat where the text entered into an input text box shows up on all users’ screens. And third, using a shared movie clip, you will see how to open Web pages on remote viewers’ screens. These are all minimal examples, but they show how you can do different things with remote shared objects. The rest is up to your imagination.
When using a class, you can scope the shared object outside the constructor, just as you would any other variable.
private var so:SharedObject;
Instantiating a remote shared object, though, is a little different than most class instances. Figure 4-1 shows the general format for instantiating a shared object.
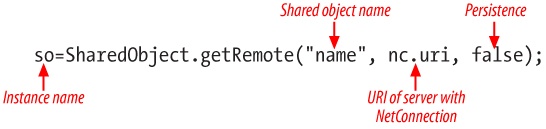
Instead of using the new statement, the getRemote() method creates the remote shared object. Using the same data type (SharedObject), you can also create a local shared object with the method, getLocal(). Given the focus on FMS3, you will not find any examples using local shared objects in this book.
Setting Up Shared Object Storage: Slots
When you set up a shared object instance, you need to set up a storage system based on the shared object’s properties. Unlike earlier versions of Flash Communication Server and Flash Media Server, Flash Media Server 3 uses the SharedObject.setProperty() method to assign values to a shared object property. By assigning different shared object properties you can create slots using most kinds of data types. The following shows a simple property slot:
var memberName:String= name_txt.text;
so.setProperty("cliName", memberName);
The shared object has a data property, cliName. So it now has a storage slot for a string name that can be shared with others connected to the same application. In the same way, you can set up as many slots as your application needs, using the appropriate data type for the data to be stored. Whenever the shared object property changes, it fires a SyncEvent to be used by an event handler that updates the information for all connected to the same shared object.
Inspecting a Shared Object
To get a better idea of what’s going on in a shared object, look at its contents. It should appear something like the contents of an array or any object that has more than a single element. Add a folder to your server-side folders named basicSO; this folder will be used for all of the examples in this chapter. In the following example, several different types of data are added to the slots. The properties include literals as well as variables to illustrate the range of data that can be put into shared objects.
The SyncEvent Class
When you use remote shared objects that are used by other clients, an important class is SyncEvent. As the name implies, the event is used in synchronizing events on your browser with those on other browsers using the same remote shared objects. By using the SYNC constant, as soon as the client connects to a remote shared object, a sync event fires up. Whenever a client changes a shared object’s data property, the action invokes a sync event. However, because different kinds of actions related to shared objects generate events, you need a way to determine the nature of the event.
The changeList Property
In ActionScript 3.0, one of the key properties in successfully dealing with events generated by actions related to shared objects is the SyncEvent.changeList property. The changeList property is an array that stores shared object properties. A key property of the changeList property is the code property that indicates what type of event occurred. When first connected to a shared object, the code generates a code value of “clear.” This code value can be used to help track the number of users connected to the same shared object.
When a remote user changes the value of a shared object, two code events are generated. A “success” value indicates that the client’s changes were successfully made, and a “change” value indicates that someone else changed the shared object. So the client who makes the change receives a “success” code, and everyone else connected to the same shared object gets a “change” code value. For this first example, both the “clear” and “success” states are used to direct the program to methods for creating slots for and assigning values to a shared object, and then for showing the context of those slots.
To see how all of this works, you can trace this next application through these key operations:
Makes a
NetConnection(nc) in the constructor function (BasicSO). This generates aNetStatusEvent.Creates a shared object in the
doSOfunction and connects the shared object to theNetConnection(nc) instance generating a sync event.With the
seeSofunction, determines the nature of the event using theSyncEvent.changeListproperty. It uses the zero array element in thechangeListproperty rather than iterating through the whole array. A finding of “clear” reports that the shared object connection has been established and calls the function to set the shared object properties. If it finds “success,” it shows the changes that have been made on your client.
This application’s purpose is to help you understand something about how shared objects work, but as designed, it focuses on both the steps in the process and how to change values in shared object. At this stage, though, it doesn’t share anything remotely. The following steps show how to set it up:
Create a new Flash file and save it as BasicSO.fla.
In the Document Class window in the Property inspector, type
BasicSOand resave the file.Open a new ActionScript file and save it as BasicSO.as.
In the BasicSO.as file, enter the script in Example 4-1, and save the file again.
Example 4-1. BasicSO.aspackage { import flash.display.Sprite; import flash.net.SharedObject; import flash.events.NetStatusEvent; import flash.events.SyncEvent; import flash.net.NetConnection; //import flash.net.ObjectEncoding; public class BasicSO extends Sprite { private var test_so:SharedObject; private var nc:NetConnection; private var monthDay:Date; private var good:Boolean; public function BasicSO () { //NetConnection.defaultObjectEncoding=flash.net.ObjectEncoding.AMF0; //Connect var rtmpNow:String="rtmp://192.168.0.11/basicSO"; nc=new NetConnection; nc.connect (rtmpNow); nc.addEventListener (NetStatusEvent.NET_STATUS,doSO); } private function doSO (e:NetStatusEvent):void { good=e.info.code == "NetConnection.Connect.Success"; if (good) { //Set up shared object test_so=SharedObject.getRemote("test",nc.uri,false); monthDay=new Date; test_so.connect (nc); test_so.addEventListener (SyncEvent.SYNC,seeSO); } } private function seeSO (se:SyncEvent):void { trace (se.changeList[0].code); switch (se.changeList[0].code) { case "clear" : loadSO (); break; case "success" : showSO (); break; } } private function loadSO ():void { test_so.setProperty ("city","Katmandu"); test_so.setProperty ("dayOfMonth",monthDay.getDate()); test_so.setProperty ("verity",true); test_so.setProperty ("bunch",250); } private function showSO ():void { trace (test_so.data.city); trace (test_so.data.dayOfMonth); trace (test_so.data.verity); trace (test_so.data.bunch); } } }Test the file by choosing Control → Test Movie.
When you run the example, the Output window shows:
clear
success
Katmandu
15
true
250
As you can see, shared objects take on the basic data types in ActionScript as other variables and properties, and they can be extracted in the same way as other objects and variables.
Syncing Shared Objects
Whenever the value of any shared object property attribute, or “slot,” changes, that change must be broadcast to all of those connected. The event handler for this process is SyncEvent.SYNC,callback. Each time any data attribute changes, a change event triggers SyncEvent.SYNC,callback, and in this way, all of the changed attributes in all of the connections are updated. The general format is the following:
share_so.addEventListener (SyncEvent.SYNC,syncSO);
....
private function syncSO(event: SyncEvent)
{
   //Update variables with so.data property attribute values
   variable1= my_so.data.attribute1;
   variable2= my_so.data.attribute2;
   variable3= my_so.data.attribute3;
}
The process for this change is fairly straightforward. Somewhere in the script a user changes one of the slots in the shared object data property. As soon as that property is changed, it triggers the SyncEvent.SYNC,callback; and when that happens, the code in the SyncEvent.SYNC,callback container updates the changes throughout the connections in the application.
For the whole process to work correctly, you need to link the shared object and the connection to the server, SharedObject. connect(NetConnection). To be able to work with remote shared objects meaningfully, you will need a line that connects the shared object instance to FMS3 using the NetConnection instance as a parameter. For example:
billz_so.connect(nc);
makes the necessary connection for the shared object instance billz_so to send and receive the changes to shared objects using the NetConnection instance nc. In all of the sample projects in this chapter, watch for the SharedObject. connect(NetConnection) statement, and don’t ever forget to include it in your applications. (When you debug your code, often you will find that the shared object connection has been left out. Without it, your shared objects will not run correctly.)
Minimalist Project for Shared Movie Clip
To see how shared objects work with a remote page, this first minimalist project uses a movie clip as a shared object. This example shows how to set up and move a movie clip around the Stage—your Stage and the Stage of anyone connected to the same shared object. In creating applications that have online slide shows that work something like a PowerPoint presentation, you need all viewers to see the pointer move to the location onscreen where you want them to focus. Using an island movie clip as a pointer, this application has island names in each of the Stage’s four corners. The four names are simply positions on the Stage that let you see that when you move the pointer onscreen, it will go to the same positions on all screens connected to the application. You’ll use these classes and objects for the application:
- Classes
NetConnection
SharedObject
NetStatusEvent
SyncEvent
MouseEvent
- Objects
Movie Clip (1)
Follow these steps to walk through the project:
Open a new Flash document and save it as MinSOmc.fla.
In the four corners of the Stage, use the Text tool to type the name of four different islands, as shown in Figure 4-2.
Draw the image of an island as shown in Figure 4-2 with the drawing tools. (Alternatively, draw an arrow pointer or anything else.)
Select the shape and press F8 to open the Convert To Symbol dialog box. Type
Islandin the Name text box and select Movie Clip as the Type. Turn on the Export for ActionScript checkbox. You should now see the class name Island in the Class window with the Base class, flash.display.MovieClip. Click OK and save the file.Delete the movie clip from the Stage. It will still be in the Library panel as a class, and you can reference it just as any other class.
Open a new ActionScript file and save it as MinSOmc.as.
Add the code in Example 4-2, and save the file again.
package
{
  import flash.display.Sprite;
  import flash.net.SharedObject;
  import flash.events.NetStatusEvent;
  import flash.events.SyncEvent;
  import flash.net.NetConnection;
  import flash.events.MouseEvent;
  //import flash.net.ObjectEncoding;

  public class MinSOmc extends Sprite
  {
        private var pointer_so:SharedObject;
        private var nc:NetConnection;
        private var good:Boolean;
        private var island:Island;

        public function MinSOmc()
        {
             //NetConnection.defaultObjectEncoding=flash.net.ObjectEncoding.AMF0;
             //Connect
             var rtmpNow:String="rtmp://192.168.0.11/basicSO";
             nc=new NetConnection  ;
             nc.connect (rtmpNow);
             nc.addEventListener (NetStatusEvent.NET_STATUS,doSO);
             island=new Island  ;
             addChild (island);
             island.x=200;
             island.y=200;
             island.addEventListener (MouseEvent.MOUSE_DOWN,beginDrag);
             island.addEventListener (MouseEvent.MOUSE_UP,endDrag);
        }

        private function doSO (e:NetStatusEvent):void
        {
             good=e.info.code == "NetConnection.Connect.Success";
             if (good)
             {
                   //Shared object
                   pointer_so=SharedObject.getRemote("point",nc.uri,false);
                   pointer_so.connect (nc);
                   pointer_so.addEventListener (SyncEvent.SYNC,doUpdate);
             }
        }

        private function doUpdate (se:SyncEvent):void
        {
             for (var cl:uint; cl < se.changeList.length; cl++)
             {
                   trace(se.changeList[cl].code);
                   if (se.changeList[cl].code == "change")
                   {
                        switch (se.changeList[cl].name)
                        {
                             case "xpos" :
                                   island.x=pointer_so.data.xpos;
                                   break;
                             case "ypos" :
                                   island.y=pointer_so.data.ypos;
                                   break;
                        }
                   }
             }
        }

        private function beginDrag (e:MouseEvent)
        {
             island.addEventListener (MouseEvent.MOUSE_MOVE,moveMc);
             island.startDrag ();
        }

        private function endDrag (e:MouseEvent)
        {
             island.stopDrag ();
        }

        private function moveMc (e:MouseEvent)
        {
             e.updateAfterEvent ();
             pointer_so.setProperty ("xpos",island.x);
             pointer_so.setProperty ("ypos",island.y);
        }
  }
}
Because this application uses the basicSO server-side application, you don’t need to add a new folder to the server-side applications folder.
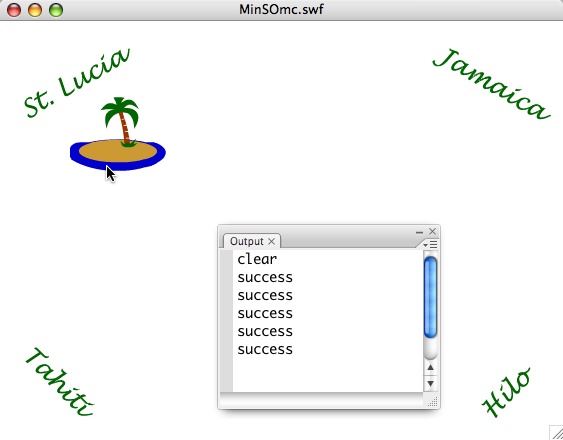
Figure 4-2 shows what you can expect to see when you test the application and start moving the shared object movie clip around the Stage. Initially, connection of the shared object fires a sync event, and the result is a message of “clear,” as can be seen in the Output window. Then the movement of the movie clip changes the values of the shared object, and because you are looking at local movement, the sync code shows “success.” If you moved the object on a remote client, you would see “change”; but because it is only running in the test mode without a remote client, you won’t see any “change” code unless you publish the code and open a browser and run it as a separate client.
To see how this all works, begin with the moveMC function and the lines:
pointer_so.setProperty ("xpos",island.x);
pointer_so.setProperty ("ypos",island.y);
Those lines set the pointer_so data value of the xpos and ypos properties based on the position of the shared movie clip. When the change occurs, it fires a SYNC event. The move action initiates a SyncEvent.changeList “change” code on the remote client’s player. (On the local client—the one that drags the movie clip—the code is “success,” not “change.”) The script then iterates through the array of clients, and then the shared object’s properties (named xpos and ypos.) The loop first finds each client and where change is indicated, and then updates the value of the movie clip’s position.
Outlined, the process looks like this:
A client moves the shared object (the island movie clip).
The movement updates the value of the shared object on the client’s application.
The change in the shared object initiates a sync event with a
changeListcode “change” for all remote clients.The
doUpdate()function assigns the value of the shared object properties to the local movie clipxandyproperties, thereby moving the movie clip.
As noted in the introduction to this chapter, you can do a lot of practical things using shared objects. Using multiple modules, you can create one module (a control modules) to remotely control objects on the pages of other modules. However, users on the other modules cannot control any shared objects even though they can see the changes made by the control module. In this way, you can set up an application where you have a speaker point to different parts of a page while giving a presentation. Likewise, in gaming, you can do all kinds of interesting things with two or more players controlling movie clips that appear and move other remote clients.
Minimalist Project for Shared Text
Having seen a minimalist project for a movie clip, you’ll now look at one for sharing text. The concepts are essentially the same, but instead of basing the changes in the shared object slots on the movement of the mouse position on the Stage, the changes are based on typed input by the user.
In this application, the user changes the value of the shared object property attribute (text content) by typing the value and pressing a button to fire a function. The function enters the value of the text input field and assigns that value to the shared object attribute. Here are the basic elements of the project:
- Classes
NetConnection
SharedObject
NetStatusEvent
SyncEvent
MouseEvent
TextArea
InputText
Button
- Objects
TextArea component
InputText component
Button component
Follow these steps to create the application:
Open a new Flash file (ActionScript 3.0) and save it as TextSO.fla.
Open the Library panel (press Ctrl+L (Windows) or Command+L (Mac OS)) and drag a TextArea, InputText, and Button component into the Library. Save the file again.
Open a new ActionScript file and save it as TextSO.as.
Enter the script in Example 4-3 and resave the file.
package
{
  import fl.controls.TextArea;
  import fl.controls.Button;
  import fl.controls.TextInput;
  import flash.display.Sprite;
  import flash.events.SyncEvent;
  import flash.events.NetStatusEvent;
  import flash.events.MouseEvent;
  import flash.net.SharedObject;
  import flash.net.NetConnection;

  public class TextSO extends Sprite
  {
        private var button:Button;
        private var text_so:SharedObject;
        private var nc:NetConnection;
        private var textArea:TextArea;
        private var textInput:TextInput;
        private var rtmpGo:String;
        private var good:Boolean;

        public function TextSO ()
        {
             //Set up UIs
             textArea=new TextArea();
             textArea.setSize (200,300);
             textArea.move (20,20);
             addChild (textArea);

             textInput=new TextInput();
             textInput.move (20,330);
             addChild (textInput);

             button=new Button();
             button.width=50;
             button.label="Send";
             button.move (125,330);
             button.addEventListener (MouseEvent.CLICK,sendMsg);
             addChild (button);

             rtmpGo = "rtmp://192.168.0.11/basicSO";
             nc = new NetConnection( );
             nc.connect (rtmpGo);
             nc.addEventListener (NetStatusEvent.NET_STATUS,doSO);
        }

        private function doSO (e:NetStatusEvent):void
        {
             good=e.info.code == "NetConnection.Connect.Success";
             if (good)
             {
                   //Set up shared object
                   text_so=SharedObject.getRemote("test",nc.uri,false);
                   text_so.connect (nc);
                   text_so.addEventListener (SyncEvent.SYNC,checkSO);
             }
        }

        private function checkSO (e:SyncEvent):void
        {
             for (var chng:uint; chng<e.changeList.length; chng++)
             {
                   switch (e.changeList[chng].code)
                   {
                        case "clear" :
                             break;

                        case "success" :
                             trace (text_so.data.msg);
                             break;

                        case "change" :
                             textArea.appendText (text_so.data.msg + "\n");
                             break;
                   }
             }
        }

        private function sendMsg (e:MouseEvent):void
        {
             text_so.setProperty ("msg",textInput.text);
             textArea.appendText (textInput.text + "\n");
        }
  }
}
When you test this application, you will need to run two copies of it. Even though it’s a minimum application, it’s perfectly functional and you could chat with others all day long with this little app. Just remember this sequence when coding chat applications:
Change value of shared object property attribute (for example, text content).
Trigger
SyncEvent.SYNCevent due to change in the shared objectmsgdata property.Change local property values by user input and assignment to the TextArea component.
Change remote property values with shared object value.
When you look at client-side shared objects as a simple sequence, it’s not so hard to see how they are set up in a script.
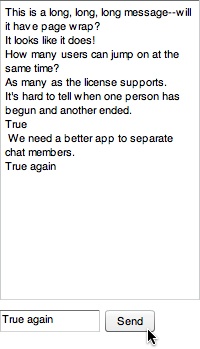
Figure 4-3 shows what you can expect to see in your browser.
The script maintains a good deal of the structure from the shared object that moves the movie clip on remote clients. In the next application, you will see a very similar code structure as well.
Minimalist Project for Shared Function
This next little minimalist project is very cool. It allows you to open a Web page on someone else’s browser. You can open a Web page from any domain, not just your local one. Here are the classes and objects you’ll use:
- Classes
NetConnection
SharedObject
NetStatusEvent
SyncEvent
MouseEvent
URLRequest
InputText
Button
- Functions
navigateToURL
- Objects
InputText component
Button component
In setting up a link to another URL, ActionScript 3.0 employs the URLRequest class and navigateToURL() function, both of which are part of the flash.net package. Because the function’s argument is the string with the URL, the argument will be the shared object. Figure 4-4 shows a chunk of code from the project that traces the changing of the shared object to the firing of the function. The five key elements are numbered from 1 to 5.
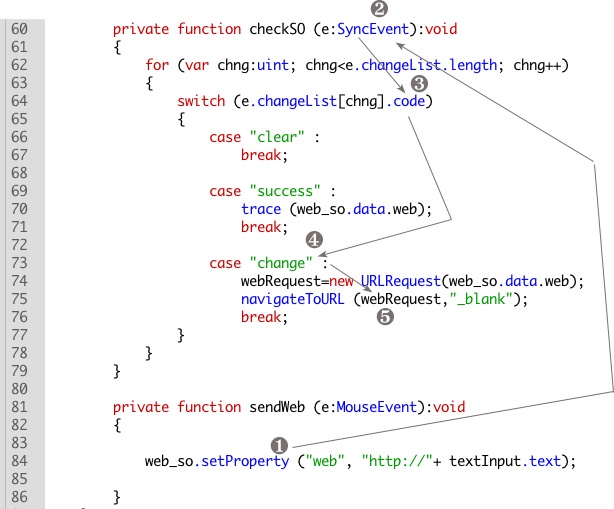
In step 1, a data property is both defined (“web”) and assigned a value (
http://plus the value of the string in the text input box).The change in a shared object causes a sync event and fires the
checkSOfunction shown in step 2.In step 3, the script iterates through the
changeListarray looking for the code value.Step 4 shows the script finding the code value “change.”
Step 5 launches the Web site stored in the
web_so.data.webslot where a “change” value has been identified.
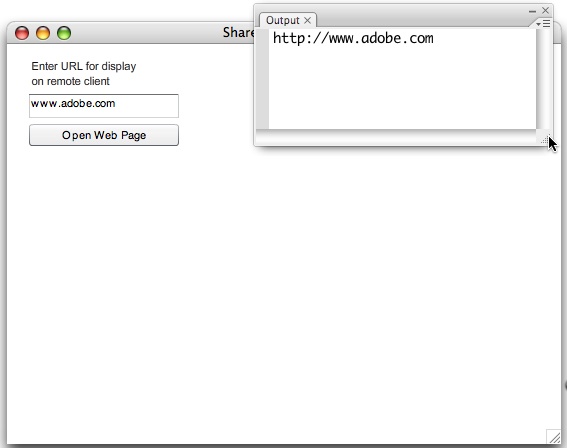
To help you see what else is going on in this process, the code value “success” displays the value of the web_so.data.web in the Output window. If you wanted, you could use that event code to open the same Web site in the client’s window. Figure 4-5 shows the application at work.
Use Figure 4-5 as a guide and implement the following steps to create the full application:
Open a new Flash file and save it as SharedFunction.fla.
Using an 11-point Arial font, type in the Static text box:
Enter URL for display on remote client. Position the text at x=20, y=14.Open the Library panel (press Ctrl+L (Windows) or Command+L (Mac OS)) and drag an InputText and Button component into the Library. Save the file again.
Open a new ActionScript file and save it as SharedFunction.as.
Add the script shown in Example 4-4, and resave the file.
Example 4-4. SharedFunction.aspackage { import fl.controls.Button; import fl.controls.TextInput; import flash.display.Sprite; import flash.events.SyncEvent; import flash.events.NetStatusEvent; import flash.events.MouseEvent; import flash.net.SharedObject; import flash.net.NetConnection; import flash.net.URLRequest; import flash.net.navigateToURL; public class SharedFunction extends Sprite { private var button:Button; private var web_so:SharedObject; private var nc:NetConnection; private var textInput:TextInput; private var rtmpGo:String; private var webURL:String; private var good:Boolean; private var webRequest:URLRequest; public function SharedFunction () { //Set up UIs textInput=new TextInput(); textInput.setSize(150,24); textInput.move (20,50); addChild (textInput); button=new Button(); button.width=150; button.label="Open Web Page"; button.move (20,80); button.addEventListener (MouseEvent.CLICK,sendWeb); addChild (button); //NetConnection rtmpGo = "rtmp://192.168.0.11/basicSO"; nc = new NetConnection( ); nc.connect (rtmpGo); nc.addEventListener (NetStatusEvent.NET_STATUS,doSO); } private function doSO (e:NetStatusEvent):void { good=e.info.code == "NetConnection.Connect.Success"; if (good) { //Set up shared object web_so=SharedObject.getRemote("web",nc.uri,false); web_so.connect (nc); web_so.addEventListener (SyncEvent.SYNC,checkSO); } } private function checkSO (e:SyncEvent):void { for (var chng:uint; chng<e.changeList.length; chng++) { switch (e.changeList[chng].code) { case "clear" : break; case "success" : trace (web_so.data.web); break; case "change" : webRequest=new URLRequest(web_so.data.web); navigateToURL (webRequest,"_blank"); break; } } } private function sendWeb (e:MouseEvent):void { web_so.setProperty ("web", "http://"+ textInput.text); } } }Switch to the SharedFunction.fla file and choose File → Publish to generate an HTML file.
If you are developing on a single computer that you’re using as both a server and host, such as a typical Windows XP or Vista machine, open your browser in your local Web host. (Typically the reference will be something like http://localhost/myFMSapps/ or http://127.0.0.1/myFMSapps/.) Navigate to SharedFunction.html and open the application. Now, from your Flash CS3 application, choose Control → Test Movie to try out the application. Enter a Web URL without the “
http://” portion, and click the button.
When you do the test, you will see a Web page open only on the remote client. The full URL name will appear in the Output window to give you an idea of what the remote client will actually open. It’s more dramatic, though, if you test the application on a remote client. Even with a LAN, if you have your browser open on a computer other than the one on which you’re developing the application, you will see the Web page on the remote site (another computer on the LAN) open.
An Upgraded Text Chat
Now that you have an idea of how shared objects work, this next application shows how to make a pretty good text chat application. Up to this point, the treatment of shared objects has been kept simple so that you could see the basics. However, now you need to reconsider the user interface for the text chat application.
In any application, you cannot think simply of the code. This is especially true when using Flash Media Server 3. You have to think of the interaction and the flow of actions by two or more people. You want to make the experience of your application as easy as possible—so easy that no one using your application notices it. That is, of course, unless you want the application to bring something to the user’s attention.
Chatter Considerations
When people engage in a text chat, their hands are on the keyboard. Once they finish a message, instead of having to remove their hands from the keyboard to click a button with the mouse, they should have the option of sending their message using the keyboard. So that’s the first thing to add to the basic chat created in the TextSO example. When a writer has finished with the current message, the writer can either click a Send button or just press the Enter or Return key.
In addition, different people in the chat room should be identified when they send a message. Adding a name to a message has two important consequences. First, it separates each message from others, which helps in clear communication. Second, the sender is identified so that everyone knows who said what.
As a last step, to make life easier for the chatter, as soon as the chatter enters the message in the input window, the message should disappear. That clears the message window for the next message to be typed in. It’s a little thing, but it makes the chat flow much smoother.
To recap, here are the items you need to create to enhance the text chat application:
Allow the user to press the Enter or Return key and submit a message without having to click the Submit button.
Separate messages in the chat window according to author.
After the user submits a message, the input message field is cleared.
A Better Chat Application
This upgraded real-time chat application needs to have more events added and a second TextInput instance where participants can enter their names. To make it easy, the application will also include a focus event (FocusEvent) so that when a person enters his or her name, the prompt message in the box disappears. Further, the application should verify that the user entered a name and did not leave the prompt message or a blank in the name window.
To give participants the opportunity to use keyboard message entry, the script will include the ComponentEvent class. This class can listen for different events stored in constants, including ENTER to trap pressing the Enter or Return key. Because the application should listen only for Enter/Return, the script does not use the KeyboardEvent class. Doing so would have required the application to listen to every key press, and in a chat application, this would have been a lot of work for the processor.
Follow these steps to create this application:
Open the TextSO.fla application, and change the Document Class value in the Property inspector to TextChat. Choose File → Save As and save the file as TextChat.fla. You can open a brand new Flash file, but this saves some time because you’re going to need to use the Button, TextInput and TextArea components already in the Library.
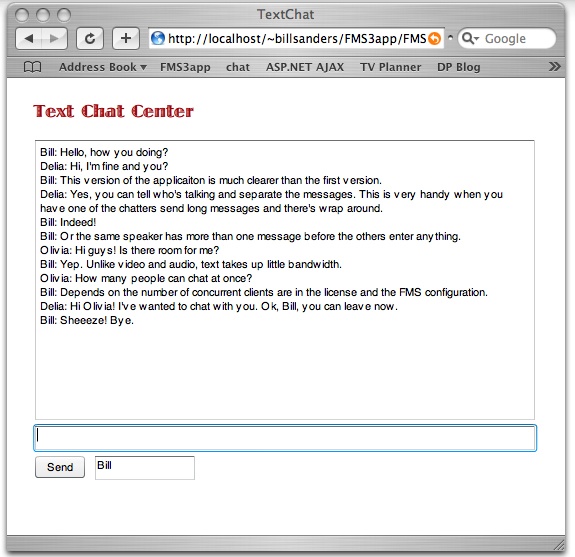
Using an 18-point display font, enter the Static text label
Text Chat Centerpositioned at x=16, y=17 on the Stage. Figure 4-6 shows how the label will look when the application is running.Open a new ActionScript file and save it as TextChat.as. Enter the code in Example 4-5 and resave the file.
package
{
  import fl.controls.TextArea;
  import fl.controls.Button;
  import fl.controls.TextInput;
  import flash.display.Sprite;
  import flash.events.SyncEvent;
  import flash.events.NetStatusEvent;
  import flash.events.MouseEvent;
  import flash.events.FocusEvent;
  import flash.net.SharedObject;
  import flash.net.NetConnection;
  import fl.events.ComponentEvent;

  public class TextChat extends Sprite
  {
        private var button:Button;
        private var text_so:SharedObject;
        private var nc:NetConnection;
        private var textArea:TextArea;
        private var textInput:TextInput;
        private var chatName:TextInput;
        private var rtmpGo:String;
        private var good:Boolean;
        private var catchKey:Boolean;
        private var noName:Boolean;

        public function TextChat ()
        {
             //Set up UIs
             textArea=new TextArea();
             textArea.setSize (500,280);
             textArea.move (20,54);
             addChild (textArea);

             textInput=new TextInput();
             textInput.setSize (500,24);
             textInput.move (20,340);
             textInput.addEventListener (ComponentEvent.ENTER,checkKey);
             addChild (textInput);

             button=new Button();
             button.width=50;
             button.label="Send";
             button.move (20,370);
             button.addEventListener (MouseEvent.CLICK,sendMsg);
             addChild (button);

             chatName=new TextInput;
             chatName.setSize (100,24);
             chatName.move (80, 370);
             chatName.text="<Enter Name>";
             chatName.addEventListener (FocusEvent.FOCUS_IN,cleanName);
             addChild (chatName);

             rtmpGo = "rtmp://192.168.0.11/basicSO";
             nc = new NetConnection( );
             nc.connect (rtmpGo);
             nc.addEventListener (NetStatusEvent.NET_STATUS,doSO);
        }

        private function doSO (e:NetStatusEvent):void
        {
             good=e.info.code == "NetConnection.Connect.Success";
             if (good)
             {
                   //Set up shared object
                   text_so=SharedObject.getRemote("test",nc.uri,false);
                   text_so.connect (nc);
                   text_so.addEventListener (SyncEvent.SYNC,checkSO);
             }
        }

        private function checkSO (e:SyncEvent):void
        {
             for (var chng:uint; chng<e.changeList.length; chng++)
             {
                   switch (e.changeList[chng].code)
                   {
                        case "clear" :
                             break;

                        case "success" :
                             break;

                        case "change" :
                             textArea.appendText (text_so.data.msg + "\n");
                             break;
                   }
             }
        }

        private function cleanName (e:FocusEvent):void
        {
             chatName.text="";
        }

        private function sendMsg (e:MouseEvent):void
        {
             noName=(chatName.text=="<Enter Name>" || chatName.text=="");
             if (noName)
             {
                   textArea.appendText ("You must enter your name \n");
             }
             else
             {
                   text_so.setProperty ("msg",chatName.text +": "+ textInput.text);
                   textArea.appendText (chatName.text +": "+textInput.text + "\n");
                   textInput.text="";
             }
        }

        private function checkKey (e:ComponentEvent):void
        {
             noName=(chatName.text=="<Enter Name>" || chatName.text=="");
             if (noName)
             {
                   textArea.appendText ("You must enter your name \n");
             }
             else
             {
                   text_so.setProperty ("msg",chatName.text +": "+ textInput.text);
                   textArea.appendText (chatName.text +": "+textInput.text + "\n");
                   textInput.text="";
             }
        }
  }
}
Figure 4-6 shows how the application should appear in a browser when you test it.
Once you have all of the code in place, test it with another user (or open two browsers on your computer). This kind of application is useful for both a standalone real-time text chat or as part of another application as a chat module. If you put it up on a server, you can chat with people all over the world and with as many as the license will support. You might even consider reconfiguring your Flash Media Server to accept more concurrent users but use less bandwidth, because text transfer takes up so little bandwidth compared to audio and video.
Get Learning Flash Media Server 3 now with the O’Reilly learning platform.
O’Reilly members experience books, live events, courses curated by job role, and more from O’Reilly and nearly 200 top publishers.

