Chapter 4. USING SOURCE MODE
In this chapter, you’ll go right into the heart of Adobe Flex 3, MXML. Using the code that was generated automatically in the previous chapter, you’ll get a feel for what makes MXML tick. Once you’re comfortable with the basics, you can start to write your own code using the built-in editor.
What Design Mode Does
What Design mode does is create MXML code for you. When you drag a component onto the stage, Design mode writes a corresponding tag in the main application’s .mxml file. If you modify the MXML code in Source mode, Design mode updates and shows those changes.
Open the application you started in the previous chapter, then switch to Source mode to look at the code that Design mode created for you.
Anatomy of a Flex Application
Looking at the source code for this simple HelloWorld example, you’ll see something like the following:
<?xml version="1.0" encoding="utf-8"?>
<mx:Application xmlns:mx="http://www.adobe.com/2006/mxml" layout="absolute">
    <mx:Panel x="10" y="10" layout="absolute" title="Howdy Ya'll">
        <mx:Label text="My name is:" fontWeight="bold" x="10" y="14"/>
        <mx:TextInput x="5" y="41"/>
        <mx:CheckBox label="I'm a Flex Expert!" x="10" y="71"/>
    </mx:Panel>
</mx:Application>
Now I’ll break this code down for you. The first line contains an XML declaration, which is just some optional XML-specific stuff. It’s the next line with the Application tag where the “Flex” begins.
Every Flex application will begin with a root tag. For Flex applications that are deployed to the web, that root tag is called Application. For AIR applications, the root tag is called WindowedApplication and is pretty much the same, with just a few desktop-specific features. For your application, which is going to be viewed in a browser, you’ll see <mx:Application> displayed at the root. Notice the attribute layout="absolute" in this tag. That’s one of those defaults that Flex throws in, and it means “make everything placed here need x,y coordinates.” Because an Application is a container, it has the ability to either require x,y coordinates or lay components out in a horizontal or vertical stack (more on this topic in the box "X and Why?: A Note about Coordinates“).
The Panel tag within the Application tag is also a container, and it has its default layout set to absolute as well. Notice the attributes x="10" and y="10", which tell Flex to place the panel 10 pixels from the left corner of the Application. The Label, TextInput, and CheckBox tags also have their coordinates set, but these coordinates are relative to the panel container in which they appear.
Of course, these tags have other attributes as well. Take a look at the Panel, which has its title set via the title attribute. In addition, the Label uses the text property to set its text and has a style property called fontWeight to make it bold. Finally, the CheckBox uses a property called label to set its label.
Try editing the code and changing some of the properties. You could, for instance, change the label on the CheckBox to read “I’m a Flex Genius!” When you’re done, switch to Design mode to see the changes.
Components Added in Source Mode
Now try modifying the UI by typing the MXML to add a component. Right below the CheckBox but still within the Panel tag, add a button component by typing <mx:Button label="Click me"/>.
Switching back to Design mode, you might notice that the button is placed on top of everything else and probably not where you envisioned it (below the CheckBox). That’s because you haven’t set the x,y coordinates for the button yet, and Flex defaults to x="0" and y="0". Now, you have the choice of guessing the coordinates and typing them in Source mode or moving the button in Design mode. Actually, you have another option. If you want a vertical layout for the items in your panel instead of having to set every item’s x,y coordinates, you could change one property of the panel. You guessed it: layout. Change the panel’s layout property to vertical either by typing in Source mode or by changing it in the Properties panel.
Now the items are stacked on top of each other vertically, and that’s great. But they’re stuck to the left edge of the panel in a not-so-attractive way. That’s where the property paddingLeft comes into play. If you set the paddingLeft property of the panel to 5, you will create a pleasing amount of space between the left edge of the panel and its contents.
If you’ve ever studied geometry, you’re familiar with x,y coordinates. You might remember that x means placement along a horizontal axis, and y refers to placement along a vertical axis. And you might have noticed something different about how x,y coordinates work in Flash. A Cartesian coordinate system, shown in Figure 4-1, will have an origin point at 0,0 and x and y values that increase as you go toward the top or toward the right. So, a point at x="3" and y="5" will be placed up and to the right of the origin.
In Flash, the origin is at the top left of the stage, and the x and y values increase as you go toward the bottom of the screen or toward the right. So, in essence, the y values are backward in Flash. That’s why giving a button a y value of 20 will place it 20 pixels from the top, and a y value of −20 will move it nearly out of view—right off the top of the stage.

Code Completion
You’ve no doubt seen that Flex Builder pops up a list of autocomplete entries when you start to type something in the editor in Source mode. This autocompletion is one of its most useful and powerful features. Typos and misspellings can wreck your project, and accepting a little help can go a long way toward preventing errors and frustration.
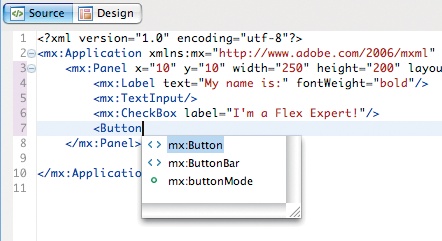
When you begin to type an attribute, Flex Builder pops up suggestions, and the most likely one (the one at the top of the list) is already selected (see Figure 4-2), so pressing Enter inserts the complete text for you. This autocompletion is useful not only for attributes but also for tags. If you’re about to insert a button, you don’t even have to begin writing the mx: part—simply typing the left bracket and the first few letters gets you started. And if you ever want the autocompletion to pop up faster, or to pop up again after it is closed, just press Ctrl+spacebar, and it comes to save the day.
MXML in Depth
MXML is the heart of your source code. It’s relatively easy to read and write, and understanding just a few rules will take you a long way in getting the job done. Because MXML is a type of XML, it’s worth going over some of the basics of XML.
The XML in MXML
One of the first books I read that had anything to do with programming was a book about XML. I wasn’t studying computer science at the time, though I’d always had a keen interest in programming and web design. I just remember wondering what this fancy language was that I kept hearing about. Much to my surprise, I discovered I had been using it all along with HTML (specifically XHTML).
It’s all about structure
I learned that XML was just structured text, any text, that uses angle brackets (< and >). That was the way it represented data, just by structuring via tags created with angle brackets. There wasn’t much of a vocabulary to it, because the author of XML decided his or her own vocabulary. XML was purely syntax and structure.
You’re reading a book right now, so you certainly know that a book contains different parts such as chapters and sections. If you wanted to represent a book in XML, you could create your own tags like <book>, <chapter>, and <section> and then add information to a document using those tags.
<book>
    <chapter>
        <section/>
    </chapter>
</book>
XML stands for Extensible Markup Language, and the extensible part is in creating your own tags. The markup part means it can include text as well as extra information about that text, via tags. In the case of HTML, you can use tags to provide text as well as information such as formatting for that text. As an example, early text-only word processors required writers to use tags equivalent to <i> and <b> to add italic and bold formatting (respectively) to a document. These tags would be converted to the proper format when printing, and this same type of markup is used in HTML today.
More importantly for a Flex application, XML shows hierarchy and structure. MXML is, if you will, a vocabulary of XML, created to provide a way to easily write the structure of a Flex application. So, lucky for us Flex developers, we can describe an application by simply writing it.
A few ground rules
If you follow these few simple rules, you’ll have worry-free development:
- All that is opened must be closed:
An important fact to remember about XML is that each tag must be complete. That is to say, if a tag is opened, it has to be closed at some point. Computers are awfully logical, and they get upset when rules aren’t followed. A tag definition, as you’ve seen, is created with a left bracket (
<), some text that is the tag’s name, followed by a right bracket (>), for example, the tag<book>. This is considered an open tag. To show that a tag is completely finished and won’t have anything else inside it, it must be closed by using a forward slash (/).You can ensure all tags are closed in a couple ways. The first is by creating an end tag for each beginning tag. So if you create the tag
<book>, you must eventually close it with the end tag</book>. Another, shorthand way to close a tag—if it doesn’t have any nested tags—is by adding a forward slash immediately before the right angle bracket of the same tag, like this:<book/>. So<book></book>is equivalent to<book/>.- Case matters:
XML is case-sensitive. That is to say, uppercase letters and lowercase letters aren’t considered the same. So,
<book>and<Book>aren’t the same in XML. And that means<mx:Text>and<mx:text>are different as well.- Declarations are optional, but polite:
The first line of an XML document may (optionally) contain a line declaring that it’s XML and what encoding it uses. The declaration looks like this:
<?xml version="1.0" encoding="utf-8"?>
All MXML files created through Flex Builder automatically contain this declaration, so you don’t need to worry about it.
Because MXML is a version of XML, MXML inherits all of these rules.
The Anatomy of a Tag
A tag can contain information in two ways, either by content or by attributes. Content is simply the text that exists between two tags, and attributes are text inside the opening tag only, with their information enclosed in quotes. Check out the following XML:
<book title="Learning Flex" author="Alaric Cole">
    <chapter title="Getting Up to Speed"/>
    <chapter title="Setting Up Your Environment"/>
</book>
In this example, <book> is the root tag, and the title and author of that tag are placed as attributes of that book. The code also has two child tags representing two chapters. Compare the previous code to the following, which contains the same information but arranged in a different way:
<book>
    <title>Learning Flex</title>
    <author>Alaric Cole</author>
    <chapter>
        <title>Getting Up to Speed</title>
    </chapter>
    <chapter>
        <title>Setting Up your Environment</title>
    </chapter>

</book>
This code is essentially the same as the first, but you’ll notice the second one is a bit more verbose. The first uses attributes, and the second uses nested tags. So, attributes can be useful as a more compact way to represent the same information as nested tags—and more compact means more readable. Compare this code to the same example in MXML.
You’re probably used to seeing something like this:
<mx:Label text="Learning Flex"/>
But did you know you could do the following?
<mx:Label>
    <mx:text>Learning Flex</mx:text>
</mx:Label>
Those two code examples are essentially the same, one using an attribute to add the text property and the other using a nested tag. You’ll usually want to use attributes in MXML for the reasons I stated earlier: compactness and readability.
However, occasionally you’ll need to use nested tags for properties, instead of using attributes. Because nested tags allow more complex content instead of simply a single-line piece of text or numbers, they’re useful for plugging in data that can’t be represented in an attribute. Consider the case of the text property. If the text were a whole paragraph, it would look strange to place it inline as an attribute. Even more important is when a component expects structured data. You might need to set the data provider of a list control, which would be an array of items, not just a single line of text. The same is true for other properties that accept an array of items, such as the columns property of a DataGrid. The columns property lets you set properties on individual columns, and you can see an example of this by dragging a DataGrid control to your application in Design mode. You’ll probably see code like this generated:
<mx:DataGrid>
    <mx:columns>
        <mx:DataGridColumn headerText="Column 1" dataField="col1"/>
        <mx:DataGridColumn headerText="Column 2" dataField="col2"/>
        <mx:DataGridColumn headerText="Column 3" dataField="col3"/>
    </mx:columns>
</mx:DataGrid>
The columns property of the DataGrid can’t really be written as an attribute because it expects a list of DataGridColumn tags, which in turn have their own properties to set.
The MX in MXML: Namespaces Explained
You’ll notice that each tag in the MXML example contains by default the designation mx followed by a colon. This is an XML namespace, stating that the Button and Panel tags belong to the mx namespace. What’s a namespace? Take a look at the word itself: name + space. A namespace is a designation of what a name for something is in regard to its placement in some type of structure. Say, for the sake of this example, that your name is John Smith. Of course, lots of other John Smiths exist, so how can you distinguish yourself? Well, you could use your location, like your home address, because it’s highly unlikely that several John Smiths live at that address (unless you’ve named your son John Smith, but that’s a different story. Anyway, he’d at least have a “Jr.” or Roman numeral attached to his name to differentiate himself). So, in terms of XML namespaces, you could refer to yourself as 123.PineStreet:JohnSmith; that’s a name you’re unlikely to witness anywhere else!
So, namespaces help distinguish different components (which may have the same name) by their location. In terms of MXML and ActionScript, the namespaces refer to the package structure of your components (what folders they’re organized in), but I’ll explain the details of packages later. For now just accept that the Flex components are in the mx namespace because the source for these components is located in a special grouping of folders. If you were to create your own button-like component and wanted to name it Button, you could do so, because you’d be placing the source for your special button code in a different location than the Flex button component. You might then refer to your button in MXML as something like <special:Button/> to differentiate it from <mx:Button/>.
What if you aren’t planning to use your own components? Why not just make mx the default namespace and omit all the extra mx: designations? That is, why can’t you just see the tags <Button/> and <Panel/> instead of <mx:Button/> and <mx:Panel/>? Well, the truth is you can if you’d like. Looking at the beginning of a typical MXML file, you’ll see the following:
<mx:Application xmlns:mx="http://www.adobe.com/2006/mxml">
Note the part that says xmlns:mx="http://www.adobe.com/2006/mxml". Translated to English, that means “Create an XML namespace called ‘mx’ and point it to the location 'http://www.adobe.com/2006/mxml‘.”
By default, the namespace for Flex components is set up to be mx, but you can change it. For instance, instead of mx, you could use the name flex by doing the following:
<flex:Application xmlns:flex="http://www.adobe.com/2006/mxml">
This line of code lets you use <flex:Button/> instead of <mx:Button/> in your MXML file. Now, if you want to be able to use simply <Button/>, change the namespace to an empty name:
<Application xmlns="http://www.adobe.com/2006/mxml">
Note
Notice how the Application tag, which declares this namespace, is also affected by it.
Using this code, the default namespace will be empty, so when you type <Button/>, you’re referring to the Flex button. If you had created your own, you’d still need to use your namespace to distinguish your components from the Flex defaults.
When you start using third-party components or begin creating your own, you’re more likely to see a package name used as a namespace identifier. Instead of something that looks like a web address, you’ll see something like xmlns:components="best.flex.components.*". I’ll go over packages more in depth in later chapters, but for brevity, just accept that a namespace in MXML lets you distinguish between different sets of components by the folder in which they’re located.
I Do Declare
The beauty of using markup languages for laying out an application is that they’re declarative. Declarative means you’re stating something. (Remember all those grammar exercises in school? Wait, that was an interrogative sentence. Oh, but that one was declarative. Find me an imperative sentence. There it was!) In essence, you can just say, “I think a button should go here,” and Flex will listen. (Well, you do have to type it, unless you have a really good speech-to-text program.) So instead of building your UI in scripts and dealing with procedures, you just place a Button tag where you want a button to exist, and Flex takes care of implementing it.
By comparison, ActionScript, the scripting language for Flex, is imperative. That means you create commands that you want the computer to follow.
I’ll show a couple of examples to demonstrate this idea. Here’s how create a panel with a button inside it in ActionScript:
import mx.containers.Panel;
import mx.controls.Button;

var panel:Panel = new Panel();
var button:Button = new Button();

addChild(panel);
panel.addChild(button);
This code instantiates a panel and a button and places the button within the panel. (addChild() is the method for adding components to the display list, which is the container that holds visual objects in your application.) Notice how you’re issuing commands. (“Computer, import! Computer, add child! Am I talking to myself?”)
Compare this script with the same thing in MXML:
<mx:Panel>
    <mx:Button/>
</mx:Panel>
That’s much less verbose, isn’t it? And it’s not necessary to really read the code and follow its flow to understand what’s happening; you can quickly scan the MXML and visualize the structure.
Not only that, but now the code is super easy to modify. Say you decided that the button should be outside the panel instead of inside it. You’d simply move the Button tag outside the Panel tag, and it would work fine. For the ActionScript version, you’d have to follow the logic of the script and know that you needed to change the method panel.addChild(button) to just addChild(button), because you want to add the child to the main stage and not the panel.
Summary
Now you’ve learned enough to really get moving with Flex and Flex Builder. You know how to work with Design mode as well as with Source mode and got your feet wet writing simple code. You’ve learned the basics of XML and how it relates to MXML. Now you’re ready to get moving. Next up on the agenda: making your applications interactive. For that you’ll need to learn a little more about ActionScript.
Get Learning Flex 3 now with the O’Reilly learning platform.
O’Reilly members experience books, live events, courses curated by job role, and more from O’Reilly and nearly 200 top publishers.

