Thus far, you’ve built a simple iPhone application and discovered that it’s not that hard to build apps for iOS. Let’s step back and take a broader look at the Objective-C language.
Objective-C is an object-oriented language that adds Smalltalk-style messaging to C. The language is a superset of the C language, providing constructs to allow you to define classes and objects. Once you get the hang of the Smalltalk-style syntax, if you’ve programmed in an object-oriented language before, things should look fairly familiar. However, there are some differences, and I discuss them in this chapter. One of the bigger differences, especially for those who are coming from a Java background, is in how Objective-C deals with memory management, although this has been massively simplified with the arrival of iOS 5.
As is the case in almost all other object-oriented languages, in Objective-C, classes provide the building blocks to allow encapsulation of data and methods that act on that data. Objects are specific instances of a class, and they contain their own instance data and pointers to the methods implemented by the class. Classes are specified in two pieces: the interface and the implementation. The interface contains the declaration of the class and is normally contained in a .h file. The implementation contains your actual code (the definition) and is normally contained in a .m file. We briefly discussed this in Chapter 3, but let’s take some time to look at it in more detail here.
Let’s return to the declaration of the ViewController class from Chapter 3, which illustrates a typical class
interface. The interface begins with the @interface keyword, followed by the name of
the class being declared, and ending with a colon followed by the name
of the base (or parent) class:
@interface ViewController : UIViewController
An Objective-C class cannot inherit from multiple classes;
however, the class it inherits from may in turn inherit from another
class. In the case of ViewController,
its base class is UIViewController,
which itself inherits from UIResponder, which inherits from NSObject, the root class of most Objective-C
class hierarchies.
Warning
Objective-C allows objects to descend from any root class.
Although NSObject is the most
common root class, it is not the only one. For instance, NSProxy is also a root class. So, you cannot
always assume that a given class is derived from NSObject.
After that first line, the instance variable declarations appear
within curly braces, although in the case of the view controller class,
we do not declare any and can omit the curly braces. Following that, we
have the declaration of properties and methods associated with the
class. The class declaration is wrapped up with the @end keyword:
#import <UIKit/UIKit.h>

@interface ViewController : UIViewController

@property (weak, nonatomic) IBOutlet UILabel *label;

- (IBAction)pushButton:(id)sender;

@end
@interface ViewController : UIViewController
@property (weak, nonatomic) IBOutlet UILabel *label;
- (IBAction)pushButton:(id)sender;
@endIn this class, we are relying on the instance variables for the properties to be automatically created when we synthesize them inside the implementation of the class. Dynamically creating the instance variables in this manner works on both the modern runtimes (Intel 64-bit and ARM) you are likely to encounter but not on older platforms.
Note
Before the release of iOS 4, the iPhone Simulator was an Intel 32-bit application, and the dynamic addition of properties at runtime was not possible. This is no longer the case.
Note
Dynamically creating instance variables using properties is a feature of Objective-C 2.0, and not a result of preprocessing magic done on your behalf by Xcode.
If instead we wished to manually create the instance variables, we would do as below:
#import <UIKit/UIKit.h>

@interface ViewController : UIViewController {
    UILabel *label;
}

@property (weak, nonatomic) IBOutlet UILabel *label;

- (IBAction)pushButton:(id)sender;

@end
which is entirely interchangeable with the initial code.
The ViewController
implementation from Chapter 3 begins by
importing the class interface in the .h file. The implementation begins with the
@implementation declaration and ends
with the @end declaration:
@implementation ViewController

   ...

@end
After the implementation begins, we must synthesize the accessor for the properties we declared in the interface file and implement the declared methods:
#import "ViewController.h"

@implementation ViewController
@synthesize label;

- (void)didReceiveMemoryWarning {
    [super didReceiveMemoryWarning];
}

- (void)viewDidLoad {
    [super viewDidLoad];
}

- (void)viewDidUnload {
    [self setLabel:nil];
    [super viewDidUnload];
}

- (void)viewWillAppear:(BOOL)animated {
    [super viewWillAppear:animated];
}

- (void)viewDidAppear:(BOOL)animated {
    [super viewDidAppear:animated];
}

- (void)viewWillDisappear:(BOOL)animated {
    [super viewWillDisappear:animated];
}

- (void)viewDidDisappear:(BOOL)animated {
    [super viewDidDisappear:animated];
}

- (BOOL)shouldAutorotateToInterfaceOrientation:
      (UIInterfaceOrientation)interfaceOrientation {
          return (interfaceOrientation !=
                  UIInterfaceOrientationPortraitUpsideDown);
}

- (IBAction)pushButton:(id)sender {
    label.text = @"Hello World!";
}

@end
Now that you’ve taken a quick look at the structure of an interface and implementation, let’s take a detailed look at the individual parts.
When instance variables are themselves objects—for instance, when
the ViewController class declares a
UILabel variable—you should always
use a pointer type. However, Objective-C adds an interesting twist: it
supports both strongly typed and weakly typed declarations. Here’s a
strongly typed declaration:
UILabel *label;
Here we declare anObject. In
the first instance, we use strong typing, declaring it as an object of
the class SomeClass.
Here’s a weakly typed version of the declaration, where it is
declared as an object of class id:
id label;
The id class is a generic C
type that Objective-C uses to represent an arbitrary object; it’s a
general type representing any type of object regardless of class and can
be used as a placeholder for both a class and a reference to an object
instance. All objects therefore are of type id. This can prove very useful; you can
imagine that if you wanted to build a generic class implementing a
linked list, the type of object held in each node would be of type
id, since you’d then be able to store
any type of object.
The declaration of properties using the @property compiler directive is a convenience
to avoid the declaration and, usually, the implementation of accessor
methods for member variables. You can think of a property declaration as
the equivalent of declaring accessor methods. You can also dictate how
the automatically generated accessor methods behave by declaring custom
attributes (see the sidebar Declaring Custom Attributes for Properties). In the ViewController class, we declare the property
to be (weak, nonatomic):
@property (weak, nonatomic) IBOutlet UILabel *label;
We can also declare the property to be an IBOutlet. While not formally part of the list
of attributes for an @property
declaration, IBOutlet denotes that
this property is an Interface Builder outlet. I talked about outlets
briefly in Chapter 3 and will discuss them
in more detail later.
When you declare an @property
in the class interface, you must also synthesize the property (unless
you wish to implement the getter and setter methods yourself) using the
@synthesize declaration, as we do for
the label property in the HelloWorldViewController class:
@synthesize label;
This asks the compiler to generate the accessor methods according to the specification in the property declaration and much reduces the amount of boilerplate code that you have to write yourself. You can use the form:
@synthesize label=_label;
to indicate that a particular instance variable (in this case
_label) should be used for the
property. This is a useful form to ensure that the values of the
property are always accessed using the generated accessor methods and
not directly via the instance variable backing the property, which can
lead to problems.
When you declare a member variable as a property and synthesize
the declared accessors using the @synthesize declaration in the @implementation of the class, you can
(entirely optionally) make use of some syntactic sugar that Objective-C
provides, called the dot syntax, as an alternative
to using the automatically generated accessor methods directly. For
instance, this lets us do the following:
label.text = @"Hello World";
instead of doing this (note that Objective-C capitalized the t in text when it generated the accessor method):
[label setText:@"Hello World"];
The dot syntax is arguably somewhat neater and easier to read.
We declare one method in the HelloWorldViewController class, called
pushButton:
#import <UIKit/UIKit.h>

@interface ViewController : UIViewController

@property (weak, nonatomic) IBOutlet UILabel *label;

- (IBAction)pushButton:(id)sender;

@end
The minus sign in front of the method indicates the method type, in this case an instance method. A plus sign would indicate a class method. For example:
+(void)aMethod:(id) anObject;
The pushButton: method takes an
id object as an argument and is
flagged as an IBAction for Interface
Builder. When compiled, IBAction is
replaced with void and IBOutlet is removed; these compiler directives
are simply used to flag methods and variables to Interface Builder. This
method is passed a generic id object
as an argument since we intended it to be triggered by a UI event, and
we want to leave it open as to what sort of UI element will be used.
Under the UI, it’s triggered when the user clicks the Push me! button in
the UI, and this id object will be
the UIButton that the user clicked to
trigger the event. We can recover the UIButton object by casting the sender object to a UIButton:
UIButton * theButton = (UIButton *)sender;
It’s a standard practice in Objective-C to call such objects
sender. If we were unsure of the
underlying type of an id object, we
could check the type using the isKindOfClass method:
if([thisObject isKindOfClass:[anotherObject class]]) { ... }If you want to call a method exposed by an object, you do so by sending that object a message. The message consists of the method signature, along with the parameter information. Messages are enclosed in square brackets; the object receiving the message is on the left and the parameters are on the right, with each parameter following a colon. If the method accepts more than one argument, this is explicitly named, and the second parameter follows a second colon. This allows multiple methods with the same name and argument types to be defined
[anObject someMethod];
[anObject someMethod: anotherObject];
[anObject someMethod: anotherObject withAnotherArgument: yetAnotherObject];
The name of the method is the concatenation of the method name and
any additional named arguments. Hence in
the preceding code we have someMethod: and someMethod:withAnotherArgument:. This may seem odd to
people coming in from other languages, which usually have much
terser naming conventions, but in general, Objective-C method names are
substantially more self-documenting than in other languages. Method
names contain prepositions and are made to read like sentences. The
language also has a fairly entrenched naming convention, which means
that method names are fairly regular.
Note
While Objective-C method names are long, Xcode will perform code completion as you type. A pop-up list of suggested methods will appear automatically. You can select a method using the up and down arrow keys, pressing Return to accept a suggestion. Pressing Control-/ will step you through the parameters of the method.
Methods can return output, as shown here:
output = [anObject someMethodWithOutput: anotherObject];
And they can be nested, as in the following:
output = [anObject someMethodWithOutput: [anotherObject someOtherMethod]];
When I originally started writing in Objective-C, one of the main problems I had with the language was the way it dealt with method calls. For those of us who are coming from more utilitarian languages, the behavior of Objective-C in this regard does seem rather strange. Although Objective-C code can be valid and not follow the rules I’ve described here, modern Objective-C is not really separable from the Cocoa framework, and Cocoa rules and conventions have become Objective-C’s rules and conventions.
In Objective-C, the nil object
is functionally equivalent to the NULL pointer found in many other C-derived
languages. However, unlike most of these languages, it is permissible to
call methods on nil without causing
your application to crash. If you call a method on (although, in
Objective-C we are actually passing a message to) the nil object type, you will get nil returned.
The way memory is managed in Objective-C on the iPhone and the iPad is probably not what you’re used to if you’re coming in from a language such as Java, Perl, Ruby, or even JavaScript. If you’re writing an application in Objective-C for the Mac, you have the option of enabling garbage collection; however, on the iPhone and iPad, you are restricted to using reference counting. This isn’t as bad as it seems, especially with the arrival of Automatic Reference Counting (ARC), which we will talk about a little later on in the chapter.
Note
Reference counting is a memory management technique where a running count of the number of references to a particular object is kept and used to deallocate the memory when the count reaches zero. See the sectionThe alloc, retain, copy, and release Cycle later in the chapter.
You can create an object in two ways. As shown in the following
code, you can manually allocate the memory for the object with alloc and initialize it using init or an appropriate initWith method (e.g., NSString has an initWithString method):
NSString *string = [[NSString alloc] init];
NSString *string = [[NSString alloc] initWithString:@"This is a string"];
Alternatively, you can use a convenience constructor method. For
instance, the NSString class has a
stringWithString class method that
returns an NSString object:
NSString *string = [NSString stringWithString:@"This is a string"];
In the preceding two cases, you are responsible for releasing the
memory you allocated with alloc. If
you create an object with alloc, you
need to release it later. However, in
the second case, the object will be autoreleased.
You should never manually release an autoreleased object, as this will
cause your application to crash. An autoreleased object will, in most
cases, be released at the end of the current function unless it has been
explicitly retained.
The autorelease pool is a convenience that defers sending an
explicit release message to an object
until “later,” with the responsibility of freeing the memory allocated
to objects added to an autorelease pool devolved onto the Cocoa
framework. All iOS applications require a default autorelease pool, and
the Xcode template inside the main.m file creates it for us:
int main(int argc, char *argv[])
{
    @autoreleasepool {
        return UIApplicationMain(argc, argv, nil,
                                 NSStringFromClass([AppDelegate class]));
    }
}
Here, the call to the UIApplicationMain routine
is held within the autorelease block, with
the default autorelease pool set up prior to entering the main
event loop, and then drained after exiting the loop.
An additional inner autorelease pool is created at the beginning of each event cycle (i.e., iteration through your application’s event loop) and is released at the end.
The need for and existence of autorelease makes more sense once you appreciate why it was invented, which is to transfer control of the object life cycle from one owning object to another without immediately deallocating the object.
Although the autorelease pool is handy, you should be careful when using it, because you unnecessarily extend the time over which the object is instantiated, thereby increasing your application’s memory footprint. Sometimes it makes sense to use autoreleased objects. However, beginning Cocoa programmers often overuse convenience constructors and autoreleased objects.
Note
Apple, writing in its Cocoa Fundamentals guide, officially discourages the use of autorelease objects on the iOS due to the memory-constrained environment on the device, stating that “Because on iOS an application executes in a more memory-constrained environment, the use of autorelease pools is discouraged in methods or blocks of code (for example, loops) where an application creates many objects. Instead, you should explicitly release objects whenever possible.”
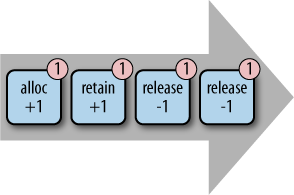
When handling memory management manually using the retain count
and the alloc, retain, and release cycle (see Figure 4-1), you should not
release objects you do not own. You should always make sure your calls
to retain are balanced by your calls
to release. You own objects that you
have explicitly created using alloc
or copy, or that you have added to
the retain count of the object using retain. However, you do not own objects you
have created using convenience constructors such as stringWithString.
When releasing the object, you have the option of sending it
either a release message or an
autorelease message:
[anObject release];
[anObject autorelease];
Sending a release message will
immediately free the memory the object uses if that release takes the object’s retain count to
zero, while sending an autorelease
message adds the object to the local autorelease pool. The object will
be released when the pool is destroyed, normally at the end of the
current function.
If your object is a delegate of another object, you need to set
the delegate property of that object to nil before you release your original
object.
While it’s vital to understand how the underlying memory management works if your going to be building applications in Objective-C, the arrival of Automatic Reference Counting with the release of iOS 5 has simplified memory management on the iOS platform a great deal.
Instead of you having to remember when to use retain, release, and autorelease, ARC evaluates the requirements of
your objects and automatically inserts the appropriate method calls for
you at compile time. The compiler also generates appropriate
dealloc methods for you.
Note
As iOS 4 is supported as a target for ARC-based applications, non-ARC based code is really only needed when targeting iOS 3.x. Additionally, Apple notes that, “ARC interoperates with manual reference counting code on a per-file basis. If you want to continue using manual reference counting for some files, you can do so.” This is important when making use of legacy libraries that are not ARC ready in ARC-based code. We’ll talk about this later in the book.
It’s really important to realize that ARC is a precompilation step
that adds retain, release, and
autorelease statements to your code for you, and
reference counting has not disappeared, it has simply been
automated.
With ARC enabled in your project, the following code:
NSObject *anObject = [[NSObject alloc] init];

// ... code which calls methods on the object
will be transformed during a precompilation step into:
NSObject *anObject = [[NSObject alloc] init];

// ... code which calls methods on the object

[anObject release];
All of the projects we’ll look at in this book use ARC-based templates.
The dealloc method is called
when an object is released. You should never call this method directly, but instead send a
release message to the object,
because the object may contain references to other objects that will not
be deallocated. Inside an application making use of ARC, there
shouldn’t be much reason to override the dealloc method, and of course ARC inserts the
release messages for you
automatically.
Warning
Even though ARC releases instance variables automatically, there
may still be legitimate reasons to override the dealloc method in your own classes. In such
cases, and unlike other superclass methods that you may have
overridden, you should never call the dealloc method in the superclass directly. ARC will add this
for you.
Your code must respond to memory warnings. Let’s look at the
HelloWorldViewController
implementation from Chapter 3 again. It
implements the didReceiveMemoryWarning method:
- (void)didReceiveMemoryWarning {
    [super didReceiveMemoryWarning];
}
This is where you should release any large blocks of memory—for instance, image or web caches—that you are using. If you ignore a memory warning, your application may crash. Since iOS devices do not have any sort of virtual memory or swap file, when the device runs out of memory, there really is no more memory to allocate. It’s possible, and advisable, to test your application by simulating a memory warning in iOS Simulator, which you can do by selecting Hardware→Simulate Memory.
When you write code, you’re probably already using patterns, although possibly you’re doing so without realizing it. A design pattern is just a reusable solution, a template, for how to approach commonly occurring problems. A pattern is not code, but instead describes how you should model the application in terms of the classes that are used, and how they should structure the interactions and relationships between these classes.
The Cocoa Touch framework underlying your iOS applications is based on one of the oldest design patterns, the Model-View-Controller (MVC) pattern, which dates from the 1970s. The MVC pattern is used to separate the program logic from the UI, and is the generally accepted way to build iOS applications. As it is used so extensively inside Apple’s own frameworks, including the UIKit framework, it would be quite hard to write an iOS application without using this pattern in your implementation. While you could write an iOS application without referencing the MVC pattern, it is enormously difficult to fight the underlying frameworks; you should instead work with them. Attempting to write iOS applications while ignoring the underlying MVC patterns is a pointless exercise in make-work.
The MVC pattern divides your application into three functional pieces:
- Model
The model manages the application state (and associated data) and is usually persistent. It is entirely decoupled from the UI or presentation of the application state to the user.
- View
The view is what the user sees, and it displays the model for the user. It allows the user to manipulate it and respond and generate events. In iOS applications, the view is normally built inside Interface Builder rather than programmatically.
- Controller
The controller coordinates updates of the view and the model when user interaction with the view makes changes to the model, and vice versa. This is typically where most of the application logic lives.
We implemented the Hello World application from Chapter 3 using this pattern. We created the view
using Interface Builder, and the ViewController class managed the view. The
application was too simple to require an explicit class to manage the
application’s state; effectively, the model was embedded in the ViewController class. If we were strictly
adhering to the design pattern, we would have implemented a further
class that the pushButton: method
would have queried to ask what text should have been
displayed.
The model class is usually a subclass of NSObject and has a set of instance variables
and associated accessor methods, along with custom methods to associate
the internal data model.
I’ve talked about both views and view controllers quite a lot, and while so far we’ve built the views in Interface Builder and then handled them using the own view controller code, that isn’t the only way to build a view. You can create views programmatically; in fact, in the early days of iOS development, you had to do things that way.
However, Interface Builder has made things a lot easier, and I recommend that in most cases you build your views using it if you can. When you used Interface Builder to construct your view, you edited a nib file, an XML serialization of the objects in the view. Using Interface Builder to create these objects, and to define the relationship between them and your own code, saves you from writing large amounts of boilerplate code that you would otherwise need to manage the view.
Note
Using Interface Builder and storyboards with iOS 5, it’s now actually possible to build a moderately complicated application with little or no code at all. We're not going to cover Storyboarding in this book. While on the face of things, it appears simpler than using nib files, you can quickly get into trouble. While they have a lot of potential, at least in my opinion, they aren't yet mature technology. At the time of writing, there are some severe issues that make the current implementation burdensome to use in practice.
If you want to create your view manually, you should override the
viewDidLoad: method of your view
controller class, as this is the method the view controller calls when
the view property is requested but is
currently set to nil. Don’t override
this method if you’ve created your view using the initWithNibName: method, or set the nibName or nibBundle properties. If you’re creating your
view manually and you do override this method, however, you must assign
the root view you create to the view
property of your view controller class:
-(void) viewDidLoad {
    UIView* view = [[UIView alloc] initWithFrame:CGRectMake(0,0,320,480)];
        .
        .
        .
    self.view = view;
    [view release];
}
Your implementation of this method should not call [super viewDidLoad], as the default
implementation of this method will create a plain UIView if no nib information is present and
will make this the main view.
I talked briefly about delegates in Chapter 3. An object that implements a delegate protocol is one that acts on behalf of another object. To receive notification of an event to which it must respond, the delegate class needs to implement the notification method declared as the delegate protocol associated with that event. The protocol may, and usually does, specify a number of methods that the delegate class must implement.
Data sources are similar to delegates, but instead of delegating
control, if an object implements a DataSource protocol, it must implement one or
more methods to supply data to requesting objects. The delegating
object, typically something such as a UITableView, will ask the data source what
data it should display; for instance, in the case of a table view, what
should be displayed in the next UITableViewCell when it scrolls into the
current view.
Declaring that a class is a data source or a delegate flags the
object for Interface Builder so that you can connect the relevant UI
elements to your code. (We’ll be talking about UITableView in Chapter 5.) To declare that AnObject was both a table
view data source and a delegate, we would note this in the @interface declaration:
@interface AnObject: UIViewController <UITableViewDataSource,
                                       UITableViewDelegate> {
   ...
}
This would mean that the AnObject object, a UIViewController, is responsible for both
populating the table view with data and responding to events the table
view generates. Another way to say this is that this object implements
both the UITableViewDataSource and
the UITableViewDelegate
protocols.
At this point, you would use Interface Builder, and we’ll be doing
that in the next chapter when we build a table-view-based application to
connect the UITableView in the view
to the data source and delegate object in the code.
This has been a dense chapter and fairly heavy going. However, the discussion of the MVC pattern should show you that this delegation of event handling and of populating data into the UI from the view to a controller class makes sense inside the confines of the pattern, and the availability of these features in Objective-C is one of the reasons why the MVC pattern has been widely adopted.
Note
In this chapter, I was able to give you only a brief overview of Objective-C and the Cocoa Touch framework. Added levels of subtlety are involved in many of the things I covered, but I didn’t have the space to cover them here. My coverage of the basics should give you enough information so that you can pick up the rest as we go along. However, if you intend to develop for the iOS on a serious level, you should read up on the language in more detail. Apple provides some excellent tutorial material on its Developer website (http://developer.apple.com/iphone/), and that should certainly be your first port of call. However, I also suggest several other books for further reading in Chapter 14.
Get Learning iOS Programming, 2nd Edition now with the O’Reilly learning platform.
O’Reilly members experience books, live events, courses curated by job role, and more from O’Reilly and nearly 200 top publishers.

