JavaBeans[49] is a component architecture for Java. It is a set of rules for writing highly reusable software elements that can be linked together in a “plug and play” fashion to build applications. Writing objects to the JavaBeans specification means you will have to write less custom code to glue them together. It also allows you to leverage JavaBean-aware development tools. With some graphical development environments, it is even possible to build complete applications just by connecting prefabricated Java Beans.
JavaBeans is a rich topic, and we can’t give it more than a brief overview here. If this overview whets your appetite, look for Developing Java Beans by Robert Englander (O’Reilly & Associates).
So, what exactly is or are Java Beans? JavaBeans defines a set of rules; Java Beans are ordinary Java objects that play by these rules. That is, Java Beans are Java objects that conform to the JavaBeans API and design patterns. By doing so they can be recognized and manipulated within visual application builder environments. Beans live and work in the Java runtime system, as do all Java objects. They communicate with their neighbors using events and other normal method invocations.
For examples of Beans, we have to look no further than the
javax.swing packages. All of the familiar components, like
JButton, JTextArea,
JScrollpane, etc., are not only suggestive of
things suitable to be Beans, but are, in fact, Beans! Much of what
you learned in Chapter 13, about the Swing
components has prepared you for understanding Beans. Although most of
the Swing components aren’t very useful in isolation, Beans can
also be large and complex application components, like spreadsheets
or document editors. The
HotJavaBrowser
Bean, for example, is a complete web
browser cast in the form of a Java Bean. We’ll talk more about
what exactly makes a Bean a Bean in a moment. For now, we want to
give you a better sense of how they are used.
Java Beans are objects intended to be manipulated visually, within a graphical application builder. They will generally be chosen from a palette of tools and manipulated graphically in an application builder’s workspace. In this sense, Beans are somewhat like widgets used in a traditional GUI builder: user interface components that can be assembled to make application “screens.” But in traditional GUI builders, the result is usually just some automatically generated code that provides a skeleton on which you hang the meat of your application. GUI builders generally build GUIs, not entire applications.
In contrast, Java Beans can be not only simple UI components like buttons and sliders but more complex and abstract components as well. It is easy to get the impression that Beans are, themselves, always graphical objects (like the Swing components that we mentioned). But Java Beans can implement any part of an application, including “invisible” parts that perform calculations, storage, and communications. Ideally, we would like to be able to snap together a substantial application using prefabricated Beans, without ever writing a line of code! Three characteristics of the JavaBeans architecture make it possible to work with application components at this level:
- Design patterns
The most important characteristic of a Java Bean is simply a layer of standardization. Design patterns (i.e., coding conventions) let tools and humans recognize the basic features of a Bean and manipulate it without knowing how it is implemented. We might say that Beans are “self-documenting.” By examining a Bean, we can tell what events it can fire and receive; we can also learn about its properties (the equivalent of its public variables) and its methods. Beans can also provide information about their features that is tailored specifically for builder tools.
- Reflection
Reflection is an important feature of the Java language. (It’s discussed in Chapter 7.) Reflection makes it possible for Java code to inspect and manipulate new Java objects at runtime. In the context of JavaBeans, reflection lets a development tool analyze a Bean’s capabilities, examine the values of its fields, and invoke its methods. Essentially, reflection allows Java objects that meet at runtime to do all of the things that could be done if they had been put together at compile time. Even if a Bean doesn’t come bundled with any “built-in” documentation, we can still gather information about its capabilities and properties by directly inspecting the class, using reflection.
- Object serialization
Finally, the Java Serialization API allows us to “freeze-dry” (some prefer the word “pickle”) a living, breathing application or application component and revive it later. This is a very important step; it makes it possible to piece together applications without extensive code generation. Rather than customizing and compiling large amounts of Java code to build our application on startup, we can simply paste together Beans, configure them, tweak their appearance, and then save them. Later, the Beans can be restored with all of their state and all of their interconnections intact. This makes possible a fundamentally different way of thinking about the design process. It is easy to use serialized objects from handwritten Java code as well, so we can freely mix “freeze-dried” Beans with plain old Bean classes and other Java code.
Our examples of Beans have ranged from simple buttons to spreadsheets. Obviously, a button Bean would be much less complex than a spreadsheet, and would be used at a different level of the application’s design. At what level are Beans intended to be used? Well, the JavaBeans architecture is supposed to scale well from small to large; simple Beans can be used to build larger Beans. A small Bean may consist of a single class; a large Bean may have many. Beans can also work together through their container to provide services to other beans.
Simple Beans are little more than ordinary Java objects. In fact, any Java class that has a default (empty) constructor could be considered a Bean. A Bean should also be serializable, although the JavaBeans specification doesn’t strictly require that. These two criteria ensure that we can create an instance of the Bean dynamically, and that we can later save the Bean, as part of a group or composition of Beans. There are no other requirements. Beans are not required to inherit from a base Bean class, and they don’t have to implement any special interface.
A useful Bean would want to send and receive events or expose its
properties to the world. To do so, it follows the appropriate design
patterns for naming the relevant methods, so that these features can
be automatically recognized. Most nontrivial Beans will also provide
information about themselves in the form of a
BeanInfo
class. A BeanInfo
class implements the BeanInfo interface, which
holds methods that can describe a Bean’s features. Normally,
this “bean info” is supplied by a separate class that is
named for and packaged with the Bean.
We can’t have a meaningful discussion of Beans without spending a little time talking about the builder environments in which they will be used. In this book we will talk about the BeanBox container that comes with Sun’s Bean Development Kit (BDK). BeanBox is by no means a real application builder environment. Its job is to provide a simple reference platform in which you can test your Beans. BeanBox reads basic Bean information, creates instances of Beans, and allows the most basic hookup of events and properties. It also comes with some interesting test Beans. Aside from that, it offers little. Its main advantage is that it is free (including source code) and universally available, because it is written in pure Java. We’ll use the BeanBox fairly extensively in this chapter to demonstrate how Beans work. But keep in mind that the BeanBox isn’t a real development environment, and that real development tools will do a lot more.
Some examples of real-world Java development environments that support Java Beans are:
IBM’s Visual Age for Java (http://www7.software.ibm.com/vad.nsf/data/document2590). Yes, this is the real URL.
Sun’s Forte for Java (http://www.sun.com/forte)
Borland/Inprise’s JBuilder (http://www.inprise.com/jbuilder)
WebGain’s Visual Café (http://www.webgain.com/Products/VisualCafe_Overview.html)
Metrowerks’s CodeWarrior (http://www.metrowerks.com)
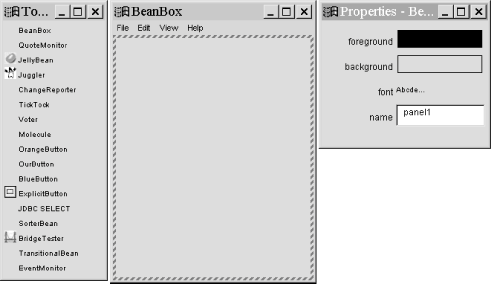
You can get the BDK from Sun at: http://java.sun.com/beans/. Refer to JavaSoft’s directions for installing it and running the BeanBox. Figure 19.1 shows the Bean palette, BeanBox work area, and a properties sheet (or customizer window). The properties sheet or “customizer” changes its contents based on the Bean selected in the work area.
To add a Bean to the BeanBox, drag it from the palette and drop it into the work area. (If that doesn’t work, try clicking on the Bean in the palette and then clicking in the work area.) Once placed in the BeanBox, a Bean can be selected by clicking on or just outside of it. You can move the Bean within the BeanBox and reshape it by dragging its corners.
Properties
represent
the
"
state” or
“data” content of a Bean. They are features that can be
manipulated externally to configure the Bean. For a Bean that’s
a GUI
component, you might expect its properties to include its color,
label, and other features of its basic appearance. Properties are
similar to an object’s public variables. Like a variable, a
property can be a primitive type (like a number or boolean) or it can
be a complex object type (like a String or a
collection of spreadsheet data). Unlike variables, properties are
manipulated using methods; this enables a Bean to take action
whenever a property changes. By sending an event when a property
changes, a Bean can notify other interested Beans of the change. (See
Section 19.1.5 later in this chapter.)
Let’s pull a couple of Beans into the BeanBox and take a look
at their properties. Grab a button Bean—the one called
ExplicitButton will do—from the palette, and
place it in the workspace.
When the ExplicitButton Bean was first loaded by
the BeanBox, it was inspected to discover its properties. When we
select an instance of the button, the BeanBox displays these
properties in the properties sheet and allows us to modify them. As
you can see in the figure, the button has four properties.
foreground and background are
colors; their current values are displayed in the corresponding box.
font is the font that is used to display the label
text; an example of the font is shown. And label
is the text of the label itself. Try typing something new in the
label field of the property sheet and watch the button label change.
The first three properties will become familiar to you; many GUI
Beans inherit them from the base Component class.
As you’ll see when we create our own Beans, there are lots of
other properties that are inherited from that class. For many Beans,
some properties aren’t relevant and it isn’t desirable to
show them all. Later we’ll show how to choose which of a
Bean’s properties are shown in the properties sheet.
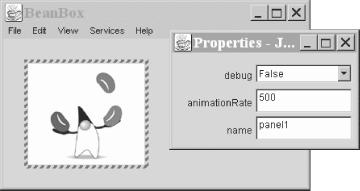
Now place a Juggler Bean (one of Sun’s cute
test Beans) in the workspace. The
animation should start: Duke should
begin juggling his coffee beans as soon as you put him in the
BeanBox, as shown in Figure 19.2. If he gets
annoying, don’t worry, we’ll have him under our control
soon enough.
You’ll see that this Bean has a different set of properties.
The most interesting is the one called
animationRate. It is an integer property that
controls the interval in milliseconds between displays of the
juggler’s frames. Try changing its value. The juggler changes
speed as you type each value. Good Beans give you immediate feedback
on changes to their properties.
Notice that the property sheet understands and provides a way to
display and edit each of the different property types. For the
foreground and background
properties, the sheet displays the color; if you click on it, a color
selection dialog pops up. Similarly, if you click on the
font property, you get a font dialog. For
integer and string values, you
can type a new value into the field. The BeanBox understands and can
edit the most useful basic Java types.
Since the types of properties are open ended, BeanBox can’t
possibly anticipate them all. Beans with more complex property types
can supply a property
editor
. The Molecule Bean
that we’ll play with in the next section, for example, uses a
custom property editor that lets us choose the type of molecule. If
it needs even more control over how its
properties
are displayed, a Bean can provide a customizer.
A customizer allows a Bean to provide its
own GUI for
editing its properties.
Beans use events to
communicate. As we mentioned in Chapter 13, events are not limited only to GUI components
but can be used for signaling and passing information in more general
applications. An event is simply a notification; information
describing the event and other data are wrapped up in a subclass of
EventObject and passed to the receiving object by
a method invocation. Event sources register listeners who want to
receive the events when they occur. Event receivers implement the
appropriate listener interface containing the method needed to
receive the events.
Sometimes it is useful to place an adapter object between an event source and a listener. An adapter can be used when an object doesn’t know how to receive a particular event; it enables the object to handle the event anyway. The adapter can translate the event into some other action, like a call to a different method or an update of some data. One of the jobs of the BeanBox is to let us hook up event sources to event listeners. Another job is to provide or produce adapters that allow us to hook up events in more complex ways.
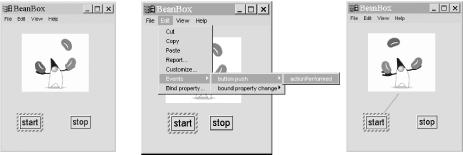
But before we get into details, let’s look at Figure 19.3 and try to get our
Juggler under control. Using the properties sheet,
change the label of our button Bean to Start. Now
while the Start button is selected, pull down the
Edit menu of the BeanBox. Choose the
submenu Events. You will see a menu
showing the listener interfaces to which the button can send events.
The names may not match the interface names that you’re
familiar with, but the relationship between the menu and the
interfaces should be clear. (The ExplicitButton
provides “friendly” names for the interfaces, rather than
using the unadorned interface names. You can also see a “bound
property change” event category; that’s another kind of
listener defined by JavaBeans, which we’ll discuss soon.)
Select the button push submenu,
which corresponds to the ActionListener interface.
You’ll see the actual event types that can be sent. In this
case, there’s only one: actionPerformed; choose it. Recall that
buttons and other GUI components generate ActionEvents when they are
used; you have just chosen an event source. You should see a red line
that looks like a rubber band stretching from the button. Drag the
line over to the Juggler, and click on it. A
dialog will appear, prompting you to choose a method to which to
“hook” this event.
What does it mean to hook an event to a
method? If you remember our discussion
of Swing, you know that event sources signal event listeners through
a very specific method, namely one defined by a listener interface.
Furthermore, all the methods that can handle an
ActionEvent accept an
ActionEvent as an argument. Some of the methods
the target dialog presents surely don’t take
ActionEvents as arguments. And if you take a peek
at the Juggler source code, you will see that it doesn’t even
implement an appropriate listener interface. How can we direct events
to it at all?
The answer is that the BeanBox automatically makes an adapter class
for us, giving us the option of delivering an event to any method
that could possibly make sense. That includes any method that could
accept the ActionEvent object as an argument,
including methods that take as an argument the type
Object. More importantly, it includes methods that
take no arguments at all. In that case, the BeanBox creates an
adapter that throws away the ActionEvent and
invokes the target method you choose whenever the event is fired.
The Juggler methods we’re interested in
targeting are startJuggling( ) and stopJuggling(
). Select startJuggling and click OK to complete the hookup of our
Start button. The BeanBox briefly displays a
message saying that it is creating and compiling the necessary
adapter class. Follow the same procedure to create a
Stop button, and hook it to stopJuggling( ). Finally, the Juggler will do our
bidding. You should be able to start and stop him with the buttons.
Choose the Save option from the menu
to save the state of the BeanBox; we’ll use the controllable
Juggler later in another example. (There is also a
SerializeComponent command;
we’ll talk about that later.)
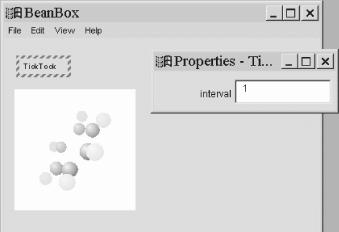
Let’s look at one more interesting example, shown in Figure 19.4, before moving on. Grab a
Molecule Bean, and place it in the BeanBox. By
dragging the mouse within the image you can rotate the model in three
dimensions. Try changing the type of molecule using the properties
sheet—ethane is fun. Now let’s see what we can do with
our molecule. Grab a TickTock Bean from the
palette. TickTock is a
timer. Every so many
seconds,
TickTock
fires a
PropertyChangeEvent, which is an event defined by
JavaBeans that notifies Beans of a change to another Bean’s
properties. The timer is controlled by an integer property called
interval, which determines the number of seconds
between events. TickTock is an
"invisible”
Bean; it is not derived from a Component and
doesn’t have a graphical appearance, just as an internal timer
in an application wouldn’t normally have a presence on the
screen. BeanBox represents invisible Beans by a simple dashed border
and a label containing its name.
Select the PropertyChangeEvent from the Events submenu, and click on our
Molecule as the target for the event. Hook the
event to the rotateOnX( ) method. Now the
Molecule should turn on its own, every time it
receives an event from the timer. Try changing the timer’s
interval. You could also hook TickTock to the
Molecule’s rotateOnY( )
method, or you could use a different instance of
TickTock and cause it to turn at different rates
in each dimension, by setting different intervals. There is no
end to the fun.
By using a combination of events and smart adapters, we can connect Beans in many interesting ways. We can even “bind” two Beans together so that if a property changes in the first Bean, the corresponding property is automatically changed in the second Bean. In this scenario, the Beans don’t necessarily have to be of the same type, but, to make sense, the properties do.
Grab two JellyBean Beans from the palette, drop
them in the BeanBox, and select one of them, as shown in Figure 19.5. You’ll notice that a
JellyBean has the simple color and font properties
of a Swing component, plus an integer property called
priceInCents. Select the Bind Property option under the Edit menu. (This menu option may not appear
for some kinds of Beans.) A dialog appears, asking which property we
would like to bind. Choose priceInCents. Now drag
the rubber band over to the other JellyBean. Another dialog appears,
asking to which property you would like to bind this value. In this
case, there is only one appropriate property: the corresponding
priceInCents. However, if a
JellyBean had other integer properties, the dialog
would list more options. After you choose the price property, BeanBox
will say that it is creating and compiling an adapter. When the
hookup is complete, go back to the first Bean, and try changing its
price. Switch to the second, and you’ll see that its price has
changed as well. The second Bean’s property has been bound to
the first.
How does this work? It’s only slightly more complicated than
our previous example, in which we hooked an event to an arbitrary
method. In that case the BeanBox generated an adapter that received
the event and, in turn, invoked the method. Bound properties rely on
the fact that the source Bean promises to fire a
PropertyChangeEvent whenever one of its
“bound” properties changes. The
JellyBean supports this feature, so the Bind property option appears in the menu for
it. BeanBox uses the feature by generating an adapter that listens
for the PropertyChangeEvent and updates the
property value in the target. Whenever the adapter receives the
event, it finds the new value and sets it in the target Bean. Try
binding the price property in the other direction as well, so that
you can change the value in either Bean, and the changes are
propagated in both directions. (Some simple logic in the Beans
prevents infinite loops from happening here.)
If you look under the Events submenu for one of the
JellyBeans, you’ll see the
PropertyChangeEvent that we described. You can use
this event like any other event; for example, you could go ahead and
hook it up to a method. Try setting things up so that your
Molecule rotates when you change the price of the
JellyBean. A more appropriate use for
PropertyChangeEvent would be to connect it to
the
reportChange( ) method of an instance of the
ChangeReporter test Bean. The
ChangeReporter will then display a message
describing each change event it receives.
Notice that the JellyBean has only one type of
PropertyChangeEvent. How then does the recipient
know which property has changed? Well, for a simple Bean, a
PropertyChangeEvent is fired whenever any bound
property changes; information in the event (a
String value) describes which property changed. A
sophisticated Bean could provide a separate type of
PropertyChangeEvent for each bindable
property.
In
the previous section, we discussed how Beans fire
PropertyChangeEvents to notify other Beans (and
adapters) that a property has changed. In that scenario, the object
that receives the event is simply a passive listener, as far as the
event’s source is concerned. JavaBeans also supports
constrained properties, in which the event listener gets to say
whether it will allow a Bean to change the property’s value. If
the new value is rejected, the change is cancelled: the event source
keeps its old value.
The JellyBean supports one constrainable property:
priceInCents. To try this out, grab a
Voter Bean from the palette. The
Voter Bean listens for constrained
PropertyChangeEvents and enforces its vote on them
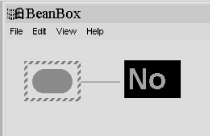
(Yes or No), depending on the
value of its vetoAll property
(False or True). Hook up the
vetoableChange event from one of
your
JellyBeans to the vetoableChange( ) method of the Voter Bean. By default,
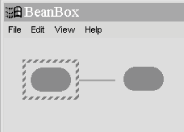
the Voter vetoes all change requests, as shown in
Figure 19.6. Try changing the price of the
JellyBean. The BeanBox should notify you that the
value cannot be changed. If you set the vetoAll
property to False, you will be free to change the
price again. Now you can decide for yourself if price controls are
warranted for jelly beans.
So how are constrained properties implemented? Normally,
PropertyChangeEvents are delivered to a
propertyChange( )
method in the listener. Constrained properties are implemented by
delivering PropertyChangeEvents to a separate
listener method called vetoableChange( ). The
vetoableChange( ) method throws a
PropertyVetoException if it doesn’t like a
proposed change.
Beans can handle the process of proposing changes in two ways. The
first is to use a “two-phase commit” style, in which the
sending Bean first issues a vetoable change. If the change passes
(i.e., none of the listeners throw a
PropertyVetoException
),
the sending Bean issues a regular property change. Bound properties
in the receiving Bean don’t respond until the second phase,
when the regular property change arrives.
An alternative strategy is to allow bound properties in the receiving Bean to act on the vetoable change; if the change is rejected by a receiving Bean, the sending Bean sends out a followup vetoable change to restore the property’s original value. In this scenario, it would be legitimate to ignore a crazy receiving Bean that wouldn’t take the old value back.
Keep in mind that binding properties and constraining properties are two separate issues. We can have either one without the other. How popular builder environments will choose to represent the two features remains to be seen. While the BeanBox does a good job of binding properties for us, it does not currently shield us from the details of hooking up constrained properties. In a real builder environment, the two processes would presumably be made to look more similar.
[49] “JavaBeans” refers to the component architecture; “Java Beans” refers to components that use this architecture.
Get Learning Java now with the O’Reilly learning platform.
O’Reilly members experience books, live events, courses curated by job role, and more from O’Reilly and nearly 200 top publishers.
