Chapter 4. Control Flow
A common metaphor given to beginning programmers is following a recipe. That metaphor can be useful, but it has an unfortunate weakness: to achieve repeatable results in the kitchen, one has to minimize choices. Once a recipe is refined, the idea is that it is followed, step by step, with little to no variation. Occasionally, of course, there will be choices: “substitute butter for lard,” or “season to taste,” but a recipe is primarily a list of steps to be followed in order.
This chapter is all about change and choice: giving your program the ability to respond to changing conditions and intelligently automate repetitive tasks.
Note
If you already have programming experience, especially in a language with a syntax inherited from C (C++, Java, C#), and are comfortable with control flow statements, you can safely skim or skip the first part of this chapter. If you do, however, you won’t learn anything about the gambling habits of 19th-century sailors.
A Control Flow Primer
Chances are, you’ve been exposed to the concept of a flowchart, which is a visual way of representing control flow. As our running example in this chapter, we’re going to write a simulation. Specifically, we are going to simulate a Midshipman in the Royal Navy in the mid-19th century playing Crown and Anchor, a betting game popular at the time.
The game is simple: there’s a mat with six squares with symbols for “Crown,” “Anchor,” “Heart,” “Club,” “Spade,” and “Diamond.” The sailor places any number of coins on any combination of the squares: these become the bets. Then he1 rolls three six-sided dice with faces that match the squares on the mat. For each die that matches a square that has a bet on it, the sailor wins that amount of money. Here are some examples of how the sailor might play, and what the payout is:
| Bet | Roll | Payout |
|---|---|---|
5 pence on Crown |
Crown, Crown, Crown |
15 pence |
5 pence on Crown |
Crown, Crown, Anchor |
10 pence |
5 pence on Crown |
Crown, Heart, Spade |
5 pence |
5 pence on Crown |
Heart, Anchor, Spade |
0 |
3 pence on Crown, 2 on Spade |
Crown, Crown, Crown |
9 pence |
3 pence on Crown, 2 on Spade |
Crown, Spade, Anchor |
5 pence |
1 pence on all squares |
Any roll |
3 pence (not a good strategy!) |
I chose this example because it is not too complex, and with a little imagination, demonstrates the main control flow statements. While it’s unlikely that you will ever need to simulate the gambling behaviors of 19th-century sailors, this type of simulation is quite common in many applications. In the case of Crown and Anchor, perhaps we have constructed a mathematical model to determine if we should open a Crown and Anchor booth to raise money for charity at our next company event. The simulation we construct in this chapter can be used to support the correctness of our model.
The game itself is simple, but there are many thousands of ways it could be played. Our sailor—let’s call him Thomas (a good, solid British name)—will start off very generic, and his behavior will become more detailed as we proceed.
Let’s begin with the basics: starting and stopping conditions. Every time Thomas gets shore leave, he takes 50 pence with him to spend on Crown and Anchor. Thomas has a limit: if he’s lucky enough to double his money, he quits, walking away with at least 100 pence in his pocket (about half his monthly wages). If he doesn’t double his money, he gambles until he’s broke.
We’ll break the playing of the game into three parts: placing the bets, rolling the dice, and collecting the winnings (if any). Now that we have a very simple, high-level picture of Thomas’s behavior, we can draw a flowchart to describe it, shown in Figure 4-1.
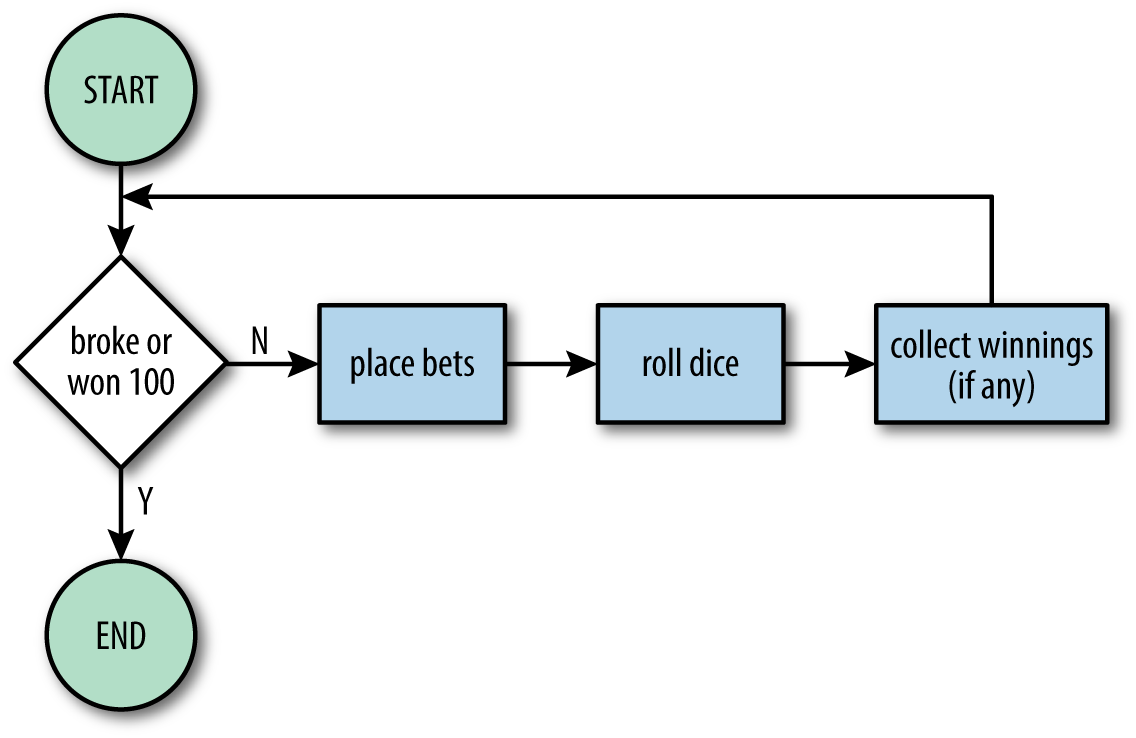
Figure 4-1. Crown and Anchor simulation flowchart
In a flowchart, the diamond shapes represent “yes or no” decisions, and the rectangles represent actions. We use circles to describe where to start and end.
The flowchart—as we’ve drawn it—isn’t quite ready to be turned directly into a program. The steps here are easy for a human to understand, but too sophisticated for computers. For example, “roll dice” would not be obvious to a computer. What are dice? How do you roll them? To solve this problem, the steps “place bets,” “roll dice,” and “collect winnings” will have their own flowcharts (we have indicated this in the flowchart by shading those actions). If you had a big enough piece of paper, you could put them all together, but for the purposes of this book, we’ll present them separately.
Also, our decision node is too vague for a computer: “broke or won 100 pence?” isn’t something a computer can understand. So what can a computer understand? For the purposes of this chapter, we’ll restrict our flowchart actions to the following:
-
Variable assignment:
funds = 50,bets = {},hand = [] -
Random integer between m and n, inclusive:
rand(1, 6)(this is a “helper function” we will be providing later) -
Random face string (“heart,” “crown,” etc.):
randFace()(another helper function) -
Object property assignment:
bets["heart"] = 5,bets[randFace()] = 5 -
Adding elements to an array:
hand.push(randFace()) -
Basic arithmetic:
funds - totalBet,funds + winnings -
Increment:
roll++(this is a common shorthand that just means “add one to the variableroll”)
And we’ll limit our flowchart decisions to the following:
-
Numeric comparisons (
funds > 0,funds < 100) -
Equality comparisons (
totalBet === 7; we’ll learn why we use three equals signs in Chapter 5) -
Logical operators (
funds > 0 && funds < 100; the double ampersand means “and,” which we’ll learn about in Chapter 5)
All of these “allowed actions” are actions that we can write in JavaScript with little or no interpretation or translation.
One final vocabulary note: throughout this chapter, we will be using the words truthy and falsy. These are not simply diminutive or “cute” versions of true and false: they have meaning in JavaScript. What these terms mean will be explained in Chapter 5, but for now you can just translate them to “true” and “false” in your head.
Now that we know the limited language we can use, we’ll have to rewrite our flowchart as shown in Figure 4-2.
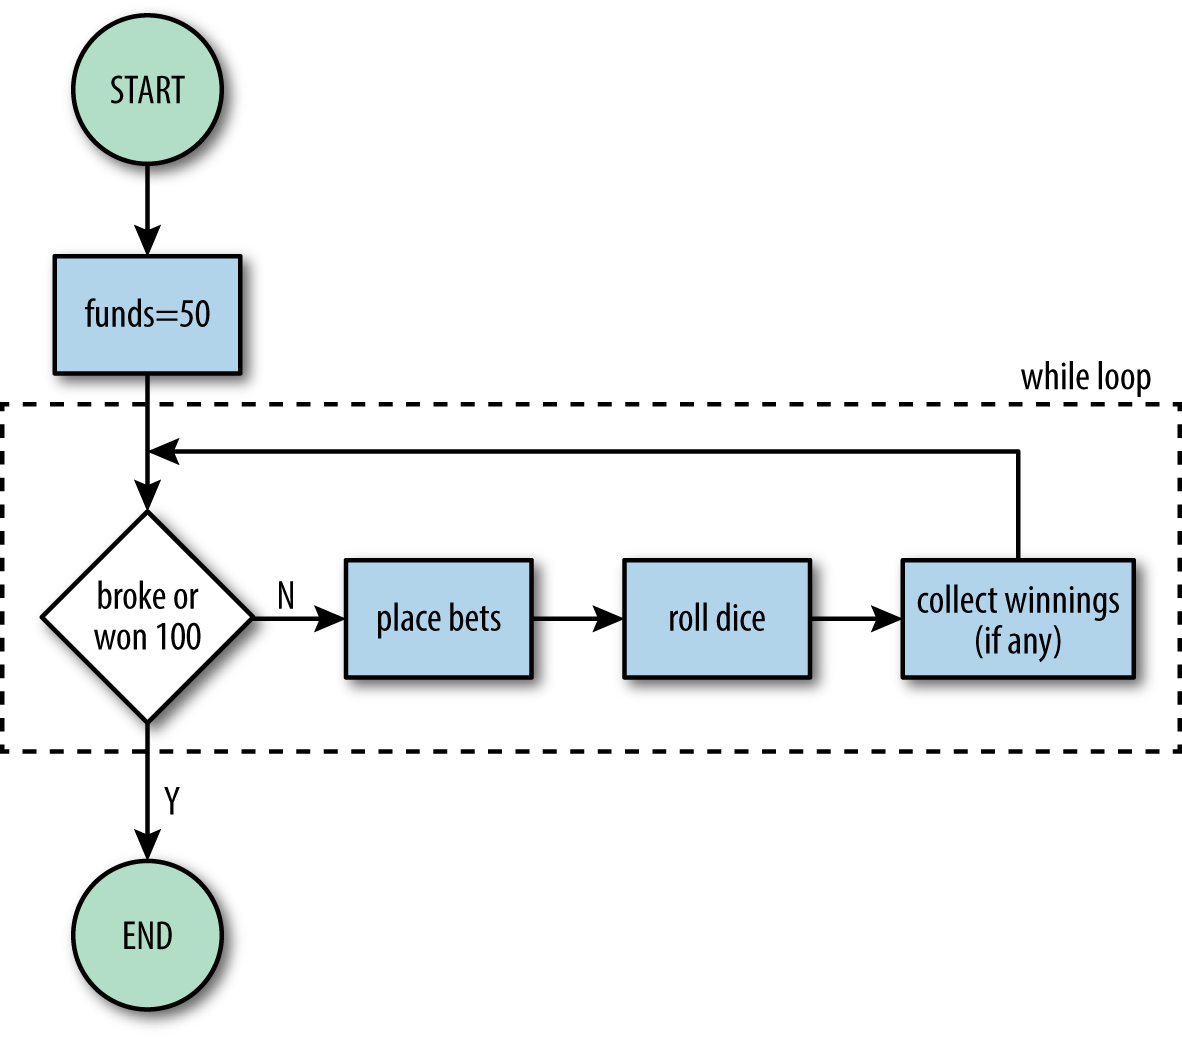
Figure 4-2. Crown and Anchor simulation flowchart (refined)
while Loops
We finally have something that we can translate directly into code. Our flowchart already has the first control flow statement we’ll be discussing, a while loop. A while loop repeats code as long as its condition is met. In our flowchart, the condition is funds > 1 && funds < 100. Let’s see how that looks in code:
letfunds=50;// starting conditionswhile(funds>0&&funds<100){// place bets// roll dice// collect winnings}
If we run this program as is, it will run forever, because funds start at 50 pence, and they never increase or decrease, so the condition is always true. Before we start filling out details, though, we need to talk about block statements.
Block Statements
Block statements (sometimes called compound statements) are not control flow statements, but they go hand in hand with them. A block statement is just a series of statements enclosed in curly braces that is treated by JavaScript as a single unit. While it is possible to have a block statement by itself, it has little utility. For example:
{// start block statementconsole.log("statement 1");console.log("statement 2");}// end block statementconsole.log("statement 3");
The first two calls to console.log are inside a block; this is a meaningless but valid example.
Where block statements become useful is with control flow statements. For example, the loop we’re executing with our while statement will execute the entire block statement before testing the condition again. For example, if we wanted to take “two steps forward and one step back,” we could write:
letfunds=50;// starting conditionswhile(funds>0&&funds<100){funds=funds+2;// two steps forwardfunds=funds-1;// one step back}
This while loop will eventually terminate: every time through the loop, funds increases by two and decreases by one for a net of 1. Eventually, funds will be 100 and the loop will terminate.
While it’s very common to use a block statement with control flow, it’s not required. For example, if we wanted to simply count up to 100 by twos, we don’t need a block statement:
letfunds=50;// starting conditionswhile(funds>0&&funds<100)funds=funds+2;
Whitespace
For the most part, JavaScript doesn’t care about additional whitespace (including newlines2): 1 space is as good as 10, or 10 spaces and 10 newlines. This doesn’t mean you should use whitespace capriciously. For example, the preceding while statement is equivalent to:
while(funds>0&&funds<100)funds=funds+2;
But this hardly makes it look as if the two statements are connected! Using this formatting is very misleading, and should be avoided. The following equivalents, however, are relatively common, and mostly unambiguous:
// no newlinewhile(funds>0&&funds<100)funds=funds+2;// no newline, block with one statementwhile(funds>0&&funds<100){funds=funds+2;}
There are those who insist that control flow statement bodies—for the sake of consistency and clarity—should always be a block statement (even if they contain only one statement). While I do not fall in this camp, I should point out that careless indentation fuels the fire of this argument:
while(funds>0&&funds<100)funds=funds+2;funds=funds-1;
At a glance, it looks like the body of the while loop is executing two statements (two steps forward and one step back), but because there’s no block statement here, JavaScript interprets this as:
while(funds>0&&funds<100)funds=funds+2;// while loop bodyfunds=funds-1;// after while loop
I side with those who say that omitting the block statement for single-line bodies is acceptable, but of course you should always be responsible with indentation to make your meaning clear. Also, if you’re working on a team or an open source project, you should adhere to any style guides agreed upon by the team, regardless of your personal preferences.
While there is disagreement on the issue of using blocks for single-statement bodies, one syntactically valid choice is nearly universally reviled: mixing blocks and single statements in the same if statement:
// don't do thisif(funds>0){console.log("There's money left!");console.log("That means keep playing!");}elseconsole.log("I'm broke! Time to quit.");// or thisif(funds>0)console.log("There's money left! Keep playing!");else{console.log("I'm broke"!);console.log("Time to quit.")}
Helper Functions
To follow along with the examples in this chapter, we’ll need two helper functions. We haven’t learned about functions yet (or pseudorandom number generation), but we will in upcoming chapters. For now, copy these two helper functions verbatim:
// returns a random integer in the range [m, n] (inclusive)functionrand(m,n){returnm+Math.floor((n-m+1)*Math.random());}// randomly returns a string representing one of the six// Crown and Anchor facesfunctionrandFace(){return["crown","anchor","heart","spade","club","diamond"][rand(0,5)];}
if…else Statement
One of the shaded boxes in our flowchart is “place bets,” which we’ll fill out now. So how does Thomas place bets? Thomas has a ritual, as it turns out. He reaches into his right pocket and randomly pulls out a handful of coins (as few as one, or as many as all of them). That will be his funds for this round. Thomas is superstitious, however, and believes the number 7 is lucky. So if he happens to pull out 7 pence, he reaches back into his pocket and bets all his money on the “Heart” square. Otherwise, he randomly places the bet on some number of squares (which, again, we’ll save for later). Let’s look at the “place bets” flowchart in Figure 4-3.
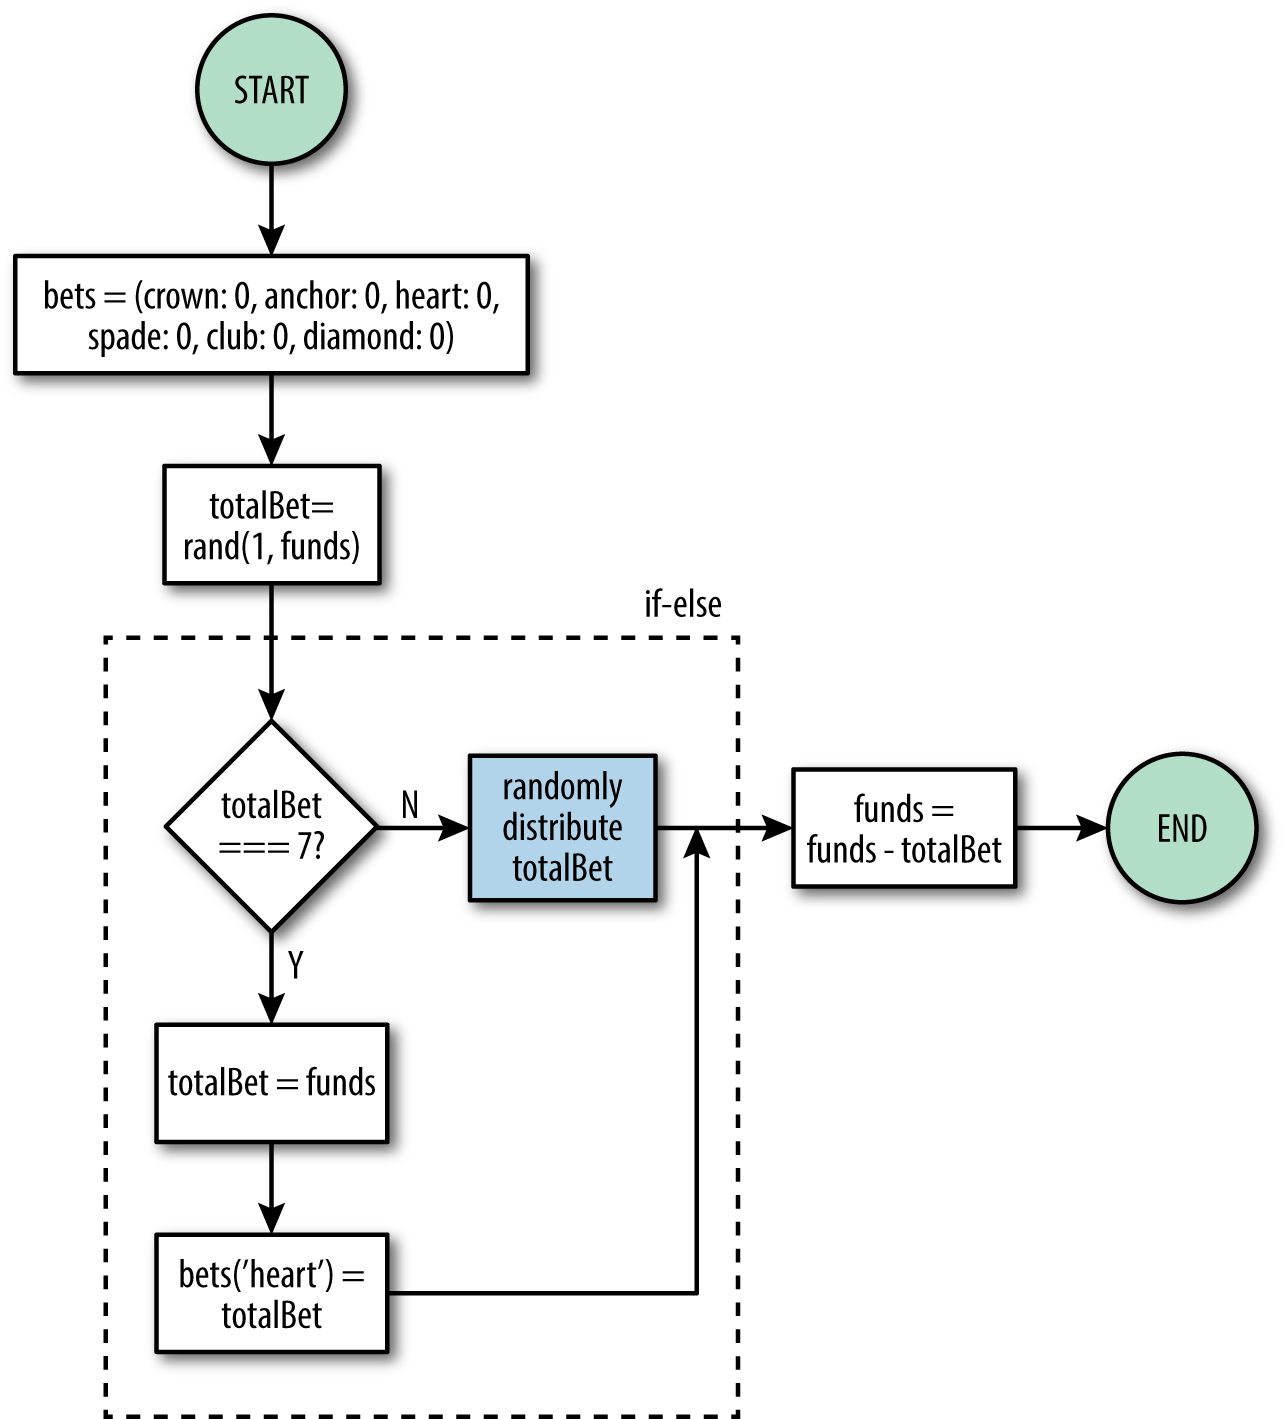
Figure 4-3. Crown and Anchor simulation: place bets flowchart
The decision node in the middle (totalBet === 7) here represents an if...else statement. Note that, unlike the while statement, it doesn’t loop back on itself: the decision is made, and then you move on. We translate this flowchart into JavaScript:
constbets={crown:0,anchor:0,heart:0,spade:0,club:0,diamond:0};lettotalBet=rand(1,funds);if(totalBet===7){totalBet=funds;bets.heart=totalBet;}else{// distribute total bet}funds=funds-totalBet;
We’ll see later that the else part of the if...else statement is optional.
do…while Loop
When Thomas doesn’t pull out 7 pence by chance, he randomly distributes the funds among the squares. He has a ritual for doing this: he holds the coins in his right hand, and with his left hand, selects a random number of them (as few as one, and as many as all of them), and places it on a random square (sometimes he places a bet on the same square more than once). We can now update our flowchart to show this random distribution of the total bet, as shown in Figure 4-4.
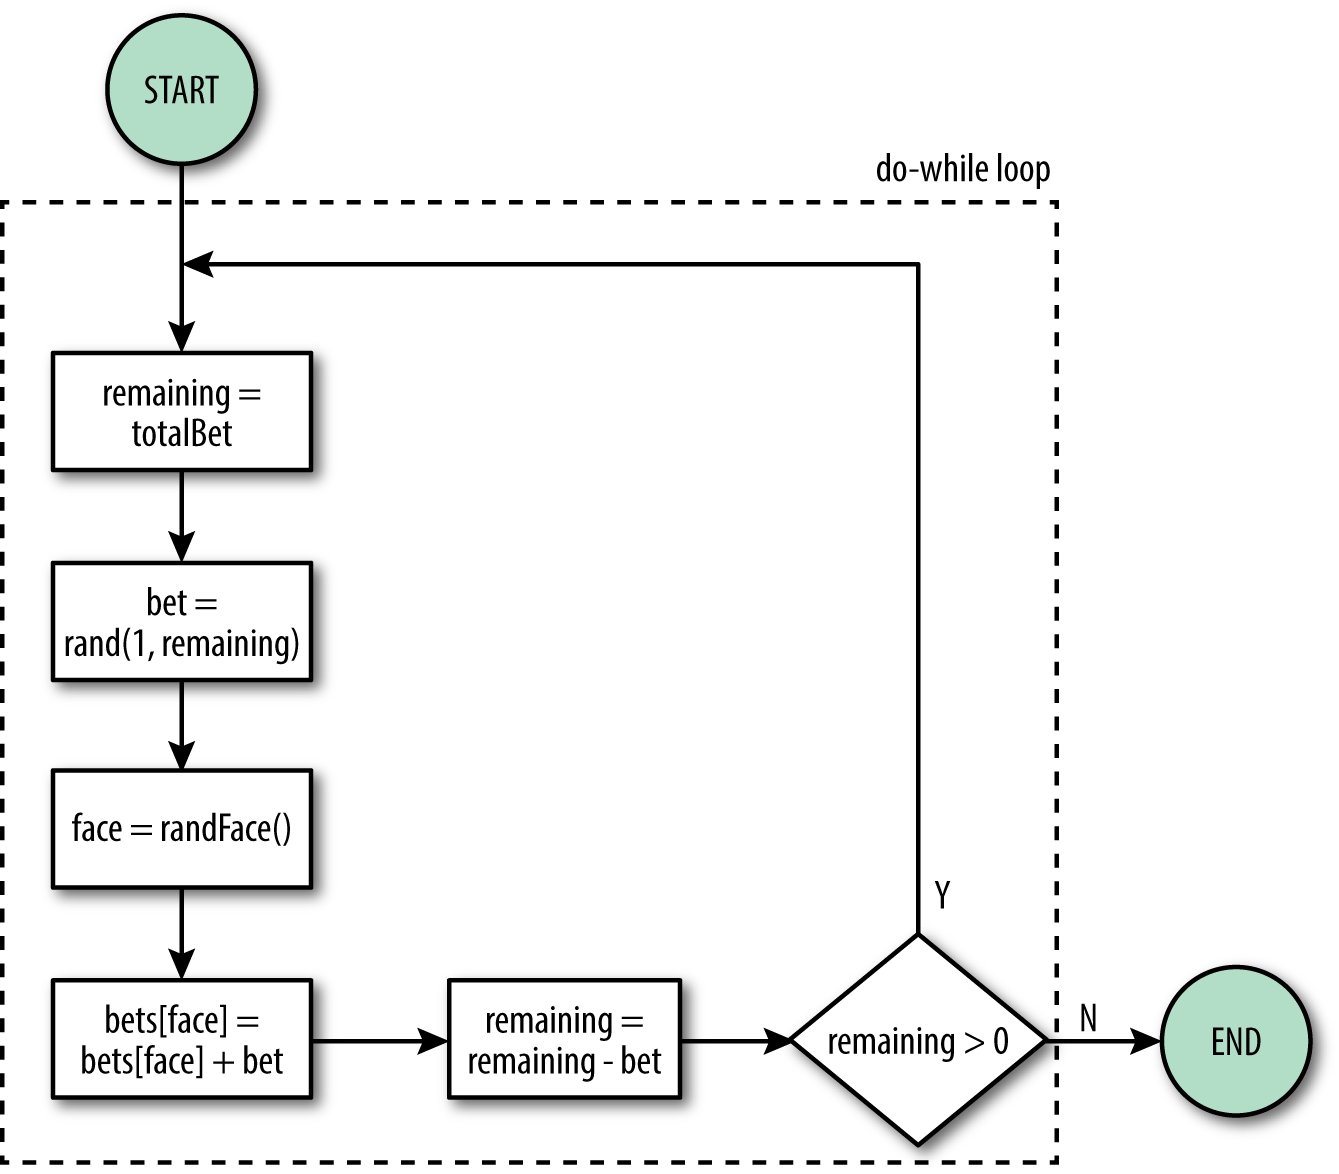
Figure 4-4. Crown and Anchor simulation: distribute bets flowchart
Note how this differs from the while loop: the decision comes at the end, not the beginning. do...while loops are for when you know you always want to execute the body of the loop at least once (if the condition in a while loop starts off as falsy, it won’t even run once). Now in JavaScript:
letremaining=totalBet;do{letbet=rand(1,remaining);letface=randFace();bets[face]=bets[face]+bet;remaining=remaining-bet;}while(remaining>0);
for Loop
Thomas has now placed all his bets! Time to roll the dice.
The for loop is extremely flexible (it can even replace a while or do...while loop), but it’s best suited for those times when you need to do things a fixed number of times (especially when you need to know which step you’re on), which makes it ideal for rolling a fixed number of dice (three, in this case). Let’s start with our “roll dice” flowchart, shown in Figure 4-5.
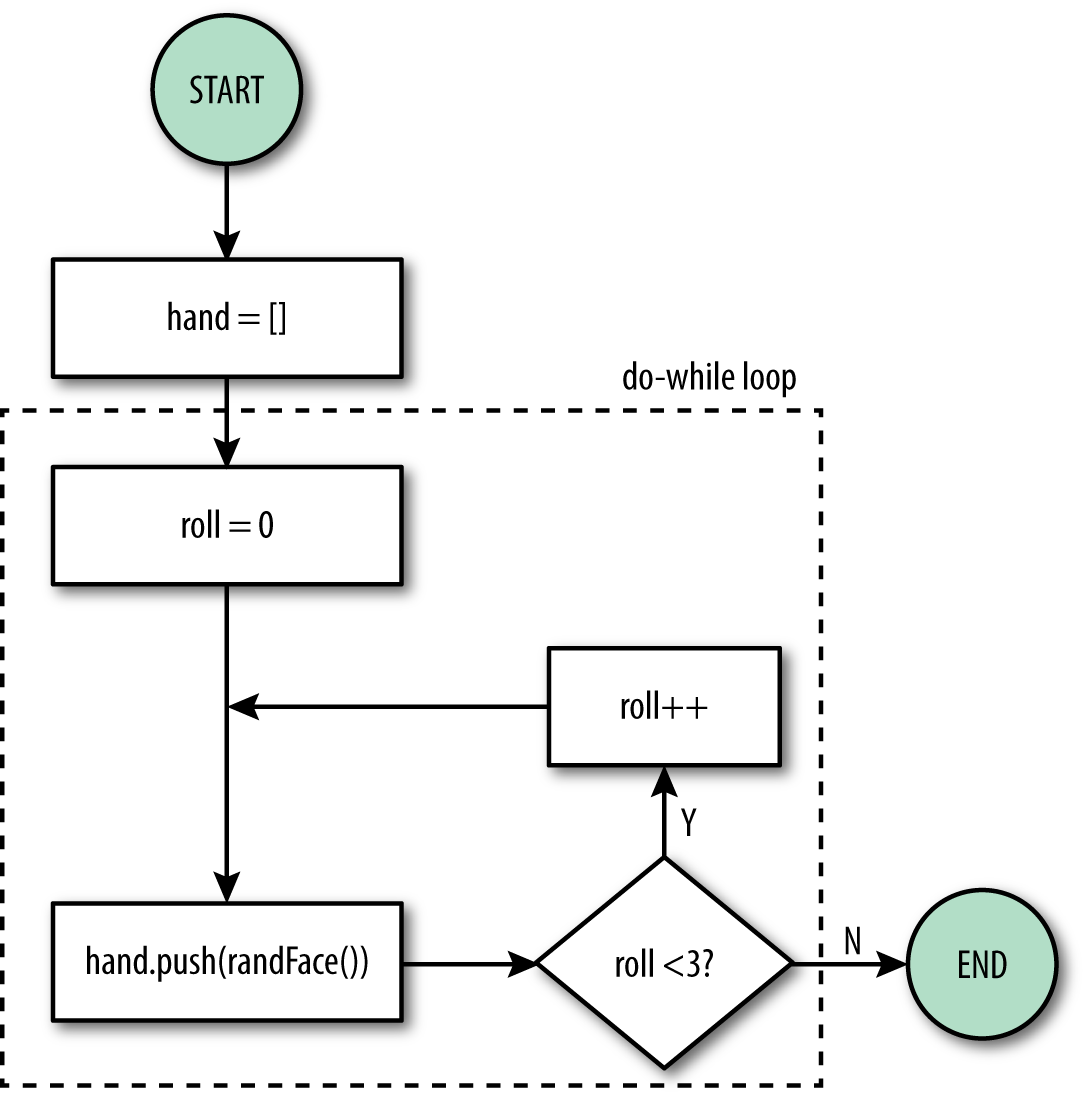
Figure 4-5. Crown and Anchor simulation: roll dice flowchart
A for loop consists of three parts: the initializer (roll = 0), the condition (roll < 3), and the final expression (roll++). It’s nothing that can’t be constructed with a while loop, but it conveniently puts all the loop information in one place. Here’s how it looks in JavaScript:
consthand=[];for(letroll=0;roll<3;roll++){hand.push(randFace());}
Programmers have a tendency to count from 0, which is why we start at roll 0 and stop at roll 2.
Tip
It has become a convention to use the variable i (shorthand for “index”) in a for loop, no matter what you’re counting, though you can use whatever variable name you wish. I chose roll here to be clear that we’re counting the number of rolls, but I had to catch myself: when I first wrote out this example, I used i out of habit!
if Statement
We’re almost there! We’ve placed our bets and rolled our hand; all that’s left is to collect any winnings. We have three random faces in the hand array, so we’ll use another for loop to see if any of them are winners. To do that, we’ll use an if statement (this time without an else clause). Our final flowchart is shown in Figure 4-6.
Notice the difference between an if...else statement and an if statement: only one of the if statement’s branches lead to an action, whereas both of the if...else statement’s do. We translate this into code for the final piece of the puzzle:
letwinnings=0;for(letdie=0;die<hand.length;die++){letface=hand[die];if(bets[face]>0)winnings=winnings+bets[face];}funds=funds+winnings;
Note that, instead of counting to 3 in the for loop, we count to hand.length (which happens to be 3). The goal of this part of the program is to calculate the winnings for any hand. While the rules of the game call for a hand of three dice, the rules could change…or perhaps more dice are given as a bonus, or fewer dice are given as a penalty. The point is, it costs us very little to make this code more generic. If we change the rules to allow more or fewer dice in a hand, we don’t have to worry about changing this code: it will do the correct thing no matter how many dice there are in the hand.
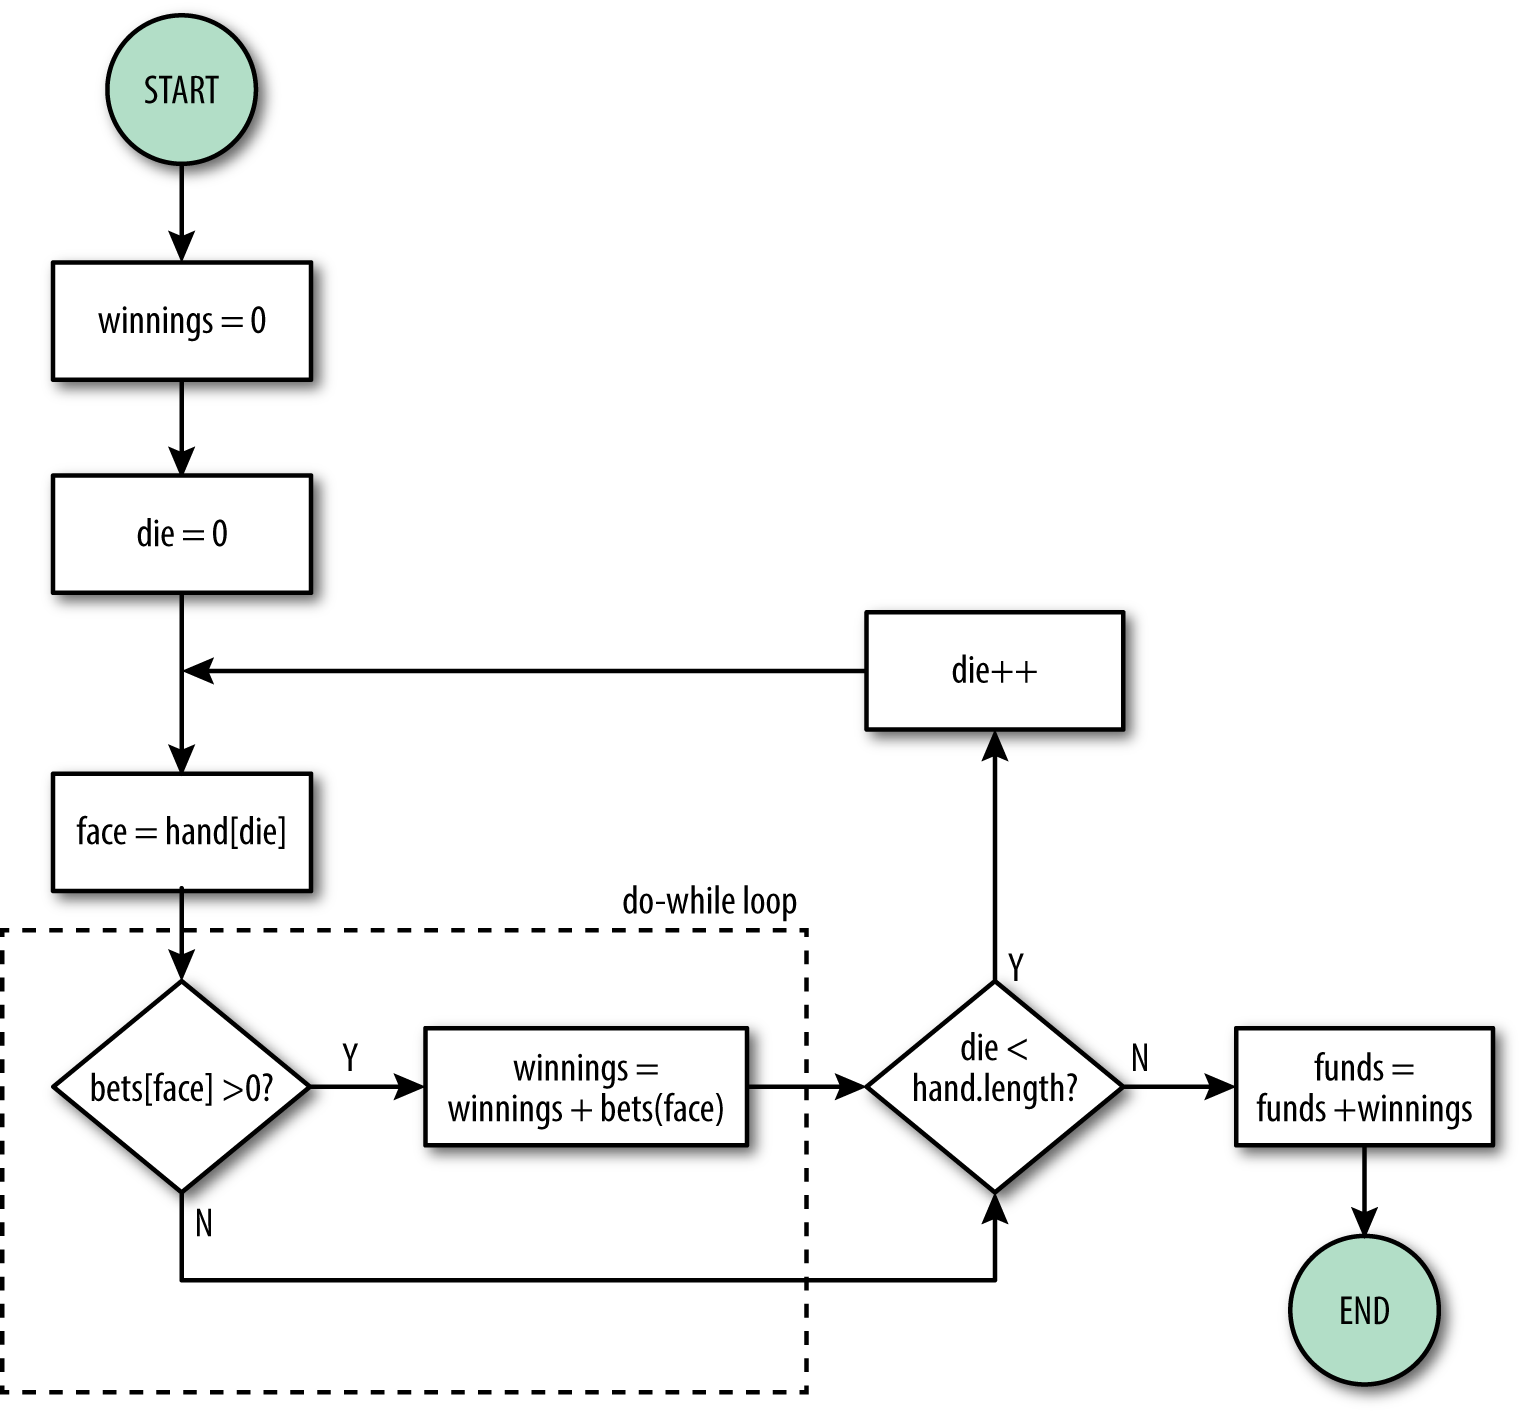
Figure 4-6. Crown and Anchor simulation: collect winnings flowchart
Putting It All Together
We would need a large piece of paper to put all of the pieces of the flowchart together, but we can write the whole program out fairly easily.
In the following program listing (which includes the helper functions), there are also some calls to console.log so you can observe Thomas’s progress (don’t worry about understanding how the logging works: it’s using some advanced techniques we’ll learn about in later chapters).
We also add a round variable to count the number of rounds Thomas plays, for display purposes only:
// returns a random integer in the range [m, n] (inclusive)functionrand(m,n){returnm+Math.floor((n-m+1)*Math.random());}// randomly returns a string representing one of the six// Crown and Anchor facesfunctionrandFace(){return["crown","anchor","heart","spade","club","diamond"][rand(0,5)];}letfunds=50;// starting conditionsletround=0;while(funds>0&&funds<100){round++;console.log(`round${round}:`);console.log(`\tstarting funds:${funds}p`);// place betsletbets={crown:0,anchor:0,heart:0,spade:0,club:0,diamond:0};lettotalBet=rand(1,funds);if(totalBet===7){totalBet=funds;bets.heart=totalBet;}else{// distribute total betletremaining=totalBet;do{letbet=rand(1,remaining);letface=randFace();bets[face]=bets[face]+bet;remaining=remaining-bet;}while(remaining>0)}funds=funds-totalBet;console.log('\tbets: '+Object.keys(bets).map(face=>`${face}:${bets[face]}pence`).join(', ')+` (total:${totalBet}pence)`);// roll diceconsthand=[];for(letroll=0;roll<3;roll++){hand.push(randFace());}console.log(`\thand:${hand.join(', ')}`);// collect winningsletwinnings=0;for(letdie=0;die<hand.length;die++){letface=hand[die];if(bets[face]>0)winnings=winnings+bets[face];}funds=funds+winnings;console.log(`\twinnings:${winnings}`);}console.log(`\tending funds:${funds}`);
Control Flow Statements in JavaScript
Now that we’ve got a firm grasp on what control flow statements actually do, and some exposure to the most basic ones, we can get down to the details of JavaScript control flow statements.
We’re also going to leave flowcharts behind. They are a great visualization tool (especially for those who are visual learners), but they would get very unwieldy past this point.
Broadly speaking, control flow can be broken into two subcategories: conditional (or branching) control flow and loop control flow. Conditional control flow (if and if...else, which we’ve seen, and switch, which we’ll see shortly) represent a fork in the road: there are two or more paths to take, and we take one, but we don’t double back. Loop control flow (while, do...while, and for loops) repeat their bodies until a condition is met.
Control Flow Exceptions
There are four statements that can alter the normal processing of flow control. You can think of these as control flow “trump cards”:
breakcontinuereturn-
Exits the current function (regardless of control flow). See Chapter 6.
throw-
Indicates an exception that must be caught by an exception handler (even if it’s outside of the current control flow statement). See Chapter 11.
The use of the statements will become clear as we go along; the important thing to understand now is that these four statements can override the behavior of the control flow constructs we’ll be discussing.
Broadly speaking, control flow can be broken into two subcategories: conditional control flow and loop control flow.
Chaining if...else Statements
Chaining if...else statements is not actually a special syntax: it’s simply a series of if...else statements where each else clause contains another if...else. It’s a common enough pattern that it deserves mention. For example, if Thomas’s superstition extends to days of the week, and he’ll only bet a single penny on a Wednesday, we could combine this logic in an if...else chain:
if(newDate().getDay()===3){// new Date().getDay() returns the currenttotalBet=1;// numeric day of the week, with 0 = Sunday}elseif(funds===7){totalBet=funds;}else{console.log("No superstition here!");}
By combining if...else statements this way, we’ve created a three-way choice, instead of simply a two-way choice. The astute reader may note that we’re technically breaking the guideline we established (of not mixing single statements and block statements), but this is an exception to the rule: it is a common pattern, and is not confusing to read. We could rewrite this using block statements:
if(newDate().getDay()===3){totalBet=1;}else{if(funds===7){totalBet=funds;}else{console.log("No superstition here!");}}
We haven’t really gained any clarity, and we’ve made our code more verbose.
Metasyntax
The term metasyntax means a syntax that, in turn, describes or communicates yet another syntax. Those with a computer science background will immediately think of “Extended Backus-Naur Form” (EBNF), which is an incredibly intimidating name for a simple concept.
For the rest of this chapter, I’ll be using a metasyntax to concisely describe JavaScript flow control syntax. The metasyntax I’m using is simple and informal and—most importantly—used for JavaScript documentation on the Mozilla Developer Network (MDN). Because the MDN is a resource you will undoubtedly find yourself using quite often, familiarity with it will be useful.
There are only two real elements to this metasyntax: something surrounded by square brackets is optional, and an ellipsis (three periods, technically) indicates “more goes here.” Words are used as placeholders, and their meaning is clear from context. For example, statement1 and statement2 represent two different statements, expression is something that results in a value, and condition refers to an expression that is treated as truthy or falsy.
Tip
Remember that a block statement is a statement…so wherever you can use a statement, you can use a block statement.
Because we’re already familiar with some control flow statements, let’s see their metasyntax:
while statement
while(condition)
    statement
While condition is truthy, statement will be executed.
if...else statement
if(condition)
    statement1
[else
    statement2]
If condition is truthy, statement1 will be executed; otherwise, statement2 will be executed (assuming the else part is present).
for statement
for([initialization]; [condition]; [final-expression])
    statement
Before the loop runs, initialization is executed. As long as condition is true, statement is executed, then final-expression is executed before testing condition again.
Additional for Loop Patterns
By using the comma operator (which we’ll learn more about in Chapter 5), we can combine multiple assignments and final expressions. For example, here’s a for loop to print the first eight Fibonacci numbers:
for(lettemp,i=0,j=1;j<30;temp=i,i=j,j=i+temp)console.log(j);
In this example, we’re declaring multiple variables (temp, i, and j), and we’re modifying each of them in the final expression. Just as we can do more with a for loop by using the comma operator, we can use nothing at all to create an infinite loop:
for(;;)console.log("I will repeat forever!");
In this for loop, the condition is omitted, which JavaScript interprets as true, meaning the loop will never have cause to exit.
While the most common use of for loops is to increment or decrement integer indices, that is not a requirement: any expression will work. Here are some examples:
lets='3';// string containing a numberfor(;s.length<10;s=' '+s);// zero pad string; note that we must// include a semicolon to terminate// this for loop!for(letx=0.2;x<3.0;x+=0.2)// increment using nonintegerconsole.log(x);for(;!player.isBroke;)// use an object property as conditionalconsole.log("Still playing!");
Note that a for loop can always be written as a while loop. In other words:
for([initialization]; [condition]; [final-expression])
    statement
is equivalent to:
[initialization]
while([condition]) {
    statement
    [final-expression]
}
However, the fact that you can write a for loop as a while loop doesn’t mean you should. The advantage of the for loop is that all of the loop control information is right there on the first line, making it very clear what’s happening. Also, with a for loop, initializing variables with let confines them to the body of the for loop (we’ll learn more about this in Chapter 7); if you convert such a for statement to a while statement, the control variable(s) will, by necessity, be available outside of the for loop body.
switch Statements
Where if...else statements allow you to take one of two paths, switch statements allow you to take multiple paths based on a single condition. It follows, then, that the condition must be something more varied than a truthy/falsy value: for a switch statement, the condition is an expression that evaluates to a value. The syntax of a switch statement is:
switch(expression){casevalue1:// executed when the result of expression matches value1[break;]casevalue2:// executed when the result of expression matches value2[break;]...casevalueN:// executed when the result of expression matches valueN[break;]default:// executed when none of the values match the value of expression[break;]}
JavaScript will evaluate expression, pick the first case that matches, and then execute statements until it sees a break, return, continue, throw or the end of the switch statement (we will learn about return, continue, and throw later). If that sounds complex to you, you’re not alone: because of the nuances of the switch statement, it’s received a lot of criticism as being a common source of programmer error. Often, beginning programmers are discouraged from using it at all. I feel that the switch statement is very useful in the right situation: it’s a good tool to have in your toolbox, but like any tool, you should exercise caution, and use it when appropriate.
We’ll start with a very straightforward example of a switch statement. If our fictional sailor has multiple numbers he’s superstitious about, we can use a switch statement to handle them accordingly:
switch(totalBet){case7:totalBet=funds;break;case11:totalBet=0;break;case13:totalBet=0;break;case21:totalBet=21;break;}
Note that the same action is being taken when the bet is 11 or 13. This is where we might want to take advantage of fall-through execution. Remember that we said the switch statement will keep executing statements until it sees a break statement. Using this to our advantage is called fall-through execution:
switch(totalBet){case7:totalBet=funds;break;case11:case13:totalBet=0;break;case21:totalBet=21;break;}
This is pretty straightforward so far: it’s clear that Thomas won’t bet anything if he happens to pull out 11 or 13 pence. But what if 13 is a far more ominous omen than 11, and requires not only forgoing the bet, but giving a penny to charity? With some clever rearranging, we can handle this:
switch(totalBet){case7:totalBet=funds;break;case13:funds=funds-1;// give 1 pence to charity!case11:totalBet=0;break;case21:totalBet=21;break;}
If totalBet is 13, we give a penny to charity, but because there’s no break statement, we fall through to the next case (11), and additionally set totalBet to 0. This code is valid JavaScript, and furthermore, it is correct: it does what we intended it to do. However, it does have a weakness: it looks like a mistake (even though it’s correct). Imagine if a colleague saw this code and thought “Ah, there’s supposed to be a break statement there.” They would add the break statement, and the code would no longer be correct. Many people feel that fall-through execution is more trouble than it’s worth, but if you choose to utilize this feature, I recommend always including a comment to make it clear that your use of it is intentional.
You can also specify a special case, called default, that will be used if no other case matches. It is conventional (but not required) to put the default case last:
switch(totalBet){case7:totalBet=funds;break;case13:funds=funds-1;// give 1 pence to charity!case11:totalBet=0;break;case21:totalBet=21;break;default:console.log("No superstition here!");break;}
The break is unnecessary because no cases follow default, but always providing a break statement is a good habit to get into. Even if you’re using fall-through execution, you should get into the habit of including break statements: you can always replace a break statement with a comment to enable fall-through execution, but omitting a break statement when it is correct can be a very difficult-to-locate defect. The one exception to this rule of thumb is if you are using a switch statement inside a function (see Chapter 6), you can replace break statements with return statements (because they immediately exit the function):
functionadjustBet(totalBet,funds){switch(totalBet){case7:returnfunds;case13:return0;default:returntotalBet;}}
As usual, JavaScript doesn’t care how much whitespace you use, so it’s quite common to put the break (or return) on the same line to make switch statements more compact:
switch(totalBet){case7:totalBet=funds;break;case11:totalBet=0;break;case13:totalBet=0;break;case21:totalBet=21;break;}
Note that, in this example, we chose to repeat the same action for 11 and 13: omitting the newline is clearest when cases have single statements and no fall-through execution.
switch statements are extremely handy when you want to take many different paths based on a single expression. That said, you will find yourself using them less once you learn about dynamic dispatch in Chapter 9.
for...in loop
The for...in loop is designed to loop over the property keys of an object. The syntax is:
for(variable in object)
    statement
Here is an example of its use:
constplayer={name:'Thomas',rank:'Midshipman',age:25};for(letpropinplayer){if(!player.hasOwnProperty(prop))continue;// see explanation belowconsole.log(prop+': '+player[prop]);}
Don’t worry if this seems confusing now; we’ll learn more about this example in Chapter 9. In particular, the call to player.hasOwnProperty is not required, but its omission is a common source of errors, which will be covered in Chapter 9. For now, all you need to understand is that this is a type of looping control flow statement.
for...of loop
New in ES6, the for...of operator provides yet another way to loop over the elements in a collection. Its syntax is:
for(variable of object)
    statement
The for...of loop can be used on arrays, but more generically, on any object that is iterable (see Chapter 9). Here is an example of its use for looping over the contents of an array:
consthand=[randFace(),randFace(),randFace()];for(letfaceofhand)console.log(`You rolled...${face}!`);
for...of is a great choice when you need to loop over an array, but don’t need to know the index number of each element. If you need to know the indexes, use a regular for loop:
consthand=[randFace(),randFace(),randFace()];for(leti=0;i<hand.length;i++)console.log(`Roll${i+1}:${hand[i]}`);
Useful Control Flow Patterns
Now that you know the basics of control flow constructs in JavaScript, we turn our attention to some of the common patterns that you’ll encounter.
Using continue to Reduce Conditional Nesting
Very often, in the body of a loop, you’ll only want to continue to execute the body under certain circumstances (essentially combining a loop control flow with a conditional control flow). For example:
while(funds>0&&funds<100){lettotalBet=rand(1,funds);if(totalBet===13){console.log("Unlucky! Skip this round....");}else{// play...}}
This is an example of nested control flow; inside the body of the while loop, the bulk of the action is inside the else clause; all we do inside the if clause is to call console.log. We can use continue statements to “flatten” this structure:
while(funds>0&&funds<100){lettotalBet=rand(1,funds);if(totalBet===13){console.log("Unlucky! Skip this round....");continue;}// play...}
In this simple example, the benefits aren’t immediately obvious, but imagine that the loop body consisted of not 1 line, but 20; by removing those lines from the nested control flow, we’re making the code easier to read and understand.
Using break or return to Avoid Unnecessary Computation
If your loop exists solely to find something and then stop, there’s no point in executing every step if you find what you’re looking for early.
For example, determining if a number is prime is relatively expensive, computationally speaking. If you’re looking for the first prime in a list of thousands of numbers, a naive approach might be:
letfirstPrime=null;for(letnofbigArrayOfNumbers){if(isPrime(n)&&firstPrime===null)firstPrime=n;}
If bigArrayOfNumbers has a million numbers, and only the last one is prime (unbeknownst to you), this approach would be fine. But what if the first one were prime? Or the fifth, or the fiftieth? You would be checking to see if a million numbers are prime when you could have stopped early! Sounds exhausting. We can use a break statement stop as soon as we’ve found what we’re looking for:
letfirstPrime=null;for(letnofbigArrayOfNumbers){if(isPrime(n)){firstPrime=n;break;}}
If this loop is inside a function, we could use a return statement instead of break.
Using Value of Index After Loop Completion
Occasionally, the important output of a loop is the value of the index variable when the loop terminates early with a break. We can take advantage of the fact that when a for loop finishes, the index variable retains its value. If you employ this pattern, keep in mind the edge case where the loop completes successfully without a break. For example, we can use this pattern to find the index of the first prime number in our array:
leti=0;for(;i<bigArrayOfNumbers.length;i++){if(isPrime(bigArrayOfNumbers[i]))break;}if(i===bigArrayOfNumbers.length)console.log('No prime numbers!');elseconsole.log(`First prime number found at position${i}`);
Using Descending Indexes When Modifying Lists
Modifying a list while you’re looping over the elements of the list can be tricky, because by modifying the list, you could be modifying the loop termination conditions. At best, the output won’t be what you expect; at worst, you could end up with an infinite loop. One common way to deal with this is to use descending indexes to start at the end of the loop and work your way toward the beginning. In this way, if you add or remove elements from the list, it won’t affect the termination conditions of the loop.
For example, we might want to remove all prime numbers from bigArrayOfNumbers. We’ll use an array method called splice, which can add or remove elements from an array (see Chapter 8). The following will not work as expected:
for(leti=0;i<bigArrayOfNumbers.length;i++){if(isPrime(bigArrayOfNumbers[i]))bigArrayOfNumbers.splice(i,1);}
Because the index is increasing, and we’re removing elements, there’s a possibility that we might skip over primes (if they are adjacent). We can solve this problem by using descending indexes:
for(leti=bigArrayOfNumbers.length-1;i>=0;i--){if(isPrime(bigArrayOfNumbers[i]))bigArrayOfNumbers.splice(i,1);}
Note carefully the initial and test conditions: we have to start with one less than the length of the array, because arrays indexes are zero-based. Also, we continue the loop as long as i is greater than or equal to 0; otherwise, this loop won’t cover the first element in the array (which would cause problems if the first element were a prime).
Conclusion
Control flow is really what makes our programs tick. Variables and constants may contain all the interesting information, but control flow statements allow us to make useful choices based on that data.
Flowcharts are a useful way to describe control flow visually, and very often it can be helpful to describe your problem with a high-level flowchart before you start writing code. At the end of the day, however, flowcharts are not very compact, and code is a more efficient and (with practice) natural way to express control flow (many attempts have been made to construct programming languages that were visual only, yet text-based languages have never been threatened by this usurper).
Get Learning JavaScript, 3rd Edition now with the O’Reilly learning platform.
O’Reilly members experience books, live events, courses curated by job role, and more from O’Reilly and nearly 200 top publishers.

