Chapter 1. The Node Environment
Forget what youâve heard about Node being a server-side tool only. Node is primarily used in server applications, true. But Node can be installed on almost any machine and used for any purpose, including running applications on your PC or even your tablet, smartphone, or microcomputer.
I have Node installed on my Linux-based server, but I also have it installed on my Windows 10-based PCs, as well as a microcomputer (Raspberry Pi).  I have an extra Android tablet that Iâm thinking of trying Node on, can use Node to program my Arduino Uno microcontroller, and am currently playing around with incorporating Node into my smart home setup thanks to IFTTTâs Maker Channel. On my PC, I use Node as a test environment for JavaScript, as well as an interface to ImageMagick for batch photo editing. Node is my go-to tool for any batch operation on my PCs or my server.
And yes, I use Node for server-side processing when I want a web interface that bypasses my Apache server, or provides a backend server process for a web application.
The point is, the Node environment is rich in functionality and reach. To start exploring this environment, we have to start at the beginning: installing Node.
IFTTT
IFTTT is a marvelous site that allows you to connect triggers and actions from a host of companies, services, and products using simple if-then logic. Each end point of the equation is a channel, including the aforementioned Maker Channel.
Installing Node
The best place to start when installing Node is the Node.js Downloads page. From here, you can download binaries (precompiled executables) for Windows, OS X, SunOS, Linux, and ARM architectures. The page also provides access to installers for a specific architecture that can greatly simplify the installation processâparticularly with Windows. If your environment is set up for building, download the source code and build Node directly. Thatâs my preference for my Ubuntu server.
You can also install Node using a package installer for your architecture. This is a helpful option not only for installing Node, but also for keeping it up-to-date (as weâll discuss further, in the section âThe Node LTS and Upgrading Nodeâ).
If you decide to compile Node directly on your machine, youâll need to set up the proper build environment, and install the proper build tools. For instance, on Ubuntu (Linux), youâll need to run the following command to install the tools needed for Node:
apt-get install make g++ libssl-dev git
There are some differences in behavior when you first install Node in the various architectures. For instance, when youâre installing Node in Windows, the installer not only installs Node, but it also creates a Command window youâll use to access Node on your machine. Node is a command-line application, and doesnât have a graphical UI like the typical Windows application. If you want to use Node to program an Arduino Uno, youâll install Node and Johnny-Five, and use both to program the connected device.
Accept Defaults in Windows World
Youâll want to accept the default location and feature installation when installing Node in Windows. The installer adds Node to the PATH variable, which means you can type node without having to provide the entire Node installation path.
If youâre installing Node on Raspberry Pi, download the appropriate ARM version, such as ARMv6 for the original Raspberry Pi, and ARMv7 for the newer Raspberry Pi 2. Once downloaded, extract the binary from the compressed tarball, and then move the application to /usr/local:
wget https://nodejs.org/dist/v4.0.0/node-v4.0.0-linux-armv7l.tar.gz
tar -xvf node-v4.0.0-linux-armv7l.tar.gz

cd node-v4.0.0-linux-armv7l

sudo cp -R * /usr/local/
You can also set up a build environment and build Node directly.
New Node Environments
Speaking of Node with Arduino and Raspberry Pi, I cover Node in nontraditional environments, such as the Internet of Things, in Chapter 12.
Saying Hello to the World with Node
Youâve just installed Node and you naturally want to take it for a spin. There is a tradition among programmers that the first application in a language is the well-known âHello, Worldâ application. The application typically writes out the words âHello, Worldâ to whatever is the output stream, demonstrating how an application is created, run, and can process input and output.
The same holds true for Node: it is the application that the Node.js website includes in the Synopsis in the applicationâs documentation. And it is the first application weâll create in this book, but with a few tweaks.
A Basic Hello World Application
First, letâs take a look at the âHello, Worldâ application included in the Node documentation. To re-create the application, create a text document with the following JavaScript, using your favorite text editing tool. I use Notepad++ in Windows, and Vim in Linux.
var http = require('http');

http.createServer(function (request, response) {
  response.writeHead(200, {'Content-Type': 'text/plain'});
  response.end('Hello World\n');
}).listen(8124);

console.log('Server running at http://127.0.0.1:8124/');
Save the file as hello.js. To run the application, open a terminal if youâre using OS X or Linux, or the Node Command window with Windows. Change to the directory where your saved file is located and type the following to run the application:
node hello.js
The result is printed out to the command line, via the console.log() function call in the application:
Server running at http://127.0.0.1:8124/
Now open a browser and type either http://localhost:8124/ or http://127.0.0.1:8124 into the address bar (or your domain, if youâre hosting Node on your server). What appears is a simple unadorned web page with âHello Worldâ in text at the top, as shown in Figure 1-1.
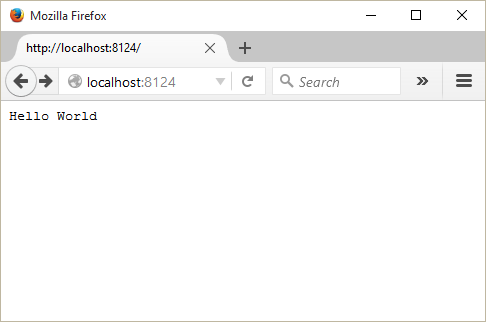
Figure 1-1. Your first Node application
If youâre running your application in Windows, youâll most likely receive a Windows Firewall alert, as shown in Figure 1-2. Uncheck the Public Network option, check the Private network option, and then click the button to Allow access.
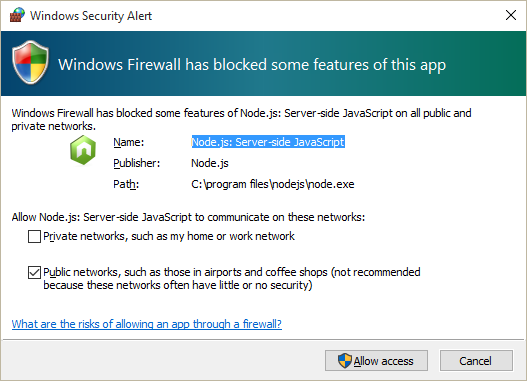
Figure 1-2. Allowing access to Node application in Windows
You wonât have to repeat this process in Windows: the system remembers your choice.
To end the program, you can either close the terminal/Command window (just terminal from this point), or type Ctrl-C.  When you ran the application, you did so in the foreground. This means you canât type any other command in the terminal. It also means when you closed the terminal, you stopped the Node process.
Running Node Forever
For now, running Node in the foreground is a good thing. Youâre learning how to use the tool, you donât yet want your applications to be externally available to everyone, and you want it to terminate when youâre finished for the day. In Chapter 11, Iâll cover how you can create a more robust Node runtime environment.
To return to the Hello World code, JavaScript creates a web server that displays a web page with the words âHello Worldâ when accessed via a browser. It demonstrates several key components of a Node application.
First, it includes the module necessary to run a simple HTTP server: the appropriately named HTTP module. External functionality for Node is incorporated via modules that export specific types of functionality that can then be used in an application (or another module). Theyâre very similar to the libraries youâve used in other languages.
var http = require('http');
Node Modules, Core Modules, and the http Module
The HTTP module is one of Nodeâs core modules, which are the primary focus of this book. Iâll cover Node modules and module management thoroughly in Chapter 3, and the HTTP module in Chapter 5.
The module is imported using the Node require statement, and the result assigned to a local variable. Once imported, the local variable can be used to instantiate the web server, via the http.createServer() function. In the function parameters, we see one of the fundamental constructs of Node: the callback (Example 1-1). Itâs the anonymous function thatâs passing the web request and response into the code to process the web request and provide a response.
Example 1-1. Hello, World callback function
http.createServer(function (request, response) {
  response.writeHead(200, {'Content-Type': 'text/plain'});
  response.end('Hello World\n');
}).listen(8124);
JavaScript is single-threaded, and the way Node emulates an asynchronous environment in a single-threaded environment is via an event loop, with associated callback functions that are called once a specific event has been triggered. In Example 1-1, when a web request is received, the callback function is called.
The console.log() message is output to the terminal as soon as the call to create the server is made. The program doesnât stop and block, waiting for a web request to be made.
console.log('Server running at http://127.0.0.1:8124/');
More on the Event Loop and Callback Function
Iâll be covering the Node event loop, its support for asynchronous programming, and the callback function in more detail in Chapter 2.
Once the server is created and has received a request, the callback function writes a plain text header with server status of 200 back to the browser, writes out the Hello World message, and then ends the response.
Congratulations, youâve created your first web server in Node in just a few lines of code. Of course, itâs not particularly useful, unless your only interest is in greeting the world. Throughout the book youâll learn how to make more useful Node applications, but before we leave Hello World, letâs make some modifications to the basic application to make it a little more interesting.
Hello World, Tweaked
Just printing out a static message does demonstrate, first of all, that the application is working and, second, how to create a simple web server. The basic example also demonstrated several key elements of a Node application. But it could be just a little richer, a little more fun to play with. So I tweaked it to provide you a second application you can try out that has a few more moving parts.
The tweaked code is in Example 1-2. In it, I modified the basic application to parse the incoming request to look for a query string. The name in the string is extracted and used to determine the type of content returned. Almost any name will return a personalized response, but if you use name=burningbird as the query, youâll get an image. If no query string is used, or no name passed, the name variable is set to 'worldâ.
Example 1-2. Hello World, tweaked
var http = require('http');
var fs = require('fs');

http.createServer(function (req, res) {
   var name = require('url').parse(req.url, true).query.name;

   if (name === undefined) name = 'world';

   if (name == 'burningbird') {
      var file = 'phoenix5a.png';
      fs.stat(file, function (err, stat) {
         if (err) {
            console.error(err);
            res.writeHead(200, {'Content-Type': 'text/plain'});
            res.end("Sorry, Burningbird isn't around right now \n");
         } else {
            var img = fs.readFileSync(file);
            res.contentType = 'image/png';
            res.contentLength = stat.size;
            res.end(img, 'binary');
         }
      });
   } else {
      res.writeHead(200, {'Content-Type': 'text/plain'});
      res.end('Hello ' + name + '\n');
   }
}).listen(8124);

console.log('Server running at port 8124/');
The result of accessing the web-based application with a query string of ?name=burningbird is shown in Figure 1-3.

Figure 1-3. Hello, Burningbird
Not much extra code, but there are several differences between the basic Hello World application and the tweaked version. From the top, a new module is included in the application, named fs. This is the File System module, one you will become very familiar with in the next several chapters. But thereâs also another module imported, but not in the same way as the other two:
var name = require('url').parse(req.url, true).query.name;
Exported module properties can be chained, so we can both import the module and use its functions in the same line. This frequently happens with the URL module, whose only purpose is to provide a URL utility.
The response and request parameter variable names are shortened to res and req to make them easier to access. Once we parse out the request to get the name value, we first test to see if itâs undefined. If not, the value is set to the fallback result, world. If name does exist, itâs tested again to see if itâs equal to burningbird. If it isnât, then the response is close to what we had in the basic application, except for inserting the supplied name into the return message.
If the name is burningbird, though, weâre dealing with an image rather than text. The fs.stat() method not only verifies that the file exists but also returns an object with information about the file, including its size. This value is used in creating the content header.
If the file doesnât exist, the application handles the situation gracefully: it issues a friendly message that the bird has flown the coop, but also provides error information at the console, using the console.error() method this time:
{ [Error: ENOENT: no such file or directory, stat 'phoenix5a.png']
  errno: -2,
  code: 'ENOENT',
  syscall: 'stat',
  path: 'phoenix5a.png' }
If the file does exist, then weâll read the image into a variable and return it in the response, adjusting the header values accordingly.
The fs.stats() method uses the standard Node callback function pattern with the error value as the first parameterâfrequently called an errback. However, the part about reading the image may have you scratching your head. It doesnât look right, not like other Node functions youâve seen in this chapter (and most likely in other online examples). Whatâs different is that Iâm using a synchronous function, readFileSync(), rather than the asynchronous version, readFile().
Node does support both synchronous and asynchronous versions of most File System functions. Normally, using a synchronous operation in a web request in Node is taboo, but the capability is there. An asynchronous version of the same bit of code is used in Example 1-3.
fs.readFile(file, function(err,data) {
                res.contentType = 'image/png';
                res.contentLength = stat.size;
                res.end(data, 'binary');
              });
Why use one over the other? In some circumstances, file I/O may not impact performance regardless of which type of function you use, and the synchronous version can be cleaner and easier to use. It can also lead to less nested codeâa particular problem with Nodeâs callback system, and one Iâll cover in more detail in Chapter 2.
Additionally, though I donât use exception handling in the example, you can use try...catch with synchronous functions. You canât use this more traditional error handling with asynchronous functions (hence the error value as the first parameter to the anonymous callback function).
The important fact to take away from this second example, though, is that not all Node I/O is asynchronous.
Filesystem and URL Modules, Buffers, and Aynchronous I/O
Iâll cover the URL module in more detail in Chapter 5, and File System is explored in Chapter 6. Note, though, that File System is used all throughout the book. Buffers and asynchronous processing are covered in Chapter 2.
Node Command-Line Options
In the last two sections, Node is invoked at the command line without the use of any command-line options. I wanted to briefly introduce some of these options before we move on. Others will be introduced when needed throughout the book.
To discover all the available options and arguments, use the help option, written as either -h or --help:
$ node --help
This option will list out all of the options, and provides the syntax to follow when running the Node application:
Usage: node [options] [ -e script | script.js ] [arguments] Â Â Â Â node debug script.js [arguments]
To find the version of Node, use the following command:
$ node -v or --version
To check the syntax of a Node application, use the -c option. This checks the syntax without running the application:
$ node -c or --check script.js
To discover the V8 options, type the following:
$ node --v8-options
This returns several different options, including the --harmony option, used to enable all completed Harmony JavaScript features. This includes all ES6 functionality thatâs been implemented but not yet staged into either the LTS or Current release.
A favorite Node option of mine is -p or --print, which can evaluate a line of Node script and print the results. This is especially helpful if youâre checking out the Process environmental properties, discussed more fully in Chapter 2. An example is the following, which prints out all of the values for the process.env property:
$ node -p "process.env"
Node Hosting Environments
As you learn Node, youâll want to become familiar with it in your own local environment, be it Windows, OS X, or Linux. When youâre ready to start providing greater access to your applications, youâll either need to find an environment where you can run a Node application, such as a virtual private network (VPN), which is what I use, or a host that specifically provides for Node application support. The former requires that you have significant experience running a Internet-faced server, while the latter may limit what you can or cannot do with your Node application.
Hosting Node on Your Server, VPS, or Managed Host
Hosting Node on the same server as your WordPress weblog is likely going to be a dead end, because of Nodeâs requirements. You donât have to have root or administrative access to run Node, but you should. In addition, many hosting companies are not going to be happy with you hosting an application on various ports that may or may not play havoc with their systems.
Hosting Node on a virtual private server (VPS), like my VPN at Linode, is a simple matter. You do have root access for your VPS and can pretty much do whatever you want, as long as you donât endanger other users who may be on the same machine. Most companies that provide VPSs ensure that each individual account is isolated from the others, and that no one account can hog all the available resources either.
The issue, though, with a VPS is the same issue youâd have if you hosted your own server: you have to maintain the server. This includes setting up an email system and an alternative web server, most likely Apache or Nginx, to handle firewalls and other security, email, etc. Itâs not trivial.
Still, if youâre comfortable with managing all aspects of a Internet-faced environment, a VPS can be an affordable option for hosting a Node application. At least until youâre ready to push it into production, in which case you may want to look at hosting the application in the cloud.
Cloud Hosting
Nowadays, an application is just as likely to reside in a cloud server as it is on an individualâs or groupâs own computers. Node applications are well-suited to cloud-based implementations.
When you host a Node application in the cloud, what youâre really doing, typically, is creating the application on your own server or PC, testing it, making sure itâs what you want, and then pushing the application out to the cloud server. A cloud server for Node allows you to create the Node application you want to create, using the resources of whatever database system or other system you wish, but without having to manage the server directly. You can focus specifically on the Node application without having to worry about FTP or email servers, or general server maintenance.
The paradigm for hosting a Node application in the cloud is fairly similar across all of the hosts. First, create the Node application, either locally or on your own server. When youâre ready to start testing a deployment environment, then itâs time to look for a cloud server. For most Iâm familiar with, you sign up for an account, create a new project, and specify that it is Node-based if the cloud is capable of hosting many environments. You may or may not need to specify which other resources are needed, such as database access.
Once ready to deploy, youâll push the application to the cloud. Youâll either use Git to push the application or you may need to use a toolset supplied by the cloud provider. As an example, Microsoftâs Azure cloud utilizes Git to push the application from your local environment to the cloud, while Googleâs Cloud Platform provides a toolset to perform the same process.
Finding a Host
Though not completely up-to-date, a good place to start looking for a Node host is a GitHub page devoted to the topic.
The Node LTS and Upgrading Node
In 2014, the Node world was stunned (or at least some of us were taken by surprise) when a group of Node maintainers split from the rest and formed their own fork of Node.js called io.js. The reason for the split is that the io.js folks felt that Joyent, the company that had been maintaining Node, wasnât moving fast enough to open governance of Node. The group also felt that Joyent was behind in its support of the latest V8 engine updates.
Thankfully, I can report that the two groups resolved the issues leading to the split, merging their efforts back to one product, still named Node.js. Node is now managed through a governing nonprofit, the Node Foundation, under the auspices of the Linux Foundation. As a result, the codebase for both groups was combined, and rather than the first official release of Node being Node 1.0, it became Node 4.0: representing Nodeâs original slow pace to Node 1.0, and io.jsâs faster 3.0 version.
Nodeâs New Semantic Versioning
One result of the merge is a strict timeline of Node releases, based on semantic versioning (Semver), familiar to Linux users. Semver releases features as three groups of numbers, each with a specific meaning. For instance, as Iâm writing this, Iâm currently using Node.js version 4.3.2 on my server. This translates to:
- The major release is 4. This number will only increase when a major, backward-incompatible change is made to Node.
- The minor release is 3. This number increases when new functionality is added, but the functionality is still backward compatible.
- The patch release is 2. This number changes when security or other bug fixes require a new release of the application. It is also backward compatible.
Iâm using the Stable release of 5.7.1 on my Windows machine, and tested the code using the Current release of 6.0.0 on a Linux machine.
The Node Foundation also supports a much more cohesive, albeit somewhat problematic, release cycle than the hit-or-miss releases we have become familiar with. It started with the first LTS (Long-Term Support) release of Node.js v4, which will be supported until April 2018. The Node Foundation then released its first Stable release, Node.js v5, at the end of October 2015. Node 5.x.x will only be supported until April 2016, when it will be replaced by Node.js v6. The strategy is for a new Stable (now Current) release every six months, but only every other one goes LTS, like Node v4.
Release of 6.0.0 as Current
In April 2016, Node released 6.0.0, which replaces 5.x, and will transition into the new LTS in October of 2016. Node also renamed the Stable designation for the active development branch to Current.
After April 2018, Node v4 enters maintenance mode. In the meantime, there will be new backward-compatible updates (known as semver-major bumps), as well as bug and security patches.
What Version Is the Book Covering?
This book covers the long-term stable release of Node.js v4. Annotations mark differences between v4 and v5/v6, wherever appropriate.
Regardless of which LTS major release you decide to use, youâll need to upgrade to each new bug/security fix as soon as it releases. However you handle each new semver-major bump is up to you and/or your organization. The upgrade should be backward compatible, though, with only underlying engine improvements impacted. Still, youâll want to incorporate any new release into an upgrade and testing plan.
Which version should you use? In a business or corporate environment, youâll most likely want to stick with the LTS release, which is, at this time, Node.js v4. However, if your environment can more quickly adapt to breaking changes, you can get access to the latest v8 and other goodies with the latest Node Current release.
The Joys of Testing and Production
I cover Node debugging and testing, as well as other development process and production procedures, in Chapter 11.
Upgrading Node
With the increased schedule of releases, keeping Node up-to-date is even more critical. Thankfully, the upgrade process is painless, and you have alternatives.
You can check your version with the following:
node -v
If youâre using a package installer, then running the package update procedure updates Node, as well as any other software on your server (sudo is not required in Windows):
sudo apt-get update
sudo apt-get upgrade --show-upgraded
If you are using a package installer, follow the instructions associated with it that are provided at the Node website. Otherwise, youâll end up out-of-sync with releases.
You can also use npm to upgrade Node, using the following sequence of commands:
sudo npm cache clean -f
sudo npm install -g
sudo n stable
To install the latest version of Node on Windows, OS X, or your Raspberry Pi, grab the installer from the Node.js downloads and run it. It installs the new version over the old.
Node Version Manager
In a Linux or OS X environment, you can also use the Node Version Manager (nvm) tool to keep Node up-to-date.
The Node package manager (npm) updates more frequently than Node. To upgrade just it, run the following command:
sudo npm install npm -g n
This command installs the latest version of the necessary application. You can check the version using:
npm -v
Be aware, though, that this can cause issues, especially in a team environment. If your team members are using the version of npm thatâs installed with Node, and youâve manually upgraded npm to the newer version, you can have inconsistent build results that may not be easy to discover.
Iâll cover npm in more detail in Chapter 3, but for now, note that you can keep all Node modules up-to-date with the following command:
sudo npm update -g
Node, V8, and ES6
Behind Node is a JavaScript engine. For most implementations, the engine is V8. Originally created by Google for Chrome, the V8 source code was open-sourced in 2008. The V8 JavaScript engine was created to improve the speed of JavaScript by incorporating a just-in-time (JIT) compiler that compiles JavaScript to machine code rather than interpreting it, which had been the norm for JavaScript for years. The V8 engine is written in C++.
Microsoftâs Node.js Fork
Microsoft forked Node to create a version that uses its JavaScript engine, Chakra, specifically to power its vision for the Internet of Things (IoT). Iâll cover this fork in more detail in Chapter 12.
When Node v4.0 released, it did so with support for V8 4.5, the same version of the engine being used by Chrome. The Node maintainers are also committed to supporting upcoming versions of V8 as theyâre released. This means that Node now incorporates support for many of the new ECMA-262 (ECMAScript 2015 or ES6) features.
Node v6 V8 Support
Node v6 supports V8 version 5.0, and new releases of Node will support newer versions of V8 accordingly.
In prior versions of Node, to access the new ES6 features, you would have to use the harmony flag (--harmony) when running the application:
node --harmony app.js
Now, ES6 feature support is based on the following criteria (directly from the Node.js documentation):
- All shipping features, which V8 considers stable, are turned on by default on Node.js and do not require any kind of runtime flag.
- Staged features, which are almost-completed features that are not considered stable by the V8 team, require a runtime flag:
--es_staging(or its synonym,--harmony). - In-progress features can be activated individually by their respective harmony flag (e.g.,
--harmony_destructuring), although this is highly discouraged unless for testing purposes.
Iâll cover the ES6 support in Node and how to effectively use the different features in Chapter 9. For now, know that the following are some of the ES6 features supported in Node, straight out of the can:
- Classes
- Promises
- Symbols
- Arrow functions
- Generators
- Collections
let- The spread operator
Advanced: Node C/C++ Add-ons
Now that Node is installed and youâve had a chance to play around with it a bit, you might be wondering exactly what it is you installed.
Though the language used to create Node applications is based in JavaScript, much of Node is actually written in C++. Normally this information is behind the scenes in most applications we use, but if youâre familiar with C or C++, you can choose to extend Node functionality using C/C++ to create an add-on.
Writing a Node add-on is not the same as writing a more traditional C/C++ application. For one, there are libraries, such as the V8 library, that youâll typically access. For another, the Node add-on is not compiled using the tools you would normally use.
The Node documentation for add-ons provides a Hello World example of an add-on. You can check out the code for the short example, which should be familiar if you have programmed with C/C++. Once youâve written the code, though, youâll need to use a tool, node-gyp, to actually compile the add-on into a .node file.
First, a configuration file named binding.gyp is created. It uses a JSON-like format to provide information about the add-on:
{"targets":[{"target_name":"addon","sources":["hello.cc"]}]}
The Node add-on configuration step is performed using the following command:
node-gyp configure
It creates the appropriate configuration file (a Makefile for Unix, a vcxproj file in Windows) and places it in the build/ directory. To build the Node add-on, run the following command:
node-gyp build
The compiled add-on is installed in the build/release directory, and is now ready to use. You can import it into your application like you would many of the others installed with Node (covered in Chapter 3).
Maintaining Native Mode Modules
Though outside the scope of this book, if youâre interested in creating native mode modules (the add-ons), you need to be aware of platform differences. For instance, Microsoft provides special instructions for native modules in Azure, and the maintainer for the popular node-serialport native module has detailed the challenges heâs faced maintaining the module.
Of course, if youâre not familiar with C/C++, youâll most likely want to create modules using JavaScript, and Iâll cover that in Chapter 3 also. But if you do know these languages, an add-on can be an effective extension, especially for system-specific needs.
One thing to be aware of is the rather dramatic changes that have occurred within Node as it has progressed from v0.8 through the new v6.x. To counter the problems that can occur, youâll need to install NAN, or Native Abstractions for Node.js. This header file helps to smooth out the differences between versions of Node.js.
Get Learning Node, 2nd Edition now with the O’Reilly learning platform.
O’Reilly members experience books, live events, courses curated by job role, and more from O’Reilly and nearly 200 top publishers.

