Before you can use Rails, you have to install it. Even if it’s already installed on your computer, or you opt to use a web-based development environment, there are a few things you’ll need to do to make it actually do something visible. In this chapter, we’ll take a look at some ways of installing Ruby, Rails, and the supporting infrastructure, and get a first, rather trivial project up and running.
Feel very welcome to jump to whatever pieces of this section interest you and skip past those that don’t. Once the software is working, we’ll generate the basic Rails application, which will at least let you know if Rails is working.
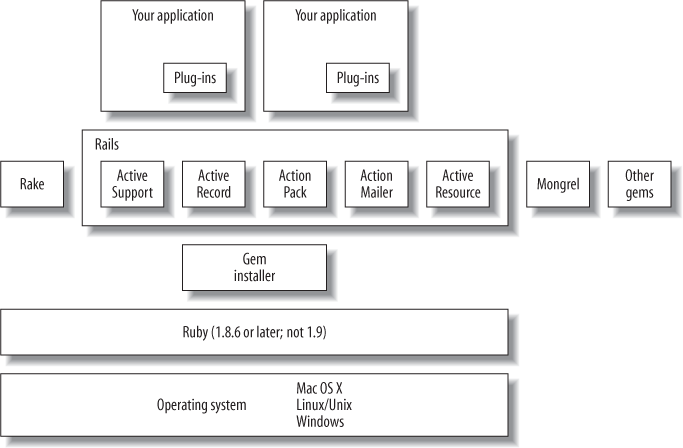
There used to be a few options for installing Rails without battling the details involved in its installation. Heroku Garden was a web-based approach that has since disappeared, and Instant Rails offers a simple (though growingly obsolete) installation for Windows users. For more on Instant Rails, see the screencast at http://broadcast.oreilly.com/2008/12/installing-instant-rails-on-wi.html. However you decide to set up Rails, in the end you’re going to need to install a structure like that shown in Figure 1-1.
Note
All of these options are free. You don’t need to spend any money to use Rails, unless maybe you feel like buying a nice text editor.
Installing Rails by hand requires installing Ruby, installing Gems, and then installing Rails. You will eventually also need to install SQLite, MySQL, or another relational database, though SQLite is already present on the Mac and in many Linux distributions.
Note
If you’re wondering how to find this “command line,” you need to find a terminal application. On the Mac, it’s called Terminal, and it’s in the Utilities folder of Applications. Linux terminals vary, but it’s probably gnome-terminal or kterm. On Windows, it’s the Command Prompt, cmd.exe. If you’ve never used a command line, you may want to get a quick reference guide for your operating system that covers it.
Ruby comes standard on a number of Linux and Macintosh platforms. To see whether
it’s there, and what version it has, enter ruby -v at the command prompt.
You’ll want Ruby 1.8.6 or later, so you may need to update it to a more recent
version:
On Mac OS X, Snow Leopard (10.6) includes Ruby 1.8.7, and Leopard (10.5) includes Ruby 1.8.6, but the previous version of OS X included Ruby 1.8.2. If you’re on Tiger (10.4) or an earlier version of OS X, you’ll need to update Ruby itself, a challenge that’s beyond the scope of this book. You may want to investigate MacPorts, and the directions at http://nowiknow.wordpress.com/2007/10/07/install-ruby-on-rails-for-mac/. For a more comprehensive installation, explore http://paulsturgess.co.uk/articles/show/46.
For Windows, the One-Click Ruby Installer (http://rubyinstaller.rubyforge.org/wiki/wiki.pl) is probably your easiest option, though there are other alternatives, including Cygwin (http://www.cygwin.com/), which brings a lot of the Unix environment to Windows.
Most distributions of Linux include Ruby, but you’ll want to use your package manager to make sure it’s updated to 1.8.6. Some, notably Ubuntu and Debian, will name the
gemcommandgem1.8.
For more on how to install Ruby on a variety of platforms, see http://www.ruby-lang.org/en/downloads/.
Note
For screencasts that shows how to get started with Rails on Ubuntu, see http://broadcast.oreilly.com/2008/11/installing-rails-on-hardy-hero.html for the desktop version and http://broadcast.oreilly.com/2008/11/installing-rails-on-ubuntu-har.html for the server version. There's also a first steps for using Rails on Mac OS X 10.5 at http://broadcast.oreilly.com/2008/11/first-steps-into-rails-on-the.html.
Warning
You don’t need to update Ruby to version 1.9—indeed, it’s better if you don’t, at this point.
Gems is also starting to come standard on a number of platforms, most recently on Mac OS X Leopard and Snow Leopard, but if you need to install Gems, see the RubyGems User Guide’s instructions at http://www.rubygems.org/read/chapter/3.
Warning
If you use MacPorts, apt-get, or a similar package installer, you may want to use it only to install Ruby, and then proceed from the command line. You certainly can install Gems and Rails with these tools, but Gems can update itself, which can make for very confusing package update issues.
Once you have Gems installed, Rails is just a command away:
~ simonstl$ sudo gem install rails
Password:
Successfully installed activesupport-2.3.5
Successfully installed activerecord-2.3.5
Successfully installed actionpack-2.3.5
Successfully installed actionmailer-2.3.5
Successfully installed activeresource-2.3.5
Successfully installed rails-2.3.5
6 gems installed
Installing ri documentation for activesupport-2.3.5...
Installing ri documentation for activerecord-2.3.5...
Installing ri documentation for actionpack-2.3.5...
Installing ri documentation for actionmailer-2.3.5...
Installing ri documentation for activeresource-2.3.5...
Installing RDoc documentation for activesupport-2.3.5...
Installing RDoc documentation for activerecord-2.3.5...
Installing RDoc documentation for actionpack-2.3.5...
Installing RDoc documentation for actionmailer-2.3.5...
Installing RDoc documentation for activeresource-2.3.5...
Note
gem install rails will install the latest official
release of Rails, which at present is 2.3.5. It will not install the Rails 3.0 beta. If
you want to install the Rails 3.0 beta - studying the latest and greatest, but wandering
away from the version covered here - see http://weblog.rubyonrails.org/2010/2/5/rails-3-0-beta-release.
You only need to use sudo, which gives your command the power of the root (administrative) account, if
you’re working in an environment that requires root access for the
installation—otherwise, you can just type gem install
rails. That will install the latest version of Rails, which may be more recent
than 2.3.4, as well as all of its dependencies. (To see which version of Rails is installed,
enter rails -v at the command line.)
Note
Mac OS X Snow Leopard (10.6) includes Rails 2.2.2 installed, which, though a little behind, will work well with the examples in this book. If you'd like more control over how Rails is installed, though, take a look at http://eddorre.com/posts/installing-ruby-on-rails-postgresql-mysql-on-snow-leopard.
However, Mac OS X Leopard (10.5) comes with Rails 1.2.3 installed. You’ll definitely need to update
Rails to version 2.1, as shown earlier, to work with the rest of this book. You’ll
also probably need to keep an eye on future updates from Apple that could change Rails on
you, and maybe even lock down Rails versions in your critical applications with the
rake tool’s freeze task.
If you’re ever wondering which gems (and which versions of gems) are installed,
type gem list --local. For more information on gems, just
type gem, or visit http://rubygems.rubyforge.org.
There are a few gems you may want to install, though these come preinstalled on Mac OS X
10.5 and later. To install the Mongrel app server, run sudo gem install
mongrel. To install the Ruby bindings for SQLite, run sudo gem install sqlite3-ruby.
(You’ll still need to install SQLite 3.)
Note
You can see the documentation that gems have installed by running the command gem server, and visiting the URL (usually http://localhost:8808) that command reports. When you’re done, you can
turn off the server with Ctrl-C.
Once you have Rails installed, you can create a Rails application easily from the command line:
~ $ rails hello
      create
      create  app/controllers
      create  app/helpers
      create  app/models
      create  app/views/layouts
      create  config/environments
...
      create  public/images/rails.png
      create  public/javascripts/prototype.js
      create  public/javascripts/effects.js
      create  public/javascripts/dragdrop.js
      create  public/javascripts/controls.js
      create  public/javascripts/application.js
      create  doc/README_FOR_APP
      create  log/server.log
      create  log/production.log
      create  log/development.log
      create  log/test.log
Note
Rails application directories are just ordinary directories. You can move them, obliterate them and start over, or do whatever you need to do with ordinary file-management tools. Each application directory is also completely independent—the general “Rails environment” just generates these applications.
To start Rails, you’ll need to move into the directory you just
created—cd hello—and then issue your
first command to get the Mongrel server busy running your application:
~ $ ruby script/server
=> Booting Mongrel (use 'script/server webrick' to force WEBrick)
=> Rails application starting on http://0.0.0.0:3000
=> Call with -d to detach
=> Ctrl-C to shutdown server
** Starting Mongrel listening at 0.0.0.0:3000
** Starting Rails with development environment...
** Rails loaded.
** Loading any Rails specific GemPlugins
** Signals ready.  TERM => stop.  USR2 => restart.  INT => stop (no restart).
** Rails signals registered.  HUP => reload (without restart).  It might not work
well.
** Mongrel available at 0.0.0.0:3000
** Use CTRL-C to stop.
Rails is now running, and you can watch any errors it encounters through the extensive logging you’ll see in this window.
Note
On most Linux and Mac systems, you can leave off the ruby part—script/server
will do. And you should note that by default, script/server binds only to localhost,
and the application isn’t visible from other computers. Normally, that’s a
security feature, not a bug, though you can specify an address for the server to use
with the -b option (and -p for a specific port) if you want to make it
visible.
For more details on options for using script/server, just enter ruby script/server
-h.
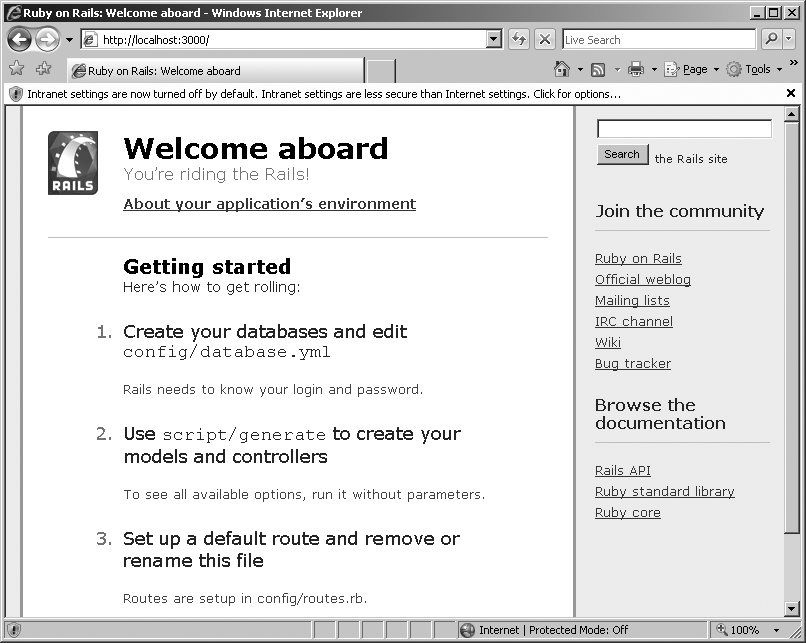
If you now visit http://localhost:3000, you’ll see the same welcome screen shown previously in Figure 1-2. When you’re ready to stop Rails, you can just press Ctrl-C.
By default, Rails 2.0 and later expects every application to have a database behind it. (That’s why Figure 1-2 refers to configuring databases at the start.) That expectation makes it a little difficult to get started with Rails, so it can be a good idea to either make sure that SQLite is installed or turn off the features that will call a database, at least at first.
Rails 2.0.2 and later versions use SQLite as the default database, and connects to it much more automatically. If you’re running an operating system that includes SQLite—such as many versions of Linux and Mac OS X 10.4 or later—you can skip this section.
To check that it’s available, you can run sqlite3
-help. If that returns a friendly help message, you’re set. You
can just run rake
db:create or rake db:migrate from the command line before running your
application, and that will perform the necessary database setup. If the help message
doesn’t come up, installing SQLite would be a good idea. (For more on SQLite, see
http://www.sqlite.org/.)
If you decide to postpone database installation and get weird errors that look like your application can’t find a database, and you weren’t expecting it to need one, then you should turn off the database connection. The key to doing this is the environment.rb file, which you’ll find in the config directory. About halfway down the file, you’ll find:
# Skip frameworks you're not going to use (only works if using vendor/rails).
# To use Rails without a database, you must remove the ActiveRecord framework
# config.frameworks -= [ :active_record, :active_resource, :action_mailer ]
To turn off Rails’ demand for a database, just remove the highlighted # symbol in front of config.frameworks. You need to do this
before you start up Rails with script/server.
Note
In development mode (which is where you start), you can change code on the fly and Rails will immediately reflect your changes, but this doesn’t apply to configuration files. They only get loaded when Rails starts up. If you need to change any configuration files, stop your application and then start it again after you’ve saved the change.
We’ll come back to Rails’ powerful database-centric core after taking a closer look at how it interacts with the Web.
Get Learning Rails: Live Edition now with the O’Reilly learning platform.
O’Reilly members experience books, live events, courses curated by job role, and more from O’Reilly and nearly 200 top publishers.

