Chapter 4. Visual Studio .NET
In Chapter 2 you learned that you can create your VB.NET applications using Notepad. In this chapter, you’ll learn why you never will. Microsoft developed Visual Studio .NET (VS.NET) to facilitate the creation of Windows and web applications. You will find that this Integrated Development Environment (IDE) is a very powerful tool that will greatly simplify your work.
Visual Studio .NET offers many advantages to the .NET developer. The following features are discussed in this chapter:
A modern interface using a tabbed document metaphor for source code and layout screens, and toolbars and informational windows that dock where you want them.
Code completion, which enables you to enter code with fewer errors and much less typing.
IntelliSense, which pops up help on every method and function call as you type.
Dynamic, context-sensitive help, which allows you to view topics and samples relevant to the code you are writing at the moment.
Immediate flagging of syntax errors (e.g., missing characters, misplaced braces, etc.), which allows you to fix problems as they are entered.
The ability to compile and test programs right in the IDE.
A built-in task list to keep track of changes you need to make.
A Start Page that provides easy access to new and existing projects.
Customization capability, which allows you to set user preferences for IDE appearance and behavior.
One VS.NET feature will be so important to you, even as a VB.NET novice, that it actually merits its own chapter: An integrated debugger, which enables you to step through code, observe program runtime behavior, and set breakpoints, even across multiple languages. The debugger is considered in detail in Chapter 10.
In addition to these basic capabilities, VS.NET provides a number of advanced features that will simplify the development process. These features include:
Convenient access to multiple design and code windows.
WYSIWYG (What You See Is What You Get) visual design of Windows forms and web forms.
An HTML editor, which provides both Design and HTML views that update each other in real time.
A Solution Explorer, which displays all the files that make up your solution (a collection of projects) in a hierarchical format.
A Server Explorer, which allows you to log on to servers to which you have network access, access the data and services on those servers, and perform a variety of other chores.
Integrated support for source control software.
Many of these advanced features are covered in detail in Programming ASP.NET and Programming .NET Windows Applications (both books cowritten by Jesse Liberty and Dan Hurwitz, published by O’Reilly).
Robert Heinlein said “TANSTAAFL: There ain’t no such thing as a free lunch.”[1] While Visual Studio .NET can save you a lot of grunt typing (and in general greatly facilitate and accelerate the development process), on the negative side the automatically generated code can obscure what is really necessary to create good working applications. It is sometimes difficult to know how Visual Studio .NET accomplishes its legerdemain. Similarly, the proliferation of mysteriously named files across your filesystem can be disconcerting when all you want to do is a simple housekeeping chore, like rename a minor part of the project.
Since most of the applications we’ll build in this book are console applications designed to illustrate the basics of the language, very little obscuring code will be produced. When you go on to create Windows and web applications, however, you’ll want to learn to sort through the code Visual Studio .NET generates in order to focus on the logic of your program.
The current chapter cannot possibly teach you everything about Visual Studio .NET; it is far too large and complex an application. What this chapter does is give you the basics for getting started and also point out some of the possible pitfalls.
Tip
Keep in mind that there’s no way to familiarize you with some of these features without wading into some slightly deeper waters of VB.NET programming, which will likely be a bit cloudy to you at this stage. As you get deeper into the book and learn more about the language, your understanding of VB.NET will become clearer.
Start Page
The Start Page is the first thing you see when you open Visual Studio .NET (unless you configure it otherwise). From here you can create new projects or open a project you worked on in a previous session. You can also find out what is new in .NET, access .NET newsgroups and web sites, search for help online, download useful code, or adjust Visual Studio .NET to your personal requirements. Figure 4-1 shows a typical Start Page.
Along the top of the application window is a set of menus and buttons. These menus and buttons are context-sensitive (i.e., they will change as the current window changes).
Along the left side of the window is a series of links to other resources, such as new developments and events in the .NET community, the MSDN online library, and free sample applications.
Projects and Solutions
A VB.NET program is built from source files, text files containing the code you write. Source code files are named with the .vb extension. The helloworld.vb file you created in Chapter 2 is a typical example.
A typical Visual Studio .NET application can have a number of other files (e.g., assembly information files, references, icons, data connections, etc.). VS.NET organizes these files into a container called a project.
Visual Studio .NET provides two types of containers for your source code, folders, files, and related material: the project and the solution. A project is a set of files that work together to create an executable program (.exe) or a dynamic link library (.dll ). Large, complex projects may consist of multiple .dll files called modules.
A solution is a set of one or more related projects. Each time you create a new project, Visual Studio .NET will either add it to an existing solution or create a new solution.
Solutions are defined within a file named for the solution and have the extension .sln.
Tip
The .sln file contains metadata, which is basically information about the data. The metadata describes the projects that compose the solution and information about building the solution. Visual Studio .NET also creates a file with the same base name as the .sln file, but with the filename extension .sou (e.g., mySolution.sln and mySolution.sou). The .sou file contains metadata used to customize the IDE.
There are a number of ways to open an existing solution. The simplest is to select Open Project from the Start menu (which will open a project and its enclosing solution). Alternatively, you can open a solution in Visual Studio .NET just by double-clicking the .sln file in Windows Explorer.
Typically, the build process results in the contents of a project being compiled into an executable (.exe) file or a dynamic link library (.dll) file. This book focuses on creating executable files.
Templates
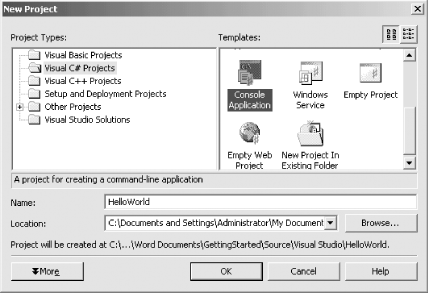
When you create a new project, you get the New Project dialog box, shown in Figure 4-2.
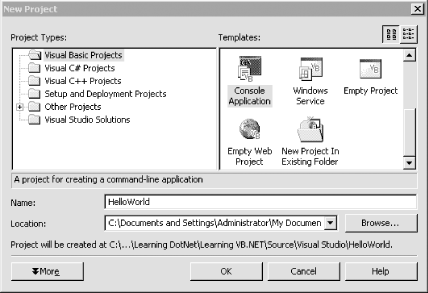
In the New Project dialog, you select the project type (in the lefthand pane) and the template (in the right). There are a variety of templates for each project type. A template is a file that Visual Studio .NET uses to set up the initial state of your project.
For the examples in this book, you’ll always choose Visual Basic Projects for the project type, and in most cases, you’ll choose Console Application as the template. Specify the name of the directory in which your project will be stored (any directory you like). At this point, you can also name your project. For the purposes of example, enter the name HelloWorld.
Inside the Integrated Development Environment (IDE)
The Visual Studio .NET IDE is centered around an editor. An editor is much like a word processor, except that it produces simple text (i.e., without formatting, such as bold, italics, etc.). As you may recall, source code files are simple text files.
The Visual Studio .NET IDE also provides support for building GUIs, which are integral to Windows and web projects. The following pages introduce some of the key features of the IDE.
Layout
The IDE is a Multiple Document Interface (MDI) application. There is a main window, and within the main window are a number of smaller windows. The central window is the text editing window. Figure 4-3 shows the basic layout.
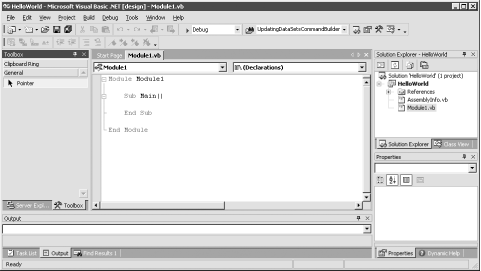
To the left of the editing window are a number of tabbed windows that contain tools used when creating Windows and web applications. To the right of the editing window is a window called the Solution Explorer. This window shows the files in the current project and the solution to which the project belongs.
In the lower-right corner is the dynamic help window. In the lower-left corner are a number of tabbed windows, including the task list. The IDE will add tasks to this list when your program has errors that must be fixed, and you can add tasks of your own to assist you in remembering what work remains to be done.
All of these windows are resizable and dockable, and many windows share space by using tabs. They can be resized by placing the mouse cursor over the edge you want to move. The cursor will change to a double arrow resizing cursor, at which point you can drag the window edge one way or the other.
The Visual Studio .NET window has a titlebar across the top, with menus below. Under the menus are toolbars with buttons that duplicate many of the common menu commands. Nearly everything that can be done through menus can also be done with context-sensitive pop-up menus, as described shortly.
By default, the toolbars are docked along the top of the window. As with many Windows applications, they can be undocked and moved to other locations, either left free-floating or docked along other window edges. You move the toolbars by grabbing them with the mouse and dragging them where you want.
Right-clicking on the titlebar of a dockable window pops up a menu with three mutually exclusive check items that let you customize the behavior of the window:
- Dockable
Specifies that the window can be dragged and docked along any side of the Visual Studio .NET window.
- Hide
Makes the window disappear, temporarily. To see the window again—that is, to unhide it—use the View item on the main menu. (The Pushpin icon, described shortly, also affects this behavior.)
- Floating
Specifies that the window will not dock when dragged against the edge of the VS.NET window. Then the floating window can be placed anywhere on the desktop, even outside the VS.NET window.
In the upper-right corner of the main IDE window are two icons:
- Pushpin
This icon toggles the AutoHide property of the window. When the pushpin is pointing down, the window is pinned in place—that is, AutoHide is turned off. Moving the cursor off the window will not affect its visibility.
When the pushpin is pointing sideways, AutoHide is turned on. Moving the cursor off the window hides the window. To see the window again, hover (or click) on the tab that is now visible along the edge where the window had been docked.
- X
The standard “close window” icon.
IntelliSense
Underlying the IDE is Microsoft’s IntelliSense technology, which puts help and editing assistance (including code completion) instantly at your disposal. IntelliSense makes programmers’ lives much easier. It provides real-time, context-sensitive help that appears right under your cursor.
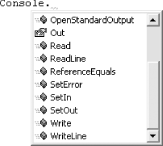
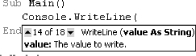
For example, in the Hello World code shown in Chapter 2, you called the WriteLine( ) method for the Console object. If you write this code in VS.NET, the pop-up help will show you every available method of the Console object as soon as you type the dot (.), as shown in Figure 4-4. And if you begin to type a method—say you enter the letters “Wr”—IntelliSense jumps to the first method that matches what you’ve typed so far.
Once you enter the method you want to call, Microsoft’s pop-up help shows you the various versions of the method and helps you determine the parameters you’ll need, as illustrated in Figure 4-5.
Code completion automatically completes your thoughts for you, drastically reducing your typing. Drop-down lists provide all methods and properties possible in the current context, making them available at a keystroke or mouse click.
Building and Running
You can run your application at any time by selecting either Start or Start Without Debugging from the Debug menu, or you can accomplish the same results by pressing either F5 or Ctrl+F5, respectively. You can also start the program by clicking the Start icon (pictured in Figure 4-6) on the Standard toolbar.
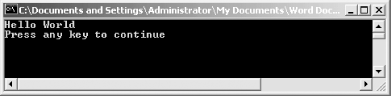
For console applications, the advantage of running the program with Ctrl+F5 is that Visual Studio .NET will open your application in a console window, display its results, and then add a line to press a key when you are ready, as shown in Figure 4-7. This keeps the window open until you’ve seen the results and pressed a key, at which point the window will close.
For More Information
This brief overview of Visual Studio .NET was intended to familiarize you with the tool. There is a great deal more to know about this tool, but most of it will not be relevant to creating the simple applications in this book.
The best way to learn about the power and scope of Visual Studio .NET is to use it and to explore its various nooks and crannies. Try right-clicking in various places and explore the context-sensitive pop-up menus as well.
As you make your way through the book, you’ll see various helpful features of Visual Studio .NET highlighted. All of these tips should make programming in VB.NET easier for you. The application’s online help files (MSDN) provide extensive additional support.
Get Learning Visual Basic .NET now with the O’Reilly learning platform.
O’Reilly members experience books, live events, courses curated by job role, and more from O’Reilly and nearly 200 top publishers.

