Setting Up the Dock
Apple starts the Dock off with a few icons it thinks you’ll enjoy: QuickTime Player, iTunes, iChat, and so on. But using your Mac without putting your own favorite icons on the Dock is like buying an expensive suit and turning down the free alteration service. At the first opportunity, you should make the Dock your own.
The concept of the Dock is simple: Any icon you drag onto it (Figure 3-1) is installed there as a large, square button. A single click, not a double-click, opens the corresponding icon. In other words, the Dock is an ideal parking lot for the icons of disks, folders, documents, and programs that you access frequently.
Note
You can install batches of icons onto the Dock all at once—just drag them as a group.
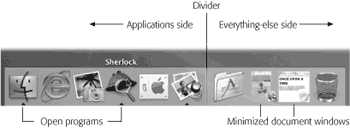
Figure 3-1. To add an icon to the Dock, just drag it there. You haven’t actually moved the original file; when you release the mouse, it remains exactly where it was. You’ve just installed a pointer—like a Macintosh alias or Windows shortcut, you might say.
Here are a few aspects of the Dock that may throw you at first:
It has two sides. See the fine dark line running down the Dock in Figure 3-1? That’s the divider. Everything on the left side is an application—a program. Everything else goes on the right side: files, documents, folders, and disks.
It’s important to understand this division. If you try to drag an application to the right of the black ...
Get Mac OS X: The Missing Manual, Second Edition now with the O’Reilly learning platform.
O’Reilly members experience books, live events, courses curated by job role, and more from O’Reilly and nearly 200 top publishers.

