From the day Apple first announced Mac OS X, the company made clear that Mac OS X offered a lot of advantages, particularly in stability—but that you would need all-new versions of your programs to realize these benefits. Most software companies announced that they would get to work Mac OS X-izing their programs, but Mac fans still kept reading the same advice: Don’t switch to Mac OS X until most or all of the programs you use every day have been adapted to run on it.
For most people, that time is here, or near. One by one, the Mac OS X versions of big-name programs became ready: Microsoft Office, AppleWorks, iMovie, iTunes, Photoshop, Illustrator, Freehand, Quicken, FileMaker, InDesign, Internet Explorer, America Online, and thousands of others.
The time has also come, therefore, to grow accustomed to the way programs and documents relate in Mac OS X—which, as this chapter makes clear, differs in several substantial ways from the Mac OS that preceded it.
Note
There are two kinds of Mac OS X-compatible programs, known by the geeks as Carbon and Cocoa programs (see Section 4.6). This chapter describes how Carbon and Cocoa programs work.
You can also run older, Mac OS 9-compatible programs that haven’t yet been updated for Mac OS X—but when you launch one of these, your Mac automatically opens a Mac OS 9 simulator called Classic. For details on running the older, Mac OS 9-specific programs in this way, see Chapter 5.
You can launch (open) a program in any of several ways.
Double-click an application’s icon in the Finder.
Click a program’s icon on the Dock or the Finder toolbar (Chapter 3).
Highlight an application icon and then press
-O (short for File→Open) or
-down arrow.
Use the submenus of the
menu’s Recent→Applications command. (You control how many programs this feature tracks using the System Preferences panel described in Section 8.11.)
Use your Go→Favorites command.
Open a document icon in any of these ways, or drag a document onto the icon of a program that can open it (whether in the Dock, the Finder toolbar, or in a folder window).
When you launch a program, the Mac reads its computer code, which lies on your hard drive’s surface, and feeds it quickly into RAM (memory). During this brief interval, the icon of the opening program jumps up and down eagerly in your Dock. (You can turn off this bouncing, as noted in Section 3.3.4.)
Note
Want to see multithreading in action? Launch a program that takes a long time to open—that is, whose icon on the Dock does a lot of bouncing.
You don’t have to wait for the application to finish bouncing—you’re wasting perfectly good computing time. Just switch to another program and get to work, as the newly opened program keeps right on launching in the background. Multithreading simply means that Mac OS X can crunch more than one process at a time.
What happens next depends on the program you’re using. Most present you with a new, blank, untitled document. Some, like iMovie and iDVD, automatically open the last file you worked on. Some, like FileMaker and PowerPoint, ask you: Do you want to open an existing document or create a new one? In AppleWorks, the welcome screen generally asks you to specify what kind of new document you want to create. And a few oddball programs don’t open any window at all when first launched.
In each case, however, you’ll notice a few changes to your menu bar. The File, Edit, and other application menus are still there—but they’re no longer immediately to the right of the
menu. The very first menu appears with bold lettering and identifies the program you’re using. It might say Internet Explorer, or Microsoft Word, or Stickies.
This Application menu (Figure 4-1) offers a number of commands pertaining to the entire program and its windows, including About, Quit, and Hide.
You quit a program in Mac OS X by pressing
-Q, which is the keyboard equivalent of choosing the Quit command. For Macintosh and Windows veterans, the only tricky part here is that the Quit command is no longer in the File menu—it’s now at the bottom of the Application menu.
But Mac OS X offers two much more fun ways to quit a program:
Control-click a program’s Dock icon and choose Quit from the pop-up menu.
When you’ve highlighted a Dock icon by pressing
-Tab to rotate through the running programs, type the letter Q without releasing the
key. The program quits instantly.
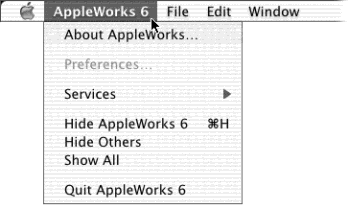
Figure 4-1. The first menu in every program lets you know, at
a glance, which program you’re actually in. One of the biggest changes
veteran Mac users have to make in adopting Mac OS X is getting used to the
fact that this new menu contains commands that, in Mac OS 9, were scattered
among the File, ![]() , and right-side Application menus.
, and right-side Application menus.
Everybody knows that Mac OS X is a rock-solid operating system, but that doesn’t mean that programs never screw up. Individual programs are as likely as ever to freeze or lock up. In such cases, you have no choice but to force quit the program—to terminate it with a blunt instrument.
The big Mac OS X difference is that doing so doesn’t destabilize your Mac, meaning you don’t have to restart it. In fact, you can usually reopen the very same program and get on with your life.
You can force quit a stuck program in any of several ways. First, you can Control-click its Dock icon (or just hold your mouse down on it). Once the pop-up menu appears, press Option so that the Quit command now says Force Quit (see Figure 4-2). Bingo—that program is outta here.
Second, you can press Option-
-Esc, the traditional Mac force quit keystroke. Third, you can choose
→Force Quit. Either way, proceed as shown in Figure 4-2.
Again, force quitting is no longer bad for your Mac. Dire warnings no longer appear. The only downside to force quitting a program is that you lose any unsaved changes to your open documents.
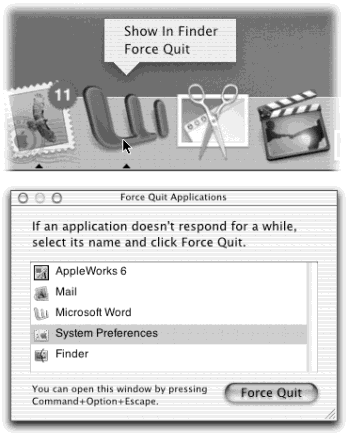
Figure 4-2. Top: You can force quit a program from the Dock thanks
to the Option key. Bottom: When you press Option-![]() -Esc or choose Force Quit from the
-Esc or choose Force Quit from the ![]() menu, a tidy box listing all open programs appears. Just click the one you
want to abort, click Force Quit, and click Force Quit again in the confirmation
box. (Using more technical tools like the Unix kill command, there are other
ways to jettison programs. But this is often the most convenient.)
menu, a tidy box listing all open programs appears. Just click the one you
want to abort, click Force Quit, and click Force Quit again in the confirmation
box. (Using more technical tools like the Unix kill command, there are other
ways to jettison programs. But this is often the most convenient.)
Get Mac OS X: The Missing Manual, Second Edition now with the O’Reilly learning platform.
O’Reilly members experience books, live events, courses curated by job role, and more from O’Reilly and nearly 200 top publishers.

