Mac OS X includes an elegant solution to tracking the programs you’ve opened: the Dock.
Chapter 3 describes the navigational features of this multi-purpose icon row—but once you’ve actually opened a program or two, it takes on a whole new purpose in life.
The primary purpose of the Dock is simple: to let you know which programs are running. Only one can be in front, or active, at a time. (It’s the program whose name appears at the upper-left corner of your screen, next to the
menu.)
To make a different program active, simply repeat the technique you used to launch the program initially. Click its Dock icon, double-click a document icon, or whatever.
Most people, however, switch to a different program by clicking its icon on the Dock. Doing so makes the program, along with any of its open windows and toolbars, pop to the front.
Exactly as in older operating systems, you can also press
-Tab to switch between programs. But in Mac OS X 10.2, a single press of
-Tab takes you to the program you used most recently, and another press returns you to the program you started in.
In terms of productivity, this is an important change from previous versions of Mac OS X. Imagine that, for example, you’re doing a lot of switching between two programs—your Web browser and your email program, for example. If you have five other programs open, you don’t waste your time
-Tabbing your way through all open programs just to “get back” to your Web browser.
When Programs Are Actually Folders
You may have noticed that OS X programs don’t seem to have 50,000 support files strewn across your hard drive. To open Internet Explorer, you no longer need to first open an Internet Explorer folder; you can just double-click the Internet Explorer icon itself. That’s a much better arrangement than in Mac OS 9 or Windows, where many programs must remain in special folders, surrounded by libraries, dictionaries, foreign language components, and other support files and folders.
The question is: Where did all those support files go?
Mac OS X features something called packages or bundles, which are folders that behave like single files. Every properly written Mac OS X program looks like a single, double-clickable application icon. Yet to the Mac, it’s actually a folder that contains both the actual application icon and all of its support files, which are hidden for your convenience. (In fact, even documents can be packages, including iDVD project files and TextEdit documents.)
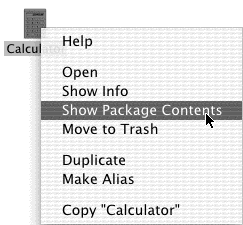
If you’d like to prove this to yourself, try this experiment. Choose Go→Applications. See the Calculator program in the list? Control-click it. From the contextual menu, choose Show Package Contents. You’re asking Mac OS X to show you what’s inside the Calculator “application icon” folder.
The Calculator package window opens, revealing a Contents folder that you’ve never seen before. If you open this folder, you’ll find a handful of strange-looking, Unix-named folders and files that are, behind the scenes, pieces of the Calculator program itself.
The application-as-folder trick is convenient for you, of course, because it means that you’re free to move the application to a different window—or uninstall the program by dragging this single icon to the Trash—without worrying that you’re leaving behind its entourage of support files. It’s also convenient for programmers, because they can update certain aspects of their applications just by replacing one of these component files, without having to rewrite the entire program.
You can even try out this programmery benefit for yourself. In the case of the Calculator and many other Mac OS X programs, the Resources folder contains individual graphics file—PDF or TIFF files—that serve as the graphic elements that you see when using the program. For example, the file lcd.tif in the calculator’s Resources folder contains the image of the calculator’s screen (where the numbers appear as you punch the calculator number buttons). Using a graphics program, you can change the background of this light-yellow calculator screen to, say, light blue. The next time you double-click the Calculator—which you now realize is actually a folder behind the scenes—you’ll see your modified calculator design.
Yet the older behavior (cycling through all programs) is still available. The trick here is to keep the
key pressed. Now, with each press of the Tab key, you highlight the Dock icon of another program, in left-to-right Dock order. Release both keys when you reach the one you want. Mac OS X brings the corresponding program to the front. (To move backward through the open programs, press Shift-
-Tab.)
If the open programs on your Mac are like overlapping sheets of paper on a messy desk, then hiding a program makes that individual sheet transparent. When a program is hidden, all of its windows, tool palettes, and button bars disappear. You can bring them back only by bringing the program to the front again (by clicking its Dock icon again, for example).
If your aim is to hide only the program you’re currently using, Mac OS X offers a whole raft of approaches to the same problem. Many of them involve the Option key, as listed here:
Option-click any visible portion of the desktop. The program you were in vanishes.
Option-click any other program’s icon on the Dock. You open that program (or bring all of its windows to the front) and hide all the windows of the one you were using.
Option-click any visible portion of another program’s windows. Once again, you switch programs, hiding the one you were using at the time.
From the Application menu—the boldfaced menu that bears the program’s name—choose Hide [Program Name].
When you’ve highlighted a Dock icon by pressing
-Tab to rotate through the running programs, press the letter H key. The program hides itself instantly. Leave the
key down the whole time, and after pressing the H, press Tab again to move on to the next program. If you release the keys while “stopped” on the program instead, you’ll bring it forward rather than hiding it.
Press
-H. This may be the easiest and most useful trick of all (although it doesn’t work in every program on earth). Doing so hides the program you’re in; you then “fall down” into the next running program.
Note
Consider this radical, timesaving proposal: Never quit the programs you use frequently. Instead, simply hit
-H whenever you’re finished working in a program. That way, the next time you need it, the program launches with zero wait time. Because Mac OS X’s virtual-memory scheme is so good, there’s almost no downside to leaving your programs open all the time.
To un-hide a program and its windows, click its Dock icon again, or choose the Show All command in the Application menu.
Note
The Dock continues to display the icons of all running programs without any indication that you’ve hidden them. Fortunately, that’s easy enough to fix. All you need is the shareware program TinkerTool, which is described in Section 17.1. It offers a simple checkbox that makes hidden programs appear with transparent Dock icons.
Choosing Hide Others from your program’s Application menu means, of course, “hide the windows of every program but this one.” It even hides your Finder (desktop) windows, although desktop icons remain visible.
Better yet, Mac OS X 10.2 adds a keystroke to this command: Option-
-H. That’s one small step for keystrokes, one giant leap for productivity geeks.
If this trick interests you, you might also enjoy its Mac OS X-only corollary, described next.
Here’s a fantastic Mac OS X secret that has no precursor in Mac OS 9 or Windows. It’s a terrific technique that lets you bring one program to the front (along with all of its open windows), and hide all other windows of all other open programs—all with one click. You might think of it as Hero mode, or Front-and-Center mode, or Clear My Calendar mode.
In any case, the trick is to Option-
-click the lucky program’s icon on the Dock. As it jumps to the fore, all other windows on your Mac are instantly hidden. (You can bring them back, of course, by clicking the appropriate Dock icons.)
In Mac OS X, there’s more to managing your window clutter than simply hiding entire programs. Now you can hide or show individual windows of a single program. In fact, Apple must believe that hiding a window will become one of your favorite activities, because it offers at least four ways to do so, including:
Click the Minimize button on the window’s title bar, as shown in Figure 4-3.
Double-click the window’s title bar.
Choose Window→Minimize Window, if your program offers such a command.
Press
-M.
Note
If you press the Option key as you perform any of these techniques, you minimize all of your program’s open windows to the Dock. (If you had several document windows open, they turn into side-by-side document icons on the Dock.) This isn’t the same thing as hiding the entire program, as described previously—you remain in the same program, but now all of its windows are hidden.
Unfortunately, there’s no way to bring them all back at once. You have to click their Dock icons one by one.
In any case, the affected window shrinks down until it becomes a new icon on the right side of the Dock. Click that icon to bring the window back.

Steel yourself for one big difference between Mac OS X and what came before. In Mac OS 9, bringing a program to the foreground also brought all of its windows to the foreground. If you were working in Internet Explorer, but Word was running in the background with six open documents, all six windows would pop to the front when you switched to Word.
As shown in Figure 4-4, however, Mac OS X takes a much more layered approach. It’s entirely possible to wind up with the windows of different programs sandwiched and layered, front to back.
If you click a visible portion of a background program’s window, or if you use the Dock’s pop-up menus to choose a single document window (as shown in Figure 3-5), that layered, sandwiched effect is what you get.
Layered windows really shine when you’re comparing two documents in two different programs, because it frees you of the window clutter of other open documents. But the time will come when you’re ready to bring all of a background program’s windows to the front. Get into the habit of clicking its Dock icon, rather than clicking inside one window. When you do that, all open windows in that application come forward, from wherever they may be.
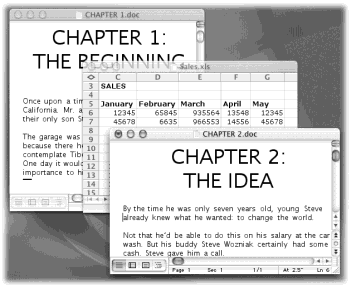
Figure 4-4. Suppose you have Microsoft Excel in the foreground, but Word in the background. If you click within a visible portion of a background window, you bring only that window of Word to the front—a sandwiched effect that never would have been possible in Mac OS 9. The remedy for this situation, if it bothers you, is the Window→Bring All to Front command, which appears in the Finder and many other programs. It brings all of a program’s windows to the front. (You can do the same thing by simply clicking the program’s Dock icon.)
As described on the next page, the Mac is smart about the relationship between documents and applications. If you double-click an AppleWorks document icon, for example, the AppleWorks program launches automatically and shows you the document.
But these days, it’s occasionally useful to open a document using a program other than the one that created it. Perhaps, as is often the case with downloaded Internet graphics, you don’t have the program that created it, or you don’t know which one was used.
In such cases, the Dock is handy: Just drag the mystery document onto one of the Dock’s tiles, as shown in Figure 4-5. Doing so forces the program to open the document—if it can.
Note
Only Dock icons of programs that can, in fact, open the file you’re dragging become highlighted. The others just shrug indifferently or even scoot aside, thinking you’re trying to drag the file into the dock.
Pressing Option-
as you drag forces them to be more tolerant. Now all Dock program icons “light up” as your document touches them, indicating that they’ll try to open your file. Even so, a “could not be opened” error message may result. As they say in Cupertino, sometimes what a can really needs is a can opener.
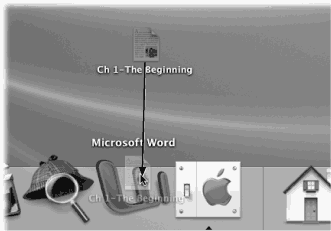
Figure 4-5. To open a document using a program that didn’t create it, drag the document icon onto the corresponding Dock tile. This technique is ideal for opening a downloaded graphics file into your favorite graphics program (such as AppleWorks or GraphicConverter). It’s also useful when opening a Read Me file into your word processor, such as Word, instead of the usual TextEdit program.
Get Mac OS X: The Missing Manual, Second Edition now with the O’Reilly learning platform.
O’Reilly members experience books, live events, courses curated by job role, and more from O’Reilly and nearly 200 top publishers.

