Before Mac OS X was released, there wasn’t really a concept of a user or account in the Macintosh environment. This hack introduces you to what it means to have an account and what this business of a Home directory is all about. We’ll also show you how to rename an account — a nonobvious task indeed.
When Mac OS X first appeared, a lot of people were aghast at the concept of user accounts, especially when they were the only ones using their computer. “Why go through all the hassle when only I exist?” they asked. The complaints only intensified as users were asked to enter an administrator password [Hack #50] for access to certain files, sometimes even denied access to settings and files on their very own computers — the gall of it!
The reasoning is two-fold: to protect you from yourself and to support Mac OS X’s multiuser environment.
The concept of protecting you from yourself may at first blush appear intrusive, but we’ve all had an instance where we’ve deleted an innocent file from our OS 9 System Folder, only to discover our idiocy when our system didn’t reboot, our printer didn’t print, or our modem didn’t sizzle. In this regard, OS X has your back; crucial files necessary for everyday operation are protected from overzealous removal.
The multiuser environment of OS X is based on technology that’s been around for a while in the Unix world: a system of checks and balances that stop your kid sister from gleefully deleting that Photoshop file you’ve been working on all weekend. Whether you’re the only user isn’t a concern; protection from the inside (yourself, your kid sister) and protection from the outside (malicious crackers, viruses, and trojans) becomes paramount.
While a determined user can delete any file on their OS X machine with enough effort (the easiest way being to boot into OS 9), Apple has wisely made it difficult to do so through Mac OS X.
When creating an account (System Preferences → Accounts → New User . . . ) — either the initial account upon installing Mac OS X, or an additional account — you’ll be prompted for both your Name (e.g., John Jacob Jingleheimer Schmidt) and something called a Short Name (see Figure 1-1).
Your Short Name is your actual username, or login name, the name by which your computer knows you. It is usually three to eight characters long, composed of letters or numbers. While OS X attempts to choose a Short Name for you based upon what you entered as your Name, it doesn’t do a particularly good job if your name isn’t as simple as Sam Smith. And, trust me, you don’t want to spend your days being known by your computer as johnjacobjingleheimerschmidt. Choose something short and quick to type, like john, johnj, or schmidt. Here’s why . . .
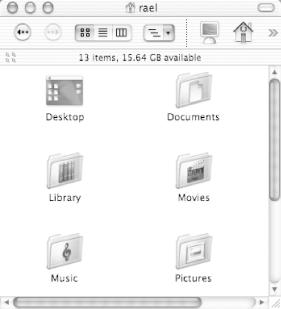
Your home directory is where you’ll be keeping all your stuff (see Figure 1-2). In it you’ll find special directories for your documents, pictures, movies, and settings (that’s what the Library is). Of course, you’re not forced to organize your stuff this way, but it is a good convention. Feel free to settle in, create new folders, and shuffle things about. It’s generally a good idea not to throw out the special folders, as the operating system and its applications often make use of them and expect them to be there. In particular, don’t touch your Library folder; it’s the home of your preferences, settings, and other pieces used by particular applications.
If you chose john as your Short Name, then your home directory will be Macintosh HD → Users → john. By creating a central place for all your important data, OS X ensures easy backup or deployment on other machines. Instead of having to single out your favorite control panels or extensions from OS 9, you can simply backup your home directory. When you’re ready to restore, simply copy it over to the same location, and your environment (iTunes music library, desktop pictures, added software tweaks, etc.) will take effect the next time you log in.
From the command
line’s [Hack #48] point of view, your
home directory — again, assuming your Short Name is john
— is /Users/john. You’ll
sometimes see it referred to on the command line as
~
.
It’s a shortcut that saves you from having to type
out your full login name when referring to your home directory. So
~/Documents actually refers to
/Users/john/Documents (Macintosh HD
→
Users
→
john
→
Documents
in the Finder).
As the primary user of your computer, you’re automatically afforded administrative privileges [Hack #50], which means that you can install just about any software, modify settings affecting how OS X functions, and create and delete other accounts. Needless to say, if you don’t want your kid sister messing up your computer, you shouldn’t make her an administrative user. Give administrative access only to those people (read: accounts) that truly need it.
While OS X makes it easy to create new accounts, alter their capabilities, or change and delete their passwords, it’s less than helpful when it comes to renaming an account (i.e., changing its Short Name). In fact, there’s simply no way to do so from the GUI side of things. To do so, you’ll have to do some of the work on the command line.
For example, let’s fix our earlier johnjacobjingleheimerschmidt bungle, renaming the account (a.k.a. Short Name) to john.
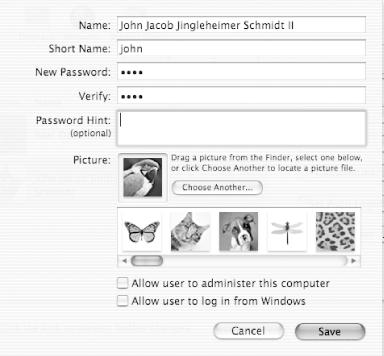
First, create a brand-new account (System Preferences → Accounts → New User). OS X won’t allow you to enter the same Name, so change it slightly for now; you’re always able to change the full name. As shown in Figure 1-3, I chose John Jacob Jingleheimer Schmidt II as a placeholder. For Short Name, choose something reasonable. Again, I chose the more sensical john, since I know he’ll be the only John using my computer and I don’t expect much confusion about who’s who.
Next, you’ll need to pull a switcheroo, giving a copy of johnjacobjingleheimerschidt’s home directory to john to use as his own. Since you’ll be making a copy rather than permanently pulling johnjacobjingleheimerschidt’s home directory out from underneath him, you’ll be able to verify that all is as it should be before deleting anything potentially valuable.
Tip
Before moving on, you should make sure that you have enough hard drive space to hold both copies. Compare the size of the home directory to the amount of available space on your drive using Get Info (File → Get Info) on each.
All of this must be done as the administrative (or root) user, as you’ll be manipulating files belonging to two other accounts. If you have not already done so, enable the root user [Hack #50] and log in as root.
Navigate in the Finder to Macintosh HD → Users.
First, you’ll remove john’s home directory; don’t worry, since it’s brand new, it doesn’t contain much of any worth. Drag the john folder to the Trash.
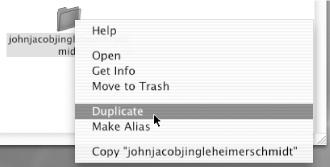
That
out of the way, duplicate the
johnjacobjingleheimerschmidt directory by
Control-clicking it and selecting Duplicate from the context menu, as
shown in Figure 1-4, and rename it to
john, as shown in Figure 1-5.
john and johnjacobjingleheimerschidt now own identical home directories.
About the only bit you don’t want to be identical is
the keychain, still named
johnjacobjingleheimerschmidt in
john’s new home directory. Navigate to
Macintosh HD
→
Users
→
john
→
Library
→
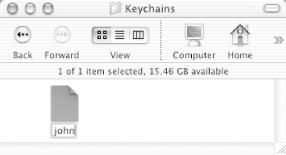
Keychains and rename the file
johnjacobjingleheimerschmidt to
john, as shown in Figure 1-6.
Speaking of ownership, while john
now has a new home directory, if you took a close look at the
permissions, you’d see that he still
doesn’t actually own the directory or anything in it
— everything’s owned by the root user (since
he requested the duplication, he owns the files). To fix the
permissions, launch the Terminal [Hack #48]
(Applications
→
Utilities
→
Terminal) and use the
chown
command, like so:
[HappyMac:/Users] root# chown -R john.staff john
[HappyMac:/Users] root# ls -l
total 0
drwxrwx---   4 root      admin   136 Feb  6 23:07 Deleted Users
drwxrwxrwt   3 root      wheel   102 Jul 13  2002 Shared
drwxr-xr-x  11 john      staff   374 Feb  6 23:08 john
drwxr-xr-x  11 johnjaco  staff   374 Feb  5 17:48 RETURN
 johnjacobjingleheimerschmidt
Notice that the john directory is now owned by
the john account and is in the right (staff)
group.
Tip
You’d think you could do this via the Get Info dialog box. It does, after all, allow you to change permissions on a folder and “Apply to enclosed items . . . “, but it just doesn’t work as expected. You can apply some changes recursively to the contents of a folder, but you can’t change the ownership in this way.
Log out as the root user and log back in again as yourself. Disable the root user [Hack #50] and you’re done.
Give the new john account a try by logging in and fiddling about. When you’re sure all’s as it should be, go ahead and delete the old johnjacobjingleheimerschmidt account and alter john’s Name (System Preferences → Accounts → Edit User) as appropriate — in this example, we dropped the II bit.
Deleting an account under Mac OS X is simple using the Accounts System Preferences panel (System Preferences → Accounts → Delete User). This will remove the account and disable the associated home directory.
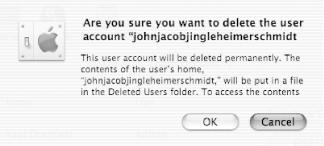
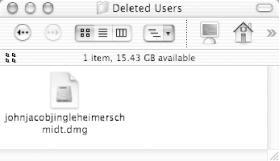
Deleted accounts, however, are gone but not completely forgotten. If you take a moment to actually read the confirmation dialog shown in Figure 1-7, you’ll learn that the contents of the now-deleted account’s home directory are archived as a disk image in Macintosh HD → Users → Deleted Users.
When and if you’re ready to permanently delete the contents of an archived home directory (see Figure 1-8), simply drag its disk image to the Trash.
Get Mac OS X Hacks now with the O’Reilly learning platform.
O’Reilly members experience books, live events, courses curated by job role, and more from O’Reilly and nearly 200 top publishers.

