Back in the innocent days of OS 9, one compression format reigned supreme: Stuffit from Aladdin Systems. With OS X and its BSD Unix foundation, there’s a whole slew of compression technologies available, all built into your default installation.
Stuffit Expander, DropStuff, and their Aladdin ilk have long been stalwarts of the Mac OS, included on Apple CDs and preinstalled machines. The same can be said for Unix utilities like gzip, bzip2, and compress, also included with OS X and available through the Terminal. Throw in Apple’s disk-image technology, which creates archives that look and act like removable disks, and you’ve got a veritable cornucopia of compression and archival technologies.
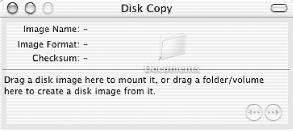
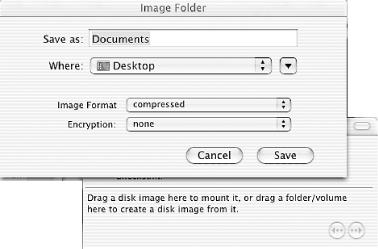
Apple has been providing disk image technology in the shape of its Disk Copy utility for years now. Creating a disk image is a mindless task — simply open Disk Copy, drag a folder over the floating window (see Figure 1-11), decide if you want encryption, and choose where to save the resultant file (see Figure 1-12).
Creating image files, however, doesn’t offer much
compression, and you’ll see a lot of
dmg.gz extensions on your new downloads. That
leads us into
gzip
and
tar. gzip
is as much of a Unix standard as Stuffit has been for the Mac. By
itself, it’s only a compression utility — it
doesn’t bundle and archive multiple files like
Aladdin’s
DropStuff (also
included in OS X). For that ability, it’s most often
combined with another utility called tar or with the generated disk
images from Apple’s Disk Copy. If you want to
compress a .dmg file you’ve
just created, you’d jump into the
Terminal [Hack #48]:
gzip -9 filename.dmgThis command will automatically compress
filename.dmg into
filename.dmg.gz, at maximum compression. If we
don’t include the -9, then gzip
will finish slightly faster, but at the expense of a slightly larger
file size (-6 is the default). Alternatively, if
we’re going to use tar (very common when it comes to
Unix downloads), we could bundle up our entire
~/Documents directory this way:
tar -cvf filename.tar ~/Documents
The c is to
create a new archive, the v is to keep us informed
of its progress, and f indicates the name of the
final archive — in this case,
filename.tar. Finally, we indicate what we want
to archive, which is ~/Documents. We could
easily archive more directories (or individual files) by adding them
after our initial ~/Documents. Unlike gzip, tar
only archives the files — it compresses nothing itself, much
like Apple’s Disk Copy. To compress our new
filename.tar, we’d used gzip as
shown earlier. Because tar and gzip are so often intertwined, we can
combine two commands into one:
tar -cvzf filename.tar.gz ~/Documents
Notice that we’ve added a z flag,
which tells tar to automatically compress the final archive with
gzip. We’ve also changed our final filename to
reflect its compressed status. More information about both of these
utilities can be accessed from your Terminal with man gzip
and man tar.
Whereas gzip uses a compression technique called Lempel-Ziv, bzip2 takes a different approach with the Burrows-Wheeler block-sorting text-compression algorithm. It’s a little slower compressing than gzip, but it often returns a smaller file size (see Table 1-1 at the end of this hack). Its use (and combination with tar) is similar to gzip, always preferring maximum compression:
tar -cvffilename.tar ~/Documents bzip2filename.tar
While gzip is more popular than bzip2 for Unix downloads, bzip2 has
been making headway due to its stronger compression.
Stuffit
Expander can readily extract either format. Still more compression
flavors exist, however. I’ve briefly outlined their
usage here — you can find more information about their usage
and specific abilities by typing man compress,
man zip, or man jar in your
Terminal.
# using the compress utility tar -cvffilename.tar ~/Documents compressfilename.tar # the same as previous tar -cvZffilename.tar.Z ~/Documents # now, zip at maximum compression zip -r -9filename.zip ~/Documents # and jar (useful for Java applications) jar cffilename.zip ~/Documents
Aladdin Systems realized there would be a need for a simple drag and
drop utility that could compress in other formats besides its own
— that’s why you’ll see
DropTar and DropZip utilities in your
/Applications/Utilities/Stuffit Lite (or
Stuffit Standard) directory. Using these is as
you’d expect — simply drag and drop the files
and folders you want to archive over its icon (or drag to its
window), and you’re set. DropTar even has the
capability to compress in multiple formats: bzip2, compress, gzip,
and the native Stuffit format.
In Table 1-1, we’ve compressed a 100MB directory using each of the utilities, with maximum compression. If you’re looking for the smallest file, then bzip2 should be your first choice, but gzip could be more compatible with every computer your archive lands on (if you’re worried only about OS X, then bzip2 is a good bet). Be forewarned: the types of files you’re archiving will give you different results with each utility — the source directory in this case was filled with an equal amount of text, image, and binary files, but you’ll notice fluctuating results with large text files, multiple tiny files, and so on.
Get Mac OS X Hacks now with the O’Reilly learning platform.
O’Reilly members experience books, live events, courses curated by job role, and more from O’Reilly and nearly 200 top publishers.


