Renewing Your DHCP-Assigned IP address
On occasion, while ostensibly assigned an IP address by a local DHCP server, OS X doesn’t appear to actually be on the network. Renewing your IP address often does the trick.
Getting your Mac to renew its dynamically assigned IP address is sometimes all that’s needed to get stalled network traffic going again.
Launch System Preferences by either clicking its icon in the Dock or selecting System Preferences from the Apple menu at the top left of your screen. Select the Network control panel.
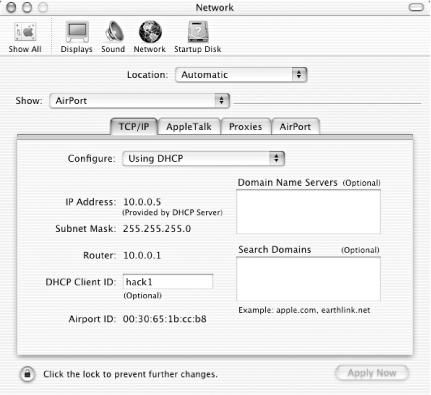
From the Network panel’s Show menu, select the source of connectivity you’re currently attempting to use, Built-in Ethernet for wired or AirPort for wireless connectivity. Select the TCP/IP tab. Using DHCP should already be selected in the Configure menu; if not, then you may well not be using DHCP, and this hack won’t be of much help to you.
The DHCP Client ID field should be empty, unless
you’ve used this hack before or your server uses
client IDs (in which case this hack won’t work for
you). Type anything you like in the
field — hack1 is as good a choice as
any — and click the Apply Now button. You should see the IP
Address field go blank for a moment, replaced by a shiny new IP
address, as shown in Figure 6-1.

Figure 6-1. A shiny new IP address
Close System Preferences and try out your new IP by pointing your web browser somewhere.
Get Mac OS X Hacks now with the O’Reilly learning platform.
O’Reilly members experience books, live events, courses curated by job role, and more from O’Reilly and nearly 200 top publishers.

