iMovie
If you have a digital camcorder (MiniDV or Digital8 format) and a few hours of free time—all right, a few weekends of it—iMovie helps you make astonishingly highquality, fully edited movies. Digital video is great; you can transfer the footage back and forth between the Mac and the camcorder a hundred times, but you’ll never see any deterioration in quality.
Phase 1: Set Up iMovie 3
The first time you run iMovie, it asks you whether you want to open an existing iMovie file (called a project) or start a new one. After that, each time you launch iMovie, it automatically opens up the movie you most recently worked on.
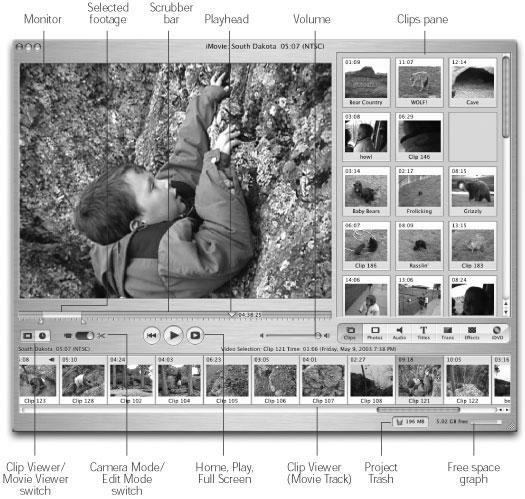
If you click Create Project, you’re asked to select a name and location for the movie you’re about to make. Once you’ve saved your project, you finally arrive at the main iMovie window ( Figure 9-9).

Figure 9-9. Here’s iMovie in a nutshell. Save your project onto the drive that has the most space (if, indeed, you have more than one), because digital video files are enormous. They require 3.6 MB of hard drive space per second or 13 gigabytes per one-hour tape. Choose a monitor resolution that’s 1024 x 768 or larger (using, for example, the Displays panel of System Preferences). Poor iMovie can’t even run at any lower setting.
Phase 2: Import Camcorder Footage
After you’ve shot some footage, connect the camcorder to the Mac using a FireWire cable. If you have the proper ...
Get Mac OS X: The Missing Manual, Panther Edition now with the O’Reilly learning platform.
O’Reilly members experience books, live events, courses curated by job role, and more from O’Reilly and nearly 200 top publishers.

