For a company whose core audience includes graphic designers and photographers, the printing features of Mac OS X got off to a shaky start. With each new version of Mac OS X, however, the situation (especially regarding printer drivers) improves. In the meantime, you’ve got these helpful tips.
It could happen to you: you have to print a document over and over in draft mode, then your hand becomes tired from changing the settings in the Print dialog box every time you need such a printout.
Fortunately (although few Mac fans realize it), the Print dialog box lets you save combinations of settings. To create custom print settings and then save them for future use, follow the directions in Figure 4-18.
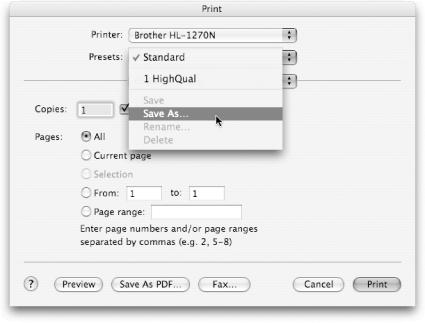
Figure 4-18. To preserve printing settings, choose File Print to summon the Print dialog box. Make the settings you’d like to preserve. Before you click Print, choose Save As from the Presets pop-up menu, and give this setting combination a name. You can recall the whole shebang in the future by simply selecting this name from the pop-up menu.
In Cocoa applications, you open the font panel by hitting
-T. This panel is relatively large as it consists of a preview area, columns for Collections, Family, Typeface, and Size, in addition to several formatting settings.
It doesn’t have to be so large, though. To work with a much smaller font panel, just drag up and left from the resize handle on the lower-right corner of the window. As you shrink the panel, sections will disappear or change into different forms until you’re left with a truly tiny font panel, as seen in Figure 4-19.
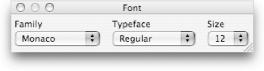
Figure 4-19. When you shrink the font panel by tugging on the resize widget, it eventually shrinks to downright tiny proportions—just three pop-up menus, as seen here. If you’re working with limited screen real estate, this trick can free up some precious pixels.
To return things to normal, just reverse the process and pull the resize handle down and to the right.
Have you ever created a document, consisting of many fonts at varying sizes, and thought, “Geez, wouldn’t this look better if everything were just a bit bigger?” The traditional solution would be to modify each section you’ve created, pick a new size for each font, and then hope it all looks about right when you’re done.
If you use a Cocoa application for word processing, though—such as TextEdit or Objectpark’s Letter Star (http://www.objectpark.net/letterstar.html)—you can greatly simplify this task. Cocoa applications support a feature known as relative font scaling. In laymen’s terms, instead of entering a certain type size for each section of text, you can select all your text and enter a multiplier or divisor, as seen in Figure 4-20.
By entering a mathematical formula instead of a font size, any text that is currently selected will be adjusted by the results of the formula. So entering “+2” will add two points to all existing font sizes, and entering “/2” will shrink all font sizes by 50 percent.
If you’ve been emailed a document that requires a Windows TrueType font, you’re in luck. It turns out that Mac OS X and Windows can both use precisely the same kind of font, without any conversion whatsoever. Just drag the font file in question from the Windows source (which could be a network folder, a CD-ROM, or an email attachment) into your Home → Library → Fonts folder, and you’re good to go.
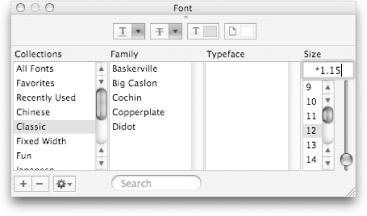
Figure 4-20. In Cocoa applications, you can enter mathematic expressions in the font panel instead of absolute sizes. Here, the existing font sizes will be increased by 15 percent due to the *1.15 multiplier. (You can also use division, addition, and subtraction.) Whatever you enter is applied to all selected text, giving you an easy way to change the font sizes across your document while maintaining the relative sizing between various fonts.
You may have heard of Unicode, but the odds are pretty good that you don’t know how to use it. It’s definitely worth learning about, though, as it’s one of Mac OS X’s most powerful text tools. This hint will get you started.
Traditional operating systems use a scheme for storing text (known as ASCII text) that has room for only 256 letters, numbers, and other characters. That’s adequate for making shopping lists and typing letters to your mom, but horribly suited for, say, writing a dissertation on the geometric attributes of Korean characters.
Enlightened modern operating systems, therefore, recognize something called the Unicode alphabet—a computer representation of over 32,000 characters, covering a wide range of languages, punctuation marks, and drawing symbols. Characters are each identified by a four-digit number, like 2318 (which happens to be the code for the Command-key symbol
). With a bit of setup work, you can insert them into almost any Mac OS X program.
Open System Preferences → International → Input Menu tab, then check both Character Palette and “Show input menu in menu bar.” A small flag icon should now appear in your menu bar. Click the flag, and you’ll see that both Unicode Hex Input and Show Character Palette are now valid options.
To input Unicode characters, launch any Cocoa application that accepts text input, such as TextEdit. Click the flag icon in the menu bar and select Show Character Palette. If it isn’t chosen already, select Unicode from the View pop-up menu at the top of the palette. Now, you can use one of the Character Palette’s three modes to select a symbol to insert:
Unicode Blocks lets you search for characters by category: Arrows, Mathematical Operators, General Punctuation, and so on. The pane on the right changes to display all the characters in the selected category.
Unicode Table lists characters by their Unicode number (2318 for the Command symbol, for example). Just add the row and column numbers (2310 + 8, in this case) to decipher the Unicode number for the symbol you want. Figure 4-21 shows this in action.
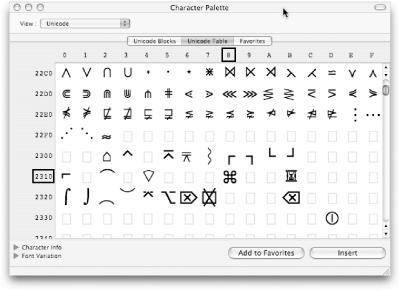
Figure 4-21. The Unicode menu on the Character Palette displays all the Unicode characters that Mac OS X is aware of. In Unicode Table mode, the numbers on the side and top identify each particular character; here, boxes are shown to point out the Command key symbol at position 2318.
Note
Unicode uses what’s known as the hexadecimal (or “hex”) system for counting. So, besides the normal digits 0-9, a number may also include the letters A-F.
Favorites, as the name would suggest, lists all your favorite characters. You can add new characters to this listing by clicking “Add to Favorites” in either Unicode Blocks or Unicode Table mode. You can also drag-and-drop to rearrange the characters within the Favorites listing.
Once you’ve selected a character in the palette, you can either drag-and-drop it into a document or press Insert.
Tip
For a complete listing of every Unicode character in existence, visit http://www.unicode.org/charts.
Unicode is ideal when you need to type characters from other alphabets, but sometimes you just want to quickly find a symbol: the paragraph mark, degrees sign, or Euro symbol, for example.
In older versions of the operating system, you’d have to use the Key Caps program, playing around with key combinations until you found the one that produced the symbol you wanted. Nowadays, you can use the Character Palette instead, sparing you the trouble of launching a separate program.
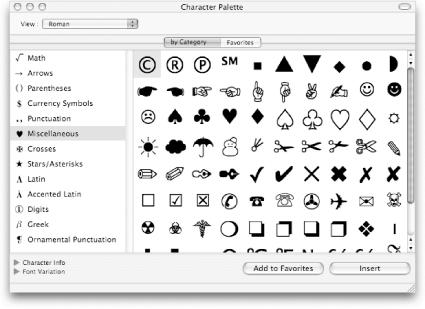
Open the Character Palette (as explained in Section 4.4.5), but choose Roman instead of Unicode from the View pop-up menu. (The Roman character set includes most common characters from Western languages.)
As shown in Figure 4-22, the “by Category” tab lets you easily browse listings of letters, numbers, and symbols. When you’ve found your desired symbol, click Insert; to save it for future use, just click “Add to Favorites.”
If you’re a Web designer, graphic artist, or just someone who enjoys collecting color swatches, you’re in luck. Mac OS X includes a couple of different tools that make it simple to capture any color you see onscreen.
The first is the ubiquitous color picker, which can be found in almost every Cocoa application (including TextEdit, Mail, and iChat). Hit Shift-
-C, and the color picker magically appears onscreen. To select a color you see onscreen, click the small magnifying glass icon next to the color box. After you do so, the cursor will change into a larger magnifying glass, as seen in Figure 4-23.
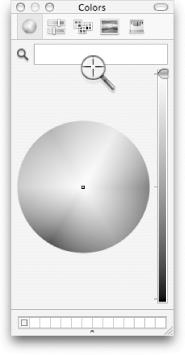
Figure 4-23. When you activate the color picker in any Cocoa application (via Shift-![]() -C) and click the small magnifying glass icon, your cursor turns into a super-sleuthing magnifying glass. Click anywhere on your screen and the color under the glass will be captured to the color picker.
-C) and click the small magnifying glass icon, your cursor turns into a super-sleuthing magnifying glass. Click anywhere on your screen and the color under the glass will be captured to the color picker.
Once you’ve activated the secret magnifying glass, click anywhere on your screen and the color under the glass will become the chosen color in the color picker. Now you can use this color like any other—for text, drawing, or future use (see hint Section 4.4.8).
If you’re a Web designer, though, you’ll probably lament the color picker’s lack of hex values for the color you sample. (To a Web designer, yellow isn’t yellow, but #FFFF00—the code used in HTML files.) If you need hex color codes, then, you’ll want to look at the second option for snagging onscreen colors: the Digital Color Meter application, hiding in your Applications → Utilities folder.
Launch the program and select “RGB as Hex Value, 8-bit” from the pop-up menu. Start moving the mouse around the screen, and hover over a color of interest. The R, G, and B boxes show the hex code. Now hit
-L to lock them in so you can keep moving the mouse without losing the code.
If you’re working with the color picker (see previous hints), you may know that you can use the boxes below the color wheel to store often-used colors. But there are probably a couple tricks you didn’t know regarding these boxes. First, you can add more rows by dragging down on the small dot below the boxes (see Figure 4-24). You now have room to store literally hundreds of color swatches, depending on the size of your monitor. (You can also use the resize handle at the bottom right of the color picker to expand it horizontally and vertically.)
After you’ve added a couple hundred of your favorite colors for future use, you’ll soon realize that there must be a better way to store them. It’s hard to find the precise color you want, since there’s no discernible order to your swatches.
That’s where custom color palettes factor in. If you work with a number of clients who each demand that you use certain colors, custom palettes are the best way to meet their needs. In short, you can create a specific palette for each client, containing only his approved colors. Confusion eliminated, just like that! As an example, Figure 4-24 offers a custom palette for a Web design firm’s client.
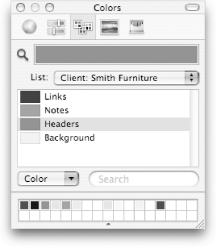
Figure 4-24. Using custom color palettes, you can easily create a customized set of colors for each client (or project). That way, you can’t cross-contaminate colors that belong on different Web pages, documents, and images.
Open the color picker from TextEdit or another Cocoa application and click the third icon from the left in the top row—the one with three small overlapping boxes. Click the List pop-up menu, and choose New. This will create an Unnamed-1 color set; click the pop-up again and choose Rename to give it a more meaningful name.
You’re now ready to start adding colors to your custom palette. You can do so by using the other color selection tools (the icons at the top of the dialog box) or by dragging them from your collection of favorite colors (the boxes at the bottom of the dialog box). When a color is dragged in, though, it may be given a generic, unhelpful name. To name it something more appropriate, click the Color pop-up and select Rename.
Your custom palettes are stored in your Home → Library → Colors folder. If the need arises, you can also give these files to co-workers, who can add them to their palette by using the Open item in the List pop-up menu (or by dropping them in their own Library → Colors folder). If you need to insure that corporate color standards are upheld, distributing a custom palette is a good first step!
The nightmare: a word processor, spreadsheet, presentation program, and email program, each with its own spell checker and spelling dictionary.
The fantasy: a computer with a single, centralized spelling dictionary that works with every program you use.
Clearly, that’s what Apple had in mind when it created the master Mac OS X spell checker. So far, Cocoa programs (Mail, TextEdit, iPhoto, and so on) are generally the only ones to capitalize on this feature, but the list will grow.
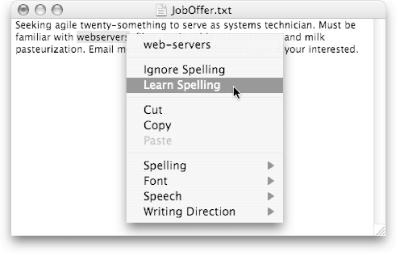
In any case, here’s how it works: as you type, a red dotted underline appears beneath any words the Mac considers incorrectly spelled. Instead of editing the word when you see the red underline, Control-click it. A menu containing recommended substitutions appears (Figure 4-25), as well as an option to teach the word to the Mac so it won’t flag it the next time around. If you use a lot of unusual words, use the Learn function to prevent the spell checker from underlining them in red in the future.
In Cocoa programs, you can control which language the spell checker uses. Control-click any blank section of a document. From the shortcut menu, choose Edit Spelling → Spelling. Inside the Dictionary area of the resulting dialog box is a pop-up menu that lets you specify the dictionary’s language—Español, Italiano, or British English, for example. (Here’s your opportunity, Brits, to make the Mac quit flagging colour as a spelling error.)
Get Mac OS X Power Hound, Second Edition now with the O’Reilly learning platform.
O’Reilly members experience books, live events, courses curated by job role, and more from O’Reilly and nearly 200 top publishers.

