If you are interested in developing applications for Apple’s Mac OS X platform, you probably know that it’s intimately tied in with the Objective-C language. Objective-C extends the standard ANSI C language by adding full object-oriented programming capabilities. It sees little use outside Apple environments.
Objective-C presents quite a contrast to Ruby, a scripting language that became very popular, thanks in part to the Ruby on Rails web framework. Both languages are very dynamic (although Objective-C is fully compiled) and object-oriented. They both have comparable levels of introspection, support metaprogramming, and have their own garbage collector. But Objective-C is a verbose language with rather tiresome requirements for specifying data and methods, and it might not fit all developers. Ruby, in contrast, is sleek and encourages quick programming techniques such as prototyping. According to its creator, Yukihiro Matsumoto, Ruby is designed for humans, not machines because “We are the masters. They are the slaves.” Both languages have their pros and cons. To find out more about Matsumoto, see the Wikipedia entry for Yukihiro Matsumoto.
Mac OS X ships with a version of Ruby you can access from the command line, but MacRuby is a completely separate project that has one key advantage: it provides access to all the features available to Objective-C programmers.
MacRuby is Apple’s implementation of the Ruby programming language. More precisely, it is a Ruby implementation that invokes methods from the well-known and proven Objective-C runtime to give you direct native access to all the OS X libraries. The end result is a first-class, compilable scripting language designed to develop applications for the OS X platform.
MacRuby brings you the best of both worlds:
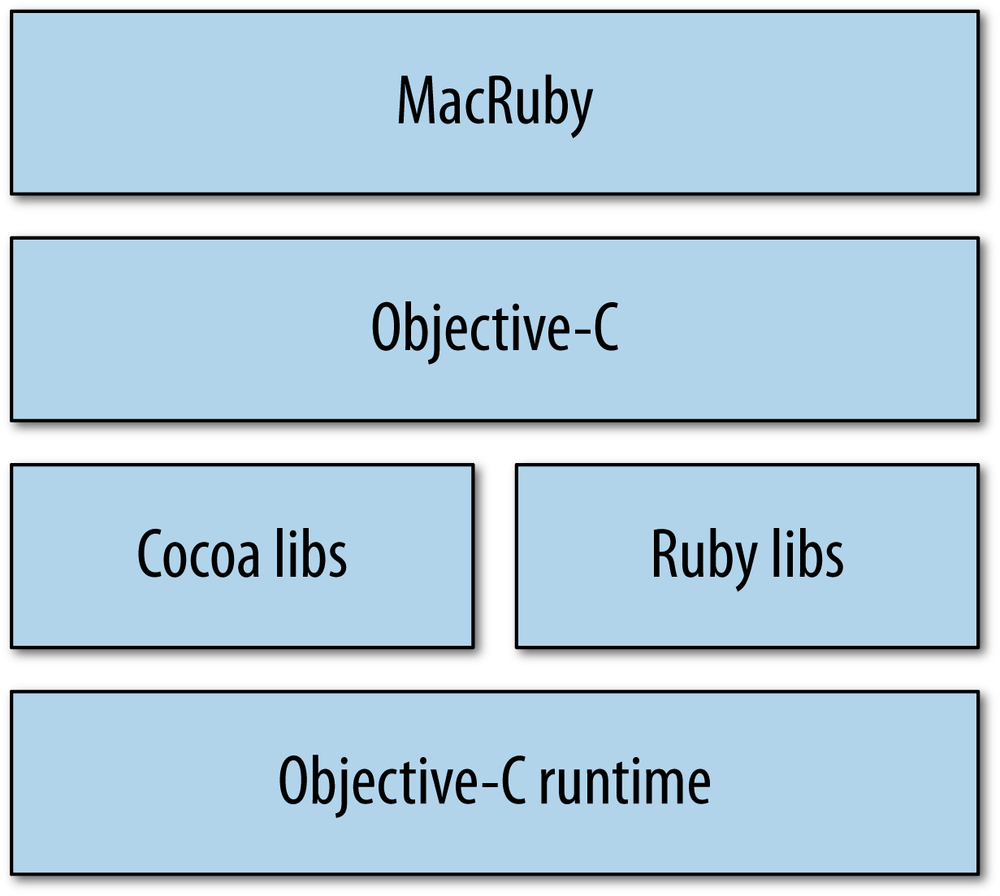
As you can see in Figure 1-1, MacRuby runs natively in the Objective-C runtime and offers Ruby as an alternative native runtime language with support for its well-known ecosystem of libraries and tools.
MacRuby has some obvious and not so obvious advantages. It is Apple’s first alternate language for accessing the Objective-C runtime. What’s even more interesting is that Apple managed to do this without reinventing the wheel. Instead, MacRuby is really the result of the blend of great existing technologies.
For most beginners, MacRuby’s learning curve is not as steep as if you start directly with Objective-C and Cocoa. Certainly, MacRuby developers also have to learn Cocoa’s APIs. However, beginners have an easier time thanks to simple things such as not having to worry about header files and implementation files, the use of a succinct and natural syntax, and the availability of an interactive shell.
A lot of documentation is available for MacRuby, although you have to learn how to interpret it because much of it assumes an Objective-C environment. In addition to MacRuby-specific documentation, such as this book, you can find a lot of documentation regarding Ruby and Cocoa. Tools used by both communities are available to MacRuby developers and you can rely on the communities to help you with domain-specific challenges.
MacRuby’s open source status might not be an obvious advantage at first, but it offers direct access to the core of the implementation. The quality of the code can be easily evaluated, patches can be submitted, and overall it is a sign that Apple wants greater involvement from the developers targeting its platform, as well as offering some transparency into its technology.
MacRuby is also for you if you are already a Cocoa developer but would like to improve your productivity, interact a bit more with the world outside of Cocoa, or maybe just improve your test coverage.
Objective-C is a great language, but it is also very verbose. The problem is not the amount of time you spend writing code (most integrated development environments [IDEs] will generate code for you anyway). The real problem is the amount of time developers spend reading and understanding the code previously written. Most of the time spent fixing a bug is not really spent “fixing” anything, but finding the source of the bug. By offering a syntax that is less verbose and easier to grasp, MacRuby instantly improves your short-term and long-term productivity.
Cocoa developers can leverage their acquired knowledge and existing code and maximize their efficiency by using MacRuby. Because Ruby, Objective-C, and C code can be used in the same project, your legacy code is 100% reusable. Available libraries for Cocoa, Ruby, and even C can help enrich your projects and save you precious time.
MacRuby has full native support for regular expressions, which might be enough to convince you to try it.
Finally, Apple’s backing is recognition that a higher-level language, designed to be easy to read and enjoyable to work with while still being fully natively Cocoa compliant, is valuable to developers targeting the Apple platform.
No doubt you are impatient to start writing applications. But before we can start writing any code, we need to make sure we have all the required tools set up properly. Getting started is really simple and doesn’t require compiling anything.
First, make sure you are running Snow Leopard, Lion, or a more recent version of MacOS X. MacRuby runs on Leopard, but for the purpose of this book, I’ll assume you are using a more recent version of the OS.
Xcode is Apple’s development environment for OS X. Installing Xcode will provide you with the tools and libraries required to develop Cocoa applications.
You can either install Xcode from the OS X DVD that shipped with your Mac or download it from Apple’s developer center.
Note
Apple regularly updates Xcode, which means that the online version is likely more recent than the one you have on your OS X installation DVD. At the time of this writing, Apple still provides Xcode 3 for free, but Xcode 4 is sold for five American dollars at the App Store, or free if you have an iOS or Mac developer license. This book will refer to Xcode 4, but the same concepts apply to Xcode 3.
As of the writing of this chapter, MacRuby is not shipping with OS X or Xcode. Lion ships with MacRuby as a private framework because the OS relies on it, but because Apple didn’t make the framework public, you are not allowed to link against it. So, you need to install MacRuby manually.
Go to the MacRuby website.
MacRuby won’t conflict with the Ruby version you already have installed.
Note
If you already have Xcode 3 installed and upgrade to Xcode 4, you will need to reinstall MacRuby so the updated version of Xcode can make proper use of the MacRuby tools.
MacRuby does not come with an uninstaller. If you want to remove MacRuby from your computer, delete the MacRuby binary files, which use the mac prefix and are located in /usr/local/bin/. Then remove MacRuby itself: /Library/Frameworks/MacRuby.framework.
Instead of making you wade through MacRuby’s history, the technical aspects of the implementations, and their pros and cons, let’s dive into a code example to get a feel for MacRuby.
We’ll build a traditional “Hello World!” example. To keep things simple, we’ll just write a script and won’t use any IDEs or GUI tools. Let’s make it pretty and create a window with a button. When the button is clicked, the computer will greet the world through its speakers:
framework'AppKit'classAppDelegatedefapplicationDidFinishLaunching(notification)voice_type="com.apple.speech.synthesis.voice.GoodNews"@voice=NSSpeechSynthesizer.alloc.initWithVoice(voice_type)enddefwindowWillClose(notification)puts"Bye!"exitenddefsay_hello(sender)@voice.startSpeakingString("Hello World!")puts"Hello World!"endendapp=NSApplication.sharedApplicationapp.delegate=AppDelegate.newwindow=NSWindow.alloc.initWithContentRect([200,300,300,100],styleMask:NSTitledWindowMask|NSClosableWindowMask|NSMiniaturizableWindowMask,backing:NSBackingStoreBuffered,defer:false)window.title='MacRuby: The Definitive Guide'window.level=NSModalPanelWindowLevelwindow.delegate=app.delegatebutton=NSButton.alloc.initWithFrame([80,10,120,80])button.bezelStyle=4button.title='Hello World!'button.target=app.delegatebutton.action='say_hello:'window.contentView.addSubview(button)window.displaywindow.orderFrontRegardlessapp.run
Type in the code (don’t worry about matching my spacing) or download it from http://bit.ly/macruby_hello_world, then save it in a file named hello_world.rb and run it in a terminal:
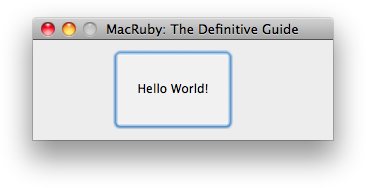
$ macruby hello_world.rbThe application, shown in Figure 1-2, will open.
Congratulations, we just wrote a graphical user interface (GUI) application in 35 lines of code! And don’t forget to click the button to hear your computer’s nice voice.
Let’s do a first walk through the code so you have a general understanding of what we just wrote.
We start by loading the AppKit framework, which gives us access to
classes to build a GUI app. Then we create a class called AppDelegate, which implements methods to handle
the actions our application triggers. This new class has three different
methods: one to be called when the application is loaded (applicationDidFinishLaunching), one when the
window is closed (windowWillClose), and one
to say, “Hello world!” (say_hello).
After the application is launched, we
create an instance of the NSSpeechSynthesizer class
that we keep in an instance variable called @voice. The instance variable makes the features
available to every method in the AppDelegate class. When the button is clicked,
we trigger the say_hello method, which
will use the voice object to greet the world. The say_hello method also outputs a string to our
terminal. Finally, when the window is closed, our code says, “Bye!” and
exits.
The class AppDelegate is used to
create a delegate that is attached to another
object to handle events sent to that object. Delegates have to be set for
each object you want to handle events for.
To keep things simple, our delegate instance is used by all the objects in the user interface: the application, the window, and the button. So, our next step is to get a pointer to our application and link it to a new instance of our delegate class:
app=NSApplication.sharedApplicationapp.delegate=AppDelegate.new
That’s pretty easy, but we are not done yet. We also need to build a window with a button inside. Furthermore, assigning an application delegate to our application does not make the other objects within the application use the delegate. Each object has to be attached explicitly. Interface Builder offers a really nice interface that allows you to graphically define targets, making the delegate concept much easier to work with.
A window is created by passing a frame reference and a style. You can see a slight increase in the code’s complexity, because we have to tell the Objective-C runtime a bunch of information.
The frame refers to the coordinate space (in points) of the window.
Objective-C developers usually pass an NSRect instance. MacRuby
developers can simply pass an Array
with the frame references in the following order: x, y,
width, height. These work like just about every other
windowing system: x and y specify the position of the top left corner of
the window from the top left corner of the screen, while width and height
specify the window’s size. The coordinates and positioning are discussed
in Chapter 5:
window=NSWindow.alloc.initWithContentRect([200,300,300,100],styleMask:NSTitledWindowMask|NSClosableWindowMask|NSMiniaturizableWindowMask,backing:NSBackingStoreBuffered,defer:false)
We also give a title to our window, set its level and style, and connect it to the delegate we previously created. The level determines how the window will stack in relation to other windows/applications. If you don’t explicitly set the window level in your script, the new window will display behind the command line, which is in focus. That’s why we need to set it as a modal window level—so it shows above the running application.
Now it’s time to create a button, the same way we created a window. We create our button by passing a frame reference:
button=NSButton.alloc.initWithFrame([80,10,120,80])
The button is styled to make it look better, give it a title, and connect it to our delegate:
button.target=app.delegate
But before moving on, we need to tell the button what to do when it’s clicked, which we do by defining its action:
button.action='say_hello:'
Remember the say_hello method we
created in our delegate? Now, when the button is clicked, the method is
triggered.
Note
Did you notice the colon at the end of the string? It’s present because we are referring to the method we want to invoke. Technically, this is called a selector and our selector takes an argument (the sender), so it is represented with a colon. We will discuss selectors a bit more later in this chapter, but in this case we just need to append a colon to the name of the method to make it a selector.
Once the button is created and set up, we can add it to the window:
window.contentView.addSubview(button)
Our GUI is now ready. We just need to display the window, put it on foreground, and run our application:
window.displaywindow.orderFrontRegardlessapp.run
That was not too hard, was it?
Now start your application from the terminal:
$ macruby hello_world.rbYou’ll see the application window shown in Figure 1-2.
Note
When executing a script via the terminal, your application won’t properly get focus and you might notice some issues with text fields, for instance. To force the focus, you can use the following code:
NSApplication.sharedApplication.activationPolicy=NSApplicationActivationPolicyRegularNSApplication.sharedApplication.activateIgnoringOtherApps(true)
Here is more good news: using Xcode and Interface Builder, we will be able to do the same thing with even less code. But before playing with the GUI tools, let’s learn more about MacRuby and Cocoa by going through the code in detail.
Our example starts with a framework:
framework'AppKit'
A framework is a library (usually a dynamically linked library) packaged with the supporting files that make it easier for a developer to use that library. Mac OS X ships with many frameworks, and a lot of third-party frameworks are also available. In Chapter 2, you’ll learn more about the Cocoa environment and some of the most commonly used frameworks.
But for now, what’s
important to understand is that we are loading an Objective-C framework called AppKit, also known as the
Cocoa Application Framework. The
AppKit framework provides the
functionality to build OS X GUI applications. We are going to explore this
framework at length in Chapter 5, so let’s just
focus on the rest of the code for now.
MacRuby is a true object-oriented language, in which everything is an object, and objects are defined by classes.
Defining a class in MacRuby is straightforward. Use the
class keyword, followed by the
capitalized name of the class. To close the class definition, use the
end keyword. Unlike Objective-C, no
headers are required; just define your class once and you are ready to
go.
Here is our AppDelegate class.
As you can see, each method begins with def and ends (like the class definition) with
end. I’ve used indentation to show
how the end statements line up with
the beginnings of the definitions:
classAppDelegatedefapplicationDidFinishLaunching(notification)voice_type="com.apple.speech.synthesis.voice.GoodNews"@voice=NSSpeechSynthesizer.alloc.initWithVoice(voice_type)enddefwindowWillClose(notification)puts"Bye!"exitenddefsay_hello(sender)@voice.startSpeakingString("Hello World!")puts"Hello World!"endend
Ruby objects are initialized using the new class method. This is exactly what we did
in our “Hello World!” example when we created an instance of our
AppDelegate class:
AppDelegate.new
And if you look further, we have another object instantiation, this time using different methods:
button=NSButton.alloc.initWithFrame([80,10,120,80])
The combination of alloc and an
init method is used because
NSButton is an
Objective-C class and has its own constructor. To keep it
simple, when dealing with classes you created or other Ruby classes, use
the new constructor method.
Otherwise, use alloc.init or any other constructors mentioned in the documentation
(in this case, alloc.initWithFrame).
Warning
Although you can use new to
instantiate an Objective-C class, I strongly recommend you use
alloc.init or related constructors
defined by the class. Apple’s Objective-C classes are usually easy to
identify, because their names start by NS. The reason for this advice is that the
class was written and tested to be used the Objective-C way and it’s
therefore safer to initialize it that way.
You can customize instantiation by defining the initialize method.
Unlike Objective-C, Ruby doesn’t have a public explicit object
allocation method, but both languages initialize instances of objects
immediately after they are created. Ruby has an internal allocate method but is called automatically.
Ruby implicitly calls the initialize
method, while Objective-C makes initialization explicit with a call to
some method whose name usually begins with init.
The following example causes an instance variable in the Book class to be initialized whenever an
object of that class is created with new:
classBookdefinitialize@created_at=Time.nowendend
To modify the construction of
any new instances, we just reopen the class and define initialize.
Note
By reopening the class, I mean that we define a class that was
previously defined. All we do here is overwrite the initialize method. Classes are never closed.
Both MacRuby and Objective-C classes can be reopened at any time, so
it’s incredibly easy to add new methods to existing classes at
runtime.
Right after a new Book instance
is created, a new instance variable called @created_at will be defined and
will hold the creation time. This @created_at instance variable is then stored
inside our newly created object.
Objects respond to methods. In Objective-C terminology, the
invocation of a method is also called sending the object a message. Like
variables, methods can be class methods, which are called on the name of the class, or
instance methods, which are called on objects after they are
created with new. A simple example of a
class method is:
classContactdefself.first# Let's pretend we have an array of contacts# held in the @contacts class instance variable.@contacts.firstendendContact.first# => #<Contact:0x20029fe20>
classContactdeffull_name"#{first_name}#{last_name}"endendContact.first.full_name# => "Laurent Sansonetti"
Note
Ruby methods don’t need to explicitly return a value. If a method doesn’t explicitly issue a return statement, the last value evaluated in the body of the method will be returned.
There can also be singleton methods. These are methods defined on an individual instance of an object, as in the following example:
laurent=Contact.firstdeflaurent.country_of_origin"Belgium"endlaurent.country_of_origin# => "Belgium"
In this example, only the object
named laurent can invoke the country_of_origin method. Singleton methods are
very useful in MacRuby, because they allow you to overwrite or define a
method on an instance instead of having to create a subclass.
Note
MacRuby methods can also be defined in many other ways, described in the Ruby language reference.
Looking at the AppDelegate class we created, we can see the
three defined methods:
defapplicationDidFinishLaunching(notification)...enddefwindowWillClose(notification)...enddefsay_hello(sender)...end
If you look closely at the names of the
methods, you will notice that the first two are CamelCased , while the last one uses an underscore. By convention,
Rubyists usually underscore their method names. But in this case, the two
first methods are callbacks sent by the application. These callbacks are
defined in Objective-C, so their names use the CamelCase syntax convention that’s ubiquitous in
Objective-C. The last method is the method we trigger when the button is
pressed. We have full control over this method and we could have defined
the button’s action method sayHello to
stay consistent. But instead, by using the Ruby convention, we can quickly
see which methods come from Cocoa libraries and which ones we wrote.
Another way to explain the same thing is that the windowWillClose and
applicationDidFinishLaunching methods are
predefined and can be included in our class to provide certain
functionality even though we are not calling them explicitly. In
comparison, say_hello is our own method
that we call explicitly in our code and thus we can name it anything we
want.
If defined on an
application delegate, the applicationDidFinishLaunching method is
triggered when the application is launched. We are using this callback to
create an instance of NSSpeechSynthesizer that
we will hold in the @voice instance
variable:
defapplicationDidFinishLaunching(notification)voice_type="com.apple.speech.synthesis.voice.GoodNews"@voice=NSSpeechSynthesizer.alloc.initWithVoice(voice_type)end
To find out which constructor to use to create a speech synthesizer and which voices are available, read the documentation. Apple documentation follows its own set of conventions, which I’ll introduce you to next.
When you load a framework, you get access to its APIs, which include classes, methods, constants, functions, enumerations, and so on. As I explained earlier, many frameworks are written in Objective-C. Their conventions reflect Objective-C practices, and that comes out in the documentation, which is fairly easy for Objective-C programmers to read, but could use some interpretation for other readers.
To learn more about each framework and see its possibilities, open the developer documentation and look for the framework, or search for a specific class. The documentation is available via Xcode or on Apple’s developer website, and it looks the same in both places.
Let’s open the NSSpeechSynthesizer
class documentation so we can see the available methods. Search for
NSSpeechSynthesizer in the
documentation and you should find the NSSpeechSynthesizer class reference. Under the
“tasks” section, there is an entry titled “Creating Speech Synthesizers”
with its first documented method called initWithVoice:
The Objective-C method signature might seem a bit cryptic at first, so let me explain what it means:
- (id)initWithVoice:(NSString *)voiceIdentifier
Notice first that the signature starts with a - symbol, which means that we are dealing with an instance method. A class method signature would start with a + symbol.
The instance method is called
initWithVoice and
returns an object of type id. In
Objective-C, the id keyword means that
the returned object can be of any type. In this case, the
documentation explains that the returned value can be either a speech
synthesizer instance or nil. Finally, the method takes an argument
representing the voiceIdentifier to use. The
argument should be a String.
However, the documentation indicates that nil can also be passed.
The documentation might refer to some constants that are
relevant to the class. In Cocoa, constants are namespaced and start
with a k followed by a two-letter
code. For instance, AB stands for AddressBook, and its documentation mentions
the kABFirstNameProperty constant.
However, even though a constant can start with a lowercase character
in Objective-C, in MacRuby, constants always have to start with an
uppercase character. In this example, Objective-C’s kABFirstNameProperty constant is available
as KABFirstNameProperty in
MacRuby.
A great advantage of using MacRuby is that we can use the
interactive shell to inspect our code. Let’s experiment with the
NSSpeechSynthesizer class and learn
more about it by interacting directly with it.
The NSSpeechSynthesizer
documentation sample we looked at earlier mentions a class method named
+ availableVoices.
Let’s play with it.
Open a terminal shell and launch macirb (macirb is MacRuby’s interactive shell and it is installed when you install MacRuby):
$macirb --simple-prompt>>framework 'AppKit'=> true >>NSSpeechSynthesizer.availableVoices=> ["com.apple.speech.synthesis.voice.Agnes", "com.apple.speech.synthesis.voice.Albert", "com.apple.speech.synthesis.voice.Alex", "com.apple.speech.synthesis.voice.BadNews", "com.apple.speech.synthesis.voice.Bahh", "com.apple.speech.synthesis.voice.Bells", "com.apple.speech.synthesis.voice.Boing", "com.apple.speech.synthesis.voice.Bruce", "com.apple.speech.synthesis.voice.Bubbles", "com.apple.speech.synthesis.voice.Cellos", "com.apple.speech.synthesis.voice.Deranged", "com.apple.speech.synthesis.voice.Fred", "com.apple.speech.synthesis.voice.GoodNews", "com.apple.speech.synthesis.voice.Hysterical", "com.apple.speech.synthesis.voice.Junior", "com.apple.speech.synthesis.voice.Kathy", "com.apple.speech.synthesis.voice.Organ", "com.apple.speech.synthesis.voice.Princess", "com.apple.speech.synthesis.voice.Ralph", "com.apple.speech.synthesis.voice.Trinoids", "com.apple.speech.synthesis.voice.Vicki", "com.apple.speech.synthesis.voice.Victoria", "com.apple.speech.synthesis.voice.Whisper", "com.apple.speech.synthesis.voice.Zarvox"]
Note
In irb mode, the chevrons (>>)
represent the irb prompt, the fat arrow (⇒)
represents output, and anything after a hash (#) is a comment
I added.
We started macirb with the --simple-prompt argument to avoid displaying
the line numbers. Check on the various options by passing the --help argument.
Let’s create an instance of the speech synthesizer, passing
nil to use the default voice, and
let’s see what methods are available:
>>voice = NSSpeechSynthesizer.alloc.initWithVoice(nil)=> #<NSSpeechSynthesizer:0x2004c7c20> >>voice.methodsreturns the available Ruby methods The list is too long for this book but give it a try on your machine. >>voice.methods(true, true)returns the available Objective-C methods => the list is too long for this book >>voice.methods(true, true).grep(/speak/i)returns all methods containing 'speak' in their name. Limited selection for the purpose of this book. => [:continueSpeaking, :stopSpeaking, :isSpeaking, :startSpeakingString]
We created a speech synthesizer instance, inspected the Ruby and Objective-C methods, and even filtered them to find the methods used to speak.
We can invoke another method to see the status of the object, then define a string and feed it to the synthesizer to read out loud:
>>voice.isSpeaking=> false # MacRuby offers an alias to Objective-C methods starting byis>>voice.speaking?=> false >>voice.respond_to?(:sing)=> false >>jelly_time = "Do the peanut butter jelly, peanut butter jelly,Peanut butter jelly with a baseball bat"=> "Do the peanut butter jelly, peanut butter jelly, \nPeanut butter jelly with a baseball bat" >>voice.startSpeakingString(jelly_time)=> true
Now let’s play with some of the other available voices we listed
earlier when we called the availableVoices class
method:
>>voice_name = "com.apple.speech.synthesis.voice.BadNews"=> "com.apple.speech.synthesis.voice.BadNews" >>voice = NSSpeechSynthesizer.alloc.initWithVoice(voice_name)=> #<NSSpeechSynthesizer:0x200855380> >>voice.startSpeakingString(jelly_time)=> true let's try with a different voice >>voice_name = "com.apple.speech.synthesis.voice.GoodNews"=> "com.apple.speech.synthesis.voice.GoodNews" >>voice = NSSpeechSynthesizer.alloc.initWithVoice(voice_name)=> #<NSSpeechSynthesizer:0x200873100> >>voice.startSpeakingString(jelly_time)=> true
Have fun trying different voices with different sentences and get a feel for macirb.
MacRuby offers a couple of method aliases to keep your code more Ruby-like. Feel free to use whichever version you prefer:
- Objective-C/Ruby accessor syntax:
object.setFoo(bar)object.foo=bar- Objective-C/Ruby boolean response syntax:
object.isFooobject.foo?- Objective-C/Ruby key accessor syntax:
keyed_object.objectForKey('foo')keyed_object['foo']- Objective-C/Ruby key setter:
keyed_object.setObject('bar',:forKey=>'foo')keyed_object['foo']=bar
The Ruby syntax is usually shorter than the Objective-C syntax, but it is good to know both for times when you go back and forth between Objective-C and Ruby code.
Some extra helpers added by MacRuby include:
- Convert a
Stringinstance into anNSData: "this is a test".to_data- Convert an
NSDatainstance into aString: data="this is a test".to_data# => #<NSCFData:0x200245d40>data.to_str# => "this is a test"- Convert an object into a property list:
[1,"two",{'three'=>3},true,false].to_plist- Load and convert a property list:
plist={one:1,two:2,three:3}.to_plistload_plist(plist)
Get MacRuby: The Definitive Guide now with the O’Reilly learning platform.
O’Reilly members experience books, live events, courses curated by job role, and more from O’Reilly and nearly 200 top publishers.

