By now, you probably have a good feel for the Registry’s structure. Once you’re comfortable navigating the Registry with RegEdit, it’s time to move on to the mechanics of working with keys and values in the Registry. RegEdit has a complete suite of commands for creating, modifying, deleting, and renaming keys and values. However, it doesn’t have a safety net, so be sure to limit your initial experimentation with editing to changes you can back out if necessary--and don’t forget the backup strategies you learned in Chapter 3.
Warning
Even though it was mentioned before, it bears repeating: there’s no convenient way to undo changes you make when editing the Registry with RegEdit. Make sure you’ve developed and are executing a Registry backup strategy. If you’re not, please go back and read Chapter 3 before you start editing anything.
Now is also a good time to mention a few things that RegEdit can’t do. Chief among them is the fact that it can’t directly edit or create values that aren’t of one of the three types it supports: DWORD, binary, and string. You can edit values of these other types, but you have to do so by viewing and editing the hex bytes that make up the binary version of the data--not a task to undertake lightly! This limitation makes it harder to edit REG_MULTI_SZ or REG_EXPAND_SZ values, which are fairly common; it’s also a problem if you try to modify the more obscure data types discussed in Minor Datatypes in Chapter 2. As a practical matter, this isn’t a huge hindrance, since most Registry values use one of the three types RegEdit supports.
Warning
In Knowledge Base article Q155267, Microsoft warns against using RegEdit to edit Registry data on a Windows NT machine. That’s because RegEdit wasn’t designed for, and doesn’t understand, some of the data types supported by Windows NT and 2000. You’ll be OK if you stick to editing DWORD and REG_SZ values.
RegEdit would have been a much better application if it had full Clipboard support, allowing you to cut, copy, and paste keys and subkeys, especially when you’re viewing more than one machine’s Registry from a single instance of RegEdit. Though it doesn’t explicitly have much Clipboard support, you can still manage to exchange names and values through the Clipboard if you keep in mind the available ways to do it.
Let’s start with key names: to copy a key’s name to the clipboard, you can use the Edit→Copy Key Name command, RegEdit ’s only Clipboard command. This command copies the key’s full path, including the root key, to the Clipboard as a text string, ready for use elsewhere. When renaming a key, for example, you can paste a name into the Rename dialog box instead of typing it.
Likewise, it’s possible (though not through the menu) to copy a value’s name or value. To accomplish this, open the editing dialog box for the value whose name or value you’re interested in, either by double-clicking it or using the Edit→Modifycommand. When the edit dialog box appears, you can use the mouse to select either the name or the value, then issue the appropriate Windows shortcut or context menu command to copy, cut, or paste the value.
The most common use for RegEdit is to modify existing values. Many of the settings stored in the Registry are accessible through various control panels and snap-ins, but others aren’t, and applications often keep private settings that occasionally require adjustment.
You can modify a value by double-clicking its entry in the value pane, by selecting it and using the Edit→Modifycommand, or by selecting Modify from the right-button context menu. What happens next depends on the value type you’re modifying. However, in all cases, once you click OK in the editing dialog, the change is made, and there’s no way to undo it other than changing back the value by hand or restoring from a backup. Note that most applications and system components won’t notice changes to a Registry value if they’re made once the application is running; you’ll usually have to quit and restart the application before the changes take effect.
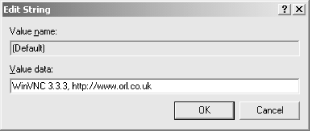
The Edit String dialog box (pictured in Figure 4-5) is pretty simple; it displays the selected value’s name and data. You can select and copy the value name, but you can’t change it. You can change the value’s data using the “Value data” field. Like the name field, this field supports the Windows cut, copy, and paste keyboard shortcuts, so you can quickly paste in values from elsewhere. You’ll see this dialog box when you select a value whose type is REG_SZ or REG_EXPAND_SZ.
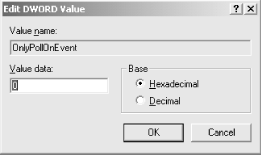
When you edit a REG_DWORD value, you see the dialog box shown in Figure 4-6. Like the Edit String dialog, you can copy text from the “Value name” field, and you can copy, paste, or cut text in the “Value data” field itself. The two radio buttons in the Base group let you specify a DWORD value in either decimal or hex; if you choose hex, you don’t need to add a leading 0x to the value you provide.
Warning
It’s a very good idea to always double-check the value you enter to make sure it matches the setting of the Base radio buttons. If you’re entering a value in hex, make sure the Hexadecimal button is selected. If the base you select and the data you enter don’t match, the change you make may not have the expected effect.
The Edit Binary Value dialog box appears whenever you edit something that’s not a DWORD, a REG_SZ, or a REG_EXPAND_SZ. Specifically, when you edit a REG_BINARY, a REG_MULTI_SZ, or either of the resource types described in Chapter 2, you see a dialog box like the one shown in Figure 4-7. Like its predecessors, you can copy text from this dialog’s Value name field; however, the Value data field’s behavior is a bit different.
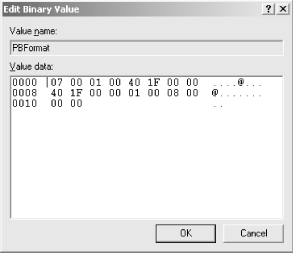
Instead of holding plain text or a single binary value, the Edit Binary Value dialog’s Value data field displays as much data as the value holds. Some binary values are a single byte; others, like the one in Figure 4-7, can be hundreds of bytes long. RegEdit doesn’t care; it displays whatever data is stored for the value. The offset column shows the offset, in hex, at which each block of data starts. The hex display area shows the value’s data as blocks of 8 hex bytes per line, and the ASCII display area shows the printable representation (if any) of the corresponding line’s hex data.
As with the string and DWORD dialogs, you can cut, copy, and paste text in the Value data field. You can also insert or replace text by highlighting text, just as in a word processor. There’s one important difference, though: what you type is interpreted according to where you clicked to select text. If you click on the hex area, whatever you type is taken as hex (only the digits 0-9 and letters A-F are acceptable input, though). If you click in the ASCII display area, what you type is interpreted as ASCII text.
What this means is that you have to be careful. Let’s say you want to change part of the value shown in the figure: you want to change the part that says “1705” to say “1999.” [22] If you select the text in the ASCII area and type “1999,” you’ll get the change you expect. If, instead, you select the corresponding range of bytes in the hex display area and type “1999,” RegEdit changes the first two bytes, 0x31 and 0x37, to what you typed: 0x19 and 0x99. Not exactly what you had in mind!
You can insert data, too. Just position the insertion point where you want the new data to go and start typing. This is particularly useful for adding strings to a REG_MULTI_SZ value; you still have to make sure to add the hex 0x00 byte that indicates the end of each string. (Better still, use RegEdt32, which offers a built-in editor for REG_MULTI_SZ strings.)
For the most part, you will probably have little use for the commands that let you add values and keys. This is because of the way applications and components use the Registry; they look for data in predetermined locations, and if you add new data that they don’t expect to find, they ignore it. I call this the “hide in plain sight” effect. Think of it like this: if you leave your FedEx delivery person a note taped to your front door asking them to leave your package on the front porch, they will. If, however, you hide the note under your doormat, they won’t look for it, won’t find it, and won’t do what you wanted. So it is with Windows 2000.
However (and you knew this was coming, right?), Microsoft didn’t add these commands just to make RegEdit look more impressive. There are good reasons to add values and keys; it’s just that the circumstances that lead to these reasons are relatively rare. First of all, if you’re a software developer, you may need to use RegEdit to add keys and values that you use in your own program. The industry trend has been to have installers take care of any Registry changes that need to be made, but before the installer is written sometimes you have to do it by hand.
The second, and probably more common, reason is that Microsoft often adds options or functions to system software that are only accessible by adding new keys to the Registry. These options may be documented in Microsoft’s knowledge base (http://support.microsoft.com), but they may remain undocumented until Microsoft feels like revealing their presence. Here’s an example: let’s say you want one Active Directory domain controller to participate in multiple sites. Since a site is a collection of subnets, a server with multiple network interfaces might credibly do so, but you can’t configure the server to do so without using the Registry editor. Knowledge Base article Q200498 explains that you must add a new REG_MULTI_SZ value named SiteCoverage to HKLM\System\CurrentControlSet\Services\Netlogon\Parameters, then put the names of all the sites you want the server to join into it. While this capability is documented in the Knowledge Base, it requires you to make a change to the Registry, which brings us to the mechanics of doing so in RegEdit.
Third-party manufacturers often take this same approach and put hidden tuning or diagnostic settings into their software or device drivers. These settings can be activated only by adding keys or values with a name known to the software.
The Edit→New command can create new keys or values; it’s actually a submenu with four commands in it: New Key, String Value, DWORD Value, and Binary Value. These commands all work in a similar way:
Select the key under which you want to create a new key or value.
Choose the appropriate command from the menu bar or the context menu.
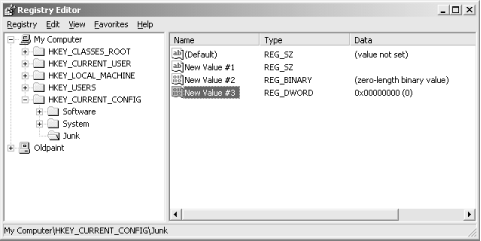
RegEdit creates the requested object and gives it a temporary name, which you may edit in place. When you create a new key, it gets an empty value: (Default). Similarly, new string and binary values are empty when created, and new DWORD values have an initial value zero. Figure 4-8 shows the results of some (injudicious) experimentation on my (backup) computer.[23]
If you’re creating a value, use the Edit→Modify command to actually assign a real value to the newly created object.
If you’re ready to try your newfound powers, look no further than Chapter 10; it contains a list of the most frequently sought-after Registry modifications.
There are times when you may need to remove data from the Registry. For example, even commercial products that include “uninstall” programs may not completely clean up all the Registry entries they’ve made. However, of all the potential ways to damage your Registry, this is the one I most often see people have problems with. Why? Two reasons: there’s no way to undo mistaken deletions from within RegEdit or RegEdt32, and some deletions don’t cause problems until the next reboot. I strongly recommend (again) that you have a current Registry backup on hand before deleting any key you didn’t create yourself.
Having said that, on to the instructions. RegEdit lets you delete any key except the root keys and any value except the (Default) value some keys have. You can delete keys and values in two ways: by selecting them (using the mouse or keyboard) and using the Edit→Delete command (or its shortcut, the Del key) or by clicking the right mouse button over the target item and using the context menu’s Delete command.
When you delete a key, RegEdit displays a confirmation dialog box that asks you whether you reallywant to delete the selected item. However, in a major faux pas, the dialog box doesn’t tell you which key you’re deleting! Before clicking the “Yes” button in this dialog, closely examine what key or value is selected and confirm that what’s selected is what you actually wanted to delete. Once you confirm the deletion, RegEdit deletes the selected key, all its subkeys, and all their values. If you accidentally delete a major key such as HKLM\SOFTWARE, you’re in for big trouble unless you have that backup handy.
Be very, very careful when deleting keys orvalues. End of sermon.
You can rename keys and values with the Edit→Renamecommand, which works equally well on keys or values. Select the item you want to rename and give the command, and the item’s name changes into an editable text field into which you can type or paste. Hit the Return key when you’re done or the ESC key to cancel your changes.
A cautionary note: just because you can rename keys and values doesn’t mean that doing so is a good idea. System components and applications always look for values with specific names, and they expect to see them in specific locations. If you change the key or value name for an important parameter, the software that uses it won’t be able to find it. Depending on how robust the software is, you may not notice any difference, or your machine may crash. The best heuristic I can recommend is never to rename any keys that belong to the OS itself and to avoid renaming keys whenever possible.
About the only noticeable change between the Windows NT 4.0 and 2000 versions of RegEdit is the latter’s addition of a Favorites menu. It’s empty by default, but you can use the Add to Favorites command to add the selected key as a favorite. When you add a new favorite, you can give it whatever name you want; the names of whatever favorites you’ve defined appear at the bottom of the menu.
To jump to a particular favorite, just select it. RegEdit expands the necessary root and subkeys, then highlights your selection. To remove a favorite, use the Remove Favorite command, which displays a small dialog box listing the keys you’ve defined.
Why did Microsoft add this? I honestly don’t know. It couldn’t have taken much time, and it might be useful if there are certain keys you edit over and over again, but I confess that, IMHO, they probably could have found a better use for the man-hours invested in building this particular feature.
Get Managing The Windows 2000 Registry now with the O’Reilly learning platform.
O’Reilly members experience books, live events, courses curated by job role, and more from O’Reilly and nearly 200 top publishers.

