You’ll almost always create Button
widgets with the -command option. This is because
for the Button to do something when pressed, we have to associate a
callback with the Button. A callback (see
Chapter 15) is actually a Perl subroutine
that’s invoked when mouse button 1 is released over the
Button.[2] (Note that we specified released; if
you click down on the Button but move the cursor away from it before
releasing, nothing happens, because the mouseclick was aborted.)
The simplest
way to specify a -command callback is using a
code reference. In many of our examples, we use
an anonymous code reference to a subroutine that
simply executes an exit statement:
$mw->Button(-text => "Done", -command => sub { exit })->pack;We might also reference an explicit subroutine (that can then be called from multiple places):
$mw->Button(-text => "Done", -command => \&save_and_exit)->pack;
Note that in both examples, -command expects a
reference to some Perl code. There are other callback formats, fully
explained in Chapter 15.
Whereas Button widgets are nearly useless without callbacks, Checkbutton and Radiobutton widgets are designed to change the value of variables. Often, no immediate action is necessary: when a Checkbutton or Radiobutton is toggled, the value of a variable is changed, and then the widget simply waits until the user tells it to do something about it. However, sometimes we do want immediate results, as in the previous Radiobutton example.
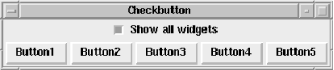
One thing a Checkbutton might do immediately when clicked is alter the appearance of the window. The Checkbutton might look something like the one in Figure 4-13.
When the user clicks the Checkbutton to turn it on, the window changes to look like Figure 4-14.
Here’s the code that makes the magic happen:
#!/usr/bin/perl -w
use Tk;
$mw = MainWindow->new;
$mw->title("Checkbutton");

## Create other widgets, but don't pack them yet!
for ($i = 1; $i <= 5; $i++) {
  push (@buttons, $mw->Button(-text => "Button$i"));
}

$mw->Checkbutton(-text => "Show all widgets",
                 -variable => \$cb_value,
                 -command => sub {
                   if ($cb_value) {
                     foreach (@buttons) {
                       $_->pack(-side => 'left');
                     }
                   } else {
                     foreach (@buttons) {
                       $->packForget;
                     }
                   }
                  })->pack(-side => 'top');
MainLoop;
To display some widgets later in the program, we create them ahead of
time and store references to them in the @buttons
array. (Observant readers will notice that the Buttons in this
example are rigged just for show and don’t even have
-command options associated with them. Normally,
each would have a specific task to perform when pressed.)
Then we create our Checkbutton. When the Button is clicked
(regardless of the status of its indicator), it will call the
subroutine pointed to by -command. Our subroutine
looks at the current value of $cb_value, shows the
Buttons if it is on, and hides them if it is off. The value in
$cb_value is changed before this subroutine is
called. When our Checkbutton is clicked again, the extra Buttons will
be removed from the window and the window will shrink back to its
previous size.
This setup is great when you want to keep a basic window uncluttered while maintaining the ability to show more widgets (if the user can handle the advanced functions of the extra widgets). For example, you can create a Find window that has a place to enter text, a Button to start the find, and an Advanced Search Checkbutton. Clicking on Advanced Search would add more widgets to the bottom of the window, allowing you to match case, use regular expressions, and use other fancy search mechanisms.
[2] Mouse button 1 is the leftmost mouse button, mouse button 2 is the middle mouse button, and mouse button 3 is the rightmost mouse button. On a 2-button mouse, mouse button 2 is often simulated by pressing buttons 1 and 3 simultaneously.
Get Mastering Perl/Tk now with the O’Reilly learning platform.
O’Reilly members experience books, live events, courses curated by job role, and more from O’Reilly and nearly 200 top publishers.

