People have been managing projects for centuries. The construction of the mountaintop city of Machu Picchu was a project—although no one’s really sure whether the ancient Inca had a word for “project manager.” In fact, you may not have realized you were a project manager when you were assigned your first project to manage. Sure, you’re organized and you can make sure people get things done, but successfully managing a project requires specific skills and know-how. Whether you’re building a shining city on a hill or aiming for something more mundane, Microsoft Project helps you document project tasks, build a schedule, assign resources, track progress, and make changes until your project is complete.
Perhaps you’re staring at the screen, wondering about the meaning of the Gantt Chart and Resource Usage in the list of Project views. Or maybe you already have dozens of Project schedules under your belt. Either way, some Project features can be mystifying. You know what you want to do, but you can’t find the magic combination that makes Project do it.
This book addresses the double whammy of learning your way around project management and Microsoft Project at the same time. It provides an introduction to managing projects and shows you how to use Project to do so. For more experienced project managers, this book can help you take your Project prowess to a new level with tips, timesaving tricks, and mastery of features that never quite behaved the way you wanted.
Since its introduction, Project Server often gets most of Microsoft’s attention and cool new features. This time around, Project 2010 Standard and Professional have a bunch of new and improved features that could quickly grow on you. The big change, of course, is that Project now uses the Microsoft fluent interface (a.k.a. the ribbon). It takes some getting used to, but many commands that took a cartload of clicks in the past, like turning summary tasks on and off, are now at your mousing fingertip. But wait, there’s more. For example, manually scheduled tasks let you control when tasks occur, but you can use them to plan from the top down or fill in only the information you have available, as you’ll learn shortly. Here’s an overview of the new Project 2010 features and where to find them in this book:
The ribbon user interface. If you knew the old menu bar inside and out, you might approach the ribbon with some trepidation. It isn’t as intuitive as Microsoft would like you to believe, and some exploring is in order before it starts to make sense. But once it does, you’ll find that many commands you use frequently—turning the project summary task and summary tasks on and off; inserting summary tasks, subtasks, and milestones; showing critical tasks, late tasks, and baselines in a Gantt Chart; formatting task bars; filtering, grouping, and sorting; and much more—are within easy reach on the ribbon. With project management’s focus on tasks and resources, Project’s ribbon tabs are even easier to learn than their Office counterparts. Instructions for using the ribbon, tabs, and commands start on Getting Around Project and also are scattered throughout this book wherever their corresponding features are discussed. To learn how to customize the ribbon, see Setting Up an Outline Code Lookup Table.
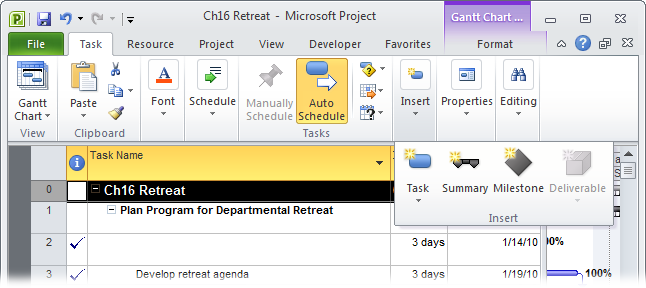
Working with summary and subtasks. The Insert Summary command (Moving Tasks) creates a new summary command with one subtask below it, ready for you to type its task name. You can also select several subtasks and use the Insert Summary command to make them all subtasks of the new summary task.
Easier formatting. When you right-click a selection—such as a single cell, a row, or several cells—a mini-toolbar (Changing Selected Text) appears with formatting commands for the font, font color, background color, bold, italic, and more. The mini-toolbar also has other frequently used commands related to what you right-click. For example, if you right-click a task, the toolbar includes buttons for setting the percent complete on the task. The Gantt Chart style gallery on the Format tab lets you choose colors for your task bars.
Note
You can now copy and paste between Project and other programs without losing formatting (Copying Information). For example, if you paste an indented task list from Word or an email message into Project, the program can keep the formatting from the original document and automatically use the indenting to create tasks at the appropriate outline level.
Timesaving features. Dragging the Zoom slider on the status bar to the left or right adjusts the timescale in a view. The status bar also has icons for displaying the most common views, like the Gantt Chart, Task Usage, Team Planner, and Resource Sheet. Project makes it easier to find your place in a table by highlighting the row ID and column heading for the selected cell, like Excel has always done.
Wrapping long names. The Task Name column automatically wraps text to show the full task name in the current width of the column. You can edit any column’s settings to wrap its contents (Changing Table Contents).
Fast and easy column changes. To insert a column, right-click the table heading and choose Insert Column (Changing Table Contents). Then, in the drop-down list that appears, choose the field you want to add. Alternatively, you can add a column by clicking the Add New Column heading on the far right of a table. If you begin to type values in Add New Column cells, Project interprets what you’ve typed to choose the correct type of custom field (Changing Table Contents). Edit a column by right-clicking its column heading and then choosing Field Settings. Or edit a custom field from within the table by right-clicking the custom field column heading and then, on the shortcut menu, choosing Custom Fields.
Faster filtering, grouping, and sorting. AutoFilter is automatically turned on, so you can filter a table by clicking the down arrow in any column. A drop-down menu appears with choices for sorting, grouping, or filtering by values in the column (Quick and Dirty Filtering with AutoFilter).
Saving views and tables. When a view is just the way you want it, you can save the view and its components by clicking a view button on the View tab and then choosing Save View (Modifying a combination view). A new option tells Project to either automatically copy your customizations to the global template or to keep them in your local file unless you specifically copy them using the Organizer (Sharing Custom Elements).
User-controlled scheduling. In Project 2010, the Manually Scheduled mode puts you in total control over when a task is scheduled. You can still set date constraints as you could in earlier versions, but date constraints apply to either the start date or the finish date, not both. With a manually scheduled task, you can pin the start or finish date, or both, to the calendar dates you want (Planning with Manually Scheduled Tasks), which is perfect for plunking a training class onto the specific days it occurs. The scheduling that you know and love from earlier versions of Project is now called Auto Scheduled mode.
Filling in placeholder information. Early in planning, you might be missing some task information. For example, you might know that a task must start on June 6, but you don’t know how long it will take. Perhaps the only thing you know is that Becky in engineering is the one who will give you the duration and dependencies for a task. Now you can create a manually scheduled task and fill in what you know (Creating Tasks with Incomplete Information). Leave cells like Start, Finish, and Duration blank, or type in placeholder text like See Becky in Engr. When you get the full story about a task, you can fill in the information and change it to an auto-scheduled task if you want.
Top-down planning. With Manually Scheduled mode, you can create summary tasks and specify the duration you’ve been given by management—for example, 12 weeks for design, 18 weeks for development, and 6 weeks for testing. As you create subtasks under summary tasks, Project can keep track of the duration you specified for the summary task and tell you whether the total duration of the subtasks fits within the summary task duration or runs past the allotted time (Planning from the Top Down).
Viewing the project timeline. The Timeline view is aptly named. It starts out showing the date range for your project as a simple horizontal bar—the timeline. You can use the timeline to pan and zoom around the dates in a view timescale—for example, in a Gantt Chart. Drag the current date range (Customizing the Timeline) to move forward or backward in time or drag an end of the timeline bar to change the start or end date you see. You can also add tasks to the timeline to see or communicate a high-level view of your project. Display tasks in the timeline as bars to keep your attention on key tasks. Adding tasks to the timeline as callouts is perfect for showing summary tasks like phases. You can paste the timeline into an email message or a presentation to share with others.
Work with resource assignments with Team Planner. Project 2010 Professional includes the Team Planner view (Quickly Assigning Resources with Team Planner), which uses swimlanes to show tasks assigned to resources. It’s easy to spot unassigned or unscheduled tasks. The unassigned swimlane stockpiles all the tasks you haven’t assigned yet, whether they’re scheduled or not. Unscheduled tasks sit in the Unscheduled Tasks column of the view, ready for you to drag onto the timescale. Assigning, scheduling, and reassigning tasks is as easy as dragging task assignments to the dates and/or resources you want. Team Planner helps you spot unassigned tasks or overallocated resources. You can drag a task to a resource who doesn’t have anything to do or move a task in the timeline to even out workloads. The view even has a setting to automatically prevent overallocations.
Leveling overallocations. The ribbon’s Resource tab puts leveling commands within easy reach. In addition, you can choose to level selected tasks or resources, a specific resource, or an entire project.
Synching Project tasks with a SharePoint task list. With Project 2010 Professional, you can share simple projects with team members through SharePoint 2010 (Sharing Projects with SharePoint) without using Project Server. Whether you create a task list in SharePoint or in Project, you can synchronize the two. Team members can update task status in SharePoint, which you then see in Project. Or you can make changes in Project that automatically pass back to SharePoint for your team.
View scheduling issues and fix them. Project indicates potential scheduling problems by underlining task values with red squiggles, similar to the ones you see for misspellings in Word. Right-clicking a cell with a red squiggle displays a shortcut menu of commands to help you fix the issue, such as rescheduling the task or simply ignoring it. In addition, you can open the task inspector (Task Inspector: Help with Schedule Problems), a beefier version of task drivers from Project 2007. The Task Inspector pane shows the factors that influence a task schedule, such as a predecessor, calendar, date constraint, resource assignments, overallocations, or all of the above. The Project 2010 Task Inspector pane also offers commands for fixing issues. Then it’s up to you to decide which one to change and how.
Playing what-if games. In Project 2007, multilevel Undo provided an easy way to try small experiments or to recover from a mistake you didn’t see until six changes later. New in Project 2010, inactivating tasks takes what-if games to a higher level and longer time period for decisions. Add tasks to your Project schedule to document alternatives for a portion of your project and evaluate each one’s results. Or create tasks for proposed change requests. Then you can inactivate those tasks. You can still see them and edit their values, but they don’t affect your project schedule or the availability of the resources assigned to them. Once you’ve chosen the alternative you want—or the change review board approves the change request—you can reactivate the tasks, retaining all the information you entered.
Note
Although this book is about the desktop versions of Project 2010, Project Server 2010 now combines both enterprise project management and portfolio management in the same product. In the past, you needed Project Server 2007 and Project Portfolio Server 2007 to accomplish the same capabilities. The enterprise side has lots of new and improved features in areas like time status and reporting, customizable workflows, and resource capacity planning.
Any project manager who’s calculated task start and finish dates by hand knows how helpful Project is. Simply calculating dates, costs, and total assigned work eliminates a mountain of grunt work and carpal tunnel syndrome, so you’ll have time and stamina left over to actually manage your projects.
In the planning stage, Project helps you develop a project schedule. You add the tasks and people to a Project file, link the tasks together in sequence, assign workers and other resources to those tasks, and poof!—you have a schedule. Project calculates when tasks start and finish, how much they cost, and how many hours each person works each day. Project helps you develop better project plans, because you can revise the schedule quickly to try other strategies until the plan really works. Views and reports help you spot problems, like too many tasks assigned to the same overworked person.
Once a project is under way, you can add actual hours and costs to the Project file. With actual values, you can use Project to track progress to see how dates, cost, and work compare to the project plan. If problems arise, like tasks running late or over budget, you can use Project tools, views, and reports to look for solutions, once again quickly making changes until you find a way to get the project back on track.
At the same time, plenty of project management work goes on outside Project. Touchy-feely tasks like identifying project objectives, negotiating with vendors, or building stakeholder buy-in are pure people skill (although Project’s reports can certainly help you communicate with these folks). Projects produce a lot of documents besides the project schedule. For example, a project plan may include financial analysis spreadsheets, requirements and specifications documents, change requests databases, and diagrams to show how the change management process works. In addition, thousands of email messages, memos, and other correspondence could change hands before a project finishes.
Communication, change management, and risk management are essential to successful project management, but they don’t occur in Project Standard or Professional. For example, you may have a risk management plan that identifies the risks your project faces, and what you plan to do if they occur. You may also develop a spreadsheet to track those risks and your response if they become reality. In Project, you may link the risk tracking spreadsheet or risk response document to the corresponding tasks, but that’s about it.
In one respect, choosing between Project Standard and Project Professional is easy. Both editions of Project have about the same capabilities if you manage projects independently and aren’t trying to work closely with other project managers, teams, and projects.
Project Standard works for most one-person shows, even if you manage several projects at the same time. You can communicate with your team via email and share documents on a network drive, or using a SharePoint website (Updating the Tasks list). However, Project Professional adds the Team Planner and the ability to inactivate tasks and synchronize Project tasks to a task list in SharePoint 2010.
However, if you manage project teams with hundreds of resources, share a pool of resources with other project managers, or manage your project as one of many in your organization’s project portfolio, then you’ll need Project Professional, along with Project Server and Project Web App. The difference between Project Standard and Project Professional is that you can turn on the enterprise features in Project Professional and connect it to Project Server and Project Web App to collaborate, communicate, and share across hundreds of projects and people.
Setting up an enterprise-wide project management system takes some planning and effort, depending on the size and complexity of your organization. Whether your company is small, medium, or large, you must weigh the benefits of managing projects company-wide against the effort and expense of defining project management policies, setting up the system, and bringing everyone up to speed. Here are some of the advantages that Project Professional and the enterprise project management software offer:
Track all projects in one place. You build Project schedules with Project Professional. When a project is ready for prime time, you publish it to Project Server to add it to the overall project portfolio. Then the status for all projects appears in a single view.
Share resources enterprise-wide. Instead of playing phone tag with other project managers about when resources are available, Project Server keeps track of all resources and when they work on which project. You can look for the right kind of resources using multilevel resource skill characteristics, and then see who’s available for your projects.
Communicate with resources. Project Web App makes it easy for you to communicate with your team, requesting status, sending messages, and so on. It also makes it easy for your team to communicate with you, replying with status, accepting assignments, or providing time worked.
Timesheets. Team members can fill out timesheets for project work. The time they submit shoots straight into the Project Server database to update progress on your projects.
Track issues, risks, and documents. Projects are more than schedules. Issues crop up that must be resolved; risks lurk that you must watch and manage; and there’s no end to the additional documents produced, like specifications, plans, work packages, and so on. Using SharePoint websites and Project Web App, team members can collaborate on all these elements online.
Managing a project requires other programs in addition to Project. Word and Excel are eager participants for the documents and financial analysis you produce. PowerPoint is ideal for project presentations and status meetings. And Outlook keeps project communication flowing. This book includes instructions for using these programs in some of your project management duties.
Office 2010 Home and Business includes Word, Excel, PowerPoint, OneNote, and Outlook. The list price is $279, although lower prices are readily available. You can purchase Office at stores like Staples or websites like www.bestbuy.com. Office 2010 Professional adds Office Web Apps, Publisher, and Access to the Office Standard suite for a total list price of $499. Here are some of the ways you might use these products in project management:
Word. Producing documents like the overall project plan, work package descriptions, requirements, specifications, status reports, and so on.
Excel. Creating spreadsheets for financial analysis or tracking change requests, risks, issues, and defects reported.
PowerPoint. Putting together presentations for project proposals, project kickoff, status, change control board meetings, and so on.
Outlook. Emailing everyone who’s anyone on the project team and setting up a shared address book for everyone to use.
Publisher. Publishing newsletters, fliers, invitations to meetings, and so on.
Access. A more robust alternative to Excel for tracking change requests, requirements, risks, and issues.
Visio 2010 Professional is another program that comes in handy, whether you want to document project processes in flowcharts or generate Visio-based visual reports. Visio Professional’s list price (which is required for PivotDiagrams and Data Graphics) is $559.95.
Project 2010 has caught up with its Office counterparts by now using the ribbon instead of the menu bar. If you haven’t met the ribbon yet, this section provides a brief introduction. The Project window is chockablock with panes and other parts that either show the information you want or help you work faster. Some features, like the ribbon and the main Project view, are always available, while others, like the Task Inspector pane, can hide until you need them. This section shows you the basics of the Project interface. Chapter 3 takes you on a full tour of the Project ribbon and all the components within the Project window.
To provide easy access to an ever-increasing number of commands, Microsoft came up with the ribbon. Programs like Word and Excel had the ribbon in Office 2007. Now Project 2010 joins their ranks. The ribbon takes up more space than the old-style menu bar (see Using the Ribbon to learn how to hide it), but it can hold oodles of commands. Many procedures that required dozens of clicks in earlier versions of Project (like displaying the project summary task) are now a click or two away on a ribbon tab.
The ribbon groups features onto logically (most of the time) organized tabs. Finding your way around the Project ribbon is easy. For instance, to create tasks, rearrange their outline levels, update their progress, or view their details, go to the Task tab. The Resource tab has commands for creating, assigning, and leveling resources. The Project tab is home base for viewing project information, defining work calendars, setting project baselines, and so on. Project opens initially with six tabs: File, Task, Resource, Project, View, and Format. When you select one of these tabs, the corresponding collection of buttons appears, as shown in Figure 1.
Tip
Chapter 25 explains how you can customize the ribbon to add tabs, sections (called custom groups), and commands.
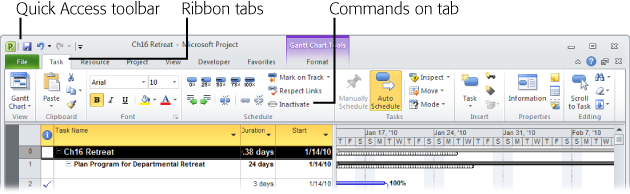
Figure 1. When you launch Project, the program goes to the File tab. However, each tab has sections that group related commands. For example, on the Task tab, the Schedule section has commands for working with your schedule, like changing outline levels, linking tasks, and updating progress.
ScreenTips provide a lot more guidance in Project 2010. For example, when you hover over a button on the ribbon, a ScreenTip appears with a description of the command and a keyboard shortcut for triggering the command. If your mouse has a scroll wheel, you can move through the tabs faster than grain through a goose by positioning the pointer over the ribbon and rolling the wheel.
Tip
If the ribbon takes up too much screen for your taste, you can collapse it to a trimmer shape much like the old menu bar by double-clicking any tab. To use features on a tab, click the tab name, and the tab appears. When you choose a command, the tab disappears.
The ribbon contorts itself to fit as you resize the Project window (see Figure 2). If you narrow your window, the ribbon makes some buttons smaller by shrinking icons or leaving out the icon text. If you narrow the window dramatically, an entire section may be replaced by a single button. However, when you click the button, a drop-down panel displays all the hidden commands.
Tip
If you prefer to keep your fingers on the keyboard, you can trigger ribbon commands without the mouse. To unlock these nifty shortcuts, press the Alt key. Letters appear below each tab on the ribbon. Press a key to pick a tab, which then displays letters under every button on the tab. Continue pressing the corresponding keys until you trigger the command you want. For example, to insert a task with the Insert Task command, press Alt. Press H to open the Task tab. You see the letters “TA” below the Task button in the Insert section. Press T followed by A to display the drop-down menu. To insert a task, press T again. See How to Use Keyboard Shortcuts to get the full scoop on keyboard accelerators.
The Quick Access toolbar is so small that you might not notice it above the File and Task tabs (see Figure 1). It looks like one of the toolbars from earlier versions of Project. Out of the box, it has icons for Save, Undo, and Redo, because people use them so often. But you can customize the Quick Access toolbar with your top commands. (Chapter 25 tells you how.)
Managing projects means looking at project information in many different ways, which explains all the built-in views Project provides out of the box. Even so, you’ll find that you create quite a few views of your own. As you’ll learn in Chapter 23, views come in single-pane and combination variations. The combination view has a top pane and bottom pane (called the Details pane) like the one shown in Figure 3 which has the Tracking Gantt view (a single-pane view) on top and the Task Form (another single-pane view) on the bottom.
In addition to the top and bottom view panes, some views have two pane-like parts of their own that appear side by side. For views like the Gantt Chart and Task Usage views, the left side of the view is a table with columns of Project fields and rows for tasks, resources, or assignments. You can add or edit values directly in the table or use it simply for reviewing. The timescale and time-phased data on the right side show data apportioned over time. In a Gantt Chart view, taskbars show when tasks begin and end. The Task Usage view uses a time-phased table instead, in which the columns represent time periods, and rows are tasks and assignments.
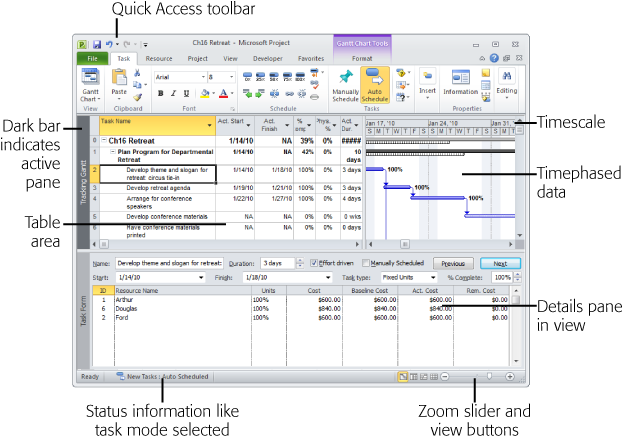
Figure 3. The Project window has convenient shortcuts tucked away in every corner of the window and most places in between. The Quick Access toolbar is a handy place for your top-favorite commands. The Status Bar shows information about your project, like the task mode (page 116) you’ve selected. On the right side of the Status Bar, you can click icons for popular Project views or drag the Zoom Slider to change the timescale in the current view.
Note
The actions you can perform depend on which view pane is active. If you select a new view, then Project replaces the active pane. Project identifies the active pane by darkening the narrow vertical bar to the left of the pane and lightening the vertical bar in the other pane.
Just to keep life interesting, Project also has task panes (no relation to view panes) for different Project-related activities. For example, when you choose Task→Tasks→Inspect, the Task Inspector pane appears to the left of your views (see Task Inspector: Help with Schedule Problems).
ScreenTips and Smart Tags are two other Project features that make temporary appearances. Project’s ScreenTips blossom into view when you position the mouse pointer over an item with a ScreenTip, like the icons in the Indicators column in a table. The ScreenTip for a date constraint icon tells you the type of constraint and the date. A Task Note icon displays a ScreenTip with part of the task note. To learn about the purpose of a Project field or how it’s calculated, position the cursor over a column header in a view and read the ScreenTip that appears.
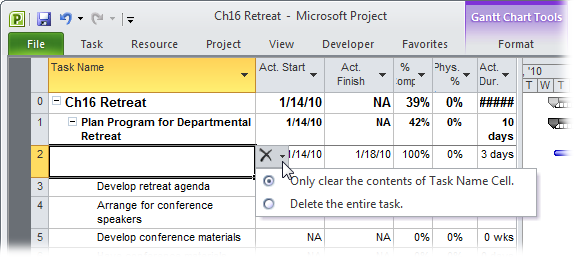
Smart Tags, on the other hand, appear when you perform certain Project actions that are renowned for their ability to confuse beginners. For example, if you select the Task Name cell in a table and then press Delete, then Project asks if you want to delete just the task name or the entire task, as illustrated in Figure 4.
Over the years and versions, Project has collected improvements the way sailboat keels attract barnacles. To use Project successfully, you need to understand something about project management, but that’s an exercise Microsoft leaves to its customers. The program’s Help feature is at least organized around the activities that project managers perform, but Help stills focuses on what Project does rather than what you’re trying to do.
Project Help is optimistically named, because it typically lacks troubleshooting tips or meaningful examples. In some cases, the topic you want simply isn’t there. Help rarely tells you what you really need to know, like when and why to use a certain feature. And highlighting key points, jotting notes in the margins, or reading about Project after your laptop’s battery is dead are all out of the question.
The purpose of this book, then, is to serve as the manual that should have come with Project 2010. It focuses on managing projects with Project Standard or Project Professional, with the aid of a few other Microsoft programs like Word and Excel. The book points out some of the power tools that come with Microsoft’s enterprise project management software, but it doesn’t explain how to set up or use Project Server and Project Web App. (To learn how to work with Project Server, check out Microsoft Office Project 2010 Inside Out by Teresa Stover [Microsoft Press] and Ultimate Learning Guide to Microsoft Office Project 2010 by Dale Howard and Gary Chefetz [EPM Learning]).
Note
Although each version of Project adds new features and enhancements, you can still use this book if you’re managing projects with earlier versions of Project. Of course, the older your version of the program, the more discrepancies you’ll run across.
In this book’s pages, you’ll find step-by-step instructions for using Project Standard and Professional features (minus the ones that require Project Server), including those you might not have quite understood, let alone mastered: choosing the right type of task dependency, assigning overtime, leveling resources, producing reports, and so on. This book helps you be productive by explaining which features are useful and when to use them.
From time to time, this book also includes instructions for using other programs, like Word and Excel, in your project management duties. Because several of these programs got a radical new look in Office 2007, you’ll find instructions for both the current and pre-ribbon versions of Word, Excel, and so on.
Although this book is primarily a guide to Project 2010, it comes with a healthy dose of project management guidance. The chapters walk you through managing a project from start to finish: getting a project off the ground (initiating), planning, doing the project work (executing), keeping the project on track (controlling), and tying up loose ends (closing). You’ll find practical advice about what project managers do and how those activities help make projects a success.
Microsoft Project 2010: The Missing Manual is designed to accommodate readers at every level of technical and project management expertise. The primary discussions are written for advanced-beginner or intermediate Project users. First-time Project users can look for special boxes with the label “Up To Speed” to get introductory information on the topic at hand. On the other hand, advanced users should watch for similar shaded boxes called “Power Users’ Clinic.” These boxes offer more technical tips, tricks, and shortcuts for the experienced Project fan. Boxes called “Tools of the Trade” provide more background on project management tools and techniques (Gantt Charts, for example). And, if you’ve ever wondered how to extract yourself from a gnarly project management situation, look for boxes called “Reality Check” for techniques you can try when project management textbooks fail you.
Microsoft Project 2010: The Missing Manual is divided into six parts, each containing several chapters:
Part One: Project Management: The Missing Manual is like a mini-manual on project management. It explains what projects are, and why managing them is such a good idea. These chapters explain how to pick the right projects to perform, obtain support for them, and start them off on the right foot. You also get a whirlwind tour of planning a project, which Part Two tackles in detail.
Part Two: Project Planning: More Than Creating a Schedule starts with a quick test drive of Project 2010 to whet your appetite. These chapters then take you through each aspect of planning a project, including breaking work down into manageable pieces, estimating work and duration, building a schedule, assembling a team, assigning resources to tasks, and setting up a budget. The remaining chapters explain how to refine your plan until everyone (mostly) is happy with it, and then how to prepare it for the execution phase of the project.
Part Three: Projects in Action takes you from an approved project plan to the end of a project. These chapters explain how to track progress once work gets under way, evaluate that progress, correct course, and manage changes. Other chapters explain how to use Project’s reports and complete important steps at the end of a project.
Part Four: Project Power Tools helps you get the most out of Project. These chapters talk about how to work on more than one project at a time and how to share data with programs and colleagues.
Part Five: Customizing Project explains how to customize every aspect of Project to fit your needs—even the ribbon. After all, every organization is unique, and so is every project. Other chapters show you how to save time by reusing Project elements (in templates) and boost productivity by recording macros.
Part Six: Appendixes. At the end of the book, three appendixes provide a guide to installing and upgrading Project, a reference to help resources for Project, and a quick review of the most helpful keyboard shortcuts.
To use this book—and Project—you need to know a few computer basics. Like other Microsoft programs, Project responds to several types of clicking mouse buttons, choosing commands from menus, and pressing combinations of keys for keyboard shortcuts. Here’s a quick overview of a few terms and concepts this book uses:
Clicking. This book gives you three kinds of instructions that require you to use your computer’s mouse or track pad. To click means to point the arrow pointer at something on the screen, and then—without moving the pointer at all—press and release the left button on the mouse (or laptop trackpad). To right-click means the same thing, but using the right mouse button. To double-click means to click the left mouse button twice in rapid succession, again without moving the pointer at all. And to drag means to move the pointer while holding down the left button the entire time.
When you’re told to Shift-click something, you click while pressing the Shift key. Related procedures, such as Ctrl-clicking, work the same way—just click while pressing the corresponding key.
Keyboard shortcuts. Nothing is faster than keeping your fingers on your keyboard—entering data, choosing names, and triggering commands, all without losing time by reaching for the mouse. That’s why many experienced Project fans prefer to trigger commands by pressing combinations of keys on the keyboard. For example, in most word processors, pressing Ctrl+B produces a boldface word. When you read an instruction like “Press Ctrl+C to copy the selection to the Clipboard,” start by pressing the Ctrl key; while it’s down, type the letter C, and then release both keys.
Throughout this book, and throughout the Missing Manual series, you’ll find sentences like this one: “Choose Task→Editing→Scroll to Task.” That’s shorthand for selecting the Task tab on the ribbon, navigating to the Editing section, and then clicking Scroll to Task. Figure 5 shows what this looks like.

Figure 5. Instead of filling pages with long and hard-to-follow instructions for navigating through nested menus and nested folders, the arrow notations are concise, but just as informative. For example, here’s how you execute the “Scroll to Task” command.
If you see an instruction that includes arrows but starts with the word File, it’s telling you to go to Project’s Backstage view. For example, the sentence “Choose File→New” means to select the File tab to switch to Backstage view, then click the New command (which appears in the narrow list on the left).
Similarly, this arrow shorthand also simplifies the instructions for opening nested folders, such as Program Files→Microsoft Office→Office14→1033.
At www.missingmanuals.com, you’ll find news, articles, and updates to the books in this series.
But the website also offers corrections and updates to this book (to see them, click the book’s title, and then click Errata). In fact, you’re invited and encouraged to submit such corrections and updates yourself. In an effort to keep the book as up-to-date and accurate as possible, each time we print more copies of this book, we’ll make any confirmed corrections you suggest. We’ll also note such changes on the website so that you can mark important corrections into your own copy of the book, if you like.
In the meantime, we’d love to hear your suggestions for new books in the Missing Manual line. There’s a place for that on the website, too, as well as a place to sign up for free email notification of new titles in the series.
This book helps you use Project. As you read through it, you’ll find references to files that you can use to help you manage your projects and websites that offer additional resources. Each reference includes the site’s URL, but you can save yourself some typing by going to this book’s Missing CD page—it gives you clickable links to all the sites mentioned here. To get to the Missing CD page, go to the Missing Manuals home page (www.missingmanuals.com), click the Missing CD link, scroll down to Microsoft Project 2010: The Missing Manual, and then click the link labeled “Missing CD.”
Safari® Books Online is an on-demand digital library that lets you easily search over 7,500 technology and creative reference books and videos to find the answers you need quickly.
With a subscription, you can read any page and watch any video from our library online. Read books on your cellphone and mobile devices. Access new titles before they’re available for print, and get exclusive access to manuscripts in development and post feedback for the authors. Copy and paste code samples, organize your favorites, download chapters, bookmark key sections, create notes, print out pages, and benefit from tons of other timesaving features.
O’Reilly Media has uploaded this book to the Safari Books Online service. To have full digital access to this book and others on similar topics from O’Reilly and other publishers, sign up for free at http://my.safaribooksonline.com.
Note
This Missing Manual includes all the Microsoft Project information you need to pass the Microsoft Project MCTS Exam, including the upcoming exam for Project 2010. An exam study guide will be available in ebook format (for a small additional cost) after Microsoft releases the Project 2010 certification exam. The guide will outline the exam objectives, reference the relevant content in this book, provide test-taking tips, and cover important best practices for using Project to manage projects. After the Project 2010 certification exam is released, check the Missing Manuals website for more information about the guide (missingmanuals.com).
Get Microsoft Project 2010: The Missing Manual now with the O’Reilly learning platform.
O’Reilly members experience books, live events, courses curated by job role, and more from O’Reilly and nearly 200 top publishers.

