Chapter 1. Introduction
Minecraft is a 3D game that involves breaking and placing blocks to obtain materials. These materials can then be used to build or craft new items and tools. These, in turn, can be used to harvest more types of blocks. The game also contains entities, which are dynamic moving objects in Minecraft (e.g., cows, pigs, and horses). Entities that are hostile are called monsters (e.g., zombies and creepers). Bosses are monsters that are very hard to defeat. Appendix A provides more details on how to get started with the game of Minecraft.
Playing the game itself is a lot of fun, but the game is even more interesting and engaging because it allows modifications (commonly referred to as mods in the gaming community). These modifications can change certain aspects of how the game was originally written (e.g., changing the size of a TNT explosion). In addition, they can add content to the game to alter gameplay (e.g., new blocks, items, and smelting recipes).
An individual player uses a client, analogous to a program downloaded on your machine. The client by itself is not of much use, though. It connects to a server, which is similar to a program running on your machine or a different machine on the Internet. This is called singleplayer mode. Minecraft also allows multiple players to join a server. This is called multiplayer mode. It’s unusual to run a server on your own machine. However, this book will explain how to make mods and run them on your Minecraft client and a server running on your machine.
It is very common to play Minecraft with multiple mods, and there are many kinds of mods that can be made to make Minecraft a more interesting game. The ability to write these mods gives a player complete control over the game. There is no official way to create mods, but there are several third-party vendors that provide that ability; Minecraft Forge is one of these ways.
Downloading and Installing Tools
In order to create mods, we need to use the following tools:
-
Java Development Kit
-
Minecraft Forge
-
Eclipse
Let’s learn about these tools and review how to download and install them.
Note
You can also follow along with a video of the installation instructions on YouTube.
Java
Markus “Notch” Persson (@notch on Twitter) wrote the game of Minecraft using the Java programming language. Java is one of the most popular programming languages. Game developers like Notch write computer programs as text files following the rules defined by Java. Image files end with different extensions like .png, .gif, or .jpg. Movie files end with extensions like .mov, .mp4, or .ogg. Similarly, Java programs are text files ending with the .java extension. These text files are called Java source files.
Java programs are written as text, but computers understand the binary language of 0s and 1s. To translate the text into something computers can understand, the files must be compiled, which is a task done in several steps in Java. The Java Development Kit (JDK) is a free toolkit bundled with Java; it is like a Swiss Army knife for Java that provides a variety of tools. The most common tools include the following:
javac-
The Java compiler takes the .java source file, checks if the class is following the syntax correctly, and converts it into a binary .class file. If there are syntax errors, those errors are reported by the tool and the .class file is not generated. This process of conversion from source file to binary file in Java terminology is called compilation.
java-
The Java virtual machine (JVM) reads a .class file and interprets it as binary instructions for the computer. This process of reading a binary file and running on the JVM is called interpretation.
jar-
Used to create or extract a named archive by bundling multiple .class files and other files such as images and configuration files. The named archive ends with a .jar extension.
These tools are simple to use, and most of the time you don’t even realize that they are used in the background to do all the work for you. We’ll look at this a little bit later in this chapter.
For Minecraft modding, we’ll write Java source files. These files are then converted into binary .class files and bundled into JAR files using the tools provided by the JDK. Before you can run Minecraft, and later build mods, you need to install the JDK.
To get started with the JDK, go to its download page at Oracle and install it on your computer by following the instructions.
If you are not sure whether the JDK is already installed on your machine, follow the installation instructions on the website. If the JDK is already installed on your computer, reinstalling it will simply update to the latest version, which is the recommended version for this book.
Minecraft Forge
Minecraft Forge is a tool that helps you build mods. Forge is currently the most popular way to modify the game. Other mod-building tools, such as Bukkit or ModLoader, have either shut down or become obsolete.
To get started with Forge, go to the Minecraft Forge downloads page. As shown in Figure 1-1, you will need to select the version of Minecraft to download.

Figure 1-1. Choosing Forge version
From the drop-down menu, select 1.8. The page should now look like the one shown in Figure 1-2.
Note
The latest version of Forge at the time of writing this book is 1.8. This version might change by the time this book is published or you are reading this book. So select the appropriate version accordingly. The mods in this book have been made for Forge 1.8. If the mods in this book do not work with future versions of Forge, then we will update the book, as well as the source code on GitHub. Appendix C includes additional details on the GitHub source code.

Figure 1-2. Downloading Forge
The first entry in the list shown in Figure 1-2 is 1.8-Latest. In that row, click the link that says Src, which will lead you to an AdFly page. Wait for five seconds and then click Skip Ad in the upper-right corner to download the ZIP file. This file contains the source code of Forge and will be used for modding.
Note that nothing has been installed yet. In fact, it might be tempting to download the Installer. This file, however, is only used to install Forge libraries on your regular Minecraft launcher so that you can load, not make, mods through it. All you’ve done so far is downloaded a ZIP file that will be used to generate the source for Minecraft.
Eclipse
Eclipse is an integrated development environment (IDE). An IDE is a tool that can edit files, package and run those files, and help find and fix the errors within those files. There are many IDEs available for use, but this book will use Eclipse for creating our mods.
We will be using Eclipse mostly to make new files, edit them, and run the game to see if they work. Eclipse is a very important tool, because without it you cannot run the game to test it, even if you can edit the source files with another text editor.
To get started with Eclipse, go to the Eclipse downloads page. Figure 1-3 shows how the page looks on a Windows machine. The drop-down menu in the upper-right corner is set to Windows by default, but you can change it to match your operating system.

Figure 1-3. Downloading Eclipse
Click the appropriate link to download the correct version.
Note
The version of Eclipse at the time of writing this book is 4.4.1. This version might change by the time this book is published or you are reading this book. It would be fine to download the latest available version of Eclipse.
Installing Eclipse is straightforward: it simply involves unzipping the downloaded file. The Eclipse website provides detailed instructions on the installation process.
Setting Up Forge in Eclipse
We need to set up Forge in Eclipse before mods can be created. In order to do that, create a new directory on your Desktop and call it forge. On Windows, this can be created by pressing the Ctrl and Esc keys together, which brings up a textbox where you can type any command that needs to run. Type cmd and press the Enter key, which will open the Command Prompt in a separate window. On Mac, pressing the Command key and space bar together brings up Spotlight, which allows you to search for different commands on your Mac. Type terminal to open up a Terminal window.
The Windows Command Prompt and Mac’s Terminal are prebuilt tools that allow you to see all the directories on your operating system, issue commands to manipulate them, and do lots of other interesting things. For now, we’ll focus on navigating to the appropriate directory and creating a new one for Forge.
Type the following series of commands at the Command Prompt or Terminal to create the directory and navigate to it:
cd Desktop
mkdir forge
cd forge
Next, move the previously downloaded ZIP file to this newly created directory. If you use a Mac, double-click the file to extract it in this directory. If you use Windows, right-click the ZIP file, select Extract All, and select this directory to extract the contents. This should create a new forge/ directory. Change to that directory by using the cd forge command.
Use the dir command on a Windows computer or ls on a Mac computer to see the contents of the directory you are currently in. If you don’t see something similar to Figure 1-4, then move on to the next folder and try using dir or ls there, and see if it matches Figure 1-4.
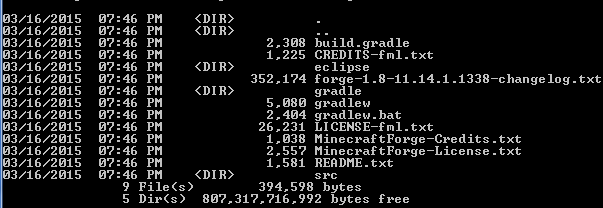
Figure 1-4. Forge folder in Command Prompt
Don’t worry about all the files that are shown here (we’ll explain these in more depth later). Once you see the correct output, run the command shown in Example 1-1 to set up Forge.
Example 1-1. Setting up a Forge workspace
gradlew setupDecompWorkspace eclipse
On Mac, you may have to give the command as ./gradlew instead of just gradlew.
The command shown in Example 1-1 will download the required files on your computer and prepare the directory for modding. This may take anywhere from 5 to 30 minutes, depending on the speed of your computer and Internet connection. If everything goes well, the following output will be shown:
BUILD SUCCESSFUL
In most cases, you should see this output. However, if you do not see this message, the command did not succeed. This could happen for several reasons. First, there might be errors in preparing the directory for modding. If that happens, you should wait a few minutes and try the command again. Another option is to consult the instructions on the Minecraft Forge website. The instructions there may not be up to date; they were for 1.6.4 when this book was written. However, the installation for 1.6.4 is the same as the installation for 1.8, so don’t worry about the version.
Another occasion when the command may fail is when you receive the following error:
Execution failed for task ':deobfuscateJar'.

> Java heap space
This can be fixed by editing gradlew.bat on Windows or gradlew on Mac. On Windows, you can use Notepad to edit the file. This can be started by typing notepad on the Command Prompt and pressing the Enter key. Open the file by navigating to File→Open… and selecting the gradlew.bat file from the correct directory.
On Mac, you can use TextEdit to edit the file. This can be started by going to Applications and clicking TextEdit. Open the file by navigating to File→Open… and selecting the gradlew file from the correct directory.
In either case, change DEFAULT_JVM_OPTS="" to DEFAULT_JVM_OPTS="-Xmx1024m". Once you’ve done that, save the file and quit the text editor. Rerun the command after making this change.
If that doesn’t work, you can check out the Minecraft Forge forum. You can search existing threads for the information you need, and if nothing turns up, you can post a question of your own.
After the setup is done, open Eclipse by locating the directory where it was installed and double-clicking eclipse.exe on Windows or eclipse on Mac. Eclipse is a tool that can do general Java editing, and by default, it has no idea that you want to make Minecraft mods. You will have to tell it that you want to, as well as the location of Forge code and where the mods should be stored. All of this information is stored in a Project and created for you as part of the command run in Example 1-1.
The project details are stored in a workspace, which is basically a directory in which all your project details are stored so you can work with it easily. A workspace can have multiple such projects. After opening Eclipse, you should see a box similar to the one in Figure 1-5.
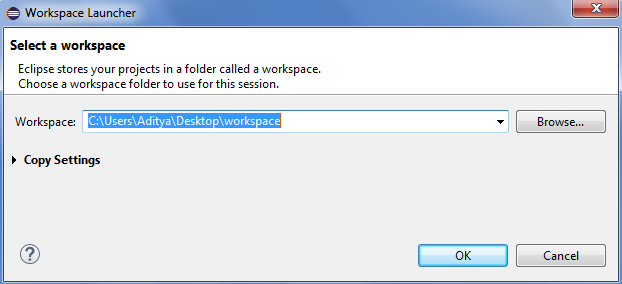
Figure 1-5. Choosing the workspace
Click Browse… to choose the workspace and navigate to the unzipped forge/ folder. In that folder, there should be another folder called eclipse/. Click that folder once to select it, then click Open. Click OK to finalize your choice.
Important
Make sure to choose the eclipse/ folder; otherwise, you will not be able to access your project.
If you accidentally clicked OK without choosing the correct workspace location, then quit the Eclipse window and start it again. It will prompt you for the workspace again.
After selecting the correct workspace location in Eclipse, your project will open up, and it should look as shown in Figure 1-6.
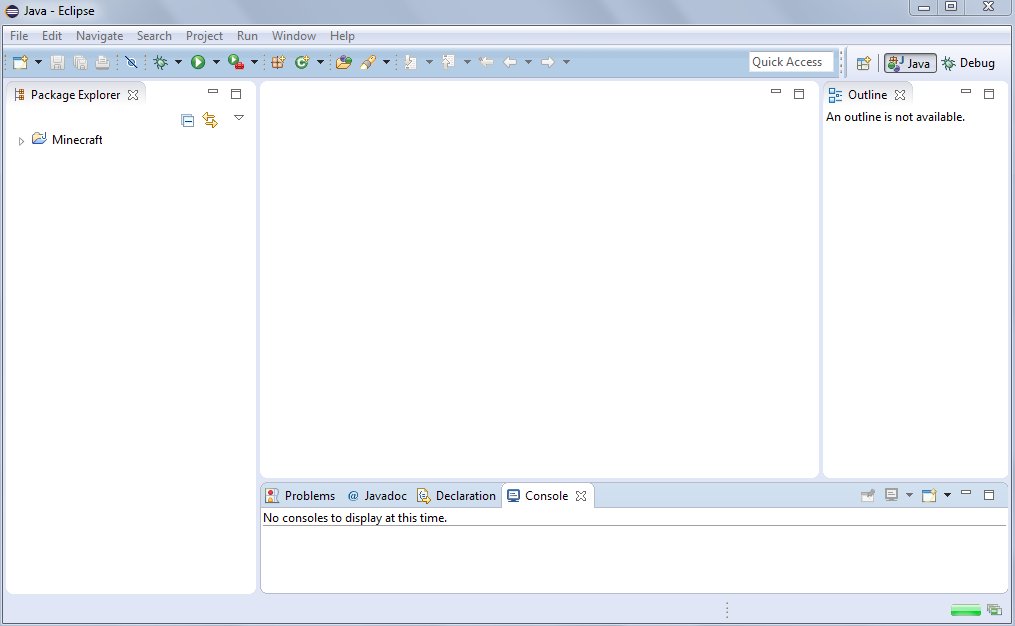
Figure 1-6. Eclipse workspace with project
The Eclipse window has a few main components:
- Package Explorer
-
This is the panel on the lefthand side, where your project structure is shown.
- Big white window in the middle
-
This is where your project files are opened and available for editing. Multiple files can be opened in different tabs in this window.
- Status window
-
Located at the bottom of the screen, this window has multiple tabs that indicate the status of different tasks that we perform in Eclipse. For example, the Minecraft server console will be displayed here when we launch the game.
It has a few other windows on the right side, but they are not directly relevant for our modding. Feel free to click X to close them.
Understanding the Example Mod
Mods are written as .java files, which are later compiled into .class files. As mentioned earlier, each Java class is a text-based file, and ends with the .java extension. A class follows the set of rules defined by the Java programming language.
In Eclipse, click the arrow next to the Minecraft/ folder. This expands the folder so that you can see its contents, as shown in Figure 1-7.
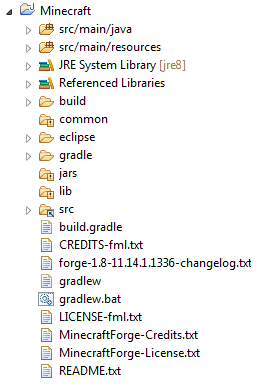
Figure 1-7. Eclipse workspace with Minecraft project expanded
This expanded folder has many subfolders (identified by another arrow before them) and several files. Most of these are required to create a JAR file for Forge, but fortunately we don’t have to worry about all of them. For now, let’s see where our mod source files will be added.
Click the arrow next to the src/main/java folder. This expands the folder where all the Java source files are stored. Click com.example.examplemod to expand a subfolder. It consists of the ExampleMod.java Java source file, which is an example mod bundled with Forge. Double-clicking the file shows it in the middle part of the IDE. You can view or make changes to it there.
The Java class looks like Example 1-2.
Example 1-2. Example mod
packagecom.example.examplemod;
importnet.minecraft.init.Blocks;
importnet.minecraftforge.fml.common.Mod;importnet.minecraftforge.fml.common.Mod.EventHandler;importnet.minecraftforge.fml.common.event.FMLInitializationEvent;@Mod(modid=ExampleMod.MODID,version=ExampleMod.VERSION)
publicclassExampleMod
{publicstaticfinalStringMODID="examplemod";
publicstaticfinalStringVERSION="1.0";@EventHandler
publicvoidinit(FMLInitializationEventevent)
{// some example code
System.out.println("DIRT BLOCK >> "+Blocks.dirt.getUnlocalizedName());
}}
There is no need to worry too much about different Java keywords, parentheses, and formatting in this code. However, there are some key Java concepts you should understand:

Each class belongs to a package. This is identified using the
packagekeyword in Java, followed by a space, the package name, and ending with;. This must be the first line in your Java class. It also defines the location of your file (in this case, com/example/examplemod).Tip
Java packages allow logically related classes to be grouped together. This allows similar class names to be used across different packages. This is analogous to sorting different colors of crayons in multiple buckets. Without sorting, it will be difficult to find the appropriate crayon. Similarly, without organizing classes in multiple packages, it will be difficult to find them.

A Java class can use other Java classes from different packages. These classes need to be imported so that they can be referred to within the code. Note, however, that this does not mean that the classes are included here, but just that they can be used here. This class is importing four classes.
Each import statement starts with the import keyword and provides the fully qualified class name. For example, the
Blocksclass is in thenet.minecraft.initpackage, and so is imported asnet.minecraft.init.Blocks. TheModclass is in thenet.minecraftforge.fml.commonpackage, and so is imported asnet.minecraftforge.fml.common.Mod. Similarly, other classes are imported from their appropriate package.
@Modtells Forge that this class is a mod and provides some basic information about the mod. The@at the beginning indicates that this is a Java annotation, which allows Java to define special marks in the code. The exact behavior of this particular annotation is defined by Forge.A Java annotation can have one or more elements that provide more details about the annotation. Each element has a value assigned to it using the equals sign (
=). Different elements, along with their value, are separated using a comma.The
@Modannotation has two elements:modidandversion. Their values are defined usingMODIDandVERSIONvariables in the class.
Each Java class has a unique name that is followed by the Java keyword
class. It must match the filename, without the .java extension. Our class’s name isExampleMod, so it’s saved as ExampleMod.java.The first opening parentheses,
{, and the last closing parentheses,}, define the scope of the class. This means that everything defined within these two braces belongs to the class.
Defines
MODIDandVERSIONvariables. Variables are used to store values of a specific type. Each variable has a name and a type associated with it. In our case,MODIDandVERSIONare the names andStringis the type, which means they can store text data. Each variable is then assigned a value using=and the exact value is enclosed within quotes. TheMODIDvariable has a value ofexamplemod, and theVERSIONvariable has a value of1.0.
Forge mods are created by “listening” for different events. Events are something that happens in your world such as initializing a mod, player breaks a block, an entity explodes, a Zombie dies, or a player sends a chat message. An event is handled by an event handler. An event handler in a Forge mod is marked with an
@EventHandlerannotation.
New functionality is added to a Java program by creating new methods. A method has four parts:
-
Name that uniquely identifies the method (
init, in our case). -
Parameters that provide different functionality based upon their value. Each parameter has a name and a type. Our method has one parameter with the
FMLInitializationEventtype andeventname. All the parameters are enclosed between(and), and different parameters are separated by a comma. -
Body is the Java code enclosed between
{and}that is executed when the method is called. Just as in a class, these parentheses define the scope of the method. This is where all the action that needs to happen is defined.The statements inside a method are generally executed from top to bottom, in the order that they appear.
-
Return type defines a return value that can be used by the caller of this function. If the method returns no value, then a special type of
voidis used.Method
initis a special method that is called by Forge when the mod is loaded. This is where the main code for the mod should be defined.
-

This line is a comment in Java and used for giving some useful information to other programmers who are reading the code. Comments can take up one line of the source file and start with two forward slashes, or
//. They can also take up many lines, and start with/*and end with*/.
Lot of Java concepts are used in this line:
-
System.out.printlnprints messages to the Minecraft server console. It’s like calling a method, and the parameters are enclosed between(and). -
The first part
"DIRT BLOCK >> "is printed exactly like itself, but without the quotation marks. -
+combines the first string and the value returned by the second method call. -
Blocks.dirt.getUnlocalizedName()returns the name of the dirt block.
-
The next section reviews the exact message that will be shown in the console.
Running Minecraft and Verifying the Mod
Let’s launch the game to see what this mod does!
Press the green arrow shown in Figure 1-8 to run the game.

Figure 1-8. Running Minecraft with Eclipse
There is a lot that happens in the background to run the game. Remember javac, java, and jar, all of which are tools that we installed earlier as part of the JDK? Eclipse uses these tools to compile all the Java source files from our project (including the Forge source files and our example mod) into class files. These files are then packaged into a JAR file. This JAR file is then used to run the Minecraft server and the client launcher. The client is also connected to this server as well. This is shown in Figure 1-9.
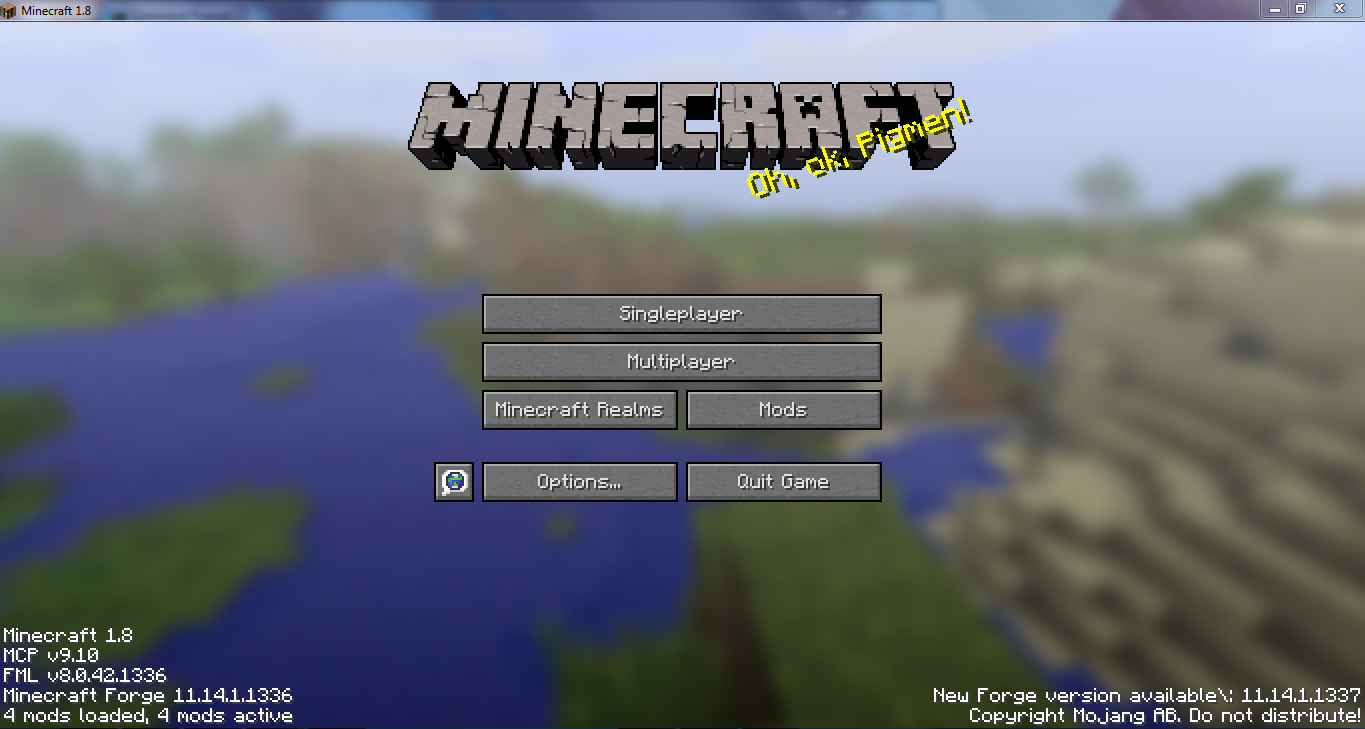
Figure 1-9. Default Minecraft client
The lower-left corner of the client window shows the version of Forge, 1.8 in this case. It also shows how many mods are loaded, four in this case. Three of the mods are default Forge mods that are required by Forge, and the fourth one is the example mod that is explained in this chapter.
The server console is displayed within a new tab in Eclipse, as shown in Figure 1-10.

Figure 1-10. Server console in Eclipse
Figure 1-10 shows an empty server console, but this will be populated with messages from the server log. You should see the message shown here in the Minecraft server console:
[Client thread/INFO] [STDOUT]: [com.example.examplemod.ExampleMod:init:18]:
DIRT BLOCK >> tile.dirt
As the mod is loaded, Forge calls the special init method explained earlier. It then executes the code inside this method, which basically prints the game name of the dirt block. You need to scroll up the console to see this exact message, though.
And so now you have run the Minecraft client and can play the usual game. The big difference between now and before is that you can change the game to your liking. Doesn’t that feel more exciting than just playing the game?
Summary
Wow, you’re already at the end of the first chapter!
This chapter explained how to get started with Minecraft modding using Forge. The tools required for modding were downloaded and installed. The basic structure of the project was opened in Eclipse. A basic introduction to the layout of Eclipse was also introduced. Fundamental Java concepts like class, package, and method were explained while walking through the sample mod. Finally, the Minecraft client was run, and the output from the sample mod was verified.
You are now all set up and ready to create new mods. All the mods in this book mostly follow the same basic pattern as the sample here; you’ll just be creating new files and altering them. And you’ll see that in action in the next chapter.
Get Minecraft Modding with Forge now with the O’Reilly learning platform.
O’Reilly members experience books, live events, courses curated by job role, and more from O’Reilly and nearly 200 top publishers.

