Bill of Materials
Mac OS X Tools and Apple Software
Third-Party Software
TransparentDock (http://www.freerangemac.com)
CandyBar (http://www.panic.com/CandyBar)
ShapeShifter (http://www.unsanity.com/haxies/shapeshifter)
MacUpdate (http://www.macupdate.com)
Skyrocket Software (http://www.skyrocketsoftware.com)
ResExcellence (http://www.resexcellence.com)
Max Themes’ Eylo offering (http://www.maxthemes.com)
When you contemplate modifying or customizing your Mac, don’t disregard the basics. Some of the simplest changes you can make are the most evident and, therefore, the most overlooked. You can make a lot of aesthetic changes to your Desktop without diving too deep. Sure, you can change the background image of your Desktop or decide which screensaver you want to use, but what if you want something more? What can you do to set your Mac apart from everyone else’s?
This chapter shows some ways you can customize your Mac OS X system to suit your sense of style, and points you in the direction of resources you’ll need. You’ll learn how to alter the default set of application icons, add new Desktop patterns, and even modify the style of the windows that Mac OS X throws at you. Don’t settle for the tried and (now) dull Aqua interface—add a little spice to your Mac.
Even though it stares you in the face every day, it’s easy to take the Desktop for granted. It lies under the windows all of the applications you have running, pretty much just sitting there, being ignored. The Desktop performs its thankless job day-in and day-out, and it’s probably just begging you for a fresh new look. Indulge your Desktop; it’s been good to you. You should be good to it.
System Preferences holds the secret to power desktop management; specifically, its Appearance and Desktop & Screen Saver preferences panels. Here’s where you can start to give your desktop a bit of personality. The Appearance preferences let you set basic interface features, such as changing the primary interface color (blue or graphite) and the look of your scrollbars. As its name suggests, the Desktop & Screen Saver panel controls the Desktop’s art and lets you pick or set a screen saver. Follow these steps to open the Desktop & Screen Saver panel so you can select new background art:
Launch System Preferences from the Apple menu (
→ System Preferences), or click on its icon in the Dock. The System Preferences window opens, displaying a list of available preferences panes.
Click on the icon for the Desktop & Screen Saver panel.
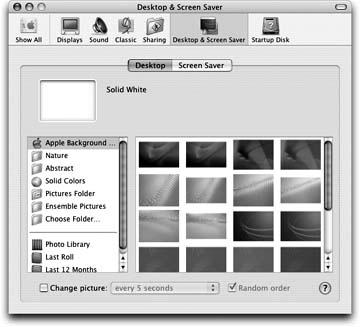
After the window updates, click the Desktop button. The Desktop pane (shown in Figure 1-1) opens. If you’re running a Macintosh system with more than one screen, separate panels appear on (and control) each display.
Examine the list that appears on the left side of the Desktop pane. This list starts with Apple Background and ends with items from your iPhoto library. It contains colletions of images and hues from which you can select a background pattern for the Desktop. Click each item in the list to see its set of pictures. Standard items include:
- Apple Background
A subdued collection of blue, aqua, gray, and purple images; pretty boring stuff here.
- Nature
A small group of nature-themed photos, including a leopard skin and a ladybug.
- Abstract
An eye-bending lesson on why Apple employees should be restrained from consuming illegal drugs.
- Solid Colors
A small but practical set of useful background colors, including both saturated hues and pastels.
- Pictures Folder
The top-level contents of ~/Pictures. The preference panel will not look in any subfolders that might be placed within the Pictures folder.
- Choose Folder…
When you click on this item, a dialog will open, from which you can select any folder on your system that contains image files. This folder gets added to the top part of the list and, when clicked on, the images within that folder are displayed in the view to the right.
- Photo Library
Items from your iPhoto library appear at the bottom of the list. This includes all standard and custom rolls and will vary depending on the contents of your iPhoto library.
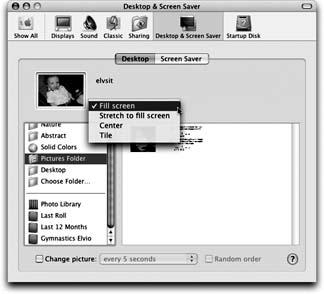
Simply select any picture or color swatch to set it as the background. When choosing a background from one of your personal picture collections, a pop-up appears at the top of the pane (Figure 1-2). This pop-up lets you choose how to display your image. The options in this menu include:
- Fill screen
Display your picture at the largest screen size while retaining proportionality.
- Stretch to fill screen
Fill the screen, stretching as needed. This option changes image proportions, which makes it less suitable for photos.
- Center
Place your image in the middle of the screen. If the image is smaller than the screen, a single-color matte appears behind it; use the color picker that appears next to the pop-up to select the matte color. If the image is larger than the screen, the edges are cropped to fit the screen.
- Tile
Completely fill the screen with multiple copies of your image. Tiling retains the original image size, so small images may appear many times. If your picture is larger than the available pixels, the results are the same as centering.
Although you can use any size picture for your desktop, large pictures that match your desktop size (such as 1024 x 684 or 1280 x 768) seem to work best.
I know I’m not alone in thinking that Mac OS 9’s desktop patterns were nicer than those shipped with Mac OS X. Many people have remarked that the desktop images that ship with Mac OS X are pretty boring and uninspired. But if you have a copy of Mac OS 9 on your computer, you can recover the lost art.
Start by making sure Mac OS 9 is installed on your computer; these steps won’t work unless it is. Most new Macs—even though they ship with Mac OS X preinstalled—still ship with Mac OS 9 on them. To find out if Mac OS 9 is installed on your Mac, all you need to do is double-click on your hard drive’s icon on the Desktop. Look for a folder named System Folder; the folder should be emblazoned with an orange number 9. That’s Mac OS 9’s system folder, and your cue that you can forge ahead.
Follow these steps to discover how to add Mac OS 9’s pictures to your Desktop backgrounds:
In the Desktop preferences pane, click on the “Choose Folder…” item on the left-hand side, just above your Photo Library. A file browser dialog appears.
Navigate to Mac OS 9’s System Folder. Select the Appearance folder, and then the Desktop Pictures subfolder.
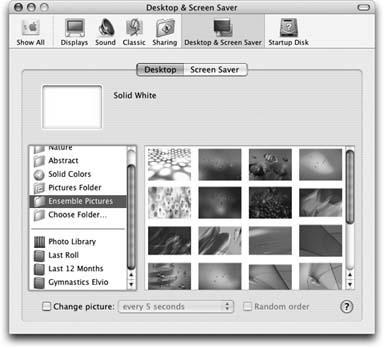
Inside the Desktop Pictures folder, you’ll find four folders (3D Graphics, Convergency, Ensemble Pictures, and Photos) that contain images you can use on your Desktop. Select the Ensemble Pictures folder, and then click on the Choose button at the bottom of the sheet. Mac OS X adds this folder to the Desktop pane. The Ensemble Pictures folder appears in the Desktop pane folders list, just above the Choose Folder item (Figure 1-3).
Now you can select one of Mac OS 9’s Desktop pictures and use that as your Desktop image for Mac OS X.
One of the coolest features added to Mac OS X (Jaguar) was the ability to select a folder that contains desktop images and automatically cycle through the pictures. With this option enabled in the Desktop preferences pane, you can change the desktop image of your Mac every five seconds or every five minutes. In these steps, you’ll see how to make this happen:
In the Desktop preferences pane, select a folder that contains two or more images. For this example, select the Solid Colors folder. (Personally, I think that solid hues produce a particularly appealing effect.)
Click on one of the choices within the Solid Colors folder. For example, click on the first blue swatch.
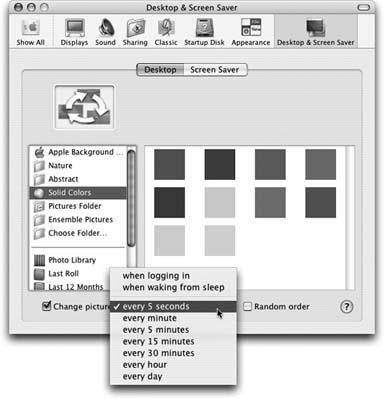
At the bottom of the window, place a checkmark in the eye. the box next to “Change picture” When checked, the two controls to the right (a pop-up list and another checkbox) activate. Also, the image at the top of the panel changes to a circle of arrows with picture rectangles behind the arrows. This image indicates you have chosen to cycle your background.
Select an update interval from the pop-up list, as shown in Figure 1-4. Intervals range from 5 seconds to 24 hours. (You can also change pictures each time you log in and when the computer wakes up from sleeping.) For this example, select 5 seconds in the pop-up menu.
By default, the images are set to switch to the next image in the folder based on the frequency you’ve set in the pop-up menu. However, if you want the system to randomly pick an image for the Desktop, check “Random order” Now when the interval you’ve set comes around, the system randomly selects an image to use from the folder.
This option does not change when you select a new folder. The same time intervals and randomization choices apply to the new pictures or colors. Additionally, if you have a second display connected to your Mac, you can set the Desktop picture—as well as the option to rotate Desktop pictures—on the second display separately from your primary display.
If you own a copy of QuickTime Pro and have a short movie on hand, you can use the Change Picture feature to create a background that animates. In these steps, you’ll see how to use stills from a movie to set your background.
In QuickTime Pro (http://www.apple.com/quicktime/upgrade/), open the movie you want to work with. The best movies for this project include action sequences with fairly rapid movement. I like to use sequences that I shoot with my Canon Digital Elph. (The camera can shoot short video clips as well.)
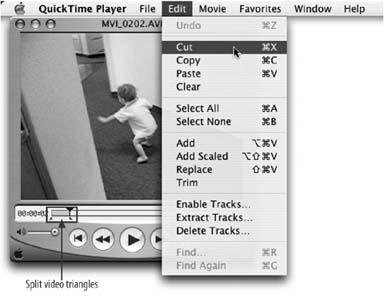
Find a short (three seconds or less) sequence of movement in your movie and use QuickTime Pro to trim away the rest of the footage. Select the footage you wish to discard with the small, gray, triangular in- and out-markers (located along the timeline). The selection area between the markers turns gray. Choose Edit → Cut (⌘ -X), as shown in Figure 1-5, to remove this selection from your movie.
Now you’ll want to export your short video clip as an image sequence. For this, choose File → Export (⌘-E); when you do, the “Save exported file as…” window appears.
In the Export pop-up menu, select “Movie to Image Sequence”
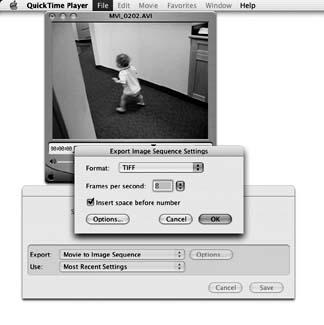
Click on the Options button next to the Export pop-up menu. The Export Image Sequence Settings dialog appears.
By default, QuickTime Pro is set to output the images as PNG files. However, to make the files smaller in size, set the output format to TIFF.
Choose how many pictures per second you want to produce. Figure 1-6 shows a selection of 8 frames per second. This means that QuickTime Pro will select the first of every eight frames of the movie to represent one second of the movie, and an image file for that frame will be saved as a TIFF file.
Click OK. This dismisses the Sequence Settings dialog and returns to the Export window.
At the top of the “Save exported file as…” window, enter a base name for your new images in the Save As field, and select a location where you want the image files to be saved.
Since you’ll want to display all of these images in sequence without them getting mixed up with other images, you should save the images in a separate folder. To do this, follow these steps:
Click on the Pictures folder in the sidebar on the left side of the “Save exported file as…” window. (This is an important step, because the new folder will be created inside the Pictures folder.)
Click on the New Folder button at the bottom-left corner of the window.
Type in a name for the new folder in the sheet that appears, and then click on the Create button to create the new folder within your Pictures folder.
That’s it; the new folder is now waiting for you to export image files to it from QuickTime Pro.
Click Save and wait as QuickTime Pro produces the new image sequence.
Return to the Desktop preferences pane (System Preferences → Desktop & Screen Saver → Desktop).
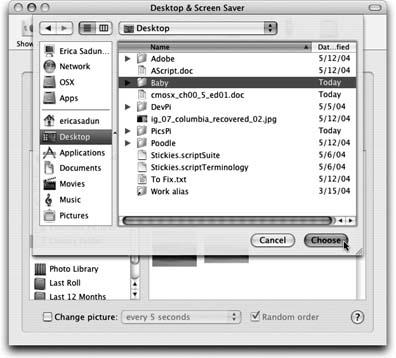
On the left, select the “Choose Folder…” item, and then navigate to the folder that you saved the image sequence to. Select the folder and then click Choose (Figure 1-7). Your new folder will load into the preferences pane.
Select the first image in your sequence.
Most movies shot from a digital camera use fairly small imagery. In order to make your images look their best, choose Center from the pop-up at the top of the preference pane and select any matting color. If you prefer, choose Fill Screen but the image will look a little grainy.
Check “Change picture” at the bottom of the preferences pane, set the time interval to 5 seconds, and deselect the checkbox next to “Random order”; this ensures that the images from your movie will run in sequence.
After following these directions, your sequence will play back in very slow motion, updating every five seconds. This creates an eerie slow-motion effect that will either thrill your subconscious or drive you to the brink of distraction. Your mileage will vary.
If your Desktop pane is set to center the images onscreen, you can produce a nifty result by taking advantage of what I call the matted-color bug. (You’ll see what I mean by this very soon.) Assuming that a single background color isn’t your thing, you can produce this effect by following these steps:
Set your background to a small photo from your iPhoto Library or to an item in your Pictures folders. (By small, I mean smaller than your screen’s resolution; say 320 x 240.)
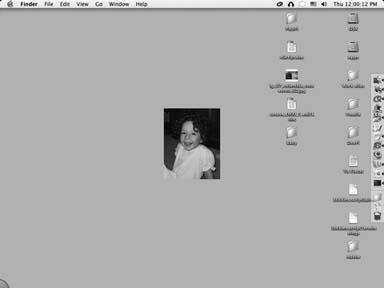
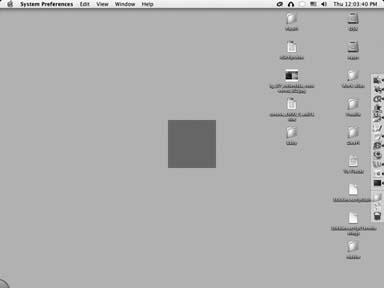
Choose Center from the pop-up at the top of the Desktop pane and select any matting color. Figure 1-8 shows how your screen might look after these choices, with a picture in the center, surrounded by a solid color.
To create the bug, select Solid Colors from the list at the left of the pane, then pick a color swatch. Figure 1-9 shows the results.
Instead of filling your entire Desktop with the selected color, it adds the color to just the center of the screen. And, because you picked a color swatch rather than an image, you can’t change the display properties to something other than Centered, so the matted color option disappears.
To add a bit more to the overall grooviness, check “Change picture,” set the update interval to 5 seconds, and then check “Random order” Instantly, your little square of color becomes a kind of virtual lava lamp.
To restore the normal color swatch behavior, go back to your Pictures folder, select another picture, and set the display to Fill Screen, Stretch to Fill Screen, or Tile.
After choosing a folder to use to set Desktop images, the folder you select tends to stick. There’s no built-in way to remove the folder from the Desktop pane’s sidebar short of hacking a property list (.plist) file (which would be getting way ahead of ourselves). Here’s a rather blunt method for reverting the Desktop pane to its original settings and folders. Don’t use this method unless you’re willing to say goodbye to any and all Desktop modifications you’ve made thus far.
Quit System Preferences by either closing the window (⌘ -Q). This method won’t work unless System Preferences is closed because you’re going to directly change the default settings for the Desktop preferences pane. If System Preferences were running, it could overwrite your changes.
Launch the Terminal application (/Applications/Utilities) to get a new Unix shell window.
At the command line, issue the following command:
$
defaults delete com.apple.desktop BackgroundThis command deletes any of the settings you may have made to the background settings via the Desktop preferences pane. When you run this command, you won’t receive any message back from the Terminal telling you that something happened. If the Terminal doesn’t spit an error message back at you, you’ll have to trust that the command did its job.
Click on the System Preferences icon in your Dock (or choose
→ System Preferences) to launch the System Preferences application again.
Click on the icon for the Desktop & Screen Saver preferences panel, and then click on the tab for the Desktop pane.
In the Desktop preferences pane, confirm that the folder you have added has been replaced with a folder named Desktop Pictures. If you select the Desktop Pictures folder, you’ll notice that the images within are the same as the default set of Apple Backgrounds (the top item in the list). If desired, assign another background image to your Desktop.
Get Modding Mac OS X now with the O’Reilly learning platform.
O’Reilly members experience books, live events, courses curated by job role, and more from O’Reilly and nearly 200 top publishers.

