I personally dislike the default Dock. It sits at the bottom of the screen, right where I need extra screen space for my work. It’s too big and it’s ugly. Fortunately, the System Preferences application provides a great starting place for customizing the Dock. Choose
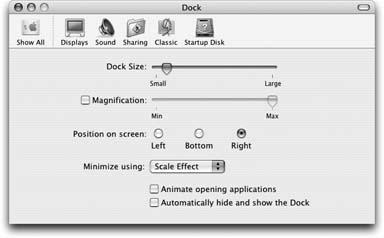
→ Dock → Dock Preferences to get started. The Dock Preferences pane (Figure 1-14) lets you set the size, position, and other attributes of your Dock to better integrate it into your workflow.
Adjustable features in the Dock Preferences pane include:
- Dock Size
Use this slider to your Dock icons larger or smaller.
- Magnification
Add a fisheye effect to your Dock by magnifying the icons closest to the cursor. I leave this option unchecked. It gives me motion sickness.
- Position on screen
Choose one of these radio buttons to set the Dock’s position to the left, bottom, or right. Note that if you use more than one screen, the left position may be on a different screen than the right position, depending on how you have the displays arranged.
- Minimize using
Dock Preferences offers access to two animations for minimizing your windows. You can scale your windows down proportionally or use the Genie effect to suck your windows into the Dock.
- Animate opening applications
When checked, this option bounces the icon of an application as it opens in the Dock. When unchecked, the small triangle beneath the icon bounces instead.
- Automatically hide and show the Dock
This checkbox allows you to hide the Dock until the cursor rests near its hidden position. Choose this option if you like playing peek-a-boo with your Dock.
If you think this is all you can do with your Dock, think again. A great shareware utility called TransparentDock (http://www.freerangemac.com) lets you slice, dice, and julienne your Dock in ways you’ve never imagined. Its name is quite misleading. TransparentDock does a lot more than affect the Dock’s transparency. Download and install a copy to see what your Dock can really do. But before you start messing with the Dock, you should create a backup of it, just to be safe.
Believe it or not, your Dock is an application, just like iTunes or Safari. Before you even think of messing with it, take the time to make a proper backup. In the following steps, you’ll see how to save a copy of your Dock.
In the Finder’s sidebar, click on the Desktop icon, and then choose File → New Folder (Shift-⌘-N) to create a new folder on your Desktop; rename this folder as Dock Backup.
Open a new Finder window (File → New Finder Window, ⌘-N) and position the two Finder windows on your screen so one doesn’t cover the other; you’ll need an unobstructed view of both Finder windows.
In the newly created Finder window, select View → As Columns (⌘-3) to use the Column View.
Click the icon for your primary hard disk and then navigate to /System/Library/CoreServices.
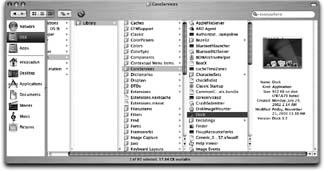
Inside the CoreServices folder, you’ll find the Dock application, as shown in Figure 1-15.
Option-drag the Dock application from the CoreServices folder to the Dock Backup folder in the other Finder window. (Holding down the Option key as you click and drag makes a copy of the dragged item.)
Now that you’ve created a copy of your Dock application that you can use to restore your Dock to its original state, it’s time to have some fun at the Dock’s expense.
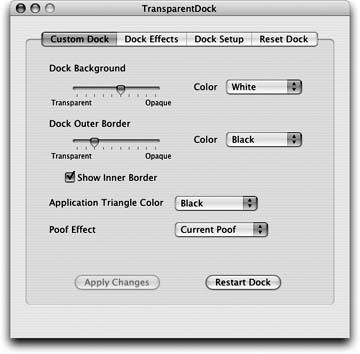
TransparentDock offers numerous ways to customize the way your Dock looks and behaves. As Figure 1-16 shows, it goes far beyond the options offered in the Dock’s preferences panel. TransparentDock can do this sort of stuff because it actually changes the Dock application, which is why you needed to create a backup before starting to play with the Dock.
Figure 1-16. TransparentDock lets you modify the Dock in a variety of ways, including changing the opacity and color of the Dock’s background.
Here’s a sampler of some of the most useful changes:
- Reposition the Dock
In the Dock Effects pane, you can control the placement and pinning of the Dock. “Pinning” means that you can have the Dock positioned so its left (or top) edge is located in one of the corners of your screen. For example, the Dock is pinned by default to the bottom-center of your display. However, you can change that so the Dock is pinned to the bottom-left corner of your display, if you so choose.
To position the Dock at the top-left of your screen, for example, choose Top from the Dock Placement pop-up and Start from the Dock Pinning pop-up. Click Apply Changes.
- Change the Dock background color
In the Custom Dock pane, select a new background color such as Green or Maroon from the Dock Background Color pop-up. Click Apply Changes.
- Change the application triangle color
In the Custom Dock pane, choose a new color such as white or yellow from the Dock Outer Border Color pop-up. Click Apply Changes.
- Change the Dock opacity
In the Custom Dock pane, adjust the Dock Background transparency slider to a new value and then click Apply Changes. You can set the transparency anywhere from completely transparent to completely opaque.
- Show the Exposé activation button
In the Dock Setup window, check Show Exposé Activation Button. Click Apply Changes. A blue translucent button appears on your screen. Click on this button to activate Exposé.
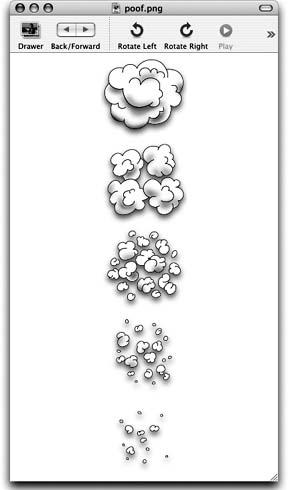
Although TransparentDock allows you to customize your “Poof”—that small cloud of smoke that appears when you drag an item out of the Dock—it’s actually a lot easier to “re-Poof” by hand. Poofs are simply PNG image files that contain a series of five images that produce the Poof animation. You can look at the default Poof with Preview:
Open a new Finder window and go to /System/Library/CoreServices.
Control-click (or right-click) on the Dock and select Show Package Contents from the contextual menu.
In the new Finder window that appears, select View → As Columns (⌘ -3) from the menu bar, and then go to the Resources folder, located inside the Contents folder.
Select poof.png and then use the keyboard shortcut ⌘-O to open the Poof file in Preview. Figure 1-17 shows the Dock’s default Poof.
A Google search for “custom poof + OS X” will turn up any number of Poof art files. I particularly like the ones found at ResExcellence (http://www.resexcellence.com/user_poofs.shtml), where you’ll find many high-quality Poofs. My favorites include the digital Poof from John Hall and the ripple Poof from NDF.
Follow these steps to back up and replace your Poof:
Download and decompress your Poof of choice. Many Poofs ship as “families” of images, so you may need to mount a disk image, select a Poof, and then copy it to the Desktop.
Open a new Terminal window. It’s a lot easier to use the command line to make Poof changes than it is to use the Finder.
Change directories as follows:
$
cd/System/Library/CoreServices/Dock.app/Contents/Resources$ls *.pngfinder.png trashempty.png wvouscornertl.png notfound.png trashfull.png wvouscornertr.png poof.png url.png wvousfloat.png resizecursor.png wvouscornerbl.png wvousfloatselected.png resizecursorv.png wvouscornerbr.pngThese two commands put you in the Dock’s Resources folder, where its PNG image files can be found.
Make a backup copy of the original Poof; you will be prompted for an administrator password:
$
sudo cp poof.png poof.png.backupPassword: ********Copy the custom Poof from the Desktop into the Dock’s application bundle, renaming it to poof.png. My original Poof art in this example was called greypoof.png.
$
sudo cp ~/Desktop/greypoof.png ./poof.pngPassword: ********Reinitialize the Dock using the
killallcommand. This command tells the Dock to terminate itself. A second or so later, the Dock will automatically restart; as it reinitializes, it reads the new Poof file.$
killall DockDrag an item out of the Dock and test your new Poof.
When you’re satisfied that the new effect works as expected, continue with the following steps to restore your original Poof:
Return to the Terminal and replace your new Poof with the original:
$
sudo mv poof.png.backup poof.pngPassword: ********Once again, use the
killallcommand to restart the Dock:$
killall Dock
TransparentDock can restore your Dock to its original settings by using the backup copy you created earlier. Just follow these steps:
Click the Reset Dock button at the top of TransparentDock’s window. The Reset pane appears.
Choose “Reset from Backup” from the Reset Method pop-up. A file dialog opens.
Navigate to your Dock Backup folder and select the Dock application inside it. TransparentDock confirms “Yes…that’s the file I need! Press Reset Dock to continue…”.
Click OK to dismiss the sheet, and then click the Reset Dock button.
A dialog prompts you for your administrator password; enter your password and click OK.
TransparentDock forces your Dock to quit and then restarts the Dock. After restarting, the Dock uses the settings you’ve previously specified in its preferences panel (System Preferences → Dock).
Get Modding Mac OS X now with the O’Reilly learning platform.
O’Reilly members experience books, live events, courses curated by job role, and more from O’Reilly and nearly 200 top publishers.


