Each time you restart your computer—and each time you log out and back in—the Finder launches, and as it starts, it reestablishes icon associations.
The Finder scans your disk and, when needed, creates an updated icon registry. You’ve already seen this registry in action, earlier in this chapter. It helps the Finder assign icons by mapping a file’s extension and creator code to an icon. But the story doesn’t end there. Although Finder sets the default look of each icon, you can override this behavior on a file-by-file (or folder-by-folder) basis and add a custom icon to any file, folder, or bundle you choose.
The most common method of changing Mac OS X icons has its roots in past operating systems. If you knew how to copy and paste icons in Mac OS 7 (or 8 or 9), the same method carries over into Mac OS X. This method does not change the core file or folder type, or even its default icon. It merely pastes a new icon on top of the old one. This icon persists until it’s changed—by a program, by a system update, or by you. The following steps walk you through the process of finding, copying, and pasting an icon. The secret here involves reusing an existing icon.
In the Finder, select a file or folder with an intriguing icon. Choose File → Get Info (⌘-I). An Info window opens, showing the current icon at the top-left, next to the file or folder name.
Click on the image of the icon to select it; you’ll know the icon is selected when a blue outline appears around it. Choose Edit → Copy (⌘-W).
Select the file you want to paste the icon onto. Choose File → Get Info (⌘-I) to open an Info window for this second file.
Select the icon at the top of the window.
Select Edit → Paste (⌘-V). The copied icon replaces the original.
Close the Info window with ⌘-W.
You can easily restore the default icon at any time. Just select the icon at the top of the Get Info window and press the Delete key. This removes the pasted icon from the file and restores its original icon.
The SetFile command, which is part of the Xcode Tools distribution, offers a powerful way to hide or show custom and default icons. Its attribute flag (-a) allows you to toggle the custom icon flag for files and folders. To enable custom icons, use the C option (uppercase). To hide custom icons, use c (lowercase) instead.
$SetFile–a C foo.tiff$SetFile–a c foo.tiff
These methods change a file or folder only on the surface. To change the default icon, you’ve got to dig a little deeper. The next sections will show you how to customize icons at their core.
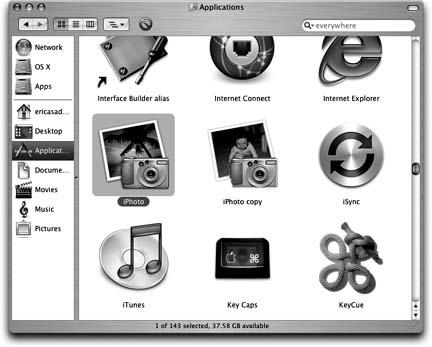
An application’s icon greets you from the Applications folder and from the Dock. These icons have been carefully designed so you can quickly identify the icon with the application and its function. Best of all, you can mess with the icons as much as you like without affecting how the application itself works. Figure 4-11 shows just one possibility; in it, iPhoto’s icon appears both in its default form and in a user-customized version.
You can customize application icons just as you would customize sounds or embedded images. Just swap in a new icon file and you’re set. In the following steps, you’ll see how to locate the proper file and update it to create a new look for an application.
In the Applications folder, select an application you want to work with. Control-click (right-click) the icon and select Show Package Contents from the pop-up. Navigate into the Contents folder.
Control-click (right-click) on the Info.plist file and select Open With → Other. A window labeled Choose Application appears, taking you to the Applications folder; scroll down and select TextEdit and then click on the Open button.
One of the jobs of an application’s Info.plist file is to associate its application with a .icns file. In TextEdit, search for
CFBundleIconFile. This is a key. Its value, a string, provides the filename for the application’s icon. For example, in iPhoto’s Info.plist file, you’ll find the following lines:<key>CFBundleIconFile</key <string>NSApplicationIcon</string
These lines tell you that iPhoto’s icon is stored in Contents/Resources/NSApplicationIcon.icns.
Go back to the Finder, open the Resources folder, and then find the .icns file identified by the Info.plist file. Click once on the icon file and select File → Duplicate (⌘-D) to make a backup copy of the file.
Use the directions from earlier in this chapter to create an entirely new icon file or update the existing one. Use Icon Composer or another icon utility to change the look of your application. When you’re satisfied with your edits, replace the application’s .icns file with the new version.
Save any work in progress on your computer and log out of your account. When you log back in, the Finder reloads all its icon associations and updates the application icon with your changes.
You can use this same method, more or less, to change the document icons defined in an application’s Info.plist, but as the next sections show, this process is a little trickier.
Get Modding Mac OS X now with the O’Reilly learning platform.
O’Reilly members experience books, live events, courses curated by job role, and more from O’Reilly and nearly 200 top publishers.


