Adding a Custom Drawer
In these steps, you will add a new type of window component, a drawer, to your Terminal window. You’ll see how to connect the drawer to your existing window and update your buttons to control the drawer.
In Interface Builder, select the Palette window and click on the window icon to open the Windows palette.
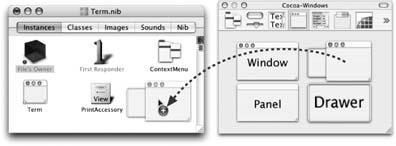
Drag a new window/drawer combination from the palette onto the NIB window, as shown in Figure 7-27. When dropped, three new instances appear in the window: a Parent Window, an NSDrawer, and a DrawContent view. The DrawContentView design window should automatically open.

Figure 7-27. Dragging a new window with a drawer into your nib project.
Close the DrawContentView design window.
In the NIB window, select the new Parent Window and delete it by choosing Edit → Cut (⌘-X) or Edit → Delete (press Delete). This leaves the new NSDrawer and Draw ContentView instances.
Select the NSDrawer instance.
In the Info window, open the Connections pane (⌘-2). After deleting the Parent Window, the NSDrawer should have just one connection: the
contentViewconnected to the NSView. The other two outlets (delegateandparentWindow) should be unconnected.Depress and hold the Control key. With the Control key pressed, drag your cursor from the NSDrawer to the Term window instance, as shown in Figure 7-28. When a square appears around Term, release the mouse and then release the Control ...
Get Modding Mac OS X now with the O’Reilly learning platform.
O’Reilly members experience books, live events, courses curated by job role, and more from O’Reilly and nearly 200 top publishers.

