NetBeans has a set of basic requirements that must be checked before attempting to run the IDE. This section details these requirements.
Large and complex Java programs are demanding of memory and processor resources, and NetBeans is no exception. Furthermore, whereas some programs can anticipate approximately how much memory or CPU time they will need, NetBeans, which allows the user to design an arbitrarily complex project, can make no such a priori assessment.
The absolute minima for running NetBeans are much more modest than the practical minima. For instance you can run NetBeans on an AMD 5x86 at 166 MHz with 64 MB of RAM and a 640 X 480 screen resolution, but only if you have no real work to do in NetBeans or any other tasks to perform on the machine in question. We know because we have tried it.
That said, we list in Table 1-1 the practical minima for running NetBeans on several popular platforms. These are of necessity somewhat subjective. One rule of thumb is that serious developers should take our word on the minima, but you can get by with less machine than we recommend if you only plan to explore NetBeans lightly (preparatory to finding yourself a more satisfactory platform on which to do serious development).
Table 1-1. NetBeans minimum requirements on several popular platforms
|
Platform |
Processor (MHz) |
Memory (MB) |
Disk (MB) |
Screen resolution |
Color palette |
|---|---|---|---|---|---|
|
Linux on Intel |
233 |
128 |
75 |
800 X 600 |
65535 |
|
Mac OS X |
400 |
256 |
75 |
Any modern color display |
Any modern color display |
|
Solaris on Intel |
330 |
256 |
75 |
1024 X 768 |
16 million |
|
Solaris on Sparc |
UltraSparc II 300 |
512 |
75 |
1024 X 768 |
16 million |
|
Windows on Intel |
330 |
192 |
75 |
800 X 600 |
16 million |
The README.HTML shipped with a recent cut (3.3 beta 2) of NetBeans indicated minimal requirements somewhat more relaxed those listed in the table. However, these requirements are overly optimistic, and you’ll find yourself having trouble doing meaningful work without more horsepower behind NetBeans.
For instance, this chapter and its illustrations are being developed on a Sun Blade with a 500-MHz UltraSparc II and 640 MB of memory. A medium-sized project currently open in NetBeans is consuming about 184 MB of memory on this machine, with peaks noticeably higher while compiling. As with any advanced design tool, NetBeans will always cheerfully accept more hardware resources and perform better for having them. The bigger and the more complex your projects are, the more NetBeans will want.
Also, you must consider what else you will be running at the same time as NetBeans. Are you developing an EJB project and debugging by running either JBoss or WebLogic as an application server instance on your local machine? Give that Wintel/Lintel machine a minimum of 512 MB physical RAM and your Solaris Sparc machine 640 MB to 1 GB.
You need the JDK installed on your computer to run NetBeans.
Sun Microsystems’ JDK consists of:
The runtime engine for the Java programming environment
The compiler and other basic tools essential to Java development
The fundamental Java class libraries that make Java usable
The Java Runtime Environment (JRE) consists of:
The runtime engine for the Java programming environment
The fundamental Java class libraries that make Java usable
The JRE is a runtime for users. The JDK is the complete software development environment for Java. Sun and other Java implementors provide the JRE packaged independently of the JDK. Everything that is in the JRE is also in the JDK—the JDK is a pure superset of the JRE.
Many operating systems nowadays, such as Linux and Solaris, come with a JDK pre-installed. Even so, you may want to obtain a later version of the JDK. At the web site java.sun.com (http://java.sun.com/) you can obtain free of charge the JDK for the following operating environments:
Linux
Solaris (both for Sparc and x86 architectures)
Microsoft Windows
Other JDKs exist for various platforms created by various other vendors and open source software organizations. Among them are:
Blackdown (http://www.blackdown.org)
FreeBSD (http://www.freebsd.org/java/)
You will need JDK 1.3 or above to run NetBeans. Consult the NetBeans JVM Frequently Asked Questions (FAQ) (http://www.netbeans.org/ide/support/faqs/installation.html) for more information about obtaining the JDK and setting it up in your particular operating environment. You will also find pertinent information in the NetBeans HowTo (http://www.netbeans.org/project/www/articles/howtos.html).
You have several choices when picking a distribution of the NetBeans IDE to download and run on your personal computer or workstation. Your choices are
Download or order the current Sun ONE Studio 4 packaging of NetBeans from the Sun ONE Studio 4 web site (http://wwws.sun.com/software/sundev/jde/index.html).
Download the latest stable release of NetBeans from the NetBeans downloads page (http://www.netbeans.org/downloads.html).
Download an earlier stable release of NetBeans from the NetBeans downloads page (http://www.netbeans.org/downloads.html).
Download a reasonably stable beta release of NetBeans from the NetBeans downloads page (http://www.netbeans.org/downloads.html).
Download the latest build of NetBeans from the NetBeans downloads page (http://www.netbeans.org/downloads.html).
Download the Q-build of NetBeans from the NetBeans Q-Builds Program (http://qa.netbeans.org/processes/q-builds-program.html).
Your choice will balance the trade-off between stability, commonality of experience with a wide range of developers of all skill levels, and advanced technology, as summarized in Table 1-2.
Table 1-2. Summary of trade-offs between NetBeans releases
|
Release |
Advantages |
Disadvantages |
|---|---|---|
|
Sun ONE Studio 4 |
Sun ONE Studio 4 cuts of the NetBeans IDE are the most stable and long-lived cuts. Patches are offered via the Update Center (see Section 1.7.1). Sun attempts to see that their enterprise customers and less adventurous developers have a reliable environment for routine Java development, one that possesses a clearly defined relationship to the trusted name and service offerings of Sun Microsystems. |
New NetBeans features make their way slowly into Sun ONE Studio 4 releases. You really only need be slightly more adventurous than the typical Sun ONE Studio 4 user to go with the latest stable NetBeans release. |
|
Latest Stable NetBeans |
This is the best choice if you are a strong developer who still wants stability. With a stable, numbered NetBeans release you get a well-tested and matured collection of code that is up to date. |
You may wish to consider the greater stability of a Sun ONE Studio 4 release, the more completely characterized environment provided by a previous stable release, or the important advances of a more recent build. |
|
Earlier Stable NetBeans |
With an earlier stable build of NetBeans, you stick with a system that is well understood. Recently, several team members on an important project using NetBeans declined to upgrade to NetBeans 3.2 and stuck with NetBeans 3.1. Although 3.2 had desirable improvement in CVS support, it also possessed a troublesome bug in menu code generation. |
NetBeans is improving at a rapid pace. If you stick with an earlier release of NetBeans, you miss important improvements and may even find yourself expending more effort to get the same results you could get with less effort using a later release. |
|
NetBeans Beta |
With a NetBeans beta, you can get the latest and most stable (as compared to the Q-Build) approach to some hurdle NetBeans is currently vaulting. Another beta advantage is that you can validate fixes you are expecting in NetBeans in response to a bug report. |
A given beta release may not be applicable to your work environment or may only serve to divert your attention from your own coding issues into the entertaining sideline of helping along the progress of NetBeans itself. |
|
NetBeans Lastest Build |
This is the bleeding edge. You not only like NetBeans, you like to build NetBeans often. These releases are posted approximately daily. Go for it! |
On the other hand, the latest build
|
|
NetBeans Q-Build |
This is a compromise between the bleeding edge and stability. It’s a more recent build than the last stable release or Beta release, but it surely compiles and runs. |
The downside of the Q-Build is that it may have unreported bugs and/or may present undocumented or poorly documented new or altered features. |
Tip
We’ve used the term “beta” in the table to characterize a prerelease or release candidate of NetBeans. Often these releases do not actually bear the term “beta” in their name.
There is another kind of distribution that you might be interested in: as mentioned in the Preface, various vendors of development and deployment environments make special releases of NetBeans that integrate these vendors’ niche-specific tools with the NetBeans environment. Visit the Who is building on top of NetBeans (http://www.netbeans.org/third-party.html) page to browse the distributions available from vendors in industries ranging from software modeling to data mining that integrate NetBeans into their products.
It’s easy to install a binary distribution of NetBeans, whether it’s the current stable release, a beta, or a Q-build.
On Windows, the distribution archive is itself an executable file. Run the installation .exe which will:
Unpack all files from within itself
Install all required program objects and ancillary files
Create a shortcut to NetBeans on your desktop from which you may start the application
On Unix, unpack the distribution archive and move the unpacked tree to an appropriate file system location.
On all platforms, be sure to read any and all Readme files found with the distribution. These files give up-to-the-minute information on installation issues and runtime issues. This especially applies to less widely used platforms such as Macintosh and OpenVMS.
In this section we are going to build NetBeans from source. You can skip this section if you don’t want to build NetBeans from its source code. However, it’s easy to build NetBeans, so you might as well try it once just for fun.
We’re going to do a simple, straightforward build, no special options, no personal changes to the source code. If you are intererested in modifying NetBeans and rebuilding it, adding modules of your own to NetBeans, and advanced options, you will want to read Chapter 13.
To get started with developing and building NetBeans, first visit NetBeans DevHome (http://www.netbeans.org/devhome/), which has explanations of how to download NetBeans source code and the latest information on builds.
To build the IDE you need several items:
A correctly configured installation of the Java Development Kit
The NetBeans source
Certain binary-only objects (sometimes called the extra binaries) distributed without source required for a NetBeans build
The Jakarta Ant build system from the Apache Project
Note
The NetBeans extra binaries include a version of Ant sufficient to build the IDE. It is not necessary to download Ant separately.
For special issues pertaining to building NetBeans under Mac OS X, please see the web page Using NetBeans on Mac OS X (http://www.netbeans.org/ide/support/mac.html).
Assuming that you now have the NetBeans sources archive file (or have performed an anonymous CVS checkout from the NetBeans source server) and that you also have downloaded the extra binaries archive (each typically a .tar.gz GNU zipped tar file or a .zip Windows-style zip file) downloaded to your machine, proceed through the following steps to build NetBeans:
Create a directory in which to work (e.g., /usr/local/src/netbeans on Unix or C:\NetBeansSource on Windows).
Change directory to your new work directory and unpack the NetBeans sources archive. It will create its own directory hierarchy whose top directory is netbeans-src below the current directory.
Create in the current directory (your new work directory) a subdirectory called nbextra (this subdir is not created automatically in unpacking).
Change directory into nbextra and unpack the NetBeans extra binaries required for the build.
Follow the instructions in the sidebar Installing and Configuring Ant to make sure the Ant build system used to perform the NetBeans source build is in place and ready to run.
Change directory back to your work directory (e.g., if you are still in nbextra then
cd ..).Change directory to the netbeans-src directory that was created automatically when you unpacked the NetBeans sources.
Change directory to the nbbuild directory.
Enter the
antcommand.
Ant will now start to run and read the build file build.xml and construct NetBeans per the project description found therein. The build process will take a few minutes even on a fast machine. Late in the build process, the newly compiled instance of NetBeans may load itself to configure its extensions and then will exit by itself, so don’t be surprised if NetBeans spontaneously appears on your computer screen and then disappears.
Okay, you did the build. Now, where did the build go? It was built in the netbeans-src/nbbuild/netbeans directory. You can run the newly built IDE from netbeans-src/nbbuild/netbeans/bin in the manner described in the sidebar Installing and Configuring Ant.
At the end of the build process, a .zip distribution archive was created analogous to the ones you download from the NetBeans web pages when you download a prebuilt version. This .zip file is found after a successful build in the netbeans-src/nbbuild directory and is called:
NetBeans-dev-yyyymmddhhmm.zipwhere yyyymmddhhmm is the year, month, day, hour, and minute in which the build was accomplished. Simply unpack that .zip file in the directory wherein you wish NetBeans to be located and you can run NetBeans from there in the manner described in Table 1-2.
By now you’re about ready to run the NetBeans IDE. Let’s take one last look at what’s necessary to launch NetBeans.
Once the minimal hardware and software requirements are met, all you need to get ready to run NetBeans is to make sure the minimal environmental requirements are met. There’s really only one: NetBeans must be able to find the Java Development Kit.
On Unix installations, the variable
JDK_HOME
must be set to the root of your JDK installation, something like
JDK_HOME=/usr/java; export JDK_HOME
On Mac OS X, the JDK is found in /Library/Java/Home. Open the command shell (Finder → Applications → Utilities → Terminal) from which you will launch NetBeans. The shell given you in the OS X Terminal application is, by default, tcsh. In tcsh issue the command:
setenv JDK_HOME
        /Library/Java/Home
If you are using a shell such as bash or zsh, the syntax will be as for Unix above,
JDK_HOME=/Library/Java/Home; export JDK_HOME
Tip
For special issues pertaining to launching NetBeans under Mac OS X, please see the web page Using NetBeans on Mac OS X (http://www.netbeans.org/ide/support/mac.html).
On Windows, NetBeans expects to be able to find the Java executable in your
PATH
variable. Either set this variable in the current command line session, for example,
SET PATH=C:\JDK1.3;%PATH%
or use MyComputer → Properties → Advanced → Environment to set the path permanently for all sessions.
NetBeans is pure Java, so all you have to do to start NetBeans is invoke the Java interpreter on the correct class file, right? Well, not exactly. NetBeans, as a user application, operates within a rich context that is pretty complicated to enter at the command line. Therefore, NetBeans is usually started by all except the experts by one of two executable files provided with the NetBeans installation. These files are present whether you downloaded a binary release of NetBeans or downloaded source and built and installed it.
Tip
There is a desktop-based launcher for NetBeans on Mac OS X. Although you can install NetBeans from any of the distributions provided on the NetBeans web site (http://www.netbeans.org), the Mac OS X distribution includes this launcher. Alternatively, you can obtain the launcher source by checking out the NetBeans sources for the module core.
For Windows operating systems, the file is either of two Windows executables:
runide.exe , which starts a command line session that launches NetBeans, thus allowing you to watch all logging output as NetBeans runs. Also, you may examine the ide.log file, which records the logging output of NetBeans as it launches and runs.
runidew.exe , which starts NetBeans through a windowing system call without opening a command line session. When you start NetBeans this way, there is one less window cluttering up your desktop, but if any “interesting” things happen that make you want the logging output, you will have to go to the directory where NetBeans stores your settings and look at the file ide.log for the output.
Tip
The local settings directory in which the files we have discussed above are found is called nbuser or some slightly different name in a given release of NetBeans (e.g., nbuser33 for release 3.3.x. or nbdev for a development release). It’s typically found on Unix systems in the user’s home directory, though it may appear elsewhere. For Windows, this directory is found wherever the user at first install of NetBeans indicated the settings directory should be placed, as described below in Section 1.6.3.
The runide.sh shell script for launching NetBeans on systems with a Unix-like shell can be passed two switches on the command line:
-jdkhome fullpath tells NetBeans where the JDK home directory is, overriding built-in defaults and variables set in the user’s environment.
-userdir fullpath tells NetBeans which directory to use in the user’s settings directory. This is very helpful if you are “stuck in a crack” between releases and are using two versions of NetBeans, both of which want to use the same user settings directory. Employing the -userdir switch keeps one NetBeans version from altering the settings you are maintaining for the other version.
In both cases, fullpath is the fully qualified path to the directory in question.
NetBeans is engineered to take into account multiple users launching NetBeans from the same installation. NetBeans accommodates this by keeping each user’s personal settings separate from the NetBeans code installation. This is handled correctly on both Windows and Unix systems. Also, NetBeans distinguishes between NetBeans versions. So if you have previously run NetBeans and upgrade to a later version, the first time the new version runs, it will offer to migrate your settings from the previous version to the version you are now running.
On Unix systems, settings are kept in a local settings directory created in the user’s home directory the first time NetBeans is run.
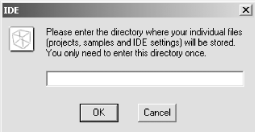
On Windows, the first time NetBeans is run, NetBeans prompts the user for the name of a directory in which settings should be stored (see Figure 1-1). The directory chosen by the user is stored in a Windows Registry key HKEY_CURRENT_USER/Software/netbeans.org/NetBeans IDE/
$VERSION, which is how NetBeans finds the user settings directory each time it runs. Some points:If the Registry variable is not set, the user will be prompted for a settings directory.
If the specified directory does not exist, it will be created. As of the current writing, NetBeans creates its user settings directory structure specifically in the directory you specify rather than automatically creating a netbeans subdirectory of the specified directory.
If the specified directory exists but is empty, NetBeans will dialog with user to create or import initial settings.
Well, sometimes things do go wrong. Let’s take a look at some of the things that can go wrong when you try to run NetBeans. Some of the problems mentioned below will probably only occur when you first try to run NetBeans; others can occur any time.
What do you do if NetBeans doesn’t come up when you start it? Generally, there are only a few common things that can go wrong when launching NetBeans. Anything uncommon will probably leave some hint of the problem in the NetBeans ide.log file.
Under Unix, this file is found at $HOME/nbuser/system/ide.log.
Under Windows, this file will be found under the system directory located in the directory in which you told NetBeans (the first time it ran) to store your local settings file.
This section applies only to those running NetBeans under the X Window System on a Unix-like operating system. There are primarily two problems relating to the X Window System that can prevent NetBeans from coming up on your local display:
Make sure that the DISPLAY variable for the session in which NetBeans is running is set to a meaningful value. For example, if NetBeans is running on foo.mydomain.com and your local box is bar.mydomain.com, you might execute something like the following in the command line session on foo.mydomain.com before issuing the command to launch NetBeans:
DISPLAY=bar.mydomain.com:0.0 ; export DISPLAY
If you are running NetBeans on a remote Unix machine and using your local machine as an X Window System server (the X Window System uses the term server to mean the unit on which the display is rendered and client to mean the application that needs that display), remember to give the remote machine permission to draw on your local display or you will get a message about something like “can’t open display.”
Sometimes there are difficulties with the appearance of the NetBeans IDE once it is launched.
As indicated previously, screen resolution can become an issue running NetBeans. NetBeans has a very “busy” display with a multitude of graphic indicators, icons, and badges that require screen real estate in which to communicate to you, the user.
If the display is at a minimum resolution, you will lose breadth of overview in favor of necessary detail. At 800 X 600 resolution it can be difficult to maintain your mental picure of the entire project you are working on because so many of the object names will have scrolled out of view in the NetBeans Explorer. At 1024 X 768 resolution the situation is acceptable if not ideal. You really will be much happier with at least a 17-inch display and a resolution above 1024 X 768. Sun Microsystems supports the development of NetBeans, so it’s probably not entirely coincidental that the common Sun monitor resolution of 1152 X 900 is nearly ideal for NetBeans.
Some X Window System servers (see above) seem not to cooperate perfectly with certain Java Swing widgets. For instance, on some X servers, the NetBeans main window, which should appear at NetBeans startup at the top of the useful display, will appear in the middle of the display. Usually resizing will clear up the problem. Try maximizing the NetBeans main window or minimize it and then maximize it.
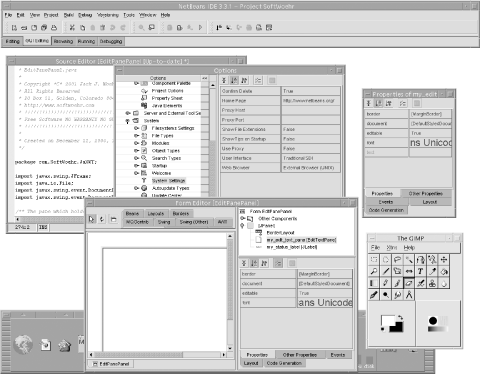
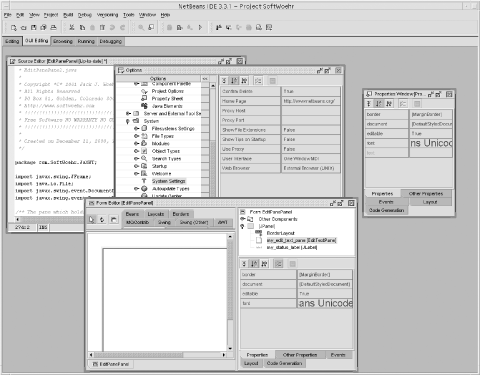
NetBeans can either display its various tools as separate desktop windows (X Window System and OS/2 style, called SDI for Single Document Interface) or as a collection of child windows within a parent window (Windows style, called MDI for Multiple Document Interface). NetBeans by default allows the user to select one or the other of these modes the first time NetBeans is run. Whichever you choose, you can switch between SDI and MDI in any subsequent session.
Use the Options dialog (pull down Tools → Options → Configuration → System → System Settings) and change the User Interface property (which is a drop-down selector) to toggle between SDI and MDI interface.
The SDI interface allows you to
Arrange NetBeans windows as you like
Minimize individual windows
Make an individual window full-screen
On the other hand, it’s a bit more disorganized than MDI, as can be seen in Figure 1-2.
The MDI interface keeps all the NetBeans windows together and organized. On the other hand, it can get cluttered because generally no individual child window is full-screen. This interface is shown in Figure 1-3.
Windowing issues come up more frequently in NetBeans than in some other IDEs because NetBeans is so liberal in allowing modules to hook the window space of the IDE proper. If something is missing, look for it. If something is misdrawn, open and close it or resize it. If something has changed, read the README file. Post to the newsgroups (see Appendix D) when you have questions.
NetBeans can automatically upgrade its core and extension modules over the Internet.
NetBeans has a module that can run periodically on your behalf and check for updates to the revision of NetBeans which you are using. The Update Center also can download and install such upgrades on your behalf if you wish.
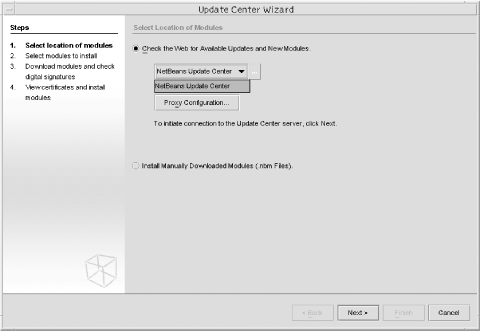
Use the Update Center Wizard to configure various factors for the Update Center, such as
Update site
Frequency of update checks
Proxy usage
You can see these options in Figure 1-4.
You also use the Update Center to install optional modules and even experimental modules currently under development. Once the Update Center has loaded, explore the modules offered and try anything you like, such as the new XML Tree Editor.
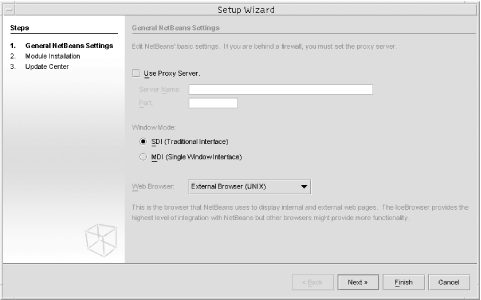
Both changing between the MDI/SDI interface and controlling the Update Center can also be performed through the Setup Wizard (shown in Figure 1-5), along with installing and configuring NetBeans modules. Pull down Tools → Setup Wizard to launch the Setup Wizard, or just use it when it pops up automatically the first time you start NetBeans.
If you got this far in the book, you’re now running NetBeans. You might wish at this point to simply run through the tutorial that is part of the NetBeans online help. Pull down Help → Help Sets → Core IDE Help. Pull down Help → Contents for the whole story.
And if you find yourself faced with problems not covered in this book, try NetBeans Frequently Asked Questions (http://www.netbeans.org/ide/support/faqs) on the web.
We hope you enjoy NetBeans.
Get NetBeans: The Definitive Guide now with the O’Reilly learning platform.
O’Reilly members experience books, live events, courses curated by job role, and more from O’Reilly and nearly 200 top publishers.
