Exploring Time-Lapse Photography
You can use the Interval Timer Photography option on the Shooting menu to automatically record a series of still photos over a period of time — a process known as time-lapse photography. Through a related menu option, Time-Lapse Photography, you can shoot a series of movie frames over time and then combine them to create a silent time-lapse movie. The next two sections explain how to use these features.
Shooting time-lapse photos
To use the Interval Timer Photography feature, which captures still time-lapse photos, take these steps:
- Set the Release mode to any setting but Self-Timer, Remote Control, or Mirror Up (Mup).
Those modes aren't compatible with interval-timing shooting.
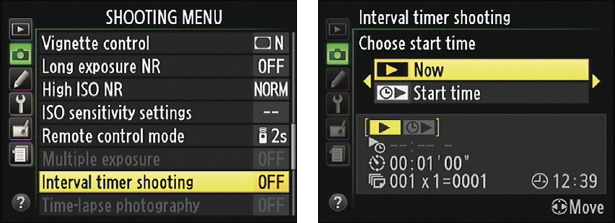
- Display the Shooting menu, highlight Interval Timer Shooting, as shown on the left in Figure 11-23, and press OK.
The screen on the right in Figure 11-23 appears.
- To begin setting up your capture session, highlight Now or Start Time.
- If you want to start the captures right away, highlight Now.
- To set a later start time for the captures, highlight Start Time.
- Press the Multi Selector right to display the capture-setup screen.
If you selected Start Time in Step 3, the screen looks like the one in Figure 11-24. If you selected Now, the Start Time option is dimmed, and the Interval option is highlighted instead.

Figure 11-23: The Interval Timer Shooting feature enables you ...
Get Nikon D600 For Dummies now with the O’Reilly learning platform.
O’Reilly members experience books, live events, courses curated by job role, and more from O’Reilly and nearly 200 top publishers.

