Chapter 4. The Tessel 2
OK, so you can blink from the command line and via Firmata or Espruino, but how about running full Node.js on a board? This is what a Tessel allows you to do.
Besides full Node.js compatibility, the Tessel board is great to get started working with the embedded Internet. The Tessel 2 hardware combines a microcontroller with a system-on-a-chip (SoC) that includes all-important building blocks for routing data in a network.
Hardware
The Tessel 2 is shown in Figure 4-1. The Tessel 2 combines a microcontroller with a more powerful microprocessor.
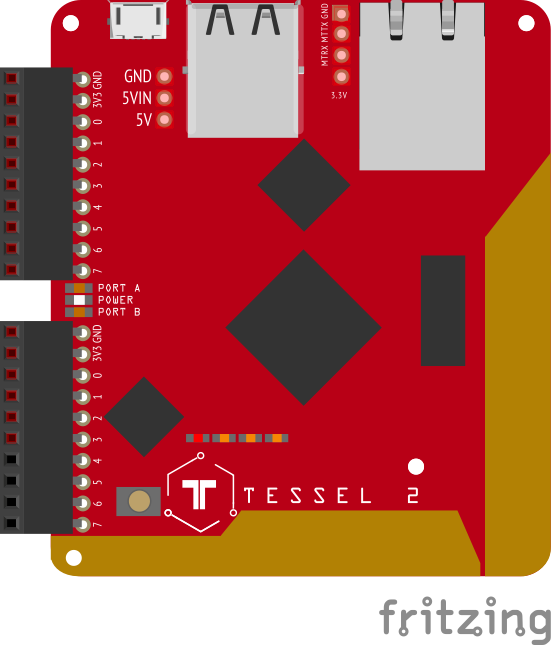
Figure 4-1. The Tessel T2 board from Rick Waldron’s “Examples with fritzing diagrams”
The idea of combining microcontrollers with a microprocessor is similar to the distributed nervous system of your body. The brain (processor) does the complex thinking, while other nervous centers in the body (controllers) coordinate the actions of hands, arms, and legs at the speed you need to react.
The “brain” in the Tessel 2 is the main processor with an operating system. Tessel 2 uses a 580 MHz Mediatek MT7620n SoC, a chip commonly found in WiFi routers. The Tessel main processor is powerful enough to run Node.js. It has 64 MB DDR2 RAM and 32 MB flash to store applications. For connectivity, there is 802.11bgn WiFi and an Ethernet port for an ultra-reliable wired connection.
For electronic peripherals, the nervous backbone of Tessel is an Atmel SAMD21 microcontroller that runs on 48 MHz, supports real-time I/O, and has an operation mode for low power. Tessel 2 is a completely open source project, so all of its hardware and software files are freely available online. You can find a guide to the tech stack here: https://tessel.gitbooks.io/t2-docs/content/Debugging/Technical_Overview.html.
Three advantages of the Tessel are:
-
It surfaces all hardware features directly to JavaScript
-
You can write code for a web server or other network protocols directly with Node.js libraries
-
It lets you easily deploy scripted code using a text editor and the command line, the tools web developers already use every day
As shown in Figure 4-2, you can extend a Tessel with “modules.” Tessel modules will be discussed in Chapter 7, which covers components for prototyping.
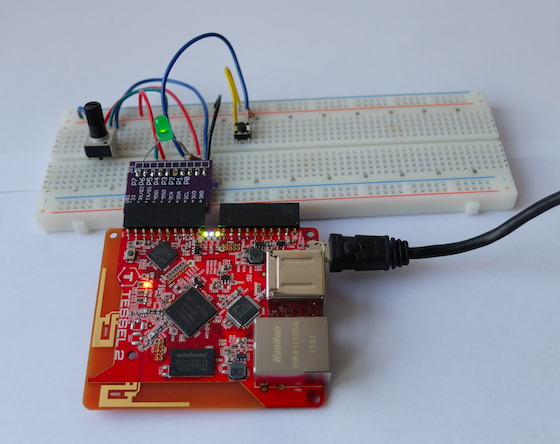
Figure 4-2. The Tessel T2 with a breakout board module and breadboard
Note
There was also a Tessel 1, which was one of the first devices that could run JavaScript natively. While this approach was promising at first, the lack of compatibility with libraries from the Node.js ecosystem was seen as a disadvantage. To examine the strategy of this approach, there is a detailed overview of Tessel 1’s software architecture at https://github.com/tessel/t1-contribution-guide.
Toolchain
As with selecting microcontrollers, toolchains play a role in the speed at which you can prototype systems. Based on JavaScript, the Tessel 2 toolchain offers a great experience to work with the embedded Internet.
Let’s look first at what makes the Tessel experience so appealing. First, there is the Tessel command-line interface (CLI) that helps with managing a device. You can quickly upload code, configure network settings, or upgrade the firmware.
If you build systems with dozens of devices or want to create and manufacture a product on Tessel, cost can quickly become important. Tessel’s eventual vision is to build tools that help users replace JavaScript with Rust or C as systems scale. It should be possible to just extract smaller hardware modules from a prototype before it goes into production. You can find an early draft of this workflow at https://github.com/technicalmachine/fractal-docs.
Command-Line Interface
$ npm install -g t2-cli
Then plug in your Tessel 2 to your computer using USB. If you are using the Tessel 2 for the first time, the starting tutorial is a good place to learn about the setup. You should give your Tessel 2 a name and allow provisioning from the computer that you use for development.
To check that your Tessel 2 is connected properly, you can type:
$ t2 list
Let’s start a fresh project to blink an LED. In the directory where you want to work (perhaps make a new folder), type:
$ t2 init
This fills out the folder on your computer with a standard Node package.json and a file called index.js that contains the blinking LED example.
Here’s the simplest version of a blinking LED example on Tessel 2:
// import the interface to Tessel hardware using the standard Node "require"
var tessel = require('tessel');
// blink!
setInterval(function () {
  tessel.led[2].toggle();
}, 100);
That’s it! Requiring “tessel” in Node.js gives you access to the JavaScript API for the board’s hardware. With the help of the tessel JavaScript library, you get objects and functions that can be performed on hardware such as an LED (see the full hardware API at https://tessel.io/docs/hardwareAPI). You can toggle this LED object. Internally, the Tessel firmware maps the LED name to a path in the OpenWRT filesystem.
To make this code run on Tessel 2, run the following command:
$ t2 run index.js
After you press Enter, you will see the following output:
INFO Looking for your Tessel...
INFO Connected to hellotessel.
INFO Building project.
INFO Writing project to RAM on hellotessel (3.072 kB)...
INFO Deployed.
INFO Running index.js...
I'm blinking! (Press CTRL + C to stop)
The t2 run command tells your computer to find your Tessel (either over USB or over your LAN), gain root access, copy over any necessary files from your directory, and then run your entry point file.
One of the LEDs on your Tessel 2 should now be blinking!
You can push the code over more permanently. Instead of t2 run, you can write:
$ t2 push
With this command, you can keep the same code between power cycles. This lets you unplug your Tessel and change it to a different power source, such as a battery.
You can also reprogram your Tessel while it is connected to a battery, as long as you are authorized (with the t2 provision command) and connected on the LAN.
You can also log in to your Tessel 2’s Linux filesystem with the command:
$ t2 root
INFO Looking for your Tessel...
INFO Connected to hellotessel.
INFO Starting SSH Session on Tessel. Type "exit" at the prompt to end.
BusyBox v1.23.2 (2016-04-07 13:52:07 EDT) built-in shell (ash)
Tessel 2  /  Built on OpenWrt
root@hellotessel:~#
From here, you can explore the OpenWRT filesystem. Also, if you need to debug a setup, root access to the Tessel 2 can be helpful. An extended list of commands is available at https://gist.github.com/flaki/a1efdb438292dd8c56c3.
Another very useful function is to turn the Tessel 2 into a WiFi access point:
$ t2 ap -n SSID -p PASS
Using this method, you can manage multiple edge devices with a single Tessel 2.
Pin Abstractions
On a Tessel 2, the pins for physical computing are provided by an Atmel SAMD21. This microcontroller provides timers, analog-to-digital converters, and other peripherals. To learn about these building blocks with JavaScript, you can attach an LED to a module pin. This discussion is limited to digital and analog pins. A full list of hardware abstractions can be found at https://tessel.io/docs/hardwareAPI.
Digital Pins
On a Tessel, pinMode configuration (input vs output) happens implicitly whether you read or write to a pin. Take a look at this example in JavaScript:
var tessel = require('tessel');
var pin0 = tessel.port.B.pin[0];
var pin1 = tessel.port.B.pin[1];
// pin0 acts as output when you write data to it
pin0.output(1);
// pin1 acts as input when you read data from it
setInterval(function () {
  pin1.read(function(err, val) {
      console.log(val);
  });
}, 600);
Writing to pin0 is done with the function pin0.output(…). Reading digital data is done with pin1.read(…) pin functions.
Analog Pins
To work with analog signals, you can use analogRead(…) and analogWrite(…).
pin.analogRead(function(error, value) {
  console.log(value);
});
This can be used easily for fading an LED with a potentiometer, as was shown in earlier chapters.
For writing an analog value there, use analogWrite(…). However, analog write can only be used on Pin 7 of Port B currently.
Embedded Internet with System-on-Chip
The combination of a microcontroller with SoC in a Tessel 2 is a great way to develop and prototype products for the IoT.
To run network services and web applications, the Mediatek SoC uses a microprocessor from the MIPS24k family.1 This microprocessor uses a 32-bit instruction set that reduces program size and increases execution speed. The building blocks of the main Tessel chip are shown in Figure 4-3.
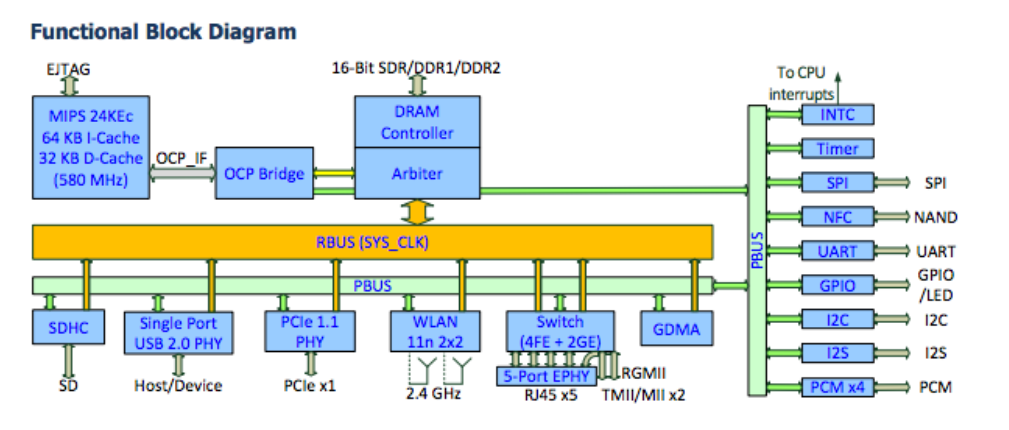
Figure 4-3. The functional blocks of a Mediatek MT7620 from the MIPS Technologies Software User’s Manual
You can quickly see the differences in blocks compared to the microcontroller from the previous chapters. To provide Internet access, the SoC has a powerful microprocessor that runs MIPS 24K and comes with integrated building blocks for WiFi and Ethernet. This makes the chip popular in many Internet gateways and WiFi routers.
With the SoC, the Tessel 2 provides many features for the development of connected devices out of the box. For example, you don’t need to flash an SD card and install its image on the device. After unboxing the Tessel 2, you are ready to start programming with JavaScript right away. An image of OpenWRT comes preinstalled on the 32 MB flash memory that is connected to the SoC.
The OpenWRT image abstracts away much of the physical layer’s complexity. You can find the build steps to build your own images of the Tessel 2 at https://github.com/tessel/openwrt-tessel.
The Tessel OpenWRT image also includes the Node.js runtime out of the box. You can see all packages of the distribution at https://github.com/tessel/openwrt-tessel/blob/master/config.mk.
Once you power on the Tessel 2 and connect via USB, you can configure the WiFi connection with a single command:
$ t2 wifi -n <network-name> -p <password>
Once you have configured the network, you can upload new code to the Tessel over a LAN connection. The following command line instruction explicitly pushes code over LAN:
$ t2 push --lan index.js
You should be able to see the device even with the USB cable removed.
To use JavaScript with embedded devices, you usually build some kind of bridge layer, such as the Firmata protocol or the Tessel 2 firmware. Alternatively, you can build your own bridge with JavaScript to an embedded device based on serial communication or by using a custom protocol as the Tessel firmware shows. The microcontroller firmware communicates with network services through the OpenWRT operating system.
Note
Running JavaScript and Node.js on embedded devices is a challenge that has inspired several approaches for both MCUs and MPUs. The differences can be in the chips chosen, the languages used, and the methods implemented to translate between the high-level language of JavaScript and the low-level communication needed by the electronic components. Two approaches (and their pitfalls) are presented in Jon McKay’s Web Rebels 2016 talk, “The Eternal Struggle: Node.js in Embedded Devices”. In particular, McKay explains the different languages and functions called at each layer of hardware abstraction.
Get Node.js for Embedded Systems now with the O’Reilly learning platform.
O’Reilly members experience books, live events, courses curated by job role, and more from O’Reilly and nearly 200 top publishers.

