We have seen how the
onload stylesheet is selected. Now
it’s time to look at what the stylesheet actually
produces. As suggested by the processing model diagram in Figure 4-7, the typical result is a mixture of
WordprocessingML and custom XML elements from the source document.
That is true for both of the examples we’ve looked
at so far (Word’s built-in “Data
only” stylesheet and our press release
example’s
“Elegant” stylesheet).
In the last section, Figure 4-11 showed the result
of applying Word’s default “Data
only” stylesheet (XML2WORD.XSL)
to a press release instance document, as displayed in the Word UI.
The stylesheet generates paragraphs corresponding to the original XML
document’s element hierarchy, indented to reflect
the element nesting. The labeled start and end tags (colored pink),
such as pressRelease, company,
and name, represent intervening elements not in
the WordprocessingML namespace. These custom tags are also included
in the WordprocessingML representation; they do not exist separately.
They are merged together into one document.
Example 4-3 shows an excerpt of the result of this transformation. You can get to the full representation from within Word either by re-saving the document as XML (un-checking the “Save data only” checkbox in the “Save As...” dialog box first) or by viewing the WordprocessingML source using the handy XML Toolbox we introduced in Chapter 2. In this excerpt, indentation has been added for readability, and custom tags from the original source XML document have been highlighted.
Example 4-3. WordprocessingML with merged custom XML elements
  <w:body>
    <wx:sect>
      <ns2:pressRelease>
        <w:p/>
        <ns2:company>
          <w:p>
            <w:pPr>
              <w:ind w:left="360"/>
            </w:pPr>
          </w:p>
          <ns2:name>
            <w:p>
              <w:pPr>
                <w:ind w:left="720"/>
              </w:pPr>
              <w:r>
                <w:t>ACME Corp.</w:t>
              </w:r>
            </w:p>
          </ns2:name>
               <ns2:address>
            <w:p>
              <w:pPr>
                <w:ind w:left="720"/>
              </w:pPr>
            </w:p>
            <ns2:street>
              <w:p>
                <w:pPr>
                  <w:ind w:left="1080"/>
                </w:pPr>
                <w:r>
                  <w:t>555 Market St.</w:t>
                </w:r>
              </w:p>
            </ns2:street>
               <ns2:city>
              <w:p>
                <w:pPr>
                  <w:ind w:left="1080"/>
                </w:pPr>
                <w:r>
                  <w:t>Seattle</w:t>
                </w:r>
              </w:p>
            </ns2:city>
               <!-- ... -->
            <w:p>
              <w:pPr>
                <w:ind w:left="720"/>
              </w:pPr>
            </w:p>
          </ns2:address>
          <w:p>
            <w:pPr>
              <w:ind w:left="360"/>
            </w:pPr>
          </w:p>
        </ns2:company>
               <!-- ... -->
        <w:p/>
      </ns2:pressRelease>
      <w:sectPr>
        <w:pgSz w:w="12240" w:h="15840"/>
        <w:pgMar w:top="1440" w:right="1800" w:bottom="1440" w:left="1800" w:header="720"
         w:footer="720" w:gutter="0"/>
        <w:cols w:space="720"/>
        <w:docGrid w:line-pitch="360"/>
      </w:sectPr>
    </wx:sect>
  </w:body>
The indentation of each paragraph in this result is defined using the
w:ind element. The value of the
w:left attribute in each case is computed (by
XML2WORD.XSL) based on the
paragraph’s depth within the merged source
document’s element hierarchy.
The ns2 namespace prefix on each of the custom XML
element names is an auto-generated prefix mapped to the press release
namespace, http://xmlportfolio.com/pressRelease,
which is declared on the w:wordDocument root
element (not shown in this excerpt). Each custom XML element is an
intervening element in the hierarchy between w:p
elements and the w:body element (ignoring the
intervening wx:sect element). Wherever a
w:p element may occur, so may a custom XML
element. All of the custom XML elements in this example are
block-level custom elements, meaning that they occur as siblings and
parents of w:p or w:tbl
elements (just w:p elements in this example).
Custom XML elements must be present for on-the-fly schema validation to work correctly. Also, by keeping the XML tags around, it is easy to preserve them when the document is saved, simply by stripping out all of the WordprocessingML markup (through the process called “Save data only,” which we’ll take a closer look at).
Although the result document of an onload XSLT
transformation must be a WordprocessingML document, strictly speaking
it is not required to have any custom XML tags. However, in both of
the examples shown so far—Word’s built-in
“Data only” stylesheet
(XML2WORD.XSL), and our press release
example’s
“Elegant” stylesheet
(pr2word.xsl)—the result does include
custom XML tags. (The reason you can’t see them in
the “Elegant” view is that they are
hidden by turning off the “Show XML
Tags” option; see the next section.)
The only time you might not want to use custom tags is when you are
sure you can translate from the plain WordprocessingML format back to
your custom XML format when the user saves the document (using an
onsave XSLT
stylesheet), and when you don’t need schema
validation. By using styles in conjunction with editing and/or
formatting restrictions, you may be able to pull this off. Your
onload and onsave XSLT
stylesheets would need to translate between your custom XML elements
and special editing regions or styles that you have set up for this
purpose. In fact, part of our press release example does just this,
as we’ll see later in the section called
“The `Apply Custom
Transform’ Document Option.” But
even in that case, we rely on the use of custom XML tags and
on-the-fly validation for other parts of the editing view.
Another thing to note about the pink tags displayed in Word’s “Data only” view is that they can be made invisible. Although the XML Structure task pane (which we’ll introduce later) includes a checkbox for turning “Show XML Tags” on and off, there is also a quick keystroke command that will do the trick. Ctrl-Shift-X toggles this option on and off. For example, if you hit Ctrl-Shift-X after opening the document we saw in Figure 4-11, then the tags will disappear, leaving the view shown in Figure 4-12.
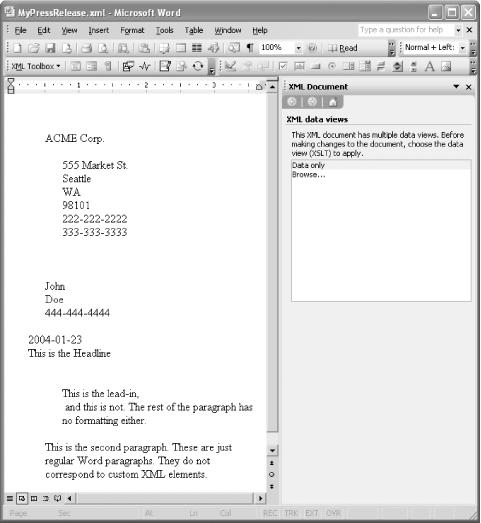
The only difference between Figure 4-11 and Figure 4-12 is that the “Show XML tags” option is turned off in Figure 4-12; otherwise, all of the document formatting is identical.
Word’s generic “Data
only” view and our press-release-specific
“Elegant” view both contain custom
XML tags. The primary visible difference between them is that
“Show XML tags” is turned on in the
“Data only” view but turned off in
the “Elegant” view. If a particular
document does not dictate whether the option should be turned on or
off, then Word defaults to the last setting chosen within the Word
application. For this reason, both stylesheets explicitly specify the
intended setting, using the w:showXMLTags literal
result element inside the w:docPr element. Here is
the relevant excerpt from XML2WORD.XSL,
Word’s default “Data
only” stylesheet:
            <!-- set Word document properties for raw XML - save as raw XML and
show XML tags in the document -->
            <w:docPr>
                <w:view w:val="web" />
                <w:removeWordSchemaOnSave w:val="on" />
                <w:showXMLTags w:val="on" />
            </w:docPr>
As you can see, the w:showXMLTags option has the
explicit value of on. In contrast, the
“Elegant” stylesheet for press
releases, pr2word.xsl, explicitly turns this
document option off:
      <w:docPr>
        <!-- ... -->
        <w:showXMLTags w:val="off"/>
      </w:docPr>
Just to prove that the custom XML elements really are present in the “Elegant” press release view, Figure 4-13 shows what the view would look like if a user turned “Show XML tags” on, for example, by pressing Ctrl-Shift-X.

In the merged representation of custom
XML and WordprocessingML that we saw in Example 4-3,
there were only block-level custom tags, i.e., custom XML elements
that occurred as siblings and parents of w:p (or
w:tbl) elements. As it happens, custom XML
elements may also occur at other places within the WordprocessingML
document hierarchy. They may occur as
“inline,” or run-level, elements
(siblings and parents of w:r elements), row-level
elements (siblings and parents of w:tr elements),
and cell-level elements (siblings and parents of
w:tc elements). In each case, they behave slightly
differently. In this section, we’ll examine
block-level and run-level custom tags. See “Table
Rows and Repeating Elements” later for a discussion
of row-level and cell-level custom tags.
Run-level custom tags are necessary to support multiple elements within the same paragraph. Whenever mixed content is needed, run-level tags are necessary. Word renders run-level tags slightly differently than their block-level, row-level, and cell-level counterparts. Instead of labeling both the start and end tags, Word labels only the start tag and colors both the start and end tags solid pink. Figure 4-14 shows a close up of Word’s block-level and run-level tags in an excerpt from our original press release template (with “Show XML tags” turned on).
The contact element is a block-level tag. It
contains two paragraphs and itself is contained within a table cell,
which, like the main document body, is a legal block-level context.
The firstName, lastName,
phone, and date elements are
all run-level tags.
Example 4-4 shows the WordprocessingML that corresponds to the visual excerpt in Figure 4-14. We’ve left out some details for now (particularly having to do with styles and editing restrictions) so that it would be easy to follow the basic structure. All of the custom tags within this excerpt are highlighted.
Example 4-4. Block-level and run-level custom tags in WordprocessingML
        <w:tbl>
          <!-- ... -->
          <w:tr>
            <w:tc>
              <w:tcPr><!-- ... --></w:tcPr>
              <ns0:contact>
                <w:p>
                  <w:r>
                    <w:t>Contact: </w:t>
                  </w:r>
                  <ns0:firstName w:placeholder="[First]">
                    <w:r>
                      <w:t/>
                    </w:r>
                  </ns0:firstName>
                  <w:r>
                    <w:t> </w:t>
                  </w:r>
                  <ns0:lastName w:placeholder="[Last]"/>
                    <w:r>
                      <w:t/>
                    </w:r>
                  </ns0:lastName>
                </w:p>
                <w:p>
                  <w:r>
                    <w:t>Phone: </w:t>
                  </w:r>
                  <ns0:phone w:placeholder="[xxx-xxx-xxxx]"/>
                    <w:r>
                      <w:t/>
                    </w:r>
                  </ns0:phone>
                </w:p>
              </ns0:contact>
            </w:tc>
            <w:tc>
              <w:tcPr><!-- ... --></w:tcPr>
              <w:p>
                <w:r>
                  <w:t>FOR IMMEDIATE RELEASE</w:t>
                </w:r>
              </w:p>
              <w:p>
                <ns0:date w:placeholder="[YYYY-MM-DD]"/>
                  <w:r>
                    <w:t/>
                  </w:r>
                </ns0:date>
              </w:p>
            </w:tc>
          </w:tr>
        </w:tbl>
Once again, the namespace prefix (ns0) is an
automatically generated prefix mapped to the namespace URI for our
press release schema. The ns0:contact element is a
block-level element, in that it is a parent of w:p
elements and could have w:p (or
w:tbl) element siblings. The
ns0:firstName, ns0:lastName,
ns0:phone, and ns0:date
elements are all run-level elements, in that they are contained in
run-level contexts—as children of w:p
elements and as siblings of w:r elements. They
themselves also contain w:r elements. Although all
of these elements occur inside a table, none of them happen to occur
as row-level or cell-level elements.
Another thing that Example 4-4 shows is how placeholders for custom XML
elements are represented in WordprocessingML. The placeholder text is
a property of the element instance itself, represented by the
w:placeholder attribute. Placeholder text is only
visible on an element field when the “Show XML
tags” option is turned off, when the element is a
leaf node (i.e., it contains no other custom XML tags), and when the
element is currently empty of any text content. Figure 4-15 shows what the placeholder text looks like for
this excerpt, after turning “Show XML
tags” back off.
Placeholder text can be applied to any custom XML tag, whether block-level, run-level, row-level, or cell-level.
Without the help of Smart Documents, end users normally won’t be able to create or delete custom XML elements (let alone attributes) in a reliable and user-friendly way. Instead, they are limited to filling out static templates of fixed XML elements. For the most part, this scenario is what our press release example illustrates. However, you can enable end users to edit a repeating list of XML elements without invoking Smart Document technology by exploiting a special property of row-level custom XML tags.
Here’s how it works.
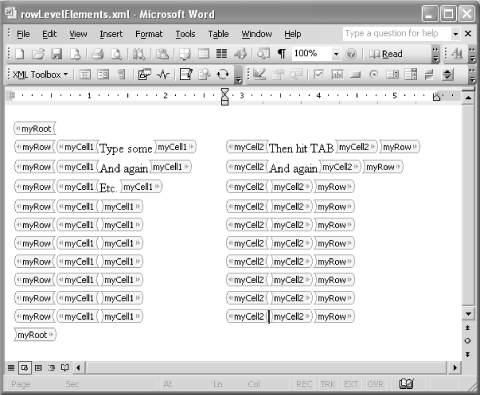
Given a table row that has a row-level custom tag applied to it, the
user can create new rows in the table, complete with custom tags,
simply by hitting the Tab key. This is easiest to explain by example.
Consider the WordprocessingML document in Example 4-5. It contains a table with one row and two
cells, each of which are contained within custom XML elements.
Appropriately named, the myRow element is a
row-level tag, and the myCell1 and
myCell2 elements are cell-level tags.
Example 4-5. A table with row-level and cell-level custom tags
<?xml version="1.0"?>
<?mso-application progid="Word.Document"?>
<w:wordDocument xmlns:w="http://schemas.microsoft.com/office/word/2003/wordml">

  <w:body>
    <myRoot>
      <w:p/>
      <w:tbl>
        <myRow>
          <w:tr>
            <myCell1>
              <w:tc>
                <w:tcPr>
                  <w:tcW w:w="4000" w:type="dxa"/>
                </w:tcPr>
                <w:p/>
              </w:tc>
            </myCell1>
                  <myCell2>
              <w:tc>
                <w:tcPr>
                  <w:tcW w:w="4000" w:type="dxa"/>
                </w:tcPr>
                <w:p/>
              </w:tc>
            </myCell2>
          </w:tr>
        </myRow>
      </w:tbl>
      <w:p/>
    </myRoot>
  </w:body>

</w:wordDocument>
Figure 4-16 shows that the user can easily create
new rows in this document just by hitting the Tab key at the end of
each row. Each new row is contained within a myRow
element, and each row contains myCell1 and
myCell2 elements. The final product you deliver to
end users, of course, will have “Show XML
tags” turned off, and will probably include some
meaningful labels, etc.
This behavior also holds true for
cell-level custom tags regardless of whether they are contained in a
custom row-level tag. For example, if we removed the
myRow tags from Example 4-5, the
myCell1 and myCell2 elements
would still repeat when the user inserts a new row into the table.
Even block-level custom tags inside table cells exhibit this
behavior—provided that the initial block-level custom tag
contains the entire content of the table cell, i.e., it has no
sibling w:p or w:tbl elements.
Run-level tags in table cells never behave this way; they are never
automatically replicated on table row insertion.
When a new row is created, the newly created XML element automatically adopts the same placeholder text that the original had. However, custom XML attributes (which, as we’ll see, are represented as literal attributes on custom XML elements) are not replicated.
You can leverage the unique behavior of custom tags and table rows to allow end users to create new instances of a repeating element type declared in your schema. Unfortunately, apart from the visible schema violation flags, the definitions in your schema have no effect on the behavior of the table. If a custom XML tag is wired to a table row or cell in one of the ways described above, then Word will replicate that tag on row insertion, regardless of how the element is declared in the schema.
Get Office 2003 XML now with the O’Reilly learning platform.
O’Reilly members experience books, live events, courses curated by job role, and more from O’Reilly and nearly 200 top publishers.

