Word automatically flows text from line to line and page to page. Nice, huh? However, an important part of document design is placing text right where you want it, breaking it up, and generally controlling the flow.
A break is an invisible barrier that stops your text in its tracks, and then starts it again on a new line, column, or page.
In Word, pressing Return (or Enter) creates a paragraph break. Although you may not have been aware of the term, they’re created every time you end a paragraph. Unless you’ve chosen a different “following paragraph” style (see Creating Styles by Example), the new paragraph assumes the same formatting as the previous.
Pressing Shift-Return inserts a line break. It’s similar to a paragraph break except that the text on the new line remains part of the original paragraph, and retains its style and paragraph formatting. No matter how you edit the surrounding text, the line break remains where you inserted it—until you remove it, of course.
Choose Insert → Break → Page Break (or press Shift-Enter) to force a hard page break. No matter how much text you add above the break, the text after the break will always appear at the top of a new page.
Use a page break when your want to start a new topic at the top of the next page. If you’re writing a manual for your babysitters, for example, inserting a hard page break at the end of the How to operate the home theater system section that causes The care and feeding of Tinker the cat to begin at the top of the following page.
Tip
In Print Layout view, page breaks are generally invisible. The text just ends in the middle of a page and won’t go any further, which can be disconcerting if you’ve forgotten about the page break you added.
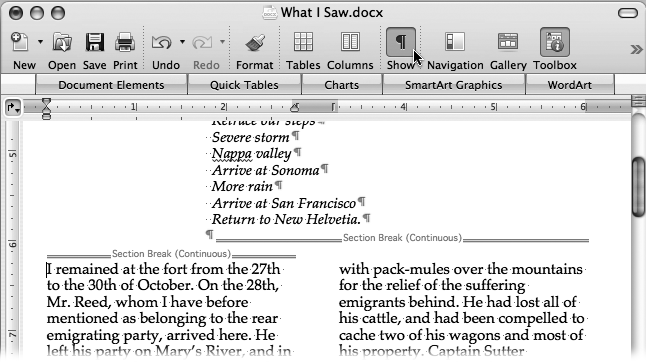
To view the dotted lines that represent a page break, choose View → Draft, or click the Show ¶ button on the Standard toolbar.
To jump text to the top of a new column (in multicolumn layouts like those described in the next section), choose Insert → Break → Column Break. Word ends the current column and, when you start typing again, hops you over to the top of the next column at the top of the page.
If you choose this option when you’re not using multiple columns (see Working with Columns), it behaves like a hard page break. (On the other hand, if you later switch to a two- or three-column format, the column break behaves like a normal column break. If you plan to make two different versions of your document—one with columns and one without—you may therefore want to use column breaks instead of page breaks.) Keyboard shortcut: Shift-⌘-Return.
A section is like a chapter—a part of a document that can have formatting independent of the other parts. For example, each section can possess unique margins, page numbering, pagination, headers and footers, even printing paper size. See “Inserting and Removing Section Breaks” for more detail on sections.
To begin a new section, insert a section break by choosing Insert → Break and choosing the specific type of section break that you want (see Inserting and Removing Section Breaks).
Warning
When deleting a break as shown in Figure 4-5, bear in mind that the usually invisible ¶ marker at the end of a paragraph “contains” the formatting for the paragraph that comes before it. If you join two paragraphs or sections together by backspacing until there’s no break between them, they blend into one and take on the formatting of the second section or paragraph.
If you’re putting together, say, a newsletter, some classified ads, or the rule book for the computer game you’ve just designed, you can give your publication a professional look by pouring it into multiple parallel columns (see Figure 4-6). Newspapers and magazines, for example, use columns in their layouts because shorter lines are easier to read, and…well, they’ve always done it that way.
Tip
You can see multiple columns only in Print Layout view (View → Print Layout). Only one column per page appears in Draft view, much to the confusion of anyone creating columns for the first time.
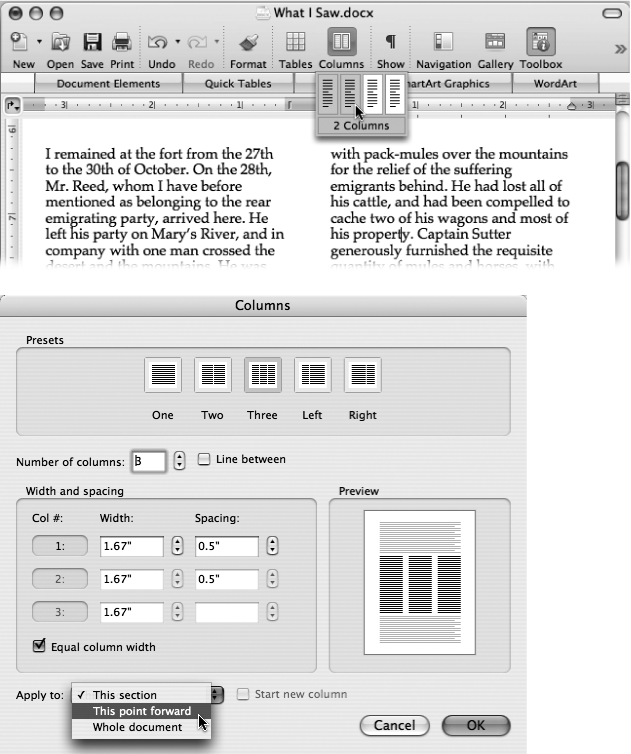
The quickest way to create columns is via the Columns button on the Standard toolbar, as shown in Figure 4-6 (top). If you want your entire document in columns, make sure nothing is selected; if you want columns for only part of the document, select that text.
Then click the Columns pop-up button on the Standard toolbar. Now drag downward and across to highlight the number of columns you’d like to use, as shown in Figure 4-6. If you need more than four columns, drag beyond their borders to expand the choices to five or six.
When you release the mouse, Word divides your text into columns of equal width. (If you highlighted only part of the document, Word automatically creates invisible section breaks above and below the selected portion; see Inserting and Removing Section Breaks.)
Figure 4-6. Top: Use the Standard toolbar’s Columns pop-up button to convert a document into multiple-column format immediately. Bottom: For more control, choose Format → Columns. Here, you see the dialog box settings that will produce a two column format, with a narrower left column and a line between them. The menu at the bottom of the box lets you choose to apply the columns beginning at the insertion point, from the beginning of the document, or just to the current section.
Although the Columns pop-up button on the toolbar is quick and easy, Word, as usual, gives you far more control if you’re willing to visit a dialog box. To use this option, select text or click in your document and proceed as follows:
Choose Format → Columns.
When the Columns dialog box opens (see Figure 4-6; bottom), the number of columns is preset to One, meaning that your text takes up the entire width of the page.
Choose one of the icons at the top of the dialog box, or enter a number in the “Number of columns” box.
The buttons labeled Two and Three create two or three columns of equal width. Left and Right mean, “Give me two columns (or the number of columns I’m about to specify in the ‘Number of columns’ box), but for some visual spice, make the first column half as wide, or twice as wide, respectively, as the other columns.” Then change the “Number of columns” box if you want more than two.
Click the arrow buttons next to the Width box for each column or the spacing boxes.
Width boxes are available for the number of columns you’ve requested. The Preview box displays the results. To create columns of equal width at any point, check the “Equal column width” box.
If you so desire, turn on “Line between” to draw a thin vertical line between columns (it only appears after you have written enough text to spill into your second column). Click OK.
You return to the document, where the fancy columns are now in place.
After you finish a column, the text flows to the top of the next column. To end one column and move on to the next, choose Insert → Break → Column Break.
Columns start out left-aligned, with an uneven right margin. The general consensus, though, is that fully justified columns give the tidiest, most professional look. To justify columns, select all the text in your columns (⌘-A if that’s your entire document), and then click “Alignment and Spacing” → Justification on the Formatting Palette. (Turn on automatic hyphenation, too, for better word spacing, as described in the following section.)
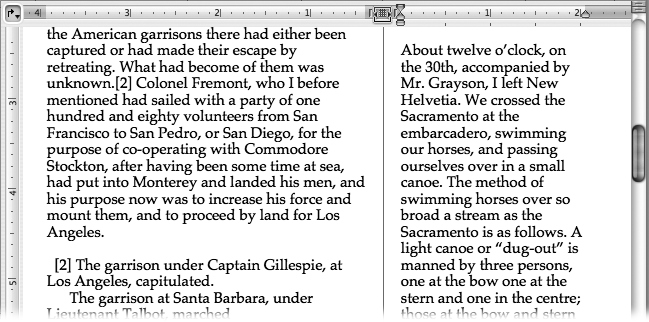
You can resize columns by dragging the column margin markers on the ruler, as shown in Figure 4-7.
Using the Format → Columns dialog box to resize columns gives you better control over the measurements, and provides access to the “Equal column width” feature. If you turn on this box, the columns remain the same width no matter what; if you resize one of them using the arrow buttons, the others automatically grow or shrink to match.
If you don’t turn on “Equal column width,” you can resize each column individually; the other columns grow or shrink to fill the page width. You can also adjust the spacing with the arrow buttons (or by entering numbers in the boxes), and glance at the Preview pane to see the effects of your changes. The total width of the columns and spacing always equals the full text width on the page: the width between the left and right indents.
Figure 4-7. The quickest way to adjust column widths is by eye. First choose View → Print Layout. Then place the cursor over the ruler near the column boundary you’d like to adjust (at the top of the page). When the cursor turns into a double-arrow box, drag to move the column margin.
Tip
If you’re having trouble getting your column lengths to come out even at the bottom of the page, check the Paragraph Spacing (under “Alignment and Spacing” in the Formatting Palette). Leaving just a small amount of space before and after each paragraph makes it easier for Word to balance the columns.
Get Office 2008 for Macintosh: The Missing Manual now with the O’Reilly learning platform.
O’Reilly members experience books, live events, courses curated by job role, and more from O’Reilly and nearly 200 top publishers.


