In the spirit of good chapter structure, we’ve saved
the best for last. In addition to numerous menus and toolbars,
Outlook provides two further methods of navigation: the
Outlook Bar and the Folder
Tree. These graphical folder views are the quintessential
means of quickly moving around Outlook and organizing your files.
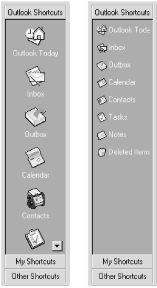
The Outlook Bar is a container for shortcuts. On it you can place shortcuts for Outlook folders, individual Outlook items, or shortcuts to programs and files external to Outlook (that is, residing on your local or network filesystem). Icons on the Outlook Bar can be displayed Large or Small as shown in Figure 4-25. To toggle this option, right-click the Outlook Bar and select the appropriate command from the context menu displayed. Large icons present a better target for file management, a topic discussed shortly, while small icons allow you to display more icons in a group. If there are more icons in a group than the pane can display, scroll arrows appear at the top or bottom of the Outlook Bar to indicate this fact (note the left Outlook bar shown in Figure 4-25).
The Outlook Bar can be hidden from view with the context menu command Hide Outlook Bar. Once hidden, you need to use the View → Outlook Bar menu command to restore it.
Note
For details on taking advantage of file management with the Outlook Bar, the Folder List and the Web Toolbar (to access system files within Outlook itself ) see Chapter 13.
In its default configuration, the Outlook Bar is divided into three Groups: Outlook Shortcuts, My Shortcuts, and Other Shortcuts. To move to a different group, simply click the title. You can add groups to this configuration, rename an existing group with a more meaningful title, or remove a group you no longer use.
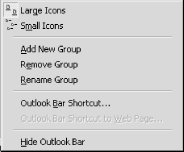
To add a new group, right-click anywhere on the Outlook Bar and choose the Add New Group command from the context menu (Figure 4-26). New groups are always added at the bottom of the Outlook Bar. Type a name for the group in the highlighted space, followed by Enter. To change the display order of the groups on the Outlook Bar, see Reordering the Outlook Bar slater in this chapter.
Outlook Bar Limits
The maximum number of groups you can have on the Outlook Bar is 12. Counting the three preconfigured groups Outlook creates, this means that you can add an additional nine groups before you run up against this program limitation. To add more than 12 groups, you have to delete an existing group. Once you reach this limit, the Add New Group command is no longer available.
To delete an existing group, right-click on the group title button or ensure the group you want to remove is displayed and right-click anywhere within the group. This is important. If you inadvertently delete the wrong group, there is no way to undo this action. Select Remove Group from the context menu. A dialog will appear to confirm this action. Note that this dialog does not display the title of the group you are deleting.
To rename an existing group, right-click on the group title and select Rename from the context menu. Type a new name in the highlighted space provided.
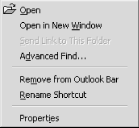
Right-clicking any item (shortcut) on the Outlook Bar invokes the context menu shown in Figure 4-27.
You Can’t Replicate the Outlook Bar
The Outlook Bar is located in the user’s Windows folder in a FAV file. Each user’s FAV file is unique to that user’s mail configuration, so this file will not work if copied from one system to another. The Outlook Bar shortcuts look for a specific signature when attempting to connect to Inbox or Sent Items. Because each Personal folder file (PST), server Mailbox, or other item folder has a unique signature, using the same Outlook Bar shortcut file will not work on a second user’s computer. This feature allows Outlook to maintain the integrity of the shortcut destinations.
- Open
Is essentially a useless command for this context menu. It is no different than clicking on the Outlook Bar icon to navigate to that folder or shortcut.
- Open in New Window
Opens the shortcut selected in a new window, without the Outlook Bar or Folder Tree displayed. It is often useful to have more than one Outlook window open while you work. For example, you could have your Inbox running in one window with the Outlook Bar and/or Folder List displayed for fast file management chores, and in a separate window (typically minimized) your Calendar displayed in the view of your choice, devoid of any navigation tools. An example of this functionality is shown in Figure 4-28.

- Advanced Find
Opens an Advanced Find dialog preconfigured to search the selected folder. This is a particularly useful shortcut to remember, especially if you use multiple Personal Folders (see Chapter 13 for a discussion of the merits of multiple PSTs and Chapter 3 for details on the Find/Advanced Find command).
- Properties
Opens the properties dialog for the shortcut selected. The properties dialog gives you access to details such as folder size, archive settings, and in the case of a top-level folder, the Advanced → Compress Folder command. Outlook folder properties are discussed fully in the “Data Structures” section in Chapter 3. If the shortcut points to a filesystem folder or program (for example, Favorites, My Computer, or a shortcut to a program), the properties dialog shown will be the same as the one available from Windows Explorer.
Any time you create a new folder in Outlook the program offers to place a shortcut to that new folder on the Outlook Bar (providing you have not turned this feature off). The dialog displayed is shown in Figure 4-29.
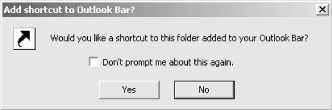
Selecting Yes places a shortcut to this newly created folder in the group My Shortcuts. Selecting “Don’t prompt me about this again” turns off both the prompt and the automatic placement of shortcuts on the Outlook Bar.
Automation aside, you can add four different types to the Outlook Bar: Outlook Folders, Outlook items, Desktop or program shortcuts, and web pages. Like everything else in Outlook, there are a variety of ways to do this depending on the shortcut type, and your mood of the moment:
- To add an Outlook Folder using the Folder List (View → Folder List)
Select the folder you want to add and drag it to a group on the Outlook Bar. A line indicates where the folder will be placed. To add the folder to a different group than the one currently open, hold your cursor (with the mouse button still depressed) over the title of an alternative group and it will open. Alternately, select a folder from the Folder List pane, and choose “Add to Outlook Bar” from the context menu. This method skips all dialogs and simply adds the selected folder to the open Outlook Bar group.
- To add an Outlook Folder from the Outlook Bar itself
Right-click in a group and choose “Outlook Bar Shortcut” from the context menu displayed (or from the File menu, New → Outlook Bar Shortcut). This will open the dialog shown in Figure 4-30 (left).
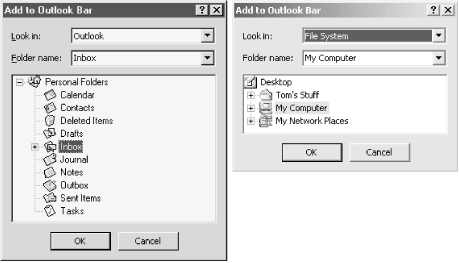
Figure 4-30. The Add to Outlook Bar dialog—Outlook Folder view on the left, filesystem view on the right
From the tree shown, select a folder. It will be placed in the group that is currently open. If the shortcut added ends up in a different group than you intended, simply drag the new shortcut to another group.
- To add a program or file from the Outlook Bar
Go to the Add to Outlook Bar dialog as described previously. Under the “Look in” option, choose Look in File System. The dialog now displays the contents of your filesystem as shown in Figure 4-30 (right). Expand the list to display the desired file or folder and select OK.
It is also possible to add system files or folders to the Outlook Bar using Windows Explorer. The easiest way to do this—considering you will likely have multiple windows open, perhaps covering each other—is to begin by minimizing Outlook to the Task Bar. Open Windows Explorer, locate the file you want to add as a shortcut, and drag it to the minimized Outlook icon. Outlook will open after a short pause. Continue holding down the mouse button and drag the shortcut to the Outlook Bar. If the group you want to add the shortcut to is not currently open, hold your mouse cursor over the group title and that group will open.
- To add an individual Outlook item to the Outlook Bar
Outlook does not support adding an item of its own kind (for example, a mail message or contact record) to the Outlook Bar directly. There is a way around this, however. Open the folder containing the item you want to add to the Outlook Bar. Drag that item to your desktop and drop it there. Next, drag the item shortcut created on the desktop onto the Outlook Bar. Now go back and delete the shortcut that remains on your desktop. Magic, as they say.
- To add a web page to the Outlook Bar
Open Internet Explorer (IE) and navigate to the page you want to add. Put your cursor on top of the icon at the far left of the address bar, hold down your left mouse button, and drag the shortcut (indicated by an arrow imposed over the cursor) to the Outlook Bar group you desire.
If you have the web page you want to add already bookmarked in IE, click on the Favorites icon in the Other Shortcuts group and drag a shortcut from the view window to the Outlook Bar.
Here are a few creative suggestions for organizing and using shortcuts you have added to your Outlook Bar:
Create a group for your favorite sites. Ensure you read the section in Chapter 3 first so you fully understand how Internet Explorer integrates with Outlook. Internet Explorer does lose some functionality when launched from within Outlook.
Keep your most frequently accessed shortcuts near the top of the Outlook Bar. That way, if you have more icons in a group than can be displayed at one time, you won’t have to continually scroll through the group to find the icon you want.
If you find yourself accessing a Control Panel applet frequently (for example, Internet Options), add it as a shortcut to your Outlook Bar. In order to do this, you will have to follow the procedure outlined previously for adding an individual Outlook item—that is, drag the Control Panel applet to your desktop first, then drag it to the Outlook Bar.
If you find yourself accessing the same document day in and day out (like a book chapter, for example), create an icon for it on your Outlook Bar.
How to Rebuild a Corrupted Outlook Bar
If you corrupt your Outlook Bar, here is how to restore it: close Outlook. Go to Start on the Windows taskbar. Select Run and in the Open box type: Outlook.exe/ResetOutlookBar. Entering this will start Outlook and rebuild the Outlook Bar to its default configuration and layout.
While the Outlook Bar is a good container to organize frequently accessed files, folders, and web sites, it is more much more than a shortcut bar; it is your gateway to "drag and drop” between Outlook’s various components. For example, you receive email from your associate Joe Snipps asking you to attend a meeting next Tuesday and you want to add it to your calendar. Go to your Inbox (or wherever the message is located), select it, and drop it on the Calendar icon. This action will create a new calendar entry, with the Subject field prefilled and the body of the email entered into the free-form notes field. Fill in the start time and date, add a note or two, link the contact field of the calendar entry to the person sending the email, and you’re done.
To sum up the preceding example:
Dragging an email message to any of Outlook’s other components (Calendar, Contacts, Tasks, Notes, and Journal) creates a new record with the message details transposed to the new item entry.
Dragging a Calendar entry to the Inbox icon creates a new message with the appointment subject as the subject of the message, and the appointment details transferred to the Notes field.
Dragging a Calendar entry to the Contacts icon creates a new entry there based on the owner (creator) of the appointment item.
Dragging a Calendar entry to Tasks, Notes, or Journal creates a new record according to the component it is dropped on.
Dragging a Task, Note, or Journal entry to another component works in a similar manner. The point here is that you can save yourself a tremendous amount of time and keyboard entry by dragging and dropping Outlook items onto Outlook Bar icons.
The Folder List displays your Outlook folders in a familiar tree structure, and is arguably one of the most useful combination navigation and file management tools available in Outlook. The fastest way to access the Folder List is to click the folder title displayed in the upper-left of your active window, as shown in Figure 4-31.
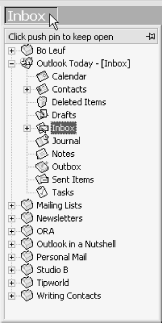
Note the small pushpin icon in the upper-right corner of the Folder List pane. Much of the functionality of the Folder List is dependent on whether this pushpin is “inactive” (as shown in Figure 4-31), or “activated” (as shown in Figure 4-32).
If you open the Folder List by simply clicking on the title and you
do not press the pushpin, this open pane becomes a quick navigational
tool. Clicking any displayed folder displays it as the active view,
and the Folder List conveniently closes again. You can navigate to
subfolders in the same manner by first clicking the tree expansion
square (+) and, after the tree expands, selecting
a folder to display. Outlook will obediently wait for you to select a
folder before making it active and closing the Folder List pane.
Folder List Magic
To quickly move one file, you do not need to “lock” the Folder List open. Select the item to move (or copy), hold down the left mouse button, and drag it to the Folder List title. Continue to hold down the left mouse button, and after a pause the Folder List will open. Release the item on the folder of your choice. To copy an item, hold down the Ctrl key as you drag.
On the other hand, if you need to do extensive file management chores, or you simply prefer to use the Folder List as your primary navigational tool rather than the Outlook Bar, “lock” it open. This can be accomplished in one of two ways:
By opening the Folder List with the View → Folder List command
By opening the Folder List using the “title shortcut” (demonstrated in Figure 4-31), and then pressing the pushpin
Here are some examples of file management shortcuts that can be used with the Folder List open:
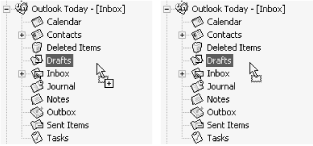
To move an Outlook item from one folder to another, select it and drag it to the destination folder displayed in the open Folder List. To copy a file from one folder to another, hold down the Ctrl key during your drag and drop action. See Figure 4-33.
To move a folder from one location to another, select the folder and drag it to a new a position; to copy it, use the Ctrl key as described in the previous paragraph.
Copy Versus Move
A quick way to tell whether you are moving or copying an item is to watch the mouse cursor. During the move operation, the cursor displays a small blank rectangle under the mouse pointer as shown in Figure 4-33 (right); during a copy operation, the cursor displays a + in addition to the rectangle as shown in Figure 4-33 (left).
Note
Outlook has several key folders inherent to its operation, called System Folders (see Chapter 3). You cannot delete, move, or rename a System Folder (e.g., the Inbox or Contacts folders).
To navigate around the Folder List using the keyboard:
Use the Home/End keys to position your selection at the top or bottom of the displayed tree. The up and down arrow keys navigate up and down the tree. To expand a branch, position your selection on the folder containing subfolders and press the right arrow key; the left arrow key collapses the branch again.
To quickly move to a specific folder name, use your keyboard’s letter keys. For example, to move to the first folder beginning with the letter “T”, press the T key; if you have more than one folder that begins with this letter, Outlook will walk down through the Folder List and when it reaches the bottom (or top) of the tree, reverse direction.
Select a folder and press F3 to open the Advanced Find dialog. For tips and tricks on harnessing the power of Outlook’s Advanced Find, see Chapter 3.
To create a new folder, the keyboard shortcut is Ctrl+Shift+E.
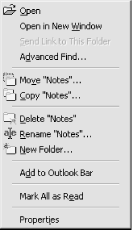
And finally, for all you “Mouseketeers” out there, selecting a folder and clicking the right mouse button displays the context menu shown in Figure 4-34.
Note
The Folder list truly comes into its own as a file management tool when you start using multiple Personal Folders. This topic is addressed in Chapter 13.
Get Outlook 2000 in a Nutshell now with the O’Reilly learning platform.
O’Reilly members experience books, live events, courses curated by job role, and more from O’Reilly and nearly 200 top publishers.

