Chapter 1. Routing and Switching Strategies
The previous book in this series, The Packet Guide to Core Network Protocols, covered the IPv4 protocols, masking, and devices that are part of every network. Now it’s time to take on the routing and switching for the network. There are an astonishing number of table-based decisions that have to be made in order to get a single packet across a network, let alone across a series of networks. Not limited to routers, switches, and access points, these decisions are made at each and every device, including hosts. As networks are constructed and devices configured to forward packets and frames, network administrators must make critical decisions affecting performance, security, and optimization.
When moving to advanced ideas, the net admin should know how and why networking tables are constructed, and in what cases manual changes will be beneficial. This chapter provides details about the routing and switching operations, as well as design elements. This chapter assumes that the reader understands the basic operation of routers and switches, as well as the standard suite of protocols including Ethernet, Internet Protocol (IP), Address Resolution Protocol (ARP), and the Internet Control Message Protocol (ICMP).
Switching: Forwarding and Filtering Traffic
Most protocols are foregone conclusions, so when building networks, many of the choices are not choices at all. It is highly probable that a network will be a mixture of Ethernet and 802.11 nodes. These nodes will run the Internet Protocol at Layer 3 of the Transmission Control Protocol/Internet Protocol (TCP/IP) networking model (see Figure 1-1). The applications will be designed for TCP or the User Datagram Protocol (UDP).
There are many types of switching: packet, circuit, multilayer, virtual circuit, wide area network (WAN), local area network (LAN). Circuiting and virtual circuit switching almost always refer to WAN or telephone technologies, and as such, will not be part of our discussion. Packet switching usually concerns a router or perhaps a WAN switch. Multilayer switching is a technique for improving the processing of IP packets, but most vendors have different ideas as to the best approach. Often, LAN switches are deployed without any thought to how multilayer switching might improve performance. In fact, other than routing between VLANs, administrators are rarely interested in how advanced features might be used on the network. Since this book is about IP-based networking, switching will almost always refer to Ethernet frames and the routing will be that of IP packets.
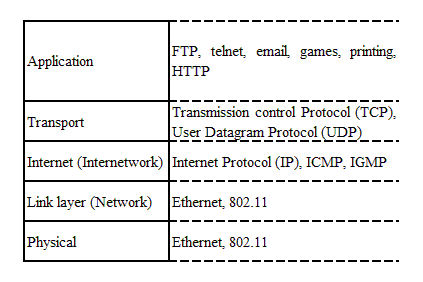
Figure 1-1. TCP/IP model
Switches operate at Layer 2 of the TCP/IP (and OSI) model and are the workhorses of most networks. The operation of switches and bridges is defined in the IEEE 802.1D standard. The standard also describes the behavior of other Layer 2 protocols, such as the Spanning Tree Protocol, which will be covered in Chapter 3.
In network design, we often talk about the “access” layer or how host devices are connected to the network. Switches and access points (we’ll ignore the use of hubs and collision domains) cover all of the bases. In addition to forwarding Ethernet frames based on Media Access Control (MAC) addresses and processing the Cyclical Redundancy Check (CRC), switches provide a couple of very important services:
Filter out traffic that should not be forwarded, such as local unicast frames
Prevent the forwarding of collisions
Prevent the forwarding of frames with errors
Switches also provide a collection of features that are part of most medium and large networks:
Virtual local area networks (VLANs)
Simple network management protocol (SNMP)
Remote management
Statistics collection
Port mirroring
Security such as 802.1X port-based authentication
Any device connected to a network, regardless of its specialization, still has to follow the rules of that network. Thus, switches still obey the rules for Ethernet access and collision detection. They also go through the same auto-negotiation operations that Ethernet hosts complete. There are several different link types used when installing switches. They can be connected directly together in point-to-point configurations, connected to shared media or to hosts. Depending on the location in the network, the requirements for performance and security can be significantly different. Core or backbone switches and routers may have the requirement of extremely high throughput, while switches connected to critical elements may be configured for stricter security. Many switches have absolutely no configuration changes, and are simply pulled out of the box and run with default factory settings.
Forwarding Based on MAC Addresses
To forward or filter Ethernet frames, the switch consults a source address table (SAT) before transmitting a frame to the destination. The SAT is also called a MAC address table or content addressable memory (CAM). Only the destination indicated in the table receives the transmission. In general, a switch receives a frame, reads the MAC addresses, performs the Cyclical Redundancy Check (CRC) for error control, and finally forwards the frame to the correct port. Broadcast and multicast frames are typically forwarded everywhere except the original source port. Figure 1-2 depicts a typical topology with a switch at the center.

Figure 1-2. Basic switch topology
Network nodes have unique MAC addresses and Ethernet frames
indentify the source and destination by these MAC addresses. A MAC
address is a 6-byte value, such as 00:12:34:56:78:99, which is assigned to the
host. The SAT is a mapping between the MAC addresses and the switch
ports. This table also keeps track of the virtual local area networks,
or VLANs, configured on the switch. On most switches, all ports are in
VLAN 1 by default. The source address table for the network shown in
Figure 1-2 might look like Table 1-1.
| MAC Address | VLAN | Port |
|---|---|---|
|
Node A MAC |
1 |
1 |
|
Node B MAC |
1 |
2 |
|
Node C MAC |
1 |
3 |
|
Node D MAC |
1 |
4 |
If the address is known, the frame is forwarded to the correct
port. If the address is unknown, the frame is sent to every port except
the source port. This is called flooding. If the destination MAC address
is a broadcast address (in the form ff:ff:ff:ff:ff:ff), the frame is again sent
everywhere except the original source port. In many cases, this is also
the behavior for multicast frames. Recall that multicast frames commonly
begin with a hexadecimal 01 in the first byte. The range of a multicast
frame can be affected by using the Interior Group Management Protocol
(IGMP). Switches can perform IGMP snooping in order to determine which
ports should receive the multicast traffic. IGMP is also defined in the
IEEE 802.1D standard. VLANs can reduce the effect of flooding or
broadcasting because they can be used to break the switch into smaller
logical segments. We’ll talk about VLANs in Chapter 4.
Figure 1-3 displays the source address table
from an operating Cisco switch. This output was obtained using the
show mac-address-table command for the Cisco switch.
The term “dynamic” means that
the switch learned the address by examining frames sent by the attached
nodes.
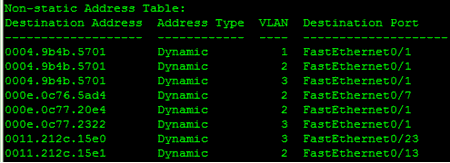
Figure 1-3. Cisco switch SAT
Note that there are three VLANs and port 1 (FastEthernet0/1) has several associated MAC addresses. This is because another switch was connected at that point. An example of this type of topology in shown in Figure 1-4. Two switches are interconnected via Port 3 on Switch 1 and Port 3 on Switch 2. As normal traffic flows, the switches will learn where all of the MAC destinations are by recording the source MACs from the Ethernet transmissions.
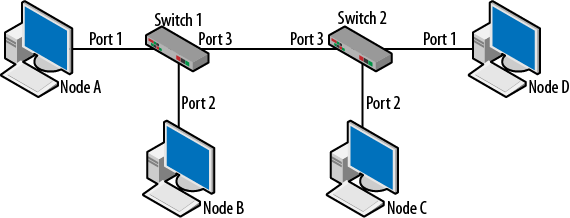
Figure 1-4. Two switch topology
In topologies such as this, it is impossible for a switch to connect directly to each destination. For example, the only piece of information Switch 2 will possess is the source MAC from its perspective. So, from the perspective of Switch 2, all frames appear to have come from the single port (3) connected to Switch 1. The reverse is also true. Building on what is known of source address tables and the learning process, the SATs for the two switches would look like Table 1-2.
| Switch 1 | Switch 2 | ||||
|---|---|---|---|---|---|
| MAC address | VLAN | Port | MAC address | VLAN | Port |
|
Node A |
1 |
1 |
Node A |
1 |
3 |
|
Node B |
1 |
2 |
Node B |
1 |
3 |
|
Node C |
1 |
3 |
Node C |
1 |
2 |
|
Node D |
1 |
3 |
Node D |
1 |
1 |
When Node A sends traffic to Node D, Switch 1 forwards the traffic out Port 3. Switch 2 receives the frame and forwards the frame to Port 1.
Figure 1-3 also depicts several VLANs. What isn’t clear from these SATs or topology diagrams is how traffic moves from one VLAN to another. Interconnected switches configured with VLANs are typically connected together via trunk lines. In addition, Layer 2 switches need a router or routing functionality to forward traffic between VLANs. With the advent of multiplayer switches, the boundary between routers and switches is getting a bit blurry. VLANs and trunks will be covered in-depth in Chapter 4.
One other very nice feature of a switch is port mirroring. Mirroring copies the traffic from one port and sends it to another. This is important because over the last several years, hubs have been almost entirely removed from the network. But without hubs, it can be a challenge to “see” the traffic that is flowing on the network. With mirroring, a management host can be installed and collect traffic from any port or VLAN. The following are examples of the commands that might be issued on a Cisco switch:
monitor session 1 source interface Fa0/24
monitor session 1 destination interface Fa0/9 encapsulation dot1q
The first command describes the source of the traffic to be monitored. The second command not only specifies the destination, but the type of frame encapsulation as well. In this case, the traffic monitored is actually flowing over a trunk line. Trunks are part of Chapter 4. Mirroring commands can also specify the direction of the desired traffic. It is possible to select the traffic traveling to or from a specific host. Typically, both directions are the default.
Figure 1-5 depicts an example in which Nodes A and B are communicating and the network admin would like to see what they are up to. So, the traffic coming to and from Node B is mirrored to the management node. Since the conversation is between Node A and B, a port connected to either one of them will suffice.
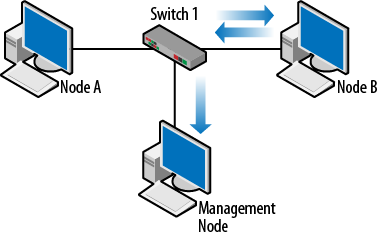
Figure 1-5. Port mirroring
Routing: Finding Paths
When building networks, we typically divide routing into two components: host and router. Routers handle traffic flowing between networks but hosts make many decisions long before the packets hit the network. Most routing protocols used to find pathways to destinations are router based, however.
Hosts are typically configured one of two ways: statically with an IP address, default gateway, and domain name server, or with values learned via the Dynamic Host Configuration Protocol (DHCP). Hosts send all traffic going off the local network to the default gateway, with the hope that the gateway can route the packets to the destination. One of my favorite questions to ask is “What is the first thing that a host does before sending a packet?” Before doing anything else, a host must process its routing table. Chapter 2 of this book is devoted to host-based routing. Historically, there have been some network technologies in which the hosts were more active. For example, IBM’s Token Ring utilized discovery frames to find destination nodes on different network segments or rings. However, this is primarily a Layer 2 function, and is not part of contemporary Ethernet- and IP-based networks. Recent years have seen a return to utilizing the host of handling the routing function in the area of ad hoc networking.
Ad hoc routing typically does not run on the traditional network infrastructure. Applications include sensor networks, battlefield communications, and disaster scenarios in which the infrastructure is gone. In these situations, nodes will handle forwarding of traffic to other nodes. Related ideas are the ad hoc applications and 802.11 ad hoc networks. It is important to realize that with the 802.11 standard, nodes can connect in an ad hoc network but do not forward traffic for other nodes. If a wireless node is not within range of the source host, it will miss the transmission.
Ad hoc routing protocols are designed to solve this particular problem by empowering the nodes to handle the routing/forwarding function. Interesting problems crop up when the “router” may not be wired into the network: things such as movement of the wireless nodes, power saving, processing capability, and memory may be affected. In addition, the application is important. Are the nodes actually sensors which have very little in the way of resources? Are they moving quickly? These challenges have resulted in several ad hoc routing protocols being developed, such as Ad hoc On Demand Distance Vector (AODV), Fisheye State Routing (FSR), and Optimized Link State Routing (OLSR).
But these ideas are all a little beyond the scope of this book. The point being made here is that hosts and the host routing table are very active in the processing of packets. Historically, nodes on some networks were even more involved, and if ad hoc routing protocols are any indication, those days are not gone for good.
Routing Devices
Routers operate at the internetwork layer of the TCP/IP model and process IP addresses based on their routing table. A router’s main function is to forward traffic to destination networks via the destination address in an IP packet. Routers also resolve MAC addresses (particularly their own) by using the Address Resolution Protocol (ARP). It is important to remember that Layer 2 (link layer) frames and MAC addresses do not live beyond the router. This means that an Ethernet frame is destroyed when it hits a router. When operating in a network, a router can act as the default gateway for hosts, as in most home networks. A router may be installed as an intermediate hop between other routers without any direct connectivity to hosts. In addition to routing, routers can be asked to perform a number of other tasks, such as network address translation, managing access control lists, terminating virtual private network or quality of service.
Basic router functionality is comprised of three major components:
Routing process
Routing protocols
Routing table
The routing process is the actual movement of IP packets from one port to another and the routing table holds the information used by the routing process. Routing protocols such as the Routing Information Protocol (RIP) or Open Shortest Path First (OSPF) are used to communicate with other routers and may end up “installing” routes in the routing table for use by the routing process. When a router is configured, the routing table is constructed by bringing interfaces up and providing the interfaces with IP addresses. A simple Cisco routing table is shown in Figure 1-6.

Figure 1-6. Router routing table
When processing packets, routers “traverse” the routing table
looking for the best possible pathway match. The routing table shown in
Figure 1-6 indicates that the router knows
of two networks: 192.168.15.0 and
192.168.20.0. Note that this router
does not have a default gateway or “gateway of last resort.” This means
that if the destination IP address is anywhere beyond the two networks
listed, the router has no idea how to get there. If you said to
yourself, “Ahh, ICMP destination unreachable message,” give yourself a
gold star.
Routing tables can be comprised of several different route types:
directly connected, static, and dynamic. Two directly connected routes
are seen in Figure 1-6. These are the
networks on which the router has an interface and are accompanied by the
letter “C” and the particular
interface, such as FastEthernet0/1.
Directly connected routes have preference over and above any other
route.
Note
The 0/1 from the interface is a designator for the blade and port in the router chassis.
Static Routes
Static entries are those that are manually installed on a router by the network administrator. For specific destinations, and in small or stable network environments, manually configured static routes can be used very successfully. By using static routes, the network administrator has determined the pathway to be used to a particular destination network. The static route will supersede any pathway learned via a routing protocol because of the administrative distance, discussed later in this chapter.
Another important idea that is central to routing is the
next hop. The next hop is a router that is one step
closer to the destination from the perspective of a particular router.
The next hop is the router to send packets to next. In many networks, a
series of next hops are used. A medium-sized routed topology is shown in
Figure 1-7. So, from the
perspective of R1, R2 would be the next hop used to get to both the
192.168.3.0 and 192.168.4.0 networks.

Figure 1-7. Small routed topology
This topology has three routers, which are cabled to each other
via the switches shown. There are several ways to emulate a topology
such as this, but this configuration was chosen for clarity. Initially,
nothing has been configured except that the interfaces have been
“brought up” and given IP addresses. To bring up an interface, it has to
have been given the no shutdown command and have a
link pulse. The routing tables of the routers will only contain the
directly connected routes. Each router is only aware of the two networks
for which is has interfaces. Table 1-3
depicts the routing tables at this point.
| R1 | R2 | R3 |
|---|---|---|
|
C 192.168.1.0 F0/0 |
C 192.168.2.0 F0/0 |
C 192.168.3.0 F0/0 |
|
C 192.168.2.0 F0/1 |
C 192.168.3.0 F0/1 |
C 192.168.4.0 F0/1 |
What is clear from these tables is that the routers do not have a
complete picture of the whole network. For example, Node A is connected
to Switch 1 and is trying to contact Node B on Switch 4. After
processing its host routing table (see Chapter 2),
it will forward the traffic to its default gateway (192.168.1.254) on R1. R1 will now consult its
routing table and discover that it only has entries for networks on the
left side of the topology. Without knowledge of the destination network,
R1 will issue the ICMP destination unreachable message.
Note
Just for fun: The 192.168.1.0
and 192.168.4.0 networks are called
stub networks because they have only one pathway in or out.
How is this problem solved? In small networks such as this, the
network administrator can issue routing commands to the routers
providing them with additional forwarding information. These would be
the static routes. For Cisco routers, the command ip
route is used. It has three fields that have to be filled in
by the network administrator:
ip route destination-network destination-network-mask next-hop-IP-address (forwarding router interface)
For example, R1 could be told how to get to the 192.168.3.0 and the 192.168.4.0 networks with the following
commands:
ip route 192.168.3.0 255.255.255.0 192.168.2.254
ip route 192.168.4.0 255.255.255.0 192.168.2.254
The commands are almost identical except for the destination
network. A couple important points: the last field specifying the
forwarding router interface (192.168.2.254) is a neighboring router that
can be reached by R1. With these two commands, the behavior is that from
R1 the traffic is destined for the two networks specified should be sent
to R2. The mask is also the mask of the destination network and not the
mask used locally. It is possible that these masks are different. This
correct form is called a recursive route.
After issuing the commands on R1, the routing tables would be updated as listed in Table 1-4:
| R1 | R2 | R3 |
|---|---|---|
|
C 192.168.1.0 F0/0 |
C 192.168.2.0 F0/0 |
C 192.168.3.0 F0/0 |
|
C 192.168.2.0 F0/1 |
C 192.168.3.0 F0/1 |
C 192.168.4.0 F0/1 |
|
S 192.168.3.0 via 192.168.2.254 | ||
|
S 192.168.4.0 via 192.168.2.254 |
While this is an improvement, it only solves part of the problem.
Now R1 understands that traffic bound for these networks has to go to
R2, but what does R2 do next? In the case of the 192.168.3.0 network, everything is fine since
this is directly connected to R2. R2 can ARP for hosts since they will
be on the same network. But since traffic is going to 192.168.4.0, R2 requires some assistance from
the administrator in the form of the following command:
ip route 192.168.4.0 255.255.255.0 192.168.3.254
The routing table is updated accordingly and we can breathe a sigh
of relief as the packets finally made it to the 192.168.4.0 network.
| R1 | R2 | R3 |
|---|---|---|
|
C 192.168.1.0 F0/0 |
C 192.168.2.0 F0/0 |
C 192.168.3.0 F0/0 |
|
C 192.168.2.0 F0/1 |
C 192.168.3.0 F0/1 |
C 192.168.4.0 F0/1 |
|
S 192.168.3.0 via 192.168.2.254 |
S 192.168.4.0 via 192.168.3.254 | |
|
S 192.168.4.0 via 192.168.2.254 |
Getting to the destination network is only half the battle—packets
still have to get back. Examining the routing table on R3, it can be
seen that the router does not understand where the 192.168.1.0 network can be found. The packet
from Node A would have gotten there, but when Node B tries to respond,
it will receive an ICMP destination unreachable message from R3. From
the perspective of Node A, it will appear as though the transmission was
never answered. To be complete, ip route commands for
all of the unknown networks would have to be issued on each router and
the routing tables updated. After all of the ip route
commands have been issued, the routing table would look like the entries
seen in Table 1-6.
| R1 | R2 | R3 |
|---|---|---|
|
C 192.168.1.0 F0/0 |
C 192.168.2.0 F0/0 |
C 192.168.3.0 F0/0 |
|
C 192.168.2.0 F0/1 |
C 192.168.3.0 F0/1 |
C 192.168.4.0 F0/1 |
|
S 192.168.3.0 via 192.168.2.254 |
S 192.168.1.0 via 192.168.2.253 |
S 192.168.1.0 via 192.168.3.253 |
|
S 192.168.4.0 via 192.168.2.254 |
S 192.168.4.0 via 192.168.3.254 |
S 192.168.2.0 via 192.168.3.253 |
The actual routing table for R2 and the ip
route commands issued on R2 are both shown in Figure 1-8.
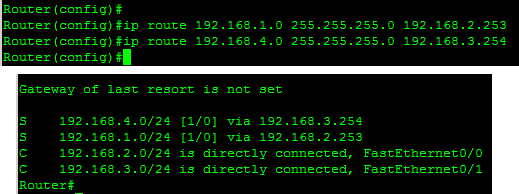
Figure 1-8. R2 routing table with static route commands
In the last few routing tables, all of the destination networks can be reached either because they are directly connected or have a static route which points to a neighbor router that might be able to help. I have used the term “might” because when using static routes, there is actually an assumption that the forwarding router chosen knows something about the pathway to the destination. This is not always the case, as was described before the routing tables were fully populated.
Note
There are several options regarding the arguments for the
ip route command and there are times when the usage
seen in this chapter should be modified. Serial links provide an
example in which the last field should be an interface rather than a
next hop ip address.
Digging a Little Deeper—Common Mistakes
Reviewing the changes outlined in Figure 1-8, there are two common mistakes made when trying to configure static routing. These will be reviewed from the perspective of R2. The following is a mistake:
ip route 192.168.1.0 255.255.255.0 192.168.2.254
This command asks the router to forward traffic to itself. In
effect this says, “R2 doesn’t know where the 192.168.1.0 network is, so let’s send it to
R2.” This also makes little sense to the router and so it usually
responds with the message shown in Figure 1-9. The network
administrator and the router stare at each other for a bit, and then the
admin is likely to try the second common mistake. This also occurs when
addresses are entered incorrectly. The proper form is shown in Figure 1-8.

Figure 1-9. Error message for circular routing
The second mistake does not actually specify a forwarding router
IP address, but rather a physical interface. This results in higher
processing load on the router, and is usually reserved for use with
interior routing protocols. The command and the resulting routing table
are shown in Figure 1-10. Though they are static
routes, the routing table indicates that the 192.168.1.0 and 192.168.4.0 networks are directly connected.
The topology shows that this is clearly not the case.
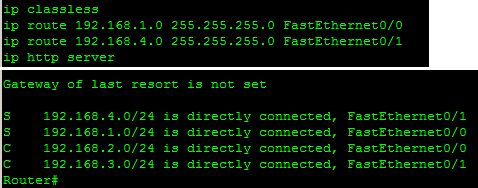
Figure 1-10. Mistake 2
The reason for the higher processing is that the command is not
specific enough and the router actually has no idea where to send the
traffic. It is similar to a person who, wishing to mail a letter,
addresses the letter but then simply opens the front door and throws the
letter outside, hoping that it will get to the destination. What is
really interesting is the effect on network traffic. The Address
Resolution Protocol (ARP) traffic is limited to the local area network
or subnet. This means that ARP messages are not generally forwarded by
routers and hosts do not ARP for nodes not on their own network. An
exception can be found in Proxy ARP, but it is rarely used. Lastly, MAC
addresses typically do not have any meaning beyond their own network.
But look what happens when the commands shown in Figure 1-10 are used. Figure 1-11 shows that R3 (192.168.3.254) is sending an ARP request for
192.168.1.1, a node on a distant
network. This breaks all of the basic behaviors and is just plain wrong.
It makes me uncomfortable just looking at it.

Figure 1-11. Nonlocal ARP traffic
Default Routes
It is often the case that several destinations can be reached via the same pathway. In cases like this, the routing table can continue to grow even though many of the routes share common fields. This was true in the routing tables for both R1 and R3. Routing table entries sharing the same pathway can be replaced with a smaller set of routes. The best examples are default routes and aggregation. Aggregation or route summarization is a technique for reducing the number of entries in a routing table by shortening the prefix length. The effect is to collect a series of destinations into a single entry.
The default route is a special case of a static route. Normally we think of default gateways or routers for hosts. Routers can also have default gateways. Like a host, when the routing table is exhausted and no matches are found for the destination, the default route is used. In Cisco-speak, this is called the gateway of last resort. Again, just like static routes, the network administrator is assuming that the next hop router knows something that the current router does not: how to get to either the destination or the next hop. Figure 1-12 shows the topology with the candidate default routes based on the information from Table 1-6.
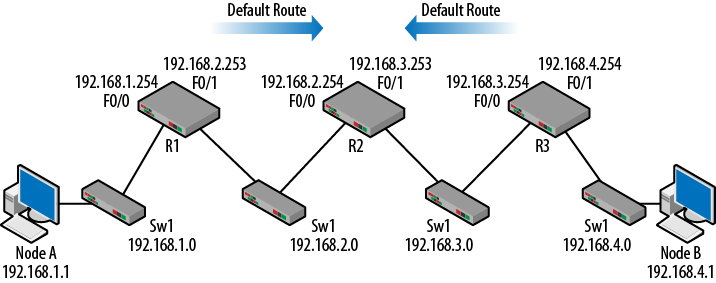
Figure 1-12. Default routes
For R1, all destinations not directly connected must be reached by
forwarding traffic to 192.168.2.254.
For R3, all destinations not directly connected must be reached by
forwarding traffic to 192.168.3.253.
Therefore, some of the routing table entries could be replaced with a
default route. For a router, a default route or gateway of last resort
is installed with a special set of arguments in the ip
route command. Instead of specifying the destination network
and the destination network mask, default routes use all 0’s. You may
recall that in processing a routing table with masks, ANDing any IP
address with a mask of 0.0.0.0
results in 0.0.0.0. This means that
any destination will result in all zeroes (0.0.0.0) and the ANDing process for this
ip route line will also be all zeroes, matching every
destination:
ip route 0.0.0.0 0.0.0.0 forwarding router interface
For R1:
ip route 0.0.0.0 0.0.0.0 192.168.2.254
and for R4:
ip route 0.0.0.0 0.0.0.0 192.168.3.253
The routing tables would be updated as in Table 1-7.
| R1 | R2 | R3 |
|---|---|---|
|
C 192.168.1.0 F0/0 |
C 192.168.2.0 F0/0 |
C 192.168.3.0 F0/0 |
|
C 192.168.2.0 F0/1 |
C 192.168.3.0 F0/1 |
C 192.168.4.0 F0/1 |
|
S 0.0.0.0/0 via 192.168.2.254 |
S 192.168.1.0 via 192.168.2.253 |
S 0.0.0.0/0 via 192.168.3.253 |
|
S 192.168.4.0 via 192.168.3.254 |
Again, there are a couple of important points to note. While the routing tables for R1 and R3 have been improved, R2 still has the same number of routes. In this case, a default route pointing to R1 or R3 would not help much because R2 would still need another route for the network in the opposite direction. Additionally, we would be risking a routing loop. Lastly, going from four routes down to three may not seem like much of an improvement for R1 and R3, but this is a small network. Production networks can be much larger and have hundreds of routes.
Dynamic Routes
Dynamic routes are those learned via routing protocols, such as Routing Information Protocol (RIP) or Open Shortest Path First (OSPF). When building a network, the approach used to handle routing is an important decision. Static routes require less processing, but changes to network topology cannot be addressed quickly. If the pathway to a destination changes, or if a router is offline, pathways or routes will be lost. Static routes also offer no protection from operator error. Typically, static routes are used when the topology is stable and the network architecture is fairly straightforward. In other words, when the network conditions are well understood. We often assume that if the network admin installs the route, if must be correct. Dynamic routing protocols can protect us from these topology changes and errors between the keyboard and the chair. Most routing protocols also provide protection from routing loops and old, incorrect information. Many also handle load balancing and multiple pathways to destinations.
Routing Protocols
Before we discuss individual routing protocols in the later chapters, it is necessary to discuss types or characteristics of protocols. The idea is to pick the right protocol for the job and to do this we have to examine the algorithm and operational details. There are several ways to look at or define different protocols.
Single versus multipath
Routing protocols use an algorithm to determine the best path to the destination. If there is only one path, the decision is quite simple. In the event that several pathways exist, the routing protocol has a choice: it may take only the best possible path, leaving others to languish until needed, or it could install multiple pathways to the destination. The former is called a single path protocol. It may be that two pathways are equal in all respects and the router cannot make a choice as to which is better. The protocol can choose to send some portion of the data via each pathway. In this case, the protocol may be performing some form of load balancing to improve network throughput, in which case it would be considered multipath. Lastly, some consideration must be given to backup paths and the protocols’ ability to failover should the preferred path be unavailable.
Interior versus exterior
Most routing protocols have established limitations. A clear example is the Routing Information Protocol (RIP), which cannot handle networks with more than 15 hops. Protocols are also designed to include in their calculations certain network parameters, such as cost or utilization. Thus, it may be that a particular protocol is completely inappropriate for a given network topology. Those designed for a group of networks under single administrative control (an autonomous system) are called interior routing protocols. We will see in later chapters that some interior routing protocols should stick to small groups of networks. Those designed for much larger scale topologies such as WAN connectivity and those deployed by ISPs are called exterior. Exterior protocols tend to link autonomous systems together. The Border Gateway Protocol (BGP) is an exterior routing protocol.
Flat versus hierarchical
When implementing a routing protocol, routers have a specific set of tasks to perform, such as advertising routing information, handling topology changes, and determining best path. If all of the routers are performing the same set of tasks, the protocol is said to be flat. This is the case with RIP. However, if there are other functions assigned to a subset of the routers, the protocol may be operating in a hierarchical manner. For example, some protocols define backbone and nonbackbone sections of the network. Traffic tends to flow from nonbackbone to backbone sections. Protocols often create boundaries around these sections called domains or areas. Peer routers communicate within a domain and backbone routers communicate between domains. OSPF is considered to be hierarchical because of its area-based organization. All OSPF routers understand forwarding within an area. Some of the routers understand inter-area forwarding and have additional knowledge of the overall topology.
Link state versus distance vector
These two terms refer to the algorithm used by the protocol to determine routes to use. Distance vector protocols are also called Bellman-Ford (for the original designers). You may recall from physics class that a vector is an object that describes magnitude and direction. An example might be that a runner was traveling 6 MPH and heading north. Distance vector routing protocols use the same idea in that they describe distance to the destination, commonly in terms of hop count (number of routers), and a direction in the form of the next hop IP address or interface to use. So, the destination network is X number of hops away and sends packets to a particular router. Neighboring routers send a portion of their routing table to each other and then send periodic updates. But there isn’t much information other than hop count and direction. It is therefore difficult to make a decision based on the quality of the path. RIP is a distance vector protocol. Distance vector protocols are generally slow to “converge the topology” when compared to link state protocols. Convergence refers to the process of establishing a steady state topology after changes have occurred.
Link state protocols utilize greater detail about the links or connections between routers in order to make more informed decisions. For example, while two pathways might cover the same distance in order to get to the destination, if one path is based on 1Gbps Ethernet and the other is based on slower Frame Relay, the former path is chosen—even if the hop count is the same. This routing information is also flooded to the entire topology to speed up convergence. After the information has been flooded, routers keep in regular contact with each other via “hello” messages indicating that nothing has changed. For these reasons, link state protocols tend to converge more quickly. The protocols are based on Dijkstra’s algorithm for finding the best path between points on a graph. OSPF is an example of a link state routing protocol.
A protocol like RIP can now be characterized as dynamic, router based, single path, interior, flat, and distance vector. Why RIP has these characteristics will be covered in Chapter 5. OSPF would be dynamic, router based, multipath, interior, hierarchical, and link state. We’ll take an in-depth look at OSPF in Chapter 6.
Choosing or Installing a Route
As the routing table is built via dynamically learned routes, the router has to decide whether a route should be installed in the table. With static routes, the router doesn’t have much choice. Additionally, as packets are received by the router, it must decide which route is the best for the given destination. For both of these decisions, three values are compared: prefix length, administrative distance, and metric values, in order of importance. These three are typically discussed in the context of Cisco routers. However, other vendors use similar processes and values in their routing table construction and decisions.
Prefix length
Prefix length is based on the number of
bits in the mask because the mask determines the network address. The
greater the number of 1’s in the mask, the longer the prefix length.
For example, an IP address of 192.168.1.5 with a mask of 255.255.255.0 has a network address of
192.168.1.0. Thus, the prefix
length is 24. The same IP address with a mask of 255.255.0.0 has a prefix length of 16 and a
network address of 192.168.0.0.
When building a routing table or forwarding packets, longer prefixes
are preferred because they get a packet closer to the destination. For
example, if you were trying to mail a letter to someone living in the
east, but all you knew was that they lived in Boston, the mail plane
would drop the letter over the city in hopes that it would reach the
destination. Providing the street gets the letter a little closer, and
adding the house number finally gets it to the destination. So the
address got longer and longer.
Similarly, to send a packet to me here at RIT (no
denial-of-service attacks, please), routing table entries using a
network address of 129.21.0.0 get
it to this general area, but RIT is a big place. Routers eventually
list the correct subnet by using a longer prefix, and get the packet
much closer. Prefix length is the number one consideration in this
process.
Administrative distance
The second consideration is the administrative distance. There are times when a router will receive information from different protocols. If the prefix lengths are the same, how does the router determine which information is the best? You might hear about two new restaurants from different friends. Experience tells you which of your friends has the better advice regarding food. Similarly, some routing protocols are better than others. Administrative distance is a number that can describe the value of information learned via a routing protocol or of the routing table entries already installed.
Every routing protocol has an administrative distance, and this is included in the routing table entries. Lower values are preferred and so, given two routes with an equal prefix length, the lower administrative distance will be chosen. Some common examples include those shown in Table 1-8.
| Route type | Administrative distance |
|---|---|
|
Static |
1 |
|
EIGRP |
90 |
|
OSPF |
110 |
|
RIP |
120 |
Based on these values, OSPF information is considered superior to that of RIP. Given the same prefix length, you would take the OSPF information over that of RIP. However, if RIP advertises a route with a prefix length of 24 compared to an OSPF prefix length of 22, the RIP information will be installed or used. In a routing table, bracketed numbers include the administrative distance:
- RIP - 192.168.1.0 255.255.255.0 [120]
- OSPF - 192.168.1.0 255.255.252.0 [110]
Note that based on the administrative distance, static routes are considered superior to any learned route and directly connected routes are superior to static.
Metric
Metric is the last comparison value for route information. Metric is used to compare routes that are learned via the same routing protocol when they have the same prefix length. The metric values are dependent upon the routing protocol—RIP uses hop count while OSPF uses a formula to derive its dimensionless metric. It is inappropriate to use the metric to directly compare information from different protocols. For example, two pathways to the same destination are received by a router via RIP packets and so have the same administrative distance. Assuming the masks used have the same prefix length, the deciding factor will be the metric. One path utilizes 4 hops to get to the destination while the other only requires 3. Clearly one path is shorter and so will be installed in the routing table. The routing table would include entries such as:
- 192.168.1.0 255.255.255.0 [120/3] via 192.168.1.254
Inside the bracket, the hop count is appended to the administrative distance.
Routing Loops
There are several topologies that create problems for both Ethernet and IP. A looped architecture is one of the most challenging. Layer 2 protocols like Ethernet do not have a mechanism to handle loops, so Radia Perlman rode to the rescue with the Spanning Tree Protocol. At Layer 3, we are afforded some measure of protection because IP includes a time to live field. As packets continue around a looped topology, each router will decrement this field by one until it reaches zero. At this point, the IP packet is no longer sent along. A simple looped topology is shown in Figure 1-13.
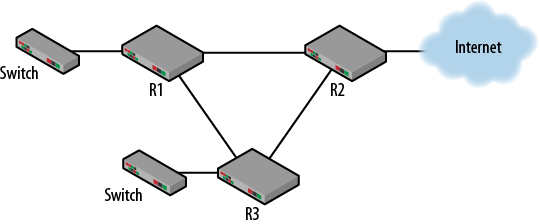
Figure 1-13. Routing loop
In this topology, nodes connected to the switches would use R1 and R2 as their default gateways. R1 and R2 would in turn use R3 as their gateway of last resort in order to get to external destinations. Routing between R1 and R2 might be handled via static or dynamic routes. As we discussed previously, the problem with static routes is that they do not respond to changing network conditions or handle loops. Any mistakes in configuration or with certain kinds of failure and packets could continuously circulate or be lost.
But routing loops are not always bad. For example, if connectivity for the nodes attached to the switches is considered critical, a routing loop might be installed to ensure that the network is very reliable. The links between R1/R3 and R2/R3 might span long distances, such as the connections to a service provider. Routing/failover protocols might be used to maintain this set of redundant links, especially if the topology is more complex than the one in Figure 1-13. Routing loops can also be installed in order to provide load balancing between links. Protocols like Hot Standby Routing Protocol (HSRP), Virtual Router Redundancy Protocol (VRRP), and the Gateway Load Balancing Protocol (GLBP) are all designed to help prevent single point of failure instances and potentially balance traffic over the links.
Figure 1-13 is a very straightforward sort of loop, but it is by no means the only way to wind up with a looped topology. Misconfiguration or lost connectivity can easily result in a loop, even where physical loops are not present. Networks actually have two topologies, physical and logical. The physical topology can be traced by following cables, or at least a good set of labels. The logical topology can only be understood by examining configurations and the flow of traffic. An example in which the physical and logical topologies do not match can be seen in Figure 1-14.

Figure 1-14. Physically linear, logical loop
When discussing static and default routes earlier in this chapter, the routing tables were simplified through the use of the default route on R1 and R3. But providing a default on R2 doesn’t simplify the routing table. We will now see why placing a default route on R2 might not be a very good idea for a completely different reason. Assume that the routing tables are built and the default routes have been assigned as depicted in Figure 1-14. R2 is now using R1 for a default route.
| R1 | R2 | R3 |
|---|---|---|
|
C 192.168.1.0 F0/0 |
C 192.168.2.0 F0/0 |
C 192.168.3.0 F0/0 |
|
C 192.168.2.0 F0/1 |
C 192.168.3.0 F0/1 |
C 192.168.4.0 F0/1 |
|
S 0.0.0.0/0 via 192.168.2.254 |
S 0.0.0.0/0 via 192.168.2.253 |
S 0.0.0.0/0 via 192.168.3.253 |
What happens if Node A pings a device not on this particular set
of networks, such as 192.168.5.1? The
ICMP echo request would be sent to the default gateway of Node A
(192.168.1.254) and R1 would discover
that it did not know where the destination was. R1 would send the packet
to its gateway of last resort: 192.168.2.254. R2 would process its routing
table and discover that it did not know where the destination (192.168.5.1) was either. R2 also has a gateway
of last resort but the problem is that it is R1. Thus, the packet is
sent right back to R1. Presto—logical loop. R1 receives the packets,
processes its routing table, and the whole thing starts over again until
the time to live field in the packet expires. Whether the configuration
was done on purpose or by mistake, the results are the same. Figure 1-15 depicts an Internet Control Message
Protocol (ICMP) packet that results from a time to live (TTL) field
being reduced to 0, though for a different conversation. ICMP has the
responsibility of informing network hosts when problems such as this
occur. Within the ICMP packet, the time to live field is set to 255. But
this is not true of all IP packets. Each router decrements this field as
the packet is forwarded.
The topology seen in Figure 1-14 is an isolated topology, and in practice would be connected to the outside world or to another series of routers that eventually sent traffic offsite. So, the default gateway and the routing tables would be configured accordingly. But never underestimate our ability to set things up improperly.
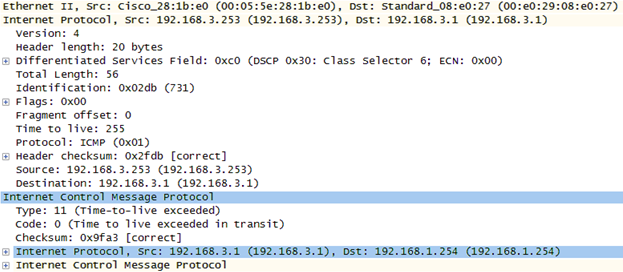
Figure 1-15. ICMP Time Exceeded
There are times when link failures can create loops. For example,
if in Figure 1-14, the R3
interface connected to the 192.168.4.0 were to be shutdown, the route
would be removed from the routing table of R3. However, the other
routers in the topology would still believe that the 192.168.4.0 network is still available via R3.
The question is: What does R3 do when traffic for the 192.168.4.0 network arrives?
| R1 | R2 | R3 |
|---|---|---|
|
C 192.168.1.0 F0/0 |
C 192.168.2.0 F0/0 |
C 192.168.3.0 F0/0 |
|
C 192.168.2.0 F0/1 |
C 192.168.3.0 F0/1 |
C 192.168.4.0 F0/1 |
|
S 0.0.0.0/0 via 192.168.2.254 |
S 192.168.1.0 via 192.168.2.253 |
S 0.0.0.0/0 via 192.168.3.253 |
|
S 192.168.4.0 via 192.168.3.254 |
As we can see, R3 receives the packet and, not knowing where the
destination is, would sends it to the gateway of last resort (R2). This
is because when the interface is shutdown, R3 removes the 192.168.4.0 network from its routing table,
resulting in another routing loop. For these reasons, whenever there is
a doubt about the stability of the network or when complexity starts to
grow, rely on dynamic routing.
Discard or Null Routing
Sometimes the best designs simply do not fit the topology at hand. When this happens, attempts to simplify or optimize the network can create real headaches. For example, aggregation is often used to shrink or simplify routing tables. To aggregate a series of routes, the number of downstream routes to be aggregated should be based on powers of 2. When network masks used to aggregate routes are modified, the changes are based on powers of 2. Now let’s consider an example: imagine that the network administrator wishes to clean up the routing tables of the small, aggregated topology shown in Figure 1-16.
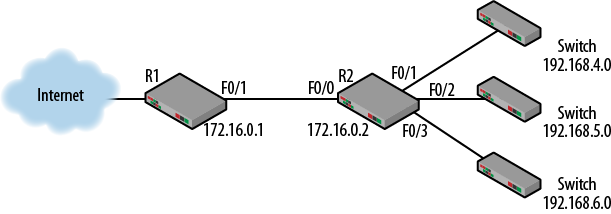
Figure 1-16. Aggregated topology
The routing tables for R1 and R2 are shown in Table 1-11. In this example, we are not concerned with the outside connectivity for R1.
| R1 | R2 |
|---|---|
|
C 172.16.0.0/16 F0/1 |
C 172.16.0.0/16 F0/0 |
|
S 192.168.4.0/24 via 172.16.0.2 |
C 192.168.4.0/24 F0/1 |
|
S 192.168.5.0/24 via 172.16.0.2 |
C 192.168.5.0/24 F0/2 |
|
S 192.168.6.0/24 via 172.16.0.2 |
C 192.168.6.0/24 F0/3 |
|
S 0.0.0.0/0 via 172.16.0.1 |
The routing tables show that R2 is using R1 as a default gateway and that R1 is accessing several networks via R2. The network administrator looks at these and decides to aggregate them together in order to make the routing table of R1 simpler. This is accomplished by manipulating the mask associated with the downstream routes on R1.
| R1 | R2 |
|---|---|
|
C 172.16.0.0/16 F0/1 |
C 172.16.0.0/16 F0/0 |
|
S 192.168.4.0/22 via 172.16.0.2 |
C 192.168.4.0/24 F0/1 |
|
C 192.168.5.0/24 F0/2 | |
|
C 192.168.6.0/24 F0/3 | |
|
S 0.0.0.0/0 via 172.16.0.1 |
The resulting entry in R1 now encompasses the following addresses:
192.168.4.0–192.168.7.255. But what happens when an
address such as 192.168.7.1 is pinged
from outside of R1? The traffic would be forwarded to R2, but since the
route is not part of the table on R2, it would use its default route to
send the traffic right back to R1. And again we have a routing loop. One
solution for this problem would be to install null routes on R2 in order
to prevent it from sending traffic back to R1. This can be for the
aggregated address or the smaller address space, so variations of this
command can be used on either router.
ip route 192.168.4.0 255.255.252.0 null0
In order to prevent this route from stopping all traffic, a higher administrative distance can be assigned to the route.
IPv6
Though IPv6 is not the focus of this book, it doesn’t hurt to take a peek. The hard part about IPv6 is learning all of the addressing and terms. After that, you have to prepare your mind for values that look quite a bit different. But, from a routing perspective, many of the techniques are the same. Figure 1-17 depicts the same topology used earlier, but it is now an IPv6 topology. The /64 is the CIDR notation for the masks used.

Figure 1-17. IPv6 topology
In order to build a topology, there are a couple of necessary changes to the configuration of each router. As can be seen, each router interface has an IPv6 address. For R1, the IPv4 and IPv6 commands are quite similar:
ip address 192.168.1.254 255.255.255.0 ipv6 address 1001::254/64
Again, the major difference is in the structure of the address. The
colons in the IPv6 address suppress long strings of zeroes. The /64 is a
classless interdomain routing (CIDR) shortcut for the mask. Routing is set
up with two commands: ipv6 unicast-routing and
ipv6 route. The second command is for the static
routes. For R1, routes for the 1003::/64 and 1004::/64 networks are
required.
ipv6 route 1003::/64 1002::254
ipv6 route 1004::/64 1002::254
The routing table for IPv6-based routers can be a little confusing at first, but after breaking it down, the similarities begin to emerge. Figure 1-18 displays the routing table for R1. Note the use of directly connected and static routes. One addition is the local (L) or link local entry. This refers to the interface of the router. The mask for these entries is /128 or all ones. This is the same as the IPv4 host entry. FF00 is the multicast entry. The brackets associated with each entry still show the administrative distance and metric.
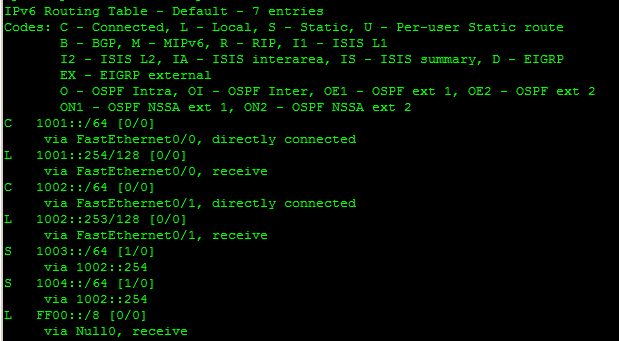
Figure 1-18. R1 IPv6 routing table
Reading
The ideas discussed in this chapter are outlined in a collection of RFC and standards, or touched on when reading about a particular protocol. For example, the RFCs for RIP and OSPF refer to several routing issues and so are listed here. When configuring network equipment, I have always found it useful to have two documents at hand: command references and configuration guides. The command references are a must, since they contain the actual commands and the arguments used with the commands. However, these are not very useful when trying to understand “best practices.” This is where configuration guides come in. These documents, along with vendor whitepapers, provide an explanation of where it is appropriate to use a particular command or how to begin building your network. In the end, trial and error will guide you as you try to get things working and gain experience.
- IEEE 802.1D: Standard for Local and Metropolitan Area Networks: Media Access Control (MAC) Bridges
- RFC 1102: Policy Routing in Internet Protocols
- RFC 2328: OSPF version 2
- RFC 2453: RIP version 2
- RFC 3768: Virtual Router Redundancy Protocol
Summary
In this chapter, we discussed some of the larger issues associated with routing and switching. When building networks, it is important to understand general concepts such as static, default, and dynamic routing. As networks grow in size and complexity, skills that become important include the ability to develop sound topology decisions and evaluate routing protocols. VLANs, trunks, installation of routes, and looped architectures were also covered. The best network administrators not only understand the commands to use, but the reasons for the commands and how network decisions are made.
Review Questions
When connected together and running VLANs, trunk lines are often used.
TRUE
FALSE
Static routes are manually installed and have a lower administrative distance than dynamic routes.
TRUE
FALSE
Dynamic routes are used whenever the network topology changes.
TRUE
FALSE
Which of the following is the proper order of importance for route selection?
Admin distance, prefix length, metric
Prefix length, admin distance, metric
Metric, prefix length, admin distance
The next hop router should be an interface on a router connected to your network.
TRUE
FALSE
Directly connected routes will be installed as soon as an interface is “up”.
TRUE
FALSE
Match the following terms to their definitions.
Metric
Admin Distance
Prefix Length
Number of bits in the mask
Value comparing information from the same routing protocol
Quality comparison between routing protocols
RIP and OSPF are both what type of routing protocol?
Distance vector
Host based
Hierarchical
Interior
What addresses are encompassed by the following routing table entry:
172.31.32.0/19?Routing loops only occur on physically looped networks.
TRUE
FALSE
Review Answers
TRUE
TRUE
FALSE
B
TRUE
TRUE
a) 2 b) 3 c) 1
D
172.31.32.0–172.31.63.255
FALSE
Lab Activities
Activity 1—Interconnected Switches and SATs
Materials: Two switches, two computers
Connect two switches via a crossover cable or uplink.
Connect the two computers, one on each switch.
Explore the SAT on each switch. Pay attention to the VLAN, port and MAC address listings. Handy Cisco command:
show mac-address-table.Experiment with either moving the computers or adding more nodes.
Before reviewing the table after each experiment, predict what the SAT content will be and why.
Activity 2—Static Routing Topology
Materials: Three routers, two computers
Wire the topology shown in Figure 1-7. Note: The topology can be reduced to two routers with the same requirements, though not as many.
Give each of the router interfaces and the computers IP addresses.
Examine the routing tables of each of the routers once the interfaces are up. Handy Cisco command:
show ip route.Experiment using PING. Which destinations are reachable and which are not?
Working from left to right, begin adding static routes in order to solve connectivity problems. Handy Cisco command:
ip route destination network destination mask forwarding router interface.Once all destinations can be PINGed from all interfaces, you are done.
Activity 3—Convert to Default Routes
Materials: Three routers, two computers, Wireshark
Using the topology from the previous activity, convert the static routes on R1 and R3 to default routes. Note: This activity can be confusing if only two routers are used, since there will not be a clear reason to choose the default route.
Examine the routing tables from each router. Select a couple destinations and process the routing tables manually, checking to see if the process can be followed step by step.
Now experiment with the captures themselves. Starting from a computer or interface, and assuming that the ARP tables are clear, try to explain every packet that will be generated as a result of a PING to an IP address at least one hop away.
Complete the PING and examine the captures in order to determine the correct answer. Were you correct? If not, why not?
Activity 4—Routing Loop
Materials: Three routers, two computers, Wireshark
Using the same topology, convert the routing table on R2 to default routes.
What addresses can be PINGed and what addresses cannot?
What happens in the command shell when you PING an address not on the topology?
Start up Wireshark and examine the traffic on the network as a result of your PING offsite.
What happens to the IP TTL field?
Where was the loop and what caused it?
What was the ICMP traffic generated as a result?
Activity 5—Null Route
Materials: Three routers, two computers, Wireshark
In the topology above, install null routes to fix the routing loop. Recall the null argument to the ip route command.
Does this solve the connectivity problem or simply hide the difficulty?
Get Packet Guide to Routing and Switching now with the O’Reilly learning platform.
O’Reilly members experience books, live events, courses curated by job role, and more from O’Reilly and nearly 200 top publishers.

