Chapter 1. The PayPal API
Overview of the PayPal API
PayPal provides developer access to its payments system via its Name-Value Pair API, referred to as NVP API for the remainder of this book. The NVP API allows a merchant to access PayPal and accomplish the following tasks:
Accept PayPal during your checkout process via Express Checkout
Charge a credit card during a Direct Payment session
Capture previously authorized Express Checkout and Direct Payment payments
Reauthorize or void previous authorizations
Pay single or multiple recipients via Mass Payment
Issue full refunds or multiple partial refunds
Search transactions using a specified search criteria
Retrieve details of a specific transaction
Accept PayPal for multiparty payments
Accept PayPal for subscriptions or freemium models. (Freemium models offer a basic product or service free of charge, while charging a premium for advanced features. A good example is something like CCleaner: you can download it and use it free, and pay for a license if you want support. You can also make donations to future development—and they accept PayPal for both.)
PayPal’s NVP API makes it simple to integrate PayPal payments into your specific web application. You, the merchant, construct an NVP string and post it via HTTPS (HTTP Secure, aka TLS/SSL) to the PayPal authorization server. PayPal posts back an NVP-formatted response that you then parse in your web application for the information relevant to the payment. Figure 1-1 shows a basic request and response workflow.
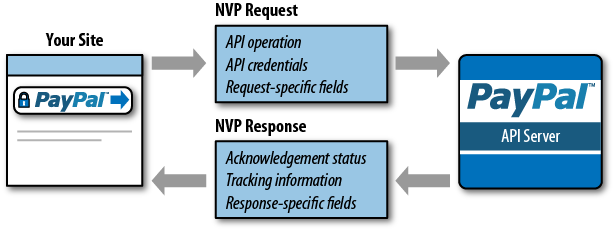
The name or method of the API operation to be performed and its version
PayPal API credentials
Operation-specific parameters formatted as name/value pairs
Note
Adaptive APIs also require an APP ID during the
request.
The PayPal API server executes the operation and returns a response containing:
Acknowledgment of success or failure (including any warnings returned in case of failure)
PayPal tracking information specific to the API operation
Response-specific information required to fulfill the request
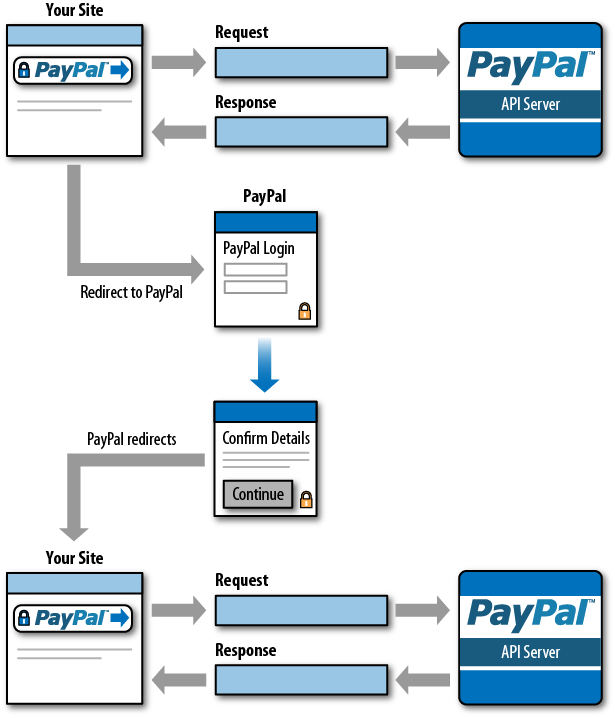
Some features of the NVP API, such as Express Checkout, require calls to multiple API operations. Other APIs like Direct Pay only require one call. But typically, you are required to:
Call an API operation—for example,
SetExpressCheckout—that sets up the return URL PayPal uses to redirect your buyer’s browser after the buyer finishes on PayPal. Other setup routines can be performed by this same API operation.Call additional API operations after receiving the buyer’s permission on PayPal, such as
GetExpressCheckoutDetailsorDoExpressCheckoutPayment.
Figure 1-2 shows the execution workflow between your application and PayPal.
Getting Started
There are two methods for integrating PayPal’s NVP API into your application: direct integration and integration through a Software Development Kit (referred to as SDK). I focus on direct integration into your website and applications.
Direct Versus SDK Integration
Direct integration allows you to use the programming language of your choice to communicate via the NVP API. This is the most flexible approach and allows direct access to the Name-Value Pair elements of the API. SDK integration provides simple functions for integration using the NVP API. There are SDKs are provided for Java, ASP.NET, PHP, Coldfusion, and Ruby. This type of integration typically wraps the HTTPS interfaces in the respective language, making the operations more natural for the developer to work with, because they are formatted in a familiar language and require just a few simple function calls to access.
Testing Versus Live Implementation
PayPal provides a sandbox environment to use while developing your application. The environment replicates the live environment, but true payment processing doesn’t occur when using the sandbox. Once you have fully developed and debugged your application, you can then switch to the live environment and start taking payments. Switching between the two is as simple as changing the target server and the API credentials used to access the server. The rest of your application will remain unchanged.
Tip
I recommend setting up your API credentials in separate files within your application. This way, you can have your sandbox credentials in one file and your production credentials in another file, referenced accordingly. For added security, I would locate these files on your server outside the default webroot, so that they cannot be called directly from the web browser.
Obtaining API Credentials
To access the NVP API, you first need to establish credentials. These identify who you are and ensure payments get to where they need to go. You establish credentials through either an API signature or an API certificate. You will need two sets of API credentials: one for development and one for production.
Creating an API Signature
Developing your application only requires access to the PayPal API sandbox. You can sign up for access to the sandbox at http://developer.paypal.com or http://x.com. Once your account is established, you can create your test accounts and obtain your API credentials. Sandbox accounts and live accounts require different processes to obtain credentials. Use the following steps for a sandbox account:
Go to https://developer.paypal.com and click “Sign Up Now.”
Enter the requested information and click “Agree and Submit.”
PayPal will send you an email to complete the sign-up process.
After confirming your email address, click “Sign Up Now” to access the sandbox.
Log into your sandbox account (after the initial login, this can be accessed directly by going to https://www.sandbox.paypal.com).
Click the “Test Accounts” link.
Click the “Create Test Account” link.
Choose Seller for the account type and select the other appropriate options (going with the defaults is highly recommended).
When using the defaults, API credentials are created automatically.
Click the API credentials link to access your API credentials.
Note
PayPal recommends you use a different login and password for your developer account than those for your live PayPal account. This will allow other people on your development team to access the sandbox and test your application without giving them access to your regular PayPal account.
For a live account, use the following steps:
Log into your PayPal Account. Under “My Account”, click the “Profile” option.
Click “API Access.”
Click “Request API Credentials.”
Check the “Request API signature” option, and then click “Agree and Submit.”
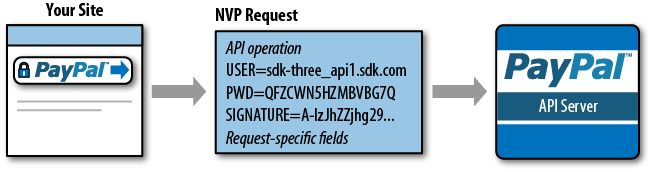
We will use the API Signature method of specifying credentials throughout this book. An API Signature is composed of three elements, as shown in Table 1-1.
| API Signature component | Example value |
API username | sdk-three_api1.sdk.com |
API password | QFZCWN5HZM8VBG7Q |
API signature | A-IzJhZZjhg29XQ2qnhapuwxIDzyAZQ92FRP5dqBzVesOkzbdUONzmOU |
When you are ready to go live, you will need to activate either the Website Payments Standard or Website Payments Pro Product on your account and establish your credentials for that account. You can sign up for your account at http://www.paypal.com.
Tip
Website Payments Pro requires additional vetting before being activated.
Creating a Name-Value Pair (NVP) Request
There are three key steps that your application must accomplish to post to the NVP API: URL encoding, constructing the request in a format the NVP API can interpret, and posting the request via HTTPS to the server.
URL encoding
Both the request to the PayPal server and the response from the server are URL encoded. This method ensures that you can transmit special characters, characters not typically allowed in a URL, and characters that have reserved meanings in a URL. For example:
NAME=John Doe&COMPANY= Acme Goods & Services
is URL encoded as follows:
NAME=John+Doe&Company=Acme+Goods+%26+Services
Each application language typically has a specific built-in URL encode method. Refer to the list in Table 1-2.
Request format
Each NVP API request is composed of required and optional
parameters and their corresponding values. Parameters are not
case-sensitive, but certain values such as the API Password,
(PWD), are case-sensitive. The required parameters
for all NVP API transactions are USER, PWD,
METHOD, and VERSION. The
METHOD, or type of transaction you are calling the
NVP API to process, has an associated VERSION.
Together the METHOD and VERSION
define the exact behavior of the API operation you want performed.
This will be followed by the information posted from your application,
including things such as Item, Quantity, and Cost.
Tip
API operations can change between versions, so when you change a version number, I recommend retesting your application code before going live.
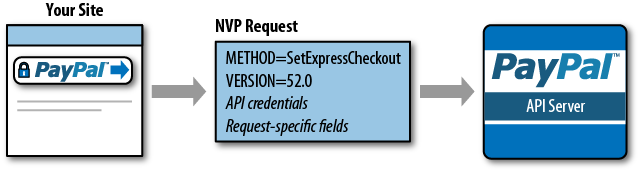
Figure 1-3 outlines the API operation of an NVP request, and Figure 1-4 shows the same transaction with credentials provided.
Putting it together
Now that we have the basic elements laid out, let’s put together a sample URL encoded NVP request via PHP, shown in Examples 1-1 and 1-2.
<?php
//PayPal NVP API Test Developer Credentials//
$paypalusername = sdk-three_api1.sdk.com;
$paypalpassword = QFZCWN5HZM8VBG7Q;
$paypalsignature = A-IzJhZZjhg29XQ2qnhapuwxIDzyAZQ92FRP5dqBzVesOkzbdUONzmOU;
$paypalserver = api-3t.sandbox.paypal.com/nvp
?>
<?php
// PayPal NVP API Simple Transaction Request Processor//
// Include the developercredentials.php file for relevant information
include("../path/outside/webroot/developercredentials.php");
// Build the credentials format of the Request String
$credentials= "USER=$paypaluser&PWD=$paypalpwd&SIGNATURE=$paypalsig";
// Designate the API Method we are calling to have handled
$method = api_method_to_use;
$version = method_version_to_use;
// Build Initial Request string
$request = $method."&".$version."&".$credentials;
// Walk the posted form elements to gather additional information
// to pass URLEncoded to API via the request string
foreach ($_POST as $key => $value){
$value = urlencode(stripslashes($value));
$request. = "&$key=$value";
};
//Build transaction and execute via curl
$ch = curl_init();
// Ensure communication is done via SSL and over a fully verified
// SSL key and certificate
curl_setopt($ch, CURLOPT_SSL_VERIFYPEER, TRUE);
curl_setopt($ch, CURLOPT_SSL_VERIFYHOST, TRUE);
// Return response as a string from server
curl_setopt($ch, CURL_RETURNTRANSFER, 1);
// Post values to server via URLEncoded string
curl_setopt($ch, CURLOPT_POST, 1);
curl_setopt($ch, CURLOPT_POSTFIELDS, $request);
//Execute Request
$response = curl_exec($ch);
?>
Tip
Notice that in Example 1-2, we reference the developercredentials.php file from a path outside the webroot. As stated earlier, this will ensure that no one can access your credentials file directly from their web browser and ensures that this information stays secure. If we were satisfied with this code and wanted to go to production, we would then change this path to the location of our production credentials file.
Parsing an NVP Response
When it comes to parsing an NVP response, your application really has to accomplish only one major step: URL decoding.
URL decoding
URL decoding the response from PayPal is basically just the reverse of URL encoding the values to pass to PayPal. For example:
NAME=John+Doe&Company=Acme+Goods+%26+Services
is decoded as follows:
NAME=John Doe&COMPANY= Acme Goods & Services
As with URL encoding, each application language typically has a URL decode method built into the language. Refer to the list in Table 1-3.
Response format
Each NVP API response is composed of an acknowledgment (or ACK), a timestamp, a CorrelationID unique to the transaction, and a build number stating the API version used to process the transaction. This basic response is then followed by a series of name/value pairs holding the transaction data, which you can parse and handle accordingly in your application. For example, you might want to display the response information to your customer. The acknowledgment will be one of the responses outlined in Table 1-4.
Putting it together
Now that we know how the response
is formatted, we can extend the
simpletransactionrequestprocessor.php file to
handle the information returned in the $response
string (see Example 1-3).
//Parse $Response and handle values
$decoderesponse = explode ('&', $response);

foreach($decoderesponse as $key => $value){

    switch ($key){
        case "ACK":
        $ack = htmlspecialchars(urldecode($value));
        break;
        case "var1":
        $var1 = htmlspecialchars(urldecode($value));
        break;        default:
        break;
        }
    }
//Your code to display or handle values returned.........
This is just a glimpse of what you can do with the PayPal API. The different integration methods, testing platforms, and credentials make it easy to debug and use the PayPal API to accept payments in just about any application. Next, we take a look at the simplest PayPal API method for accepting payments: Express Checkout.
Get PayPal APIs: Up and Running now with the O’Reilly learning platform.
O’Reilly members experience books, live events, courses curated by job role, and more from O’Reilly and nearly 200 top publishers.

