It took them a decade, but computer engineers finally realized people don’t enjoy opening a computer case to add new parts. The engineers tweaked the design, and now, unlike your computing forefathers, you don’t need to reach for the screwdriver to install a new mouse—you simply plug its cable into a convenient outlet on your PC’s case.
But although today’s mice, keyboards, printers, scanners, monitors, and scores of other parts slip into a convenient jack, a few parts still hide inside the case. Some contain fragile circuitry that could be damaged by fumbling fingers. Others stay hidden simply because they rarely need replacing.
Today, you need to open your PC only when performing these occasional tasks:
Adding or replacing memory if your PC runs too slowly (usually noticeable when you have several programs open simultaneously).
Adding cards to your PC to give it new abilities—a FireWire port required by a digital camcorder, for instance.
Replacing the power supply if your PC refuses to turn on.
Changing the battery when your PC begins forgetting the time and date.
Identifying parts that are causing problems.
This chapter gives you an introduction to your PC’s case and the parts that call it home—the motherboard (Section 1.4), memory chips (Section 1.6), slots (Section 1.7.1), cards (Section 1.7), and power supply (Section 1.9). This introduction tells you what these parts do, when you need to find them, and, if necessary, how to repair or replace them.
Along the way, you’ll learn how to look up your PC’s computing “horsepower,” a handy thing to know when puzzling over the System Requirements list on every software box. Finally, this chapter identifies all the connectors on the outside of your PC’s case, what plugs into them, and what to do if a cable doesn’t fit.
Note
If you’re a laptop owner, you’re in luck: everything in this chapter applies to both laptops and PCs. “Laptop Life” boxes explain any differences on how to deal with them.
Video store clerks never interrogate their customers about their VCR’s voltage or motor speeds. But try to buy software at a computer store or online, and you’re expected to know these intimate details about your PC’s inner workings. The System Requirements fine print for most software, including Windows XP, lists terms like these:
Processing power. This refers to your CPU (Section 1.4), which stands for Central Processing Unit and is your PC’s brain. Engineers measure a CPU’s clock speed—how fast it thinks—in GHz (gigahertz) or MHz (megahertz). The bigger the number, the faster your CPU thinks. For example, Windows XP requires a 233 MHz CPU, but works faster if your PC’s got a 500 MHz or faster CPU.
RAM (Random Access Memory). Memory (Section 1.6), a temporary storage area for Windows to work in, is measured in megabytes (MB). The more RAM you pack into your computer, the more programs Windows can run simultaneously. Windows XP requires 128 MB of RAM, but works best with 512 MB or more.
Video. Most software, including Windows XP, says it requires a "Super VGA” or higher resolution monitor (Section 3.1) and video adapter (Section 3.8.2), the internal device feeding all those pretty pictures to your monitor’s screen. This cryptic requirement means very little. Nearly every computer sold in the last decade sports both a Super-VGA monitor (if it in fact ships with a monitor) and a Super-VGA video adapter. Some graphics-hungry programs, like games, also want to know the video adapter’s brand, model, and amount of memory.
Hard drive (hard disk) space. You may already know the size or storage capacity of your hard drive (Section 9.2), your computer’s holding tank for stored programs and files. However, most software wants to know the amount of free space left on your hard drive. After all, your new software needs some elbow room. Windows XP, for instance, consumes two or three gigabytes of space; most programs require much less. Most hard drives today hold between 40 and 120 GB of space.
CD drive reading and writing (saving) speed. Here, bigger numbers are better. Today’s compact disc drives (Section 10.14.1) are fairly speedy, reading information at a speed of about 52X (the “X” means 52 times faster than the original CD models) and burning (recording) at about 32X—plenty fast for most software and file-saving tasks.
Note
The first CD burners took 74 minutes both to read and write to a CD. So a 52X CD recorder burns a CD in less than 90 seconds.
DVD drive reading and writing speed. Again, bigger numbers are better. Today’s DVD drives (Section 10.14.1) both read and write to DVDs at 16X. DVD burners can also read and write to CDs, making them a handy “do-it-all” drive.
Software version numbers. Age discrimination saturates the computer industry, and software often refuses to work with older, previously released versions of other programs. If that hot new Freeway Designer software requires Traffic Simulator v3.0 and you’re still simulating traffic with Version 2.0, Freeway Designer won’t run.
Operating System and Service Pack. It’s not enough to know that your computer runs Windows XP, Microsoft’s newest operating system. Microsoft has released two additional upgrades to Windows XP known as Service Packs (see Section 15.4) to fix XP’s security holes and other shortcomings.
If your PC doesn’t match every requirement listed on a box of new software, the software probably won’t work well or at all. So, how do you know exactly what’s inside your PC?
Reading your computer’s receipt or packing slip often provides clues, but you’re not lost if those things have fallen behind the desk.
Some computer manufacturers, including Dell (http://www.dell.com) and Gateway (http://www.gateway.com), affix serial numbers to the case of every computer they sell. If you spot a number-bearing sticker on the case of your Dell or Gateway PC, visit the manufacturer’s Web site, head to the site’s Customer Support area, and type in the sticker’s number. (Dell calls its serial number a Service Tag.) The Web site displays your computer’s packing slip, listing the specifications of every part it contained when sold.
Tip
Can’t read the serial or Service Tag number stamped on the sticker? Visit the company’s Web site, anyway. You can usually download software that extracts the number from its hiding spot on one of your computer’s chips, and, with your permission, ships the number off to the company’s Web site. Armed with your PC’s tag number, the site then displays your PC’s specifications.
When suitably prodded, Windows XP also coughs up specific information about your PC. Table 1-1 shows how to make Windows XP divulge the information System Requirement lists most frequently mention. Figure 1-1 shows how to print a handy list of your PC’s system information that you can carry when shopping for new parts or software.
Table 1-1. Locating your PC’s System Requirements information
The Information You Need | How to Find that Information |
|---|---|
Operating System, Service Pack number, Central Processor Unit (CPU) type and speed, and available Random Access Memory (RAM). | Start → Right-click My Computer → Properties. The General tab lists the information. |
Hard disk size and amount of free space. | Start → My Computer. Right-click your hard drive icon and choose Properties. The General tab lists the information. |
CD drive–burning (recording) speed. | Start → My Computer → Right-click CD drive → Properties → Recording tab. In the Desktop CD Recording section near the window’s bottom, click the “Select a write speed” drop-down menu to see your drive’s available recording speeds. (If you don’t spot a tab marked Recording, Windows XP can’t burn CDs on that drive.) |
DVD drive–burning (recording) speed. | Windows XP doesn’t recognize DVD burners; it simply lists them as DVD drives (or sometimes CD-burning drives). To find out your DVD drive’s recording speed, you need to look at your PC’s documentation, poke around the menus of your DVD-burning program, or visit the drive manufacturer’s Web site and look up the drive’s model number. |
Program version number. | Open any program and choose Help → About. |
Display type, resolution, and number of colors. | Start → Control Panel → Display → Settings tab. |
Video card memory in MB (megabytes). | Start → Settings and Help → Control Panel → Display → Settings → Advanced → Adapter. |
DirectX version, a set of utility programs often used by games. | Start → All Programs → Accessories → System Tools → System Information → Tools → DirectX Diagnostic Tool → System tab. |
Unlike your PC’s glowing monitor, your PC’s case usually sits unnoticed beneath the desk or in a dark corner. After you switch the power on or off, you usually touch the PC’s case for only two reasons:
You want to plug something into your PC, like a new mouse, digital camera, or glowing blue game controller.
You want to place something inside your PC like new memory or a new drive, or you need to replace something that’s not working.
Plugging something into the case is easy enough, once you find the right port (Section 1.8), a general term describing any hole, jack, or plug you use to connect things like a mouse or speakers to your PC. Putting something inside the case takes more effort, but it’s probably easier than you think, thanks to the design of your PC’s case.
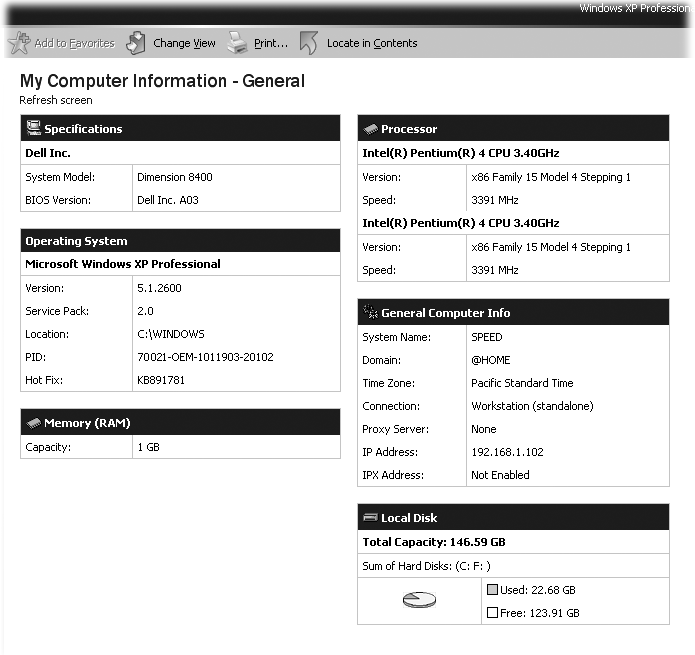
Figure 1-1. This list shows the items most frequently mentioned in a software box’s System Requirements’ area. To see this information about your own computer, click Start → Help and Support → Use Tools to View your Computer Information and Diagnose Problems → My Computer Information → View General System Information about this Computer. Click the Print icon to have the printer spit out a handy crib sheet you can take to the store.
PCs aren’t designed like cars, which force owners to find a specific muffler for their ’67 Chevy El Camino. Most PC cases contain standard-sized parking spots called bays for sliding in standard-sized drives—boxy storage units like CD drives or hard drives. For example, almost any hard drive slides smoothly into almost any case’s drive bays (Figure 1-2) and locks into place easily with screws or a bracket
The holes in your PC’s case also line up exactly with the holes in the computer’s motherboard (Section 1.4), a large flat card stuffed with your computer’s main circuitry. And the holes in the PC’s power supply (Section 1.9), a metal box that pipes electricity throughout your PC, also align with the holes in your PC’s case. This “matching holes” design lets you easily attach standard-sized parts to your PC’s case with just a few screws.
Many of your PC’s other internal parts hail from the same IKEA school of easy assembly, but they use slots and matching tabs. For instance, the motherboard contains standard-sized slots, good for plugging in memory (Section 1.6), which comes on little circuit-filled sticks that let your computer juggle information.
Cards (Section 1.7), larger flat parts that add features like better video to a PC, slip into slightly larger slots on a motherboard.
In most cases, opening your PC’s case boils down to sliding off a side panel. But before starting, make sure you have a fresh backup of your most important files. Chances are, nothing catastrophic will happen. But since you should back up your files every day anyway, now’s a good time to make sure last night’s backup worked (see Section 15.1).
Before opening the case, turn off your computer and unplug its power cord from the wall. Then examine your computer to see where its case opens. Some newer, expensive computers pop open at the press of two large pushbuttons, as seen in Figure 1-3, top. (Cases on expensive computers sometimes have built-in padlock holders to keep out potential thieves.)
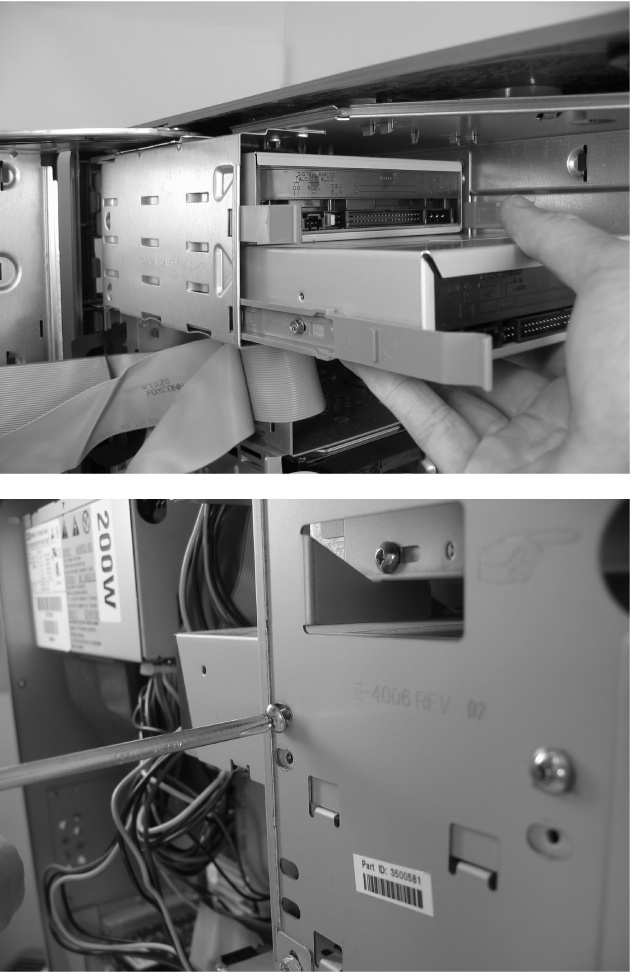
Figure 1-2. Top: Thanks to the standard design of a PC case, this hard drive slides easily into a shelf called a bay, where a mounting bracket holds it in place. Bottom: Some bays hold items in place with screws. Note how the screw holes in the bay precisely align with the screw holes in the CD drive, making it easy for a few screws to hold the drive in place.
Many computers use two thumbscrews—screws with large round heads that you can twist off with one hand—to hold the side panel onto the case. Twist off the thumbscrews and slide off the panel with an easy push (Figure 1-3, middle and bottom). Older models sometimes use two or three regular screws instead of the easier-to-remove thumbscrews. Once you remove the screws or thumbscrews, slide the side panel toward the back of the computer and outward. After you move the panel a few inches, you should be able to easily pull it off. Set the panel to the side, and you’re in.
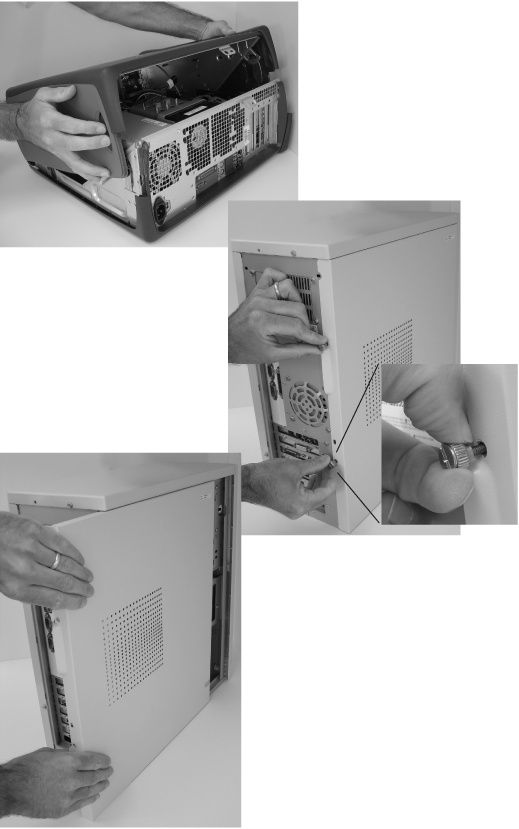
Figure 1-3. Top: You can open some cases by pressing two large buttons that sit on opposing sides of the case. Press the buttons and lift upwards; the case begins to hinge open. Middle: Screws hold most other cases together. To open the case, remove the screws or thumbscrews (inset) that hold the side panel in place. Bottom: After removing the screws, slide off the panel, pulling it toward the back of the computer.
Tip
It’s easy to lose screws when removing a PC’s case and its internal parts. To prevent mix-ups, place screws from different parts of your PC into different hollows of an empty egg carton.
Most PC cases are trouble-free, since they rarely break. The only troubleshooting you might have to perform is making sure the case keeps your PC’s parts enclosed and cool: whirling fans inside the case constantly cycle air through strategically placed vents to prevent parts from overheating.
If your PC’s case ever feels very warm or even hot to the touch, it’s definitely overheating, and it needs immediate attention. Follow these guidelines to test for proper cooling and learn how to fix potential cooling problems.
Check the air flow. Find your case’s vents and make sure they’re not pushed up against the side of a desk or wall. The case’s side vents need at least an inch or two of clearance. Leave at least six inches of breathing room between the back of your PC and anything else.
Clean the vents regularly. Feel free to leave your PC turned on while you remove dust and pet hair with a vacuum cleaner’s brush nozzle. (Most of the dust clogs the computer’s back fan vent.) If you notice a dust beard growing from your computer’s vents, pick up a can of “Dust Off” or similar compressed air from your local computer or office supply store. Take the computer outdoors, remove its case (Section 1.4), and spray off any dust clogging the vents and parts.
Leave the sides of the case attached. If you just installed a new part (a DVD drive, for instance), run the computer with the case open or with a side-panel removed while you confirm that everything works okay. But don’t leave it that way for regular use, even if you want to look fashionably geeky. Case vents are designed to move the air flow over the PC’s hottest parts. Leaving the case open or off disrupts the air flow and can make your PC run hotter than it should.
Listen for the main fan. Behind a vent on the back of your PC lives a large fan that constantly pushes air through your PC. If that fan stops spinning, your PC will overheat. You can usually see or hear the fan spin, but if you’re not sure the blades are moving, try this test: stick a thin strip of paper (not wire) through the vents to feel the fans brush against it. If the fan isn’t moving, you’ll need to replace your PC’s power supply (Section 1.9) since that’s where the fan lives.
Note
Built to last, PC cases don’t wear out. But if you find yourself contemplating a shiny new case with glowing blue lights, set aside a day or two to move your old PC’s guts to its new housing. For more information about choosing cases and bolting down parts, check out Building the Perfect PC (O’Reilly).
Your PC’s motherboard, a large flat, rectangular piece of circuitry, serves as a platter for your computer’s brains, memory, cards, and connectors. Everything inside your PC ultimately connects to the motherboard, which shuttles information between the parts.
Since the motherboard lies buried deep inside your PC, you’ll spot it only under a few circumstances: when replacing the battery, replacing the power supply (Section 1.9), adding memory (Section 1.6), or adding cards (Section 1.7).
When rummaging inside your computer during one of those tasks, use Figure 1-4 as a roadmap.
The CPU, the chunky chip serving as your computer’s brain, determines how quickly your computer follows instructions. The more powerful the CPU, the faster it can fling around information, leading to less time waiting at the keyboard. Windows XP works well with CPU’s from two companies: Intel’s Pentium 4 (fastest) or Celeron (slower) CPU, or AMD’s Athlon 64 (fastest) or Sempron (slower) CPU.
Engineers measure a CPU’s "thinking” speed (known as clock cycles) in megahertz (MHz) or gigahertz (GHz); the bigger the number, the faster the CPU, and the more you pay for it. This knowledge comes in handy when shopping for computers, as you know that a 3.6 GHz PC is slightly faster (and more expensive) than a 3.2 GHz. It’s mostly gamers and movie editors who need super fast, super expensive PCs. For word processing and e-mail, most people do fine with a bargain-priced 2.4 GHz Celeron or Sempron.
Once you bring your computer home, you can’t do much more with the CPU besides look at its perch on your motherboard. (And even peeking isn’t easy, because the CPU’s always covered with a fan or metal flippers to cool it down.) In theory, you can pop an old CPU off the motherboard and pop in a faster one, but it’s rarely worth the effort, for several reasons.
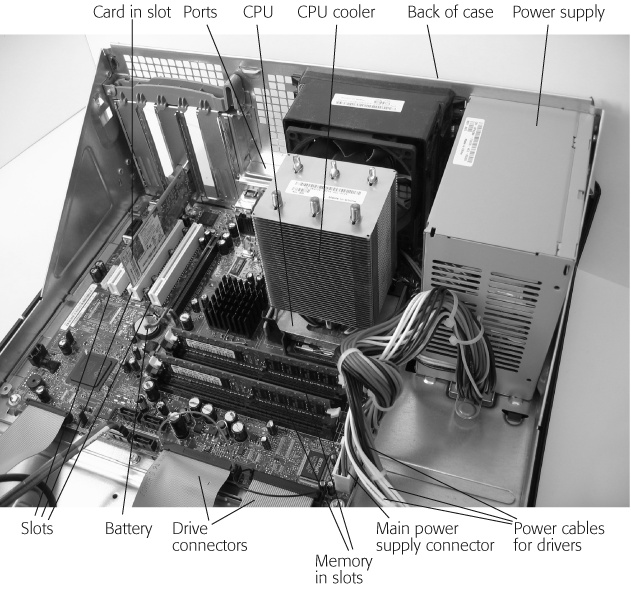
Figure 1-4. Your motherboard contains your CPU, battery, memory, memory slots, cards, slots, and connectors for plugging in parts and cables. Motherboards vary slightly in their layouts, so your’s probably looks somewhat different. But these main components appear on every motherboard. (The power supply connects to the case, not to the motherboard, but its wires lead to the motherboard to feed it power.)
First, replacing a CPU is expensive and time consuming. Second, different types of CPUs require different types of motherboards—they’re not nearly as interchangeable as most computer parts are. Finally, a PC’s only as fast as its slowest part. That slow part is most likely the hard drive, the video card, the memory, or all three. In most cases, adding a slightly faster CPU to your motherboard won’t make a noticeable speed difference. If you’re itching to speed up your PC, try adding more memory (Section 1.6) or a faster hard drive (Section 9.2), instead.
When it’s time to replace your CPU, it’s usually time to replace the entire computer.
Many people confuse memory with hard drives, because they both store the same things: programs, documents, digital photos, and other files. What’s the big difference?
Well, your computer uses your hard drive as a huge parking lot that stores all the information that you want to permanently store. But managing all that space slows down the hard drive. Just as finding your car and getting it out of the lot takes time—you find yourself waiting for Windows XP to load a program or file.
Compared to a lumbering hard drive, memory is as speedy as a freeway. That’s why Windows loads programs and files off the hard drive and into your PC’s memory to use them. PCs would run much more quickly if everything was stored in RAM and computer operations could skip hard drives altogether. Why don’t PCs work this way?
Because memory’s expensive when compared to hard drives. Hard drives cost only about a dollar or so per gigabyte; memory costs about $200 per gigabyte.
To save you money, Windows pulls a little trick when it runs out of memory: it stakes out a chunk of empty hard disk space and uses it to dump information that won’t currently fit into memory. By juggling information back and forth from the hard drive to memory, Windows XP works a little more slowly, but still gets the job done.
Note
The chunk of hard drive space used as makeshift memory goes by several names: "virtual memory,” a "paging file,” or a "swap file.”
But perhaps the biggest difference between memory and a hard drive is durability. Once stored on a hard drive, information stays put when you turn off your PC. Information stored in memory, however, disappears whenever your PC crashes or you turn it off.
You only have to fiddle with your PC’s memory under two conditions:
You want to add more memory to speed up your computer.
You suspect a memory chip is bad. Usually this is a last resort when your PC’s not working correctly.
Memory comes on modules—little chip-filled sticks about the size of a piece of Wrigley’s chewing gum. Each module lives in its own little slot on the motherboard; two little levers (one on each side of the slot) lock it in place (Figure 1-5). To remove memory, unlock its levers and pull it out; to add memory, push it into the slot and lock it in place with the levers.

Figure 1-5. Top: To add memory, push the module all the way into its slot on the motherboard. (Sometimes you need to push really hard to make sure the memory fits snugly into its slot.) As you push, little levers on each side of the slot move inward, trying to grasp the module’s little notch. Bottom: Give the levers a little push toward the module to lock it into its slot. To remove a module, reverse the steps. Pull out the levers to lift the module from its slot, and then lift the module with your fingers.
Warning
To avoid damaging your memory from static, wear latex gloves to handle the chip, insert it, or remove it from its socket. If you’re out of latex gloves, buy a “grounding strap” from a computer store. The strap eliminates static when you attach it between your wrist and the computer’s chassis.
Adding memory to your PC is the single best way to improve its performance. With more memory installed, you can run more programs simultaneously, open and save your files more quickly, and boast about how much RAM you have to your friends and neighbors. Fortunately, inserting additional memory modules into your motherboard’s slots is as easy as pushing toast into a toaster. The hard part of adding memory comes when choosing the specific type of memory your PC needs.
First, memory comes in different sizes (memory and slots use several physical sizes, and they must match), capacities (128 MB to 1 GB or more), types (SDRAM, DDR SDRAM, RDRAM, and others), and speeds (memory rated at 166 MHz can run faster than memory rated at 133 MHz).
Second, motherboards can access only a certain amount of memory. You can add 4 GB of memory to nearly any motherboard, for instance, but if the motherboard can access only 2 GB, you’ve wasted your money.
Finally, some motherboards insist you install memory in matched pairs. These finicky motherboards insist that you install two modules of the same type of memory. They won’t recognize a single module until you fill a nearby slot with another module of the same size, capacity, and speed as the first.
Yes, these tasks make for daunting homework assignments, and memory vendors know it. So, to find your own PC’s picky memory requirements, visit the Web sites of the most popular memory vendors: Crucial (http://www.crucial.com), Kingston (http://www.kingston.com), or SimpleTech (http://www.simpletech.com).
All three Web sites offer online tools for choosing the most compatible memory for your particular computer. Choose your PC’s make and model from a drop-down list; the Web page then lists your PC’s memory type, its motherboard’s memory capacity, and whether you have to add the memory in pairs. Best yet, the page lists the exact type of memory module you need, as well as the price.
Don’t know your PC’s make or model? Then download and run Crucial’s free Memory Advisor program (Figure 1-6), which sniffs through your PC and supplies you with all the info you need.
If you can’t locate the right type of memory for your particular computer using these Web sites, resort to some sleuthing on your own. Track down your motherboard’s make and model (Section 1.4), visit the support area of the motherboard manufacturer’s Web site, and look up the memory requirements for that particular model.
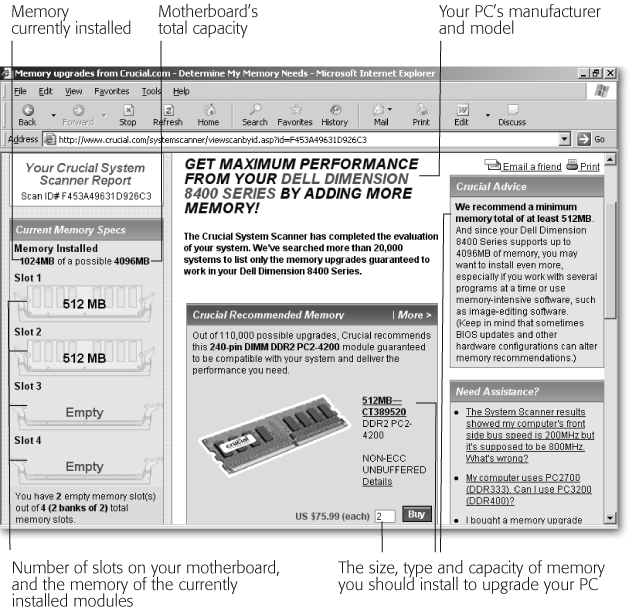
Figure 1-6. In less than a minute, Crucial’s Memory Advisor program (http://www.crucial.com) scans your computer and dishes up exactly what you need to know when replacing memory: the amount of memory your motherboard can handle, the type of memory you need, the number of empty and used memory banks, a suggested memory module for your computer, and its price. Print out the page and check prices at local shops before buying.
Even when you know the type of memory your PC needs, you need a little grade-school arithmetic to choose the right capacity. Follow these guidelines when upgrading your PC’s existing memory:
Determine the memory your computer currently contains. When you right-click My Computer and choose Properties, Windows displays the amount of memory (RAM) inside your PC. (It’s listed on the bottom line of the window, or very near the bottom.)
Determine the type and amount of memory your motherboard can handle. The online calculators at the memory vendors’ Web sites (Section 1.6.1.1) list your motherboard’s memory limit. Subtract the amount of installed memory from your motherboard memory limit to find out how much more memory you can add.
Determine the amount of memory you need. Microsoft says Windows XP requires 128 MB, but 512 MB is more realistic. Your only limit is your bank account and the amount of memory your motherboard can physically process. If you work with lots of digital photos or video, consider upgrading to 1 GB or more.
Count your motherboard’s empty sockets. If the online Web sites can’t count your motherboard’s empty sockets, pop off your PC’s case (Section 1.3) and look for yourself. Spot an empty socket? Then you can fill it with a memory module to increase your computer’s memory. But if your sockets are all full, things become trickier. To upgrade, you must replace a low capacity memory module with a higher capacity module. Replacing a 128 MB module with a 512 MB module, for instance, gives you an additional 384 MB of memory.
Buy and install the memory that meets your needs. Once you decide the amount of memory you need, buy it online or from your local office supply or computer store, and install it by pushing it into the empty slot as described on Section 1.6.
Memory doesn’t leave much room for troubleshooting. It either works or it doesn’t. Unfortunately, it’s not always obvious when it doesn’t work. Sometimes your PC tells you upfront. Many PCs tally up their memory when you first power them on, and use cryptic error messages mentioning “parity” and “memory” if something’s wrong.
Other symptoms aren’t as obvious, including inexplicable Windows crashes ending with “The Blue Screen of Death”—an ugly blue screen displaying an indecipherable error message. Sometimes large programs crash when you load large files, as they stretch your memory to its limits.
Many people check their memory as a last resort, when they can’t find anything else to blame for their PC’s intermittent, undiagnosed problems.
But before assuming one of your memory modules has gone bad, try the following tips:
Reseat the memory in its sockets. Turn off and unplug your computer. Then remove and reinsert one memory module into its slot. Repeat with the adjacent slot until you’ve removed and reseated every module. Then plug your computer back in to see if you’ve cured the problem. If you have another memory module lying around, use it to replace your other modules, one at a time, restarting your computer each time to see if the problem disappears.
Clean your memory chip’s contacts. A memory chip’s contacts—the shiny tabs that plug into the motherboard’s slots—often tarnish with age, creating a bad connection. To fix them, remove your memory chips and carefully rub the contacts with contact cleaner, which you can pick up from any hardware store. (A pencil eraser also works in a pinch.) Reinsert the cleaned-up modules into their sockets, turn on your computer, and see if the eraser trick cleared things up.
Check the memory’s type, slot position, and capacity. Double-check to make sure you replaced your memory with the correct type and that you didn’t add more memory than your motherboard can recognize (Section 1.6.1.1).
Expansion cards, envelope-sized “mini-motherboards” like the one shown in Figure 1-7, live on from computing’s early days. Cards let people expand their PC’s power, often by adding new connectors called ports. Twenty-five years ago, for instance, many people installed a card with a special port that accepted the latest new computing gadget: a mouse.
Today, people still add new ports to their PCs by pushing cards into special slots on their motherboard. For instance, digital camcorders dump video into PCs through a FireWire port, a high-speed connector missing from most PCs. If your PC doesn’t have a FireWire port, open your PC’s case, and push a FireWire card into one of your motherboard’s empty slots. The new FireWire port appears on the back of your PC.
The new port appears because of the way cards are shaped. Most cards contain ports on one edge and a tab on their bottom that you push into the motherboard’s slot. When pushed into a slot, the cards’ ends poke through the back of your PC, looking like a row of silver strips. Figure 1-7, top, shows a card before it’s installed; below it, a figure shows the newly installed card joining a row of previously installed cards viewed from the outside of your case.
Most items that once came on cards now plug into much-more-convenient USB ports (Section 1.8.1). But when you need something that USB can’t offer, like a FireWire port, expansion cards do the job. With a price tag averaging $30 to $100 per card, adding an expansion card is much cheaper than buying a new computer.
Cards can add more than new ports to a computer. Adding an MPEG decoder card, for instance, adds special circuitry to the motherboard. Your computer uses a chip on the MPEG decoder card to convert video into MPEG format, which is the format commonly used to store video on DVDs.
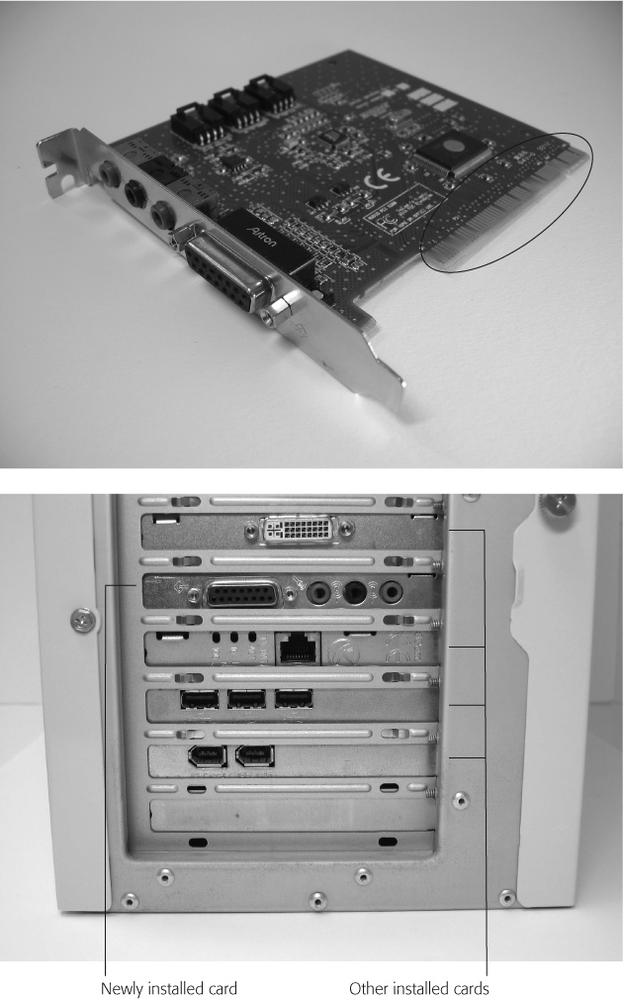
Figure 1-7. Top: Sliding this sound card into a slot on your PC’s motherboard provides a quick way to add better sound to your PC. Other types of cards let you add things like FireWire ports, a microphone, or a joystick. The tab on the card’s bottom (circled) slips into a slot on your PC’s motherboard. Bottom: The rear ends of installed cards poke through the lower back of a PC, so that you can access any ports the cards contain.
Engineers redesign slots every few years, making each new breed faster and more powerful. Since slot types aren’t compatible with each other, they all use a slightly different size to keep folks from pushing the wrong type of card into the wrong type of slot. Your PC contains a motley crew of differently sized slots, all meant for different types of cards.
The newest, most powerful slots handle the most souped-up cards, usually the latest, super-fast video card to please the gaming and graphic design crowd. Motherboard designers always add a few of the newest slot types to their latest motherboard. But the designers always leave in a few older slots to stay compatible with older cards. With such an assortment of slots to choose from, few people use every slot in their computer.
If you’re ready to expand your PC with a new port, new circuitry, or something not available through a USB port, start by peeking at your motherboard’s slots (Section 1.7.2) to see what type of empty ones it contains. Key distinguishing characteristics are slot size and color. Once you’ve identified your slot type, you’re ready to shop for the appropriate card to fill it.
Your PC’s motherboard probably comes with a mixture of these slot types: ISA, PCI, AGP, or PCI-Express, all described below and shown in Figure 1-8.
Ranked in order of popularity, these slots live on most motherboards:
PCI (Peripheral Component Interconnect). Colored white, PCI slots sit together in a row on most motherboards today. Since they’re the most popular, most stores sell a wide variety of PCI cards. When shopping for a PCI card to add to an empty PCI slot, look for the acronym PCI on the card’s box to ensure the card fits. (Don’t confuse “PCI” with “PCI-Express,” a newer and different type of slot explained below.)
PCI-Express (Peripheral Component Interconnect—Express). Usually colored black, the newly released and powerful PCI-Express slots aim to replace all other slots in the coming years. Found only on the newest computers, PCI-Express slots come in small (dubbed “1X”), medium (4X and 8X) and long (16X) sizes. Some new video cards fit into the long PCI-Express 16X slot, but the other sizes are so new, hardly any cards use them.
AGP (Accelerated Graphic Port). Usually brown, AGP slots differ from other slots in that they accept only video cards. (And the newest video cards are beginning to switch over to PCI-Express format.) Your AGP slot, if you have one, lives on the end of your PCI slot row, toward the middle of your motherboard.
ISA (Industry Standard Architecture). Black ISA slots, found only on old computers, let computer hobbyists run their stash of treasured but obsolete parts—like those 20-year-old modems they can’t bear to part with. If your computer has an ISA slot, it usually sits at the beginning of the row of PCI slots, on the motherboard’s edge. Most people never use it.
Tip
Unlike other cards, which usually stick to PCI slots, video cards come in three different types: PCI-Express (black), AGP (brown), or PCI (white). Since your video card must match your slot, you need to make sure you buy the right type of card to fit your slot.
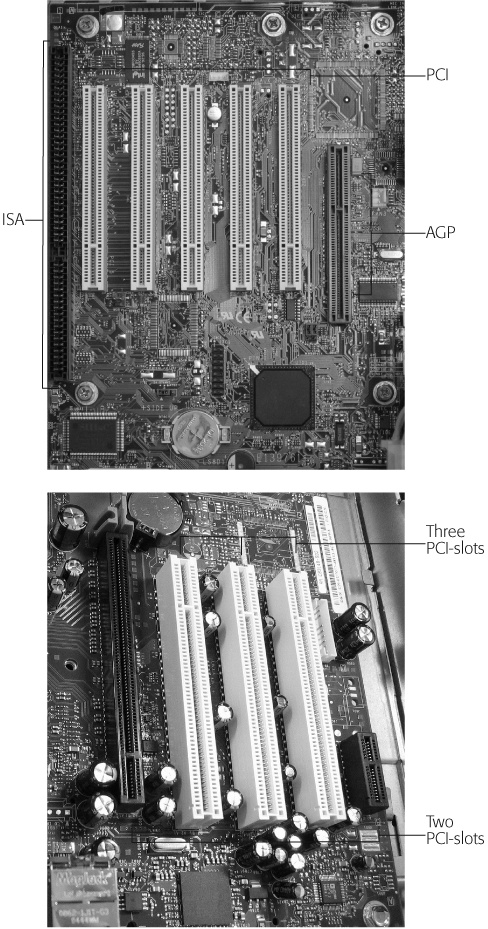
Figure 1-8. Top: This motherboard, made in 1998, contains a row of four white PCI slots, which accept most cards sold today. To their right sits one brown AGP slot, used only by some video cards. To the left sits one black ISA slot (rarely seen, as it accepts only very old cards). Bottom: This motherboard from 2004 bears a row of three white PCI slots. To their left is a large black PCI-Express slot used by the latest video cards. On the far right lives a small PCI-Express slot that’s so new, very few cards yet fit it. You identify slots mostly by their color (which you can’t see in this black and white photo). Many motherboards also print the slot’s type next to the slot in fine print.
Before you install a card, turn off and unplug your PC, remove your PC’s case (Section 1.3), and take a moment to orient yourself. Your new card’s shiny silver edge (the side containing the card’s ports, if it has any) aims toward the back of your PC, where it pokes through one of the case’s several rectangular openings (as shown on Figure 1-7, bottom). Once you have your bearings, follow these steps to insert and attach your new card.
Remove the thin piece of metal covering the opening in your PC’s case near the empty slot.
A piece of metal covers the opening where your card will poke through (Figure 1-9). Remove the screw that holds the cover in place, and lift out the cover.
Figure 1-9. A row of rectangular openings along the back of your PC’s case lets each card poke through. The opening lets you access the card’s ports after you close the PC’s case. A little metal strip, held in place by a single screw, covers each unused opening. Unscrew and lift out the metal strip near your vacant slot. Save that strip, as you’ll need to reinsert it if you ever decide to remove a card.
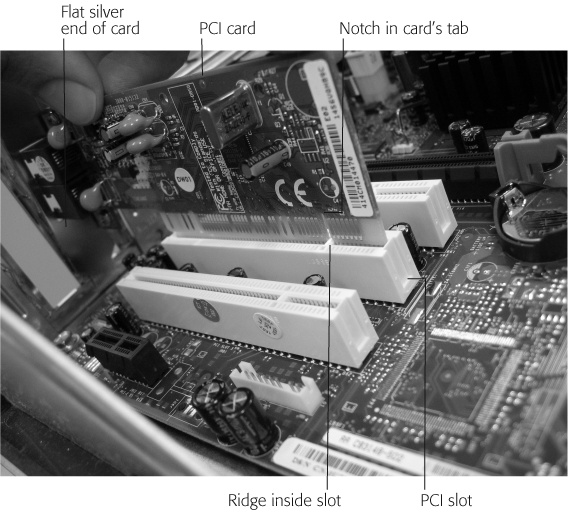
Position the card directly over the slot.
The card’s flat metal end points toward the newly uncovered rectangular opening in the back of your PC (Figure 1-10). A notch in the card’s tab aligns with a ridge in the motherboard’s slot. The design lets cards and slots mesh like pieces of a puzzle. You won’t be embarrassed by accidentally pushing a PCI-Express or AGP card into a PCI slot, because the card won’t fit.
Push the card into the slot.
If the card resists, try pushing with a gentle rocking motion until it slips into the slot.
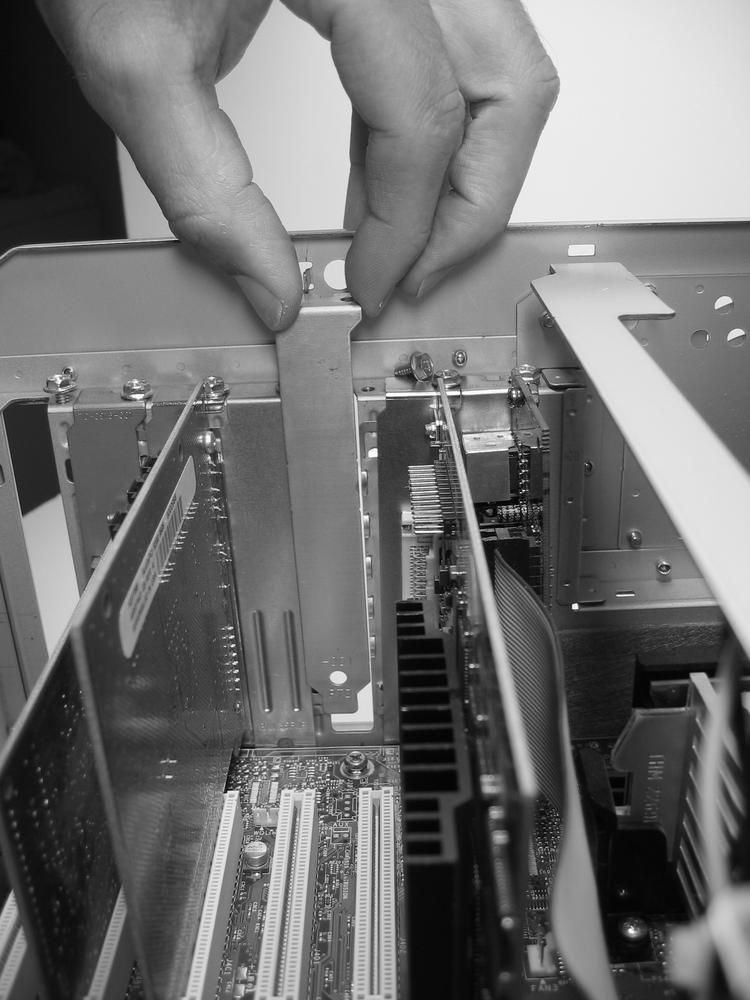
Fasten the card in place and then replace your PC’s cover.
Some PCs hold a card in place with a single screw, shown in the top of Figure 1-11. Other cases use a long, thin, push-down bracket, as shown in the bottom of Figure 1-11.
Reverse these steps to remove a card: lift the bracket or remove the screw that holds the card in place. Then pull the card upward until it pops out. Pulling a little bit on each end of a card in a seesaw motion removes the most stubborn cards.
Removing a card leaves a long rectangular opening in the back of your PC. If you’ve lost the original metal cover to the opening, pick one up at a computer store. You need to block that hole to keep dust and spiders from entering your PC, as well as to improve your computer’s air flow so it can stay cool inside.
Unlike other parts covered in this chapter, cards almost always require drivers—specially crafted pieces of software that let your operating system recognize and talk to the cards. Once you’ve installed a card, Windows usually recognizes it, and begins searching through its own built-in stash of drivers for the right one.
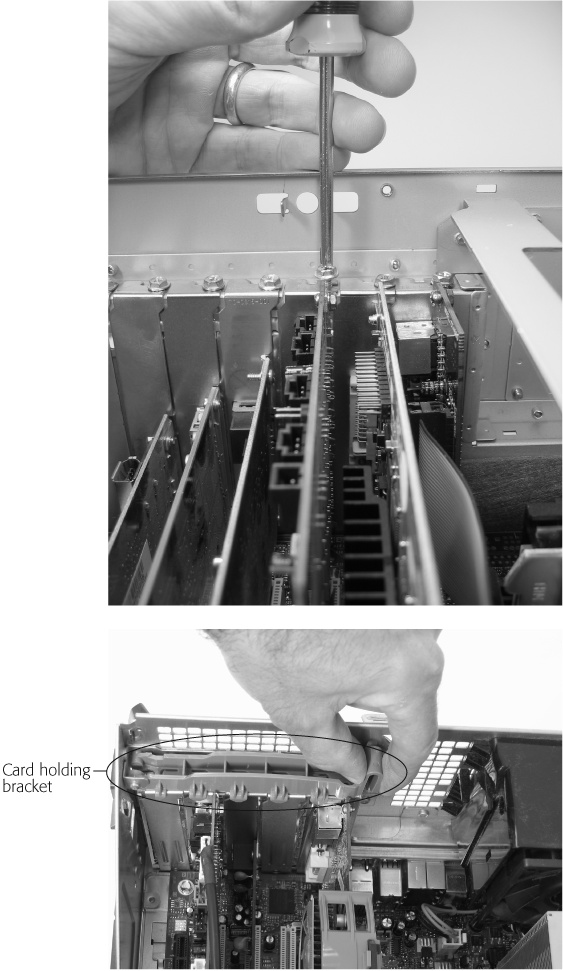
Figure 1-11. Top: Some PCs hold cards in place with a single screw along the top. When you accidentally drop the screw onto the motherboard—and this happens often—turn your PC upside-down, shake the screw out, and try again. Bottom: Other PCs let you push down a single cover or bracket to hold all the cards in place. If your PC uses the bracket, don’t screw the cards down—just use the bracket.
If you’re lucky, Windows automatically locates the right driver, installs it, and begins chattering with your PC’s new accessory.
If you’re not lucky and Windows doesn’t even notice your newly installed card, run Windows’ Add Hardware Wizard (Start → Control Panel → Add Hardware). The Wizard searches your PC for the new hardware, finds it, and leads you through the process of installing the driver.
If you’re downright cursed, Windows needs your handholding in locating and installing the right driver (Section 16.5.4).
Some PCs don’t have any cards in their slots. That means the circuitry for most of your PC’s ports—its network, sound, and video ports—are built into the motherboard itself. Sly engineering wizards compressed all those circuits into a chip or two and placed it on the motherboard. Reducing a bulky card to a tiny chip saves space, cost, and, unfortunately, performance. Sliding in a high-performance card overrides the motherboard’s built-in circuitry, letting you beef up your computer.
If your newly added replacement for a motherboard’s onboard task—video, for instance—doesn’t work, you probably need to enter your PC’s BIOS area (Section 17.2) and disable its onboard video. That tells the PC to stop using the motherboard’s built-in circuits and to use the more advanced circuitry on the newly added video card, instead.
Tip
The contacts on cards sometimes tarnish with age, leading to a bad connection and bad behavior. To clean them, turn off and unplug your computer. Remove the problem card and rub its contacts with a plain ol’ pencil eraser until they’re shiny again. Push the card back down into its slot, fasten it down, cross your fingers, and turn on your computer.
One more thing: If one of your cards doesn’t work, or the installation program has trouble with it, turn off your PC and move the card to a new slot. Sometimes that gives the PC a fresh look at things, and helps it recognize the card more easily.
The word port sounds like some kind of a well-protected haven—after all, boats pull into them when the weather’s rough. Ports stay well protected on computers, too, usually located as awkwardly as possible on the back of your computer, as shown in Figure 1-12. But rather than havens or harbors, computer ports are any type of connector on your PC, from the small rectangular hole of a USB port to the odd-shaped nub of a serial, game, or parallel port.
Whatever the shape, ports provide quick entrance for the cables of portable music players, digital cameras, printers, speakers, and other mainstays of the computerized lifestyle.
Thanks to Windows "Plug and Play” technology, you needn’t turn off your computer before plugging something into a port.
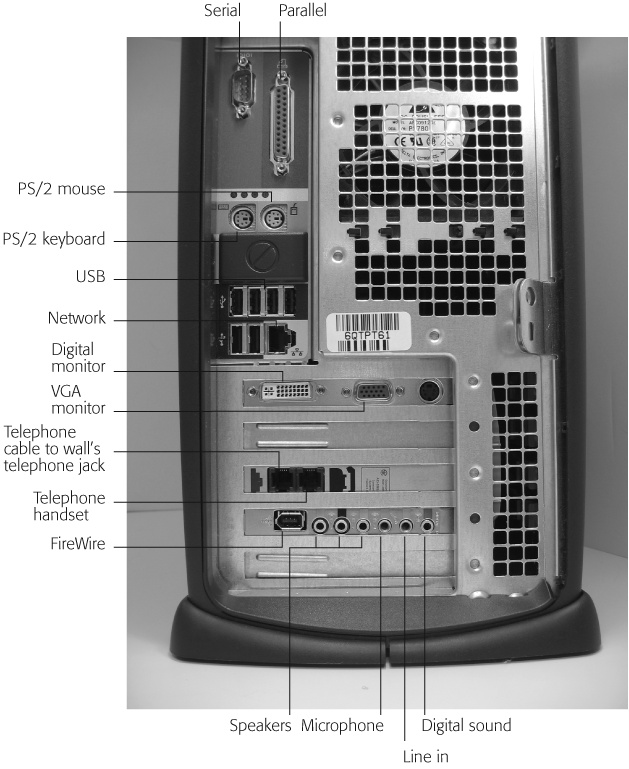
Figure 1-12. A wide variety of connectors have graced the rumps of computers over the past 20 years. Today, most computers have more ports than you need, simply to stay current with older parts. The ports used most often, USB ports, live on the back of this computer, but sometimes live on a PC’s front panel, as well as on the sides of some keyboards and monitors.
Note
The one exception is the elderly PS/2 mouse jack (Section 1.8.6); you must turn off your computer before plugging in a PS/2 mouse. USB mice—the ones with rectangular plugs—don’t require you to turn off the computer first.
Engineers think up new port types every few years. Not everybody lives on the cutting edge, though, so new ports usually began life on cards (Section 1.7), drop-in pieces of circuitry that stick out the back of your computer. (You can spot the cards in Figure 1-12; they’re the horizontal strips near the bottom of the computer’s case.)
Older, more established ports—USB, serial, parallel, PS/2, and occasionally networking—come built into the motherboard (Section 1.4). You can see built-in ports in Figure 1-12; they’re that cluster of connectors above the strips of cards.
The rest of this section contains close-up pictures of the ports you need when plugging in their appropriate gadgetry.
The vast majority of monitors plug into this usually blue, 15-hole female port (Figure 1-13). When plugged into a VGA (Video Graphics Array) port, a monitor runs in analog mode, an elderly video standard that still thrives today. Many PCs today include a built-in VGA port.
Digital monitors, by contrast, known for their sharper images and shocking price tags, plug into differently shaped ports rarely found on PCs. Instead, people install digital ports by adding a video card (Section 1.7).
To find the video card and its digital monitor port, if you have one, look among those shiny strips of metal consuming the bottom half of your computer’s back panel.
If you have a digital monitor but no digital port, you’re not left in the dark. Many digital monitors contain both a VGA and a digital port, so you can plug them into either a VGA port or a digital port. When plugged into a VGA port, a digital monitor’s picture won’t look quite as sharp. It’s fine for most work, but if the picture’s not detailed enough for your eyes, start shopping for a digital video card.
Some digital video cards contain two video ports—one analog and one digital. Extremely versatile, they let you plug in whatever monitor you own: either a regular, analog monitor or an expensive digital monitor. Or, for the ultimate in sprawling-desktop extravagance, plug in both types of monitors and spread your desktop across both displays (Section 3.3). Analog monitors, digital monitors, and video cards get their own coverage in Chapter 3.
Most computer accessories plug into a USB port—a rectangular slot (Figure 1-14) usually hidden on the back of your computer. Newer computers also sprout a few USB ports along the case’s front, keeping them handy for digital cameras, MP3 players, and other dump-and-go portables.
USB-loving parts include keyboards, mice, hard drives, printers, scanners, sound boxes, network adapters, PDA cradles, digital cameras, keychain drives, portable laptop lights, fans, and many other bits of digital gadgetry.
Some USB keyboards sport extra USB ports on their sides, letting you chain even more USB gadgets through a single port. But no matter how many USB gadgets you crave, you’ll probably run out of desk space before running out of ports: your PC can juggle up to 127 simultaneous USB devices.
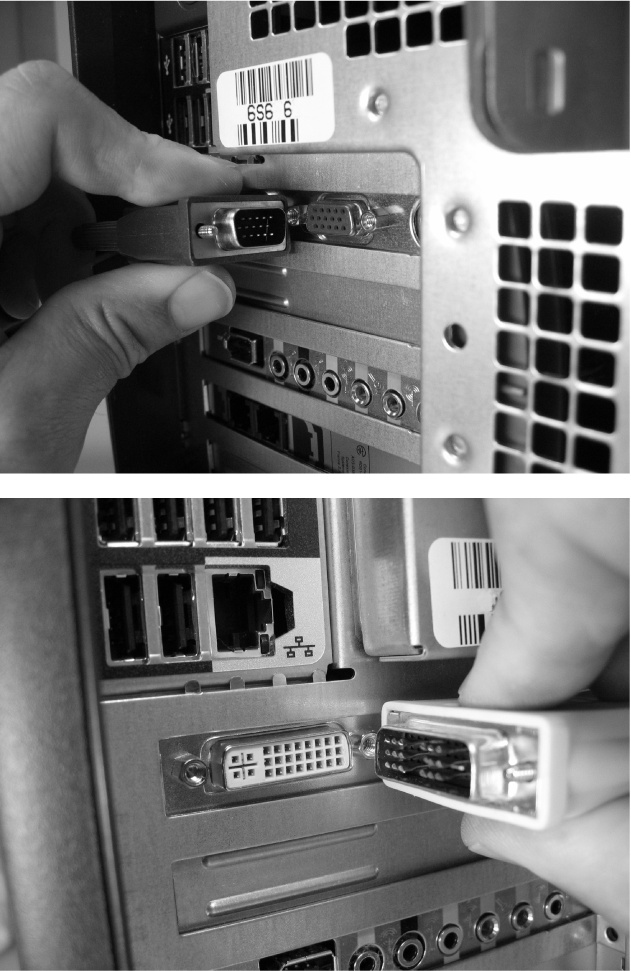
Figure 1-13. Top: Most monitors plug into a VGA port, found on nearly every PC built in the past 15 years. Bottom: The vastly more expensive digital monitors plug into a digital video port. Unlike most cables, monitor connectors are secured into their jacks with two screws. Turn the two thumbscrews next to the port to tighten them, keeping the monitor’s cable from accidentally falling out of the computer when you move the monitor on your desk.
Tip
Some USB accessories insist that you install their drivers before plugging them in; others want the drivers installed after you attach them. You can look up a particular device’s preference in its manual, if it has one. Or, you can create a Restore Point (Section 16.3.2) before plugging in the device. If the device doesn’t work, the Restore Point lets you erase Windows XP’s bad experience, install the device’s drivers, and then try again.
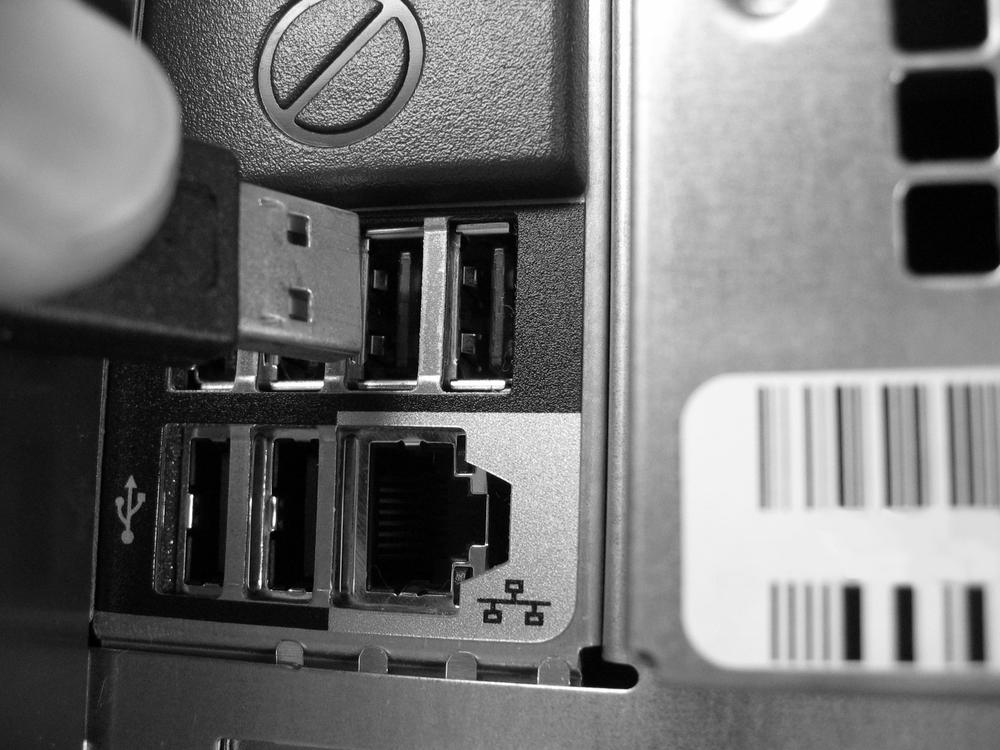
Figure 1-14. Most computer parts today plug into a rectangular USB port. If the cable from your USB gadget won’t reach your computer, pick up an extension cable. Don’t get carried away, though, as some power-hungry USB goodies can’t handle cables longer than six feet.
Most USB devices are “Plug and Play,” meaning you simply plug them in, and wait a few seconds for them to formally introduce themselves to Windows. When Windows XP gives the “installed and ready to use” pop-up message, feel free to start using them. If Windows XP snubs them at the door, though, you probably need to install a driver (Section 16.5.4) for your new USB gadget.
The most versatile of computer connectors, the USB port lives a surprisingly trouble-free life. Most of the time, Windows XP recognizes devices when they’re first plugged in, letting you use them within a few seconds. Should things go wrong, however, try these suggestions:
The plug doesn’t fit. Your first USB problem may be simply plugging in the cable. Unlike most plugs, the symmetrical USB plug doesn’t show which way is “up.” Still the plug fits only in one direction, so if you’re having trouble inserting the darn thing, flip it over and see if it finally slips into the jack.
The plug is the wrong size. If the plug still doesn’t fit, you may be dealing with a size issue. USB plugs come in three sizes, as shown in Figure 1-15. Most cables use the larger size plug, but some small, portable devices use the smaller size.
(Most small USB devices come with a converter cable bearing a large plug on one end for your PC and small plug on the other end for your gadget.)
Figure 1-15. USB plugs and ports come in three main sizes. The vast majority use the standard, rectangular-shaped size called “Series A” (left). Others use the fatter, six-sided size called “Series B” (middle). Small consumer devices like digital cameras and MP3 players often use the smallest size called “Mini-Series A/B” (right).
Windows XP doesn’t recognize the USB device. Sometimes Windows XP doesn’t recognize your newly plugged-in part and gives up. That means Windows XP doesn’t have a driver (Section 16.5.4) for it. To fix the problem, unplug the device and run its installation software to install the driver, so that Windows XP embraces your gadget when you plug it in again.
The cable doesn’t work. USB 2.0 pipes information through the cable 40 times faster than USB 1.1, so manufacturers strengthen USB 2.0 cables with extra shielding—an extra cover of wire wrapping—to keep the data running smoothly. The extra shielding thickens the cables somewhat, but sometimes USB 2.0 and USB 1.1 cables look identical. Your old USB 1.1 cables may still work with some USB 2.0 gadgetry, but not with all. If Windows XP doesn’t recognize your USB 2.0 device anymore, make sure you’re using its own cable, not a leftover from an older, USB 1.1 gadget.
Windows XP no longer recognizes a familiar USB device. When Windows XP suddenly doesn’t recognize your trusty digital camera or other gadget, try unplugging the camera, counting slowly to five, and plugging it back in. Windows XP often recognizes it the second time and begins talking with it. That’s because Windows takes a second or two to recognize a knock at the USB port’s door, both when you first plug in something and when you unplug it. If you unplug and plug back in a device too quickly, you may confuse Windows, keeping it from noticing that you plugged the device back in.
Your PC doesn’t have enough USB ports. Although new PCs often come with six or more USB ports, many older computers pack only two ports. When you find yourself with more gadgets than ports, pick up a USB hub (Figure 1-16). A hub works like a sprinkler system attachment, plugging into one port and splitting the signal into four or more.
Be sure to buy a powered USB hub. The $15 to $30 box plugs into a wall outlet as well as a USB port, and supplies extra electricity to any USB devices that need the juice.
Your device doesn’t have enough power. Two of a USB port’s four wires shuttle information to and from a device; the other two supply electricity. The port’s power keeps you from adding batteries to glowing optical mice or clip-on laptop lights. Some devices like cell phones and MP3 players even use USB ports as chargers. Plug one of these gadgets into a port, and after a few hours, the USB port has charged the internal battery.
But sometimes a hoggy device wants more power than the port can deliver. USB ports can dish out only a limited amount of power—500mA (milliamps) at 5 volts, to be precise. If a gadget stops working or complains about a loss of power, try plugging it into another USB port to spread the load.
If it still complains, your only solution may be a powered USB hub (Section 1.8.3). By plugging into the wall, the hub’s able to supply your USB accessories with all the power they need. Figure 1-17 shows how to see how much power a device is trying to grab, helpful when troubleshooting power problems.
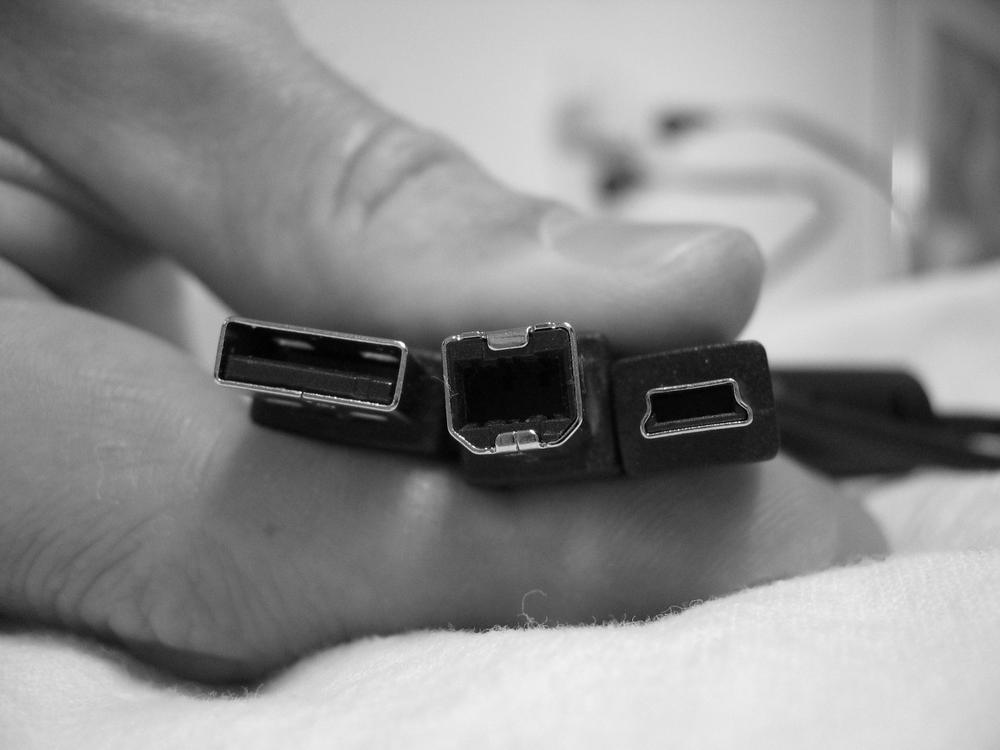
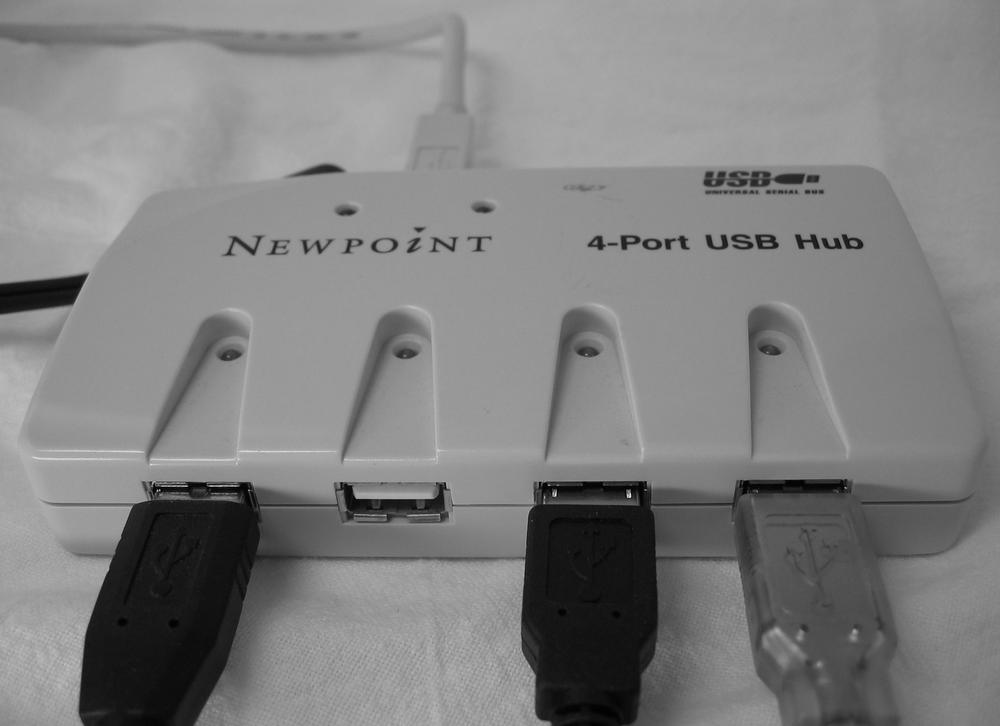
Figure 1-16. A powered USB hub not only turns one USB port into four USB ports, but supplies extra juice to USB devices that draw a lot of current—usually devices with bright lights, motors, hard drives, or other power-sapping features.

Figure 1-17. To see how much power your USB gadgets draw, click Start → Control Panel → System → Hardware → Device Manager. Click Universal Serial Bus Controllers, and then double-click any of the USB Root Hub entries. On the Power tab, Windows XP displays what’s plugged into that port (a mouse, in this case) and how much power it draws. If it’s over 500 mA (milliamps), it’s overloading that particular USB port.
The groovy sounding FireWire port, popular mostly with digital camcorder buffs, began life years ago inside Apple computers. The super-speedy new port let video hounds quickly pour digital video in and out of their Apple computers.
To weasel out of Apple’s licensing fees, PC engineers renamed FireWire to “IEEE 1394.” (It was the 1,394th standard the Institute of Electrical and Electronics Engineers had published.) Similarly, Sony, a big player in the digital camcorder market, called the port “i.Link,” and includes it on most of their PCs. Most PC manufacturers don’t include the port, although it’s gaining momentum.
Whether called FireWire, IEEE 1394, or i.Link, the odd-shaped plugs and ports shown in Figure 1-18 let PCs move information about 40 times faster than a USB 1.1 connection, and just a little slower than USB 2.0.
Tip
Connect a FireWire cable between two PCs’ FireWire ports and run Windows XP’s Network Setup Wizard to create a speedy, on-the-fly network (Section 14.10.2) for exchanging data or sharing an Internet connection.
FireWire’s fairly dependable. Being “Plug-and-Play,” just like USB, Windows XP usually recognizes the camcorder, scanner, or other accessory as soon as you plug it in. (And if it doesn’t, you need to install the accessory’s driver (Section 16.5.4).
The most common problem comes when your new device—most camcorders (Section 5.8), some iPods (Section 7.2.4), and some portable hard drives—requires a FireWire port and your PC’s missing one. To let them gossip, slip a FireWire card into your PC (Section 1.7); the card adds a FireWire port.
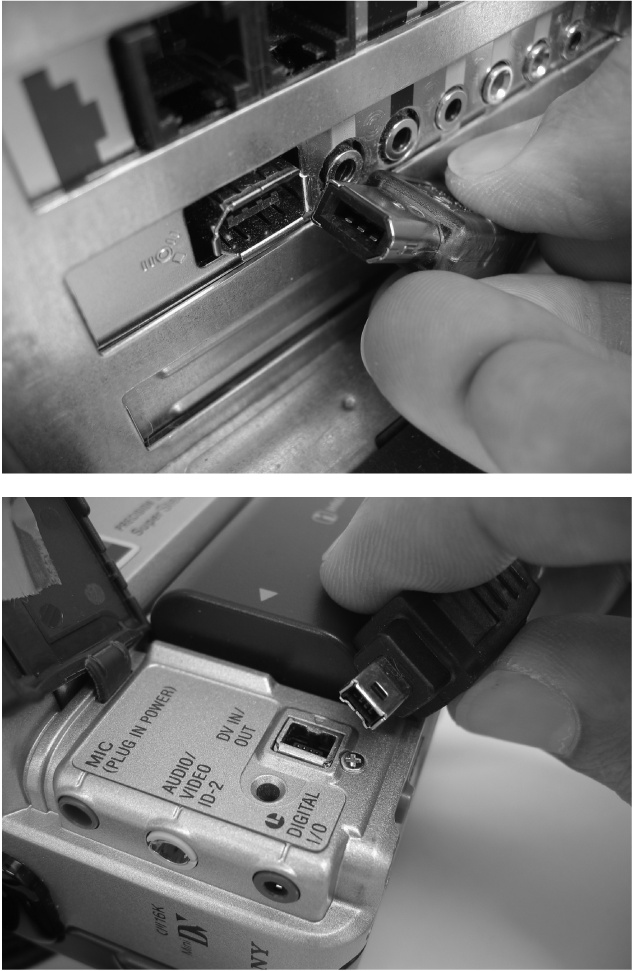
Figure 1-18. Top: FireWire jacks and ports come in two sizes. The larger, six-wire plug transmits power as it exchanges information. Bottom: The smaller, four-wire plugs lack the two power wires, so those devices need their own power source. Whatever size its port takes, FireWire transmits information at 400Mbps compared to 10Mbps for USB 1.1 and 480Mbps for USB 2.0.
FireWire cables and jacks use two sizes of connectors. PCs usually favor the larger size jacks (Figure 1-18, top), and portable gadgets prefer the smaller jacks (Figure 1-18, bottom), forcing you to find a FireWire cable with a different-sized plug on each end. Luckily, most gadgets come packaged with the right type of cable, but if yours didn’t, buy an adapter or new cable at a computer store.
Warning
Technically, FireWire is hot-swappable, meaning you can plug FireWire devices in and out of your PC without turning off either the computer or the gadget. But some camcorders take hot-swapping literally—producing a spark or short that can fry your camcorder when you plug it in. To be safe, keep your camcorder turned off (the computer can stay on) before you connect or disconnect the FireWire cable. (Sony camcorders are immune to this problem, as their “i.Link” cables don’t transmit any power.)
If your computer has an Ethernet (aka network) port (Figure 1-19, top), you can connect it to a network—a sort of social club that lets computers share information, printers, or, perhaps most important of all, an Internet connection.
Since everybody wants to connect to the Internet, most PCs today come with a built-in network port. If your PC escaped the assembly line without one, add it by sliding a network card into one of your PC’s vacant slots (Section 1.7). Or, buy a USB network adapter—a handy converter that plugs into a USB port and sports a network port on its other end.
To put your network port to use, you need a network cable (Section 14.2.3), some surprisingly inexpensive network gear (Section 14.1.1), and Windows XP’s built-in Network Connection Wizard (Section 14.4).
Almost all PCs also come with a phone jack (Figure 1-19, bottom), just like the one on the back of your telephone. The phone jack means your computer contains a modem, handy for connecting to the Internet through a dial-up connection. Most modems can also send and receive faxes with Windows XP’s built-in fax software, described in the online appendix, “Other Cool Things You Can Do Online,” available on the “Missing CD” page at http://www.missingmanuals.com.
To put the modem to work, connect a plain old phone line between your computer’s phone jack and the phone jack in your wall. Subscribe to an Internet Service Provider (Section 11.3.1), run Windows XP’s Internet Connection Wizard (Section 11.4.1), and start browsing the Internet.
Many people who use dial-up modems eventually purchase a second phone line dedicated to the modem so their family can still make calls and their friends won’t always hear a busy signal. Another solution is to switch to broadband service (Section 11.1.2) if it’s available in your area.
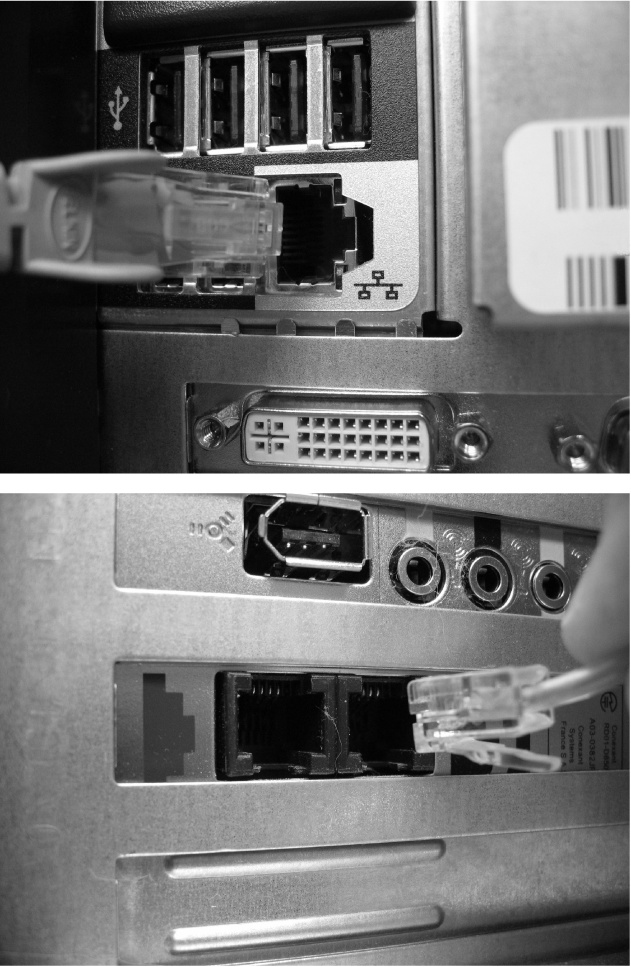
Figure 1-19. Top: It’s easy to confuse an Ethernet port, used for connecting to other computers as well as the Internet, with the plain old phone jack below. They look almost identical. Even worse, the Ethernet and phone jacks usually sit side-by-side on a computer. However, an Ethernet plug is a tad wider than the phone plug, so it never fits into a phone jack. Bottom: Running a phone line between your phone jack and the phone jack in your wall lets your computer connect to the Internet; some computers even use the phone line to send faxes. Although a phone line’s plug fits into an Ethernet port, it feels loose and won’t snap into place.
Most mice and keyboards (Chapter 2) plug into the ubiquitous USB port like everything else. But in the old days, mice and keyboards required their own special ports, dubbed “PS/2” ports after the model of IBM computer that introduced them in 1987. The ports, shown in Figure 1-20, remain useful for people with older, PS/2-style mice and keyboards.
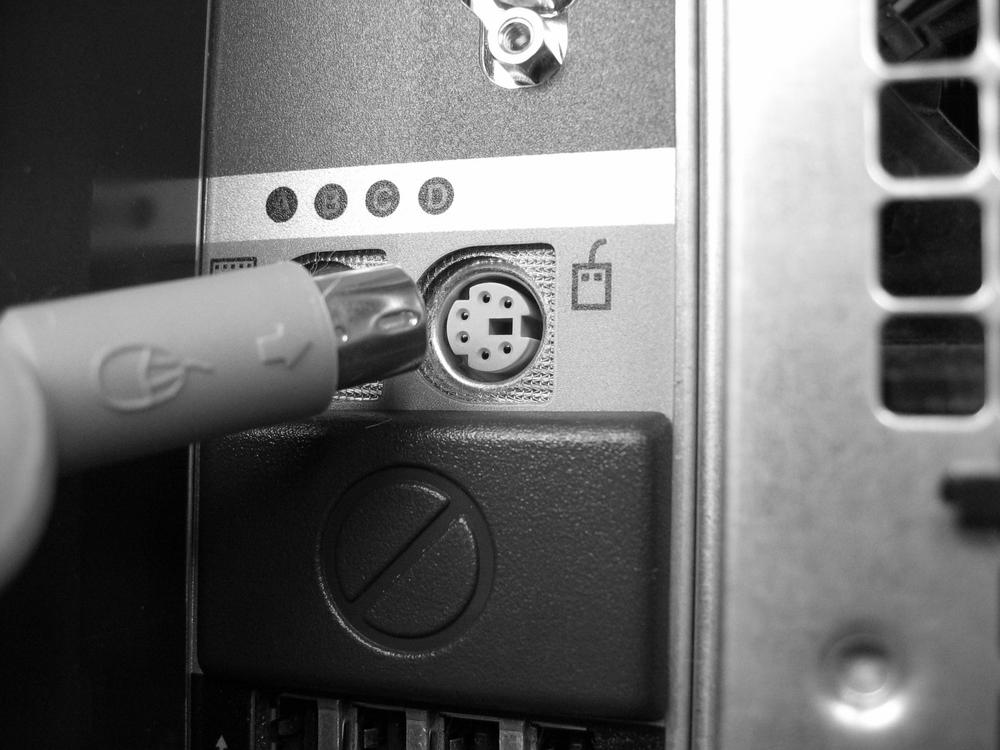
Figure 1-20. A computing leftover, PS/2 ports work with old-style mice and keyboards. Although the two ports look identical, the mouse won’t work in the keyboard port and vice versa. To keep the right plug in the right jack, match the plug’s color with the jack’s color. (Keyboards often use green for their plugs and jacks; mice cables often use purple plugs and jacks.)
Although you can leave your computer on when you plug or unplug items from ports, the PS/2 mouse remains the exception. In fact, if your PS/2 mouse cable accidentally falls from its jack, and you quickly plug it back in, your mouse pointer stays frozen in horror on the screen. Press the Windows Key (Section 2.1.3) to bring up your Start menu, and choose Restart to let the computer recognize your mouse once again.
Most computers route their sound through 1/8-inch stereo jacks—just like the headphone jacks found on iPods and most portable music players. Since the computer’s row of little sound jacks look identical, the hardest part is figuring out what plugs in where. When plugging in speakers, microphones, or music players, look for tiny symbols etched into the metal next to each jack, as shown in Figure 1-21 and the table that follows.
Then, after making sure the sound level’s turned way down (Section 7.5.3) push each connector into its proper jack.
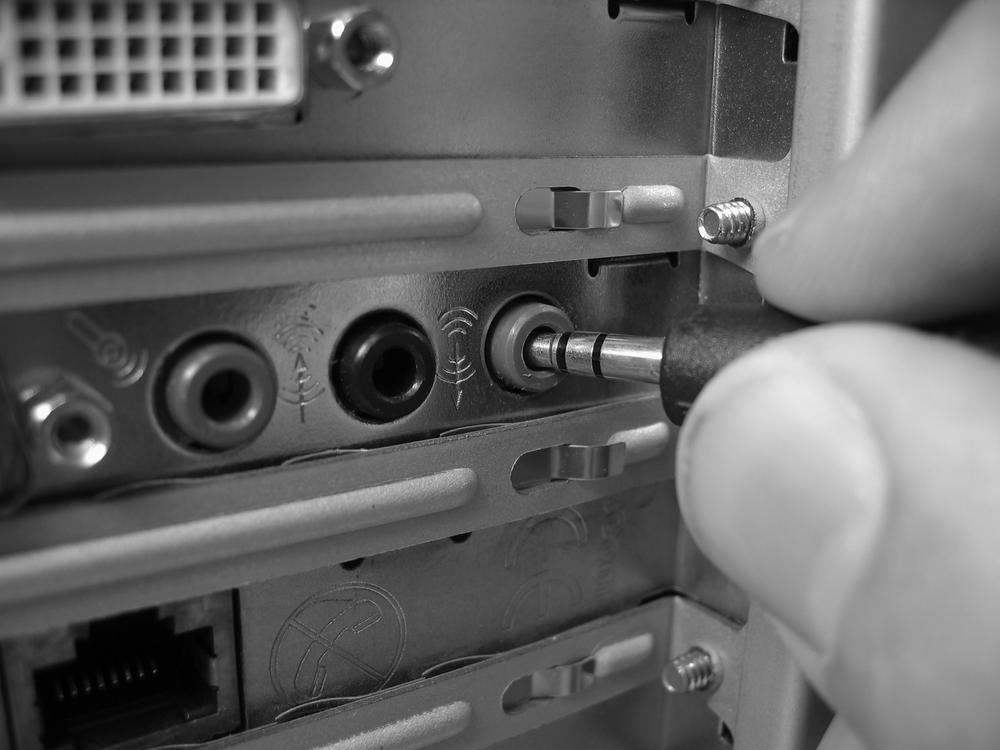
Figure 1-21. Frustrating farsighted people worldwide, speakers, microphones, and sound sources plug into closely spaced 1/8-inch wide ports. To keep people from accidentally plugging things into the wrong port, manufacturers etch tiny identification symbols next to each port. Plugging a jack into the wrong port won’t damage the equipment, but unless you turn down your computer’s volume beforehand, you may hear some startling noises.
Not many people use their PC’s game port (Figure 1-22) anymore. Today’s crop of joysticks, steering wheels, foot pedals, and game pads plug into the faster and more versatile USB port.
Today, the 15-hole female game port primarily attracts musicians, as some synthesizers and other MIDI (Musical Instrument Digital Interface) instruments still plug into the port for recording. If you spot a game port on your PC, it’s probably attached to your PC’s sound card.
Musicians, too, are beginning to abandon the game port as they ditch MIDI for digital recording, and migrate to the much faster FireWire port. Look for the game port to sink deeper into the Computing Port Graveyard in the coming years.
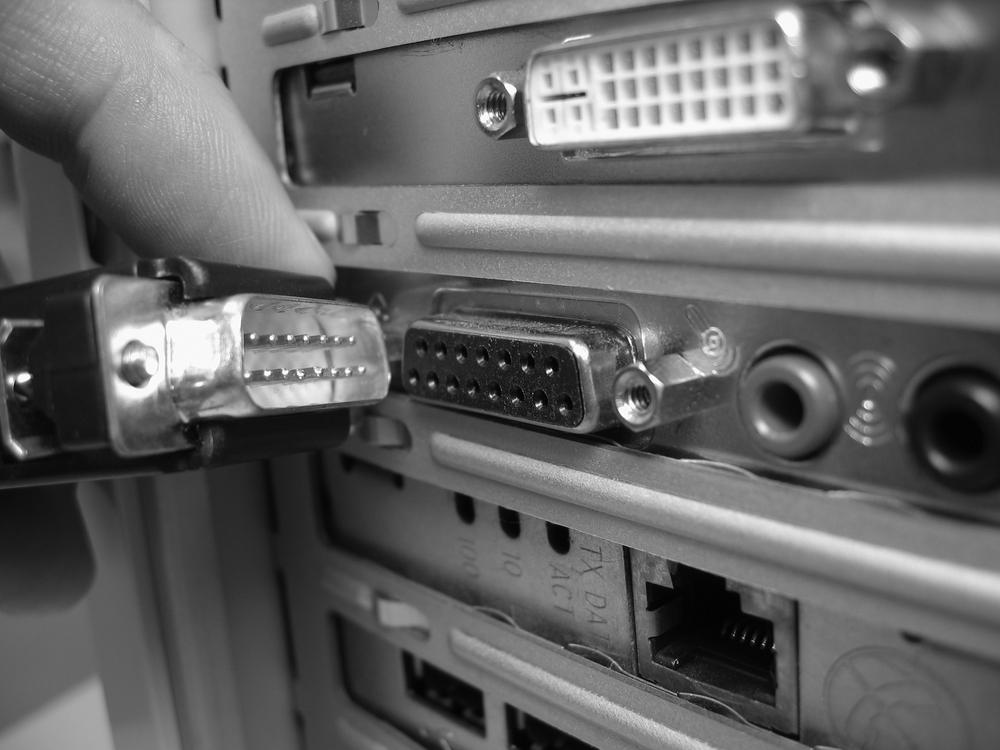
A leftover from computing’s early years, a serial port (Figure 1-23) still looks frightening, with nine sharp pins protruding from its D-shaped metal hoop. Years ago, dial-up modems suckled up to the port, to let people connect to the Internet. Today, almost all PCs come with built-in modems, leaving the serial port to collect dust and poke stray fingers.
Another vestigial tail of computing, the parallel port (also Figure 1-23) resembles an elongated nub with 25 holes. Speedy in its day, the parallel port once connected to nearly every printer and quite a few scanners. Today, printers and scanners attach through the more versatile USB port (Section 1.8.1). Printers and scanners both prefer the faster USB 2.0 port rather than the older USB 1.1 port. If the cable of your printer or scanner doesn’t fit into your USB port, chances are it’s supposed to plug in the parallel port.
Garage sale addicts still use the two ports to wring a few more ounces of life out of their aging printers, scanners, portable organizers, bar code readers, and other early issue computing doodads. A small but enthusiastic crowd of hackers and hobbyists rewire their PC’s slow-but-versatile serial ports to work with home-built robots, small trains, backyard monorails, light controllers, and other creations.
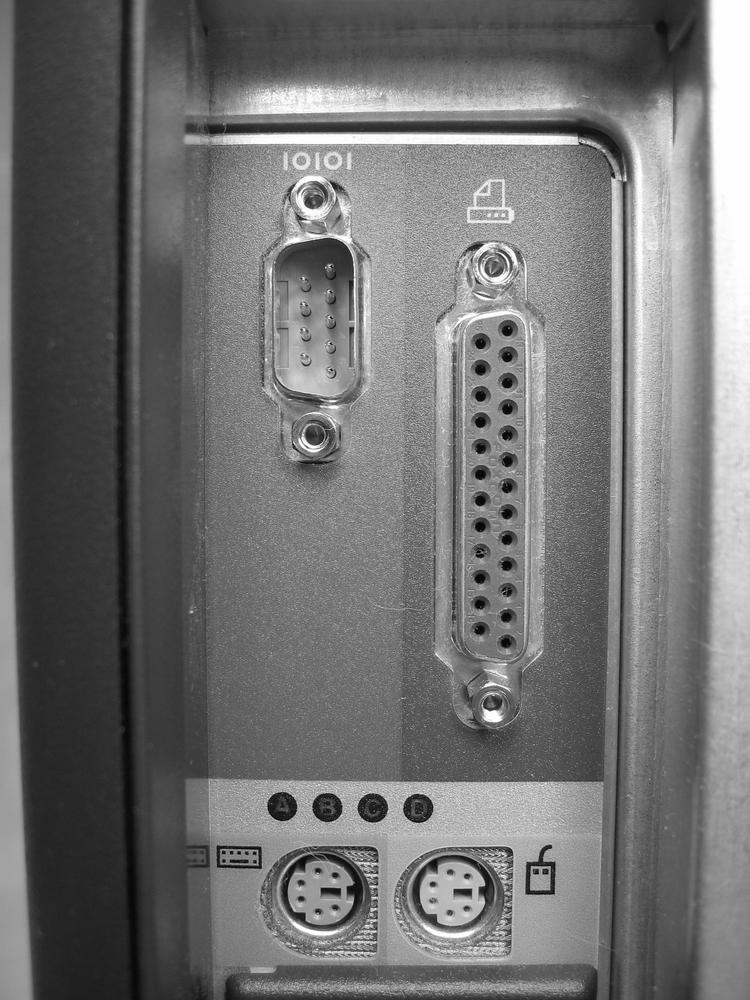
Figure 1-23. Most people don’t use their PC’s serial port (left) or parallel port (right), shown above the old-school PS/2 ports for the mouse and keyboard. Almost everything that once plugged into these two ports now plugs more conveniently into a USB port. A few old (and dreadfully slow) modems still plug into the serial port, and some old printers and scanners still use the parallel port.
Your computer’s power supply lives inside the PC’s case, where it converts the wall outlet’s 120 volts into the lower voltage sucked up by your computer’s parts. It needs attention only during two main events: if you spot a ton of dust clogging its main fan, and when your PC refuses to turn on. A few swipes with a vacuum cleaner’s brush attachment (Section 1.3.1) solves the first problem, but the second one is much more complicated. Luckily, most people never need to tackle replacing their power supply; the computer usually wears out first.
Note
Don’t confuse a PC’s power supply with an Uninterrupted Power Supply (UPS). The PC’s power supply is a small box that lives inside your PC. A UPS (Section A.3.3) is an optional add-on, usually in the form of a large, heavy box that sits outside your PC to protect your work from power outages.
If your desktop PC’s power switch doesn’t seem to have any effect, do what the techies do: put your ear to the computer case and listen closely for any sounds. Normally, turning on the computer starts the power supply’s whirling fan. But if you can’t hear the fan blowing air over your PC’s parts—nor any other noises inside your PC—then the power supply is dead and must be replaced.
Before jumping to this unpleasant and rare conclusion, try a few sure-fire tests:
Press the power button for about 10 seconds, and then wait another 10 seconds. Then press the power button again. Repeat. Sometimes that’s all it takes to resuscitate a frozen PC.
Juggle the power cord in its outlet, and where it plugs into the back of your PC. It may be loose.
Check the little red switch on the back of your PC to see if a practical joker has switched it to 220 from 110 (see Section 1.9.1.3).
If you’re still seeing no signs of activity, your power supply is dead.
In fact, if the power supply’s fan stops working but your computer still runs (Section 1.4), you still need to replace the power supply. Without the power supply’s cooling fan, your computer will overheat, leading to even more expensive repairs. When your power supply needs replacing, the next section explains how to handle the chore.
Warning
Even after you unplug the power supply, its internal capacitors store up dangerous amounts of electricity. Don’t try to pry open the power supply’s case and repair it yourself. You have to replace—not repair—the power supply.
Yes, even unplugged power supplies contain dangerous amounts of electricity. And yes, replacing one sounds like a stunt from a reality TV show. However, the dangerous parts are sealed inside the power supply’s metal box, away from sensitive fingers.
Many people prefer the convenience of letting a repair shop handle the job of performing this transplant procedure. Replacing the power supply yourself, however, saves money, results in a better power supply, and gives you a conversation starter at cocktail parties. If you’re handy with a screwdriver, your first step is choosing the right replacement.
When shopping for a replacement power supply, you need to know the replacement’s proper wattage, which is the maximum amount of power it can feed to your PC. You also need to know its physical size, so it screws back into the same place as the old one.
If you haven’t upgraded your PC with additional parts, buy a replacement power supply that’s the same wattage as your old power supply. Look for your old power supply’s wattage, usually between 200 and 300 watts, stamped on a sticker along its top or side. You may need to first remove the power supply from the computer case (Section 1.3) to see the sticker.
But if you’ve upgraded your PC, especially by adding a faster video card or extra drives, your original power supply probably isn’t dishing out enough wattage. In fact, the upgrade’s extra drain may have put the final knife into your old power supply’s ailing heart. How then do you know how many watts to buy for your replacement?
To answer this admittedly difficult question, vendors like PC Power and Cooling (http://www.pcpowerandcooling.com) and JS Custom PCs (http://www.jscustompcs.com) offer free online wattage calculators. If you check off your PC’s main parts on the Web site’s form, the site tallies up your computer’s wattage requirements.
Tip
Google the phrase “power supply wattage calculator” to find similar wattage calculators and compare notes.
When in doubt, buy a replacement with more wattage than you need, despite the higher cost. For an extra 20 to 40 bucks, those extra watts offer room for future upgrades, as well as peace of mind. Plus, buying a high wattage power supply isn’t like replacing all your nightlights with 100-watt bulbs. Your computer draws different amounts of power depending on its current task, so the power supply dishes out only what the computer currently needs. If your computer doesn’t need extra power, the power supply won’t suck extra power from your outlet.
Power supplies come in several sizes, but the vast majority use a size called ATX, named for the Advanced Technology eXtended moniker that Intel slung onto its motherboards in 1995. If your computer’s strong enough to run Windows XP, it’s probably using an ATX power supply, widely available both online and at computer stores.
Your computer’s packing slip, the sticker on the old power supply, or the PC manufacturer’s Web site (Section 1.1) can usually tell you what size you’re looking for. Searching online for the power supply’s part number (found on its sticker), often turns up a vendor for hard-to-find power supplies, as well.
For a higher quality replacement—one bearing both an accurate wattage rating and a long life—buy from a third-party vendor like JS Custom PCs or PC Power and Cooling.
Warning
Many Dell computers don’t use standard power supplies, and the voltage difference can toast your computer’s motherboard. When replacing a Dell PC’s power supply, make sure the replacement is designed specifically for a Dell computer.
But if you’re having trouble finding a replacement, call your PC’s customer support number and buy a replacement directly from the manufacturer. Although the power supply won’t be as high-quality or quiet as one from a third-party manufacturer, you’ll still save money by installing it yourself.
After opening your computer case’s (Section 1.3), look in the back of the computer for the three or four screws surrounding the topmost fan. (That fan, located adjacent to the power cable, lives inside the power supply itself.) Inside your computer, usually near the top, the power supply clings to the back wall with those screws. The power supply lives in a gray metal box that has dozens of colored wires poking out of it (see Figure 1-4). When you find the power supply, follow these steps to remove it and install the replacement.
Remove the power cord between the computer and the wall, and then unplug all of the power supply’s cables and connectors.
Remove the PC’s power cord first, both from the wall outlet and from where it pushes into the power supply.
Next, look inside your computer to find the thick bundle of wires protruding from the power supply. Locate where the wires plug into your motherboard (Figure 1-24) and into your drives (Figure 1-25).
Tip
As you unplug wires, consider drawing a quick diagram of how the various plugs fit into their jacks so you can push the new ones into the same places.
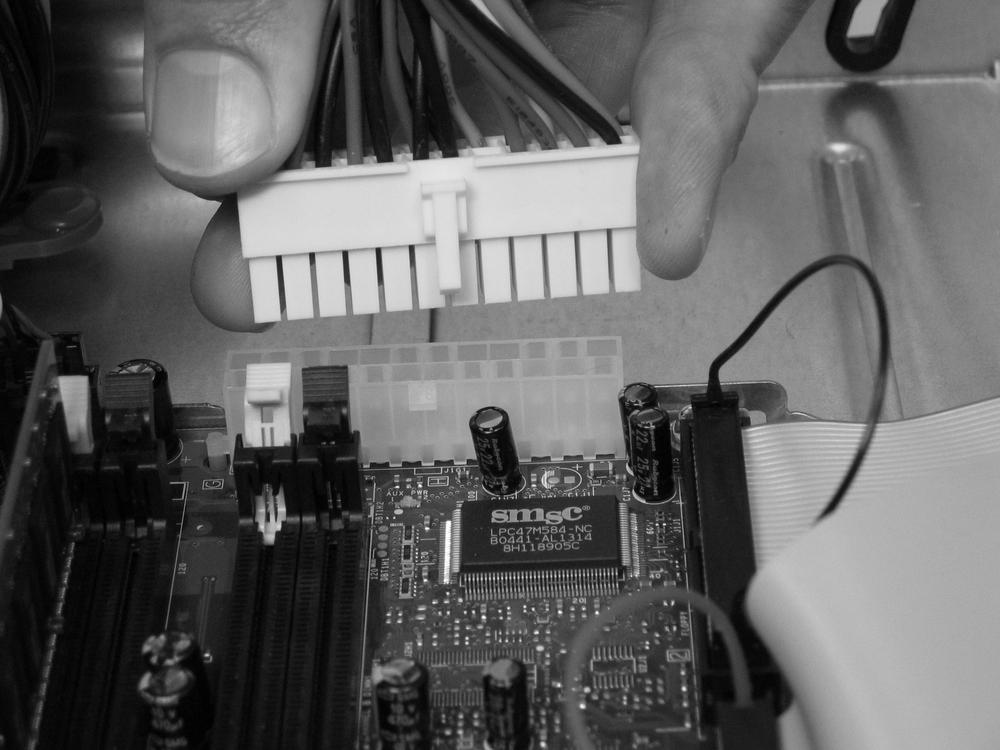
First, remove the largest plug from its jack on your motherboard, shown in Figure 1-24. If you spot any other plugs or wires leading from your power supply to the motherboard, unplug them from the motherboard, as well.
Figure 1-24. The power supply’s largest plug provides power to the motherboard, where it’s shuttled off to other parts as required. To remove it, pinch in the little latch on one side of the plastic connector and pull the connector straight up. (Don’t tug on the wires, no matter how tempting.) The plug fits into the motherboard’s jack only one way, with the plug’s latch clasping onto the motherboard jack’s latch.
Note
When removing or inserting plugs into jacks, pull on the plastic connector, never on the wires. Too much stress on the wires may pop them out of their connectors. (If a pair of needle-nose pliers can’t put the wires back into the connector, bring your PC to the repair shop, beg for mercy, and ask them to refasten the wires with their “Molex Pin Extractor” and “Molex Crimp Tool.”)
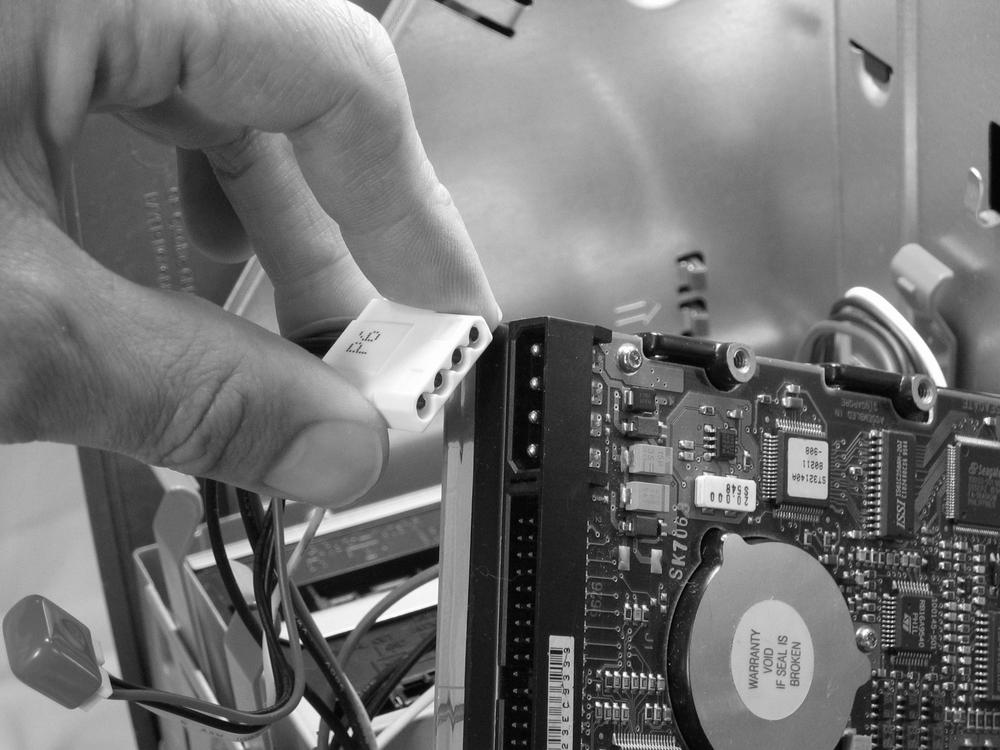
Next, remove the smaller plugs (called Molex connectors) from their sockets on the back of your drives, shown in Figure 1-25. Finally, disconnect any cooling fans that connect to the power supply—you sometimes find fans cooling high-powered video cards, as well as the CPU.
Figure 1-25. Most drives connect to the power supply with the large plastic Molex connector. Be sure to grip the plastic connector itself, not the wires, which can pull out of the plug amid much cursing. The Molex connectors sometimes take a little sideways motion to loosen their grip. The connectors reattach to the drives only one way, so you can’t plug them in the wrong way.
Remove the screws holding the power supply to the case, and remove the old power supply.
Locate the screws surrounding the fan on the outside of the case. Depending on your PC’s model, remove two, three, or four screws. Save the screws in an egg carton or ice cube tray. You may need to snap off plastic cooling vents—large snap-on molded plastic shafts that direct the air around the CPU. Save the vents for the new power supply.
Attach the new power supply.
Locate the screws you removed in Step 1 and attach the new power supply. The holes in the power supply line up exactly with the holes in the case; if they don’t, your power supply is upside down, sideways, or the wrong size. Reattach any plastic cooling vents you removed earlier.
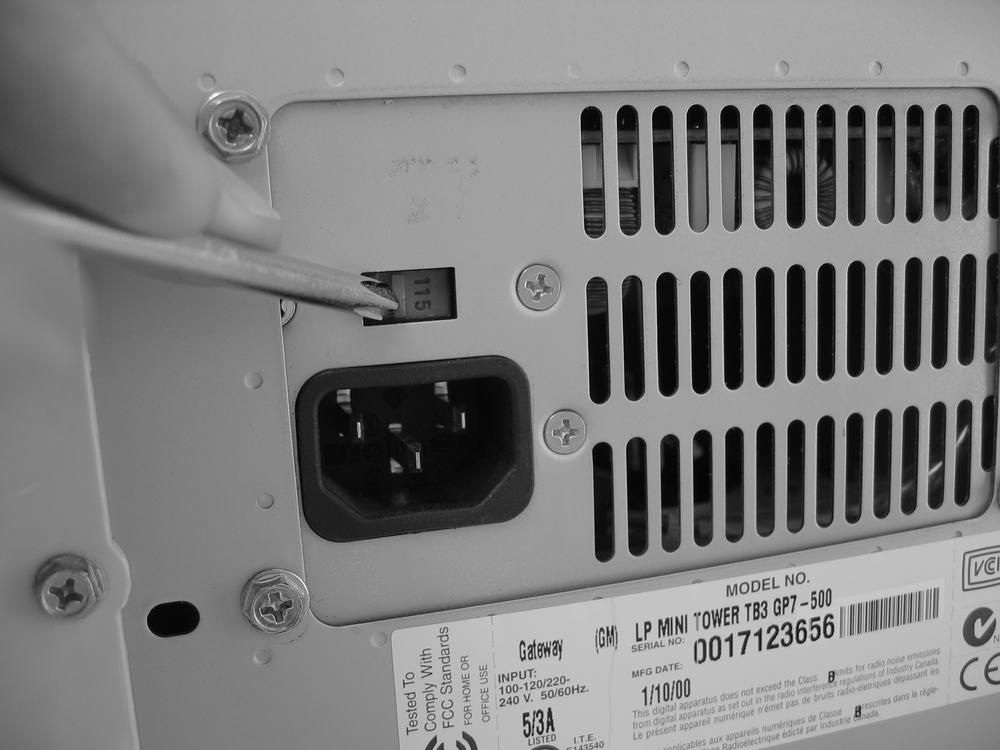
Set the correct voltage for your country.
A little red switch beneath the power outlet, shown in Figure 1-26, lets you set the voltage to either 110/115 volts (North America and Japan) or 220/230 volts (most European countries). If necessary, flip the power supply’s little red switch to match your country’s voltage.
Figure 1-26. A little red switch on the back of the power supply lets you toggle the voltage between 110/115 to 220/230. Although it’s usually set for 110/115, many countries manufacture and sell power supplies. If it’s not set to your correct voltage, use a little screwdriver to flip the switch so your correct voltage shows.
Attach the new power connectors to their jacks.
Reattach the wires to the motherboard, your drives, and any cooling fans.
When finished, plug your old power cable into the back of your power supply. (Most power supplies don’t come with new power cables.) Don’t plug it into the wall yet, though.
Don’t be surprised to see some of your power supply’s wires dangling unused. They’re for upgrades you may install later.
Reattach the case panel, plug in your PC, and turn it on.
Your PC should whir back into action. If it doesn’t, turn it off and make sure you fastened your motherboard’s connectors tightly in the right places. Try pushing the power cord tightly into the back of your computer, too; sometimes that doesn’t make a good connection. If your PC still doesn’t turn on and you don’t even hear the power supply’s fan, somebody sold you a dud. Exchange it for a new one.
When you’re sure the new power supply works, feel free to throw away the old one. (Some hobbyists save them in case they need to salvage a Molex connector.)
Just like a cheap pocket calculator, your expensive PC contains a battery. Without it, your PC would forget the date, time, and the names of its parts whenever it’s unplugged or loses power. Batteries last a fairly long time—from three to seven years. The first symptom of a dead battery? Your PC complains about its amnesia when turned on, leading to odd error messages occasionally mentioning the words BIOS or CMOS (Section 17.1).
Luckily, replacing the motherboard’s battery is a cheap and easy fix.
Tip
Most motherboards use 2032 lithium batteries, an inexpensive battery about the size of a quarter. Since your motherboard probably uses one, too, save time by picking up a replacement 2032 battery at a nearby camera store, electronic supply store, or even a drug store.
Turn off the computer and remove its side panel or case (Section 1.3).
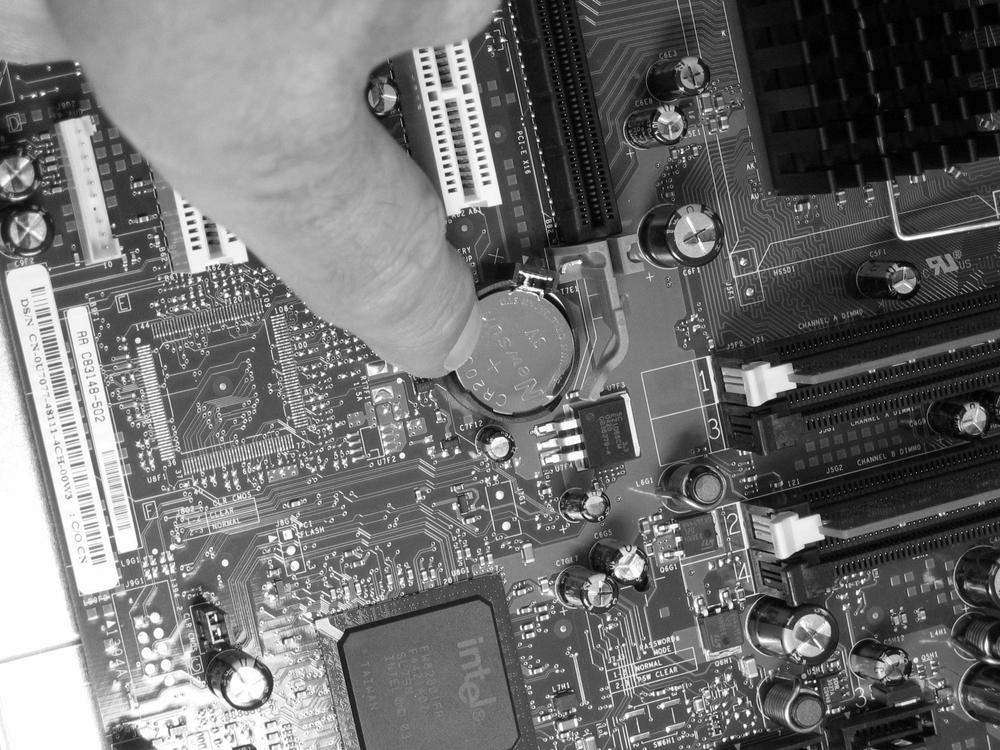
Locate the motherboard’s battery.
A small round silver disc (as shown in Figure 1-27), the battery usually lies flat in a small plastic holder.
Remove the battery.
Note which side of the battery faces up, so you can insert the new one the same way. Next, unlatch the battery and lift it from its holder. Sometimes just pressing down on one edge of the battery pops it from the holder.
If necessary, buy a replacement battery that matches the old one.
Most, but not all, computers use 2032 lithium batteries. (The number’s stamped onto the battery’s flattest surface.) If you haven’t already bought a replacement, buy one now.
Install the replacement battery.
Push in the new battery facing the same way as the old battery—usually with the numbers facing up—or your motherboard won’t recognize it. Most battery holders won’t let you insert the battery the wrong way.
Close the computer’s case.
Reattach the side panel, if your PC uses one, and then reattach the screws or thumbscrews to hold it in place.
When your PC boots up with a newly installed battery, it may still display confused words about “Setup” or “New Devices.” But after automatically identifying its parts once again, the computer memorizes them until the battery dies again, anywhere from 5 to 10 years later.
Get PCs: The Missing Manual now with the O’Reilly learning platform.
O’Reilly members experience books, live events, courses curated by job role, and more from O’Reilly and nearly 200 top publishers.

