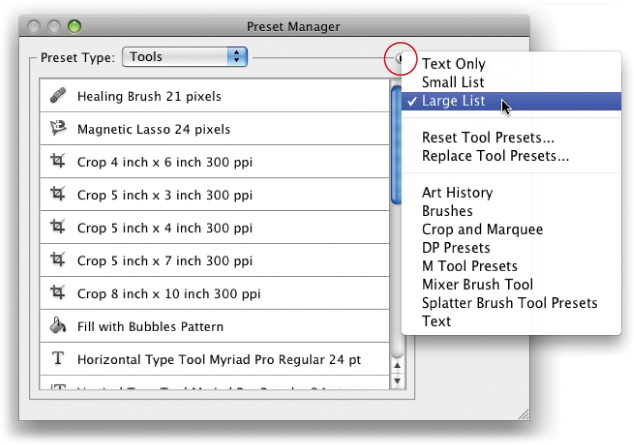
Once you get comfortable in Photoshop, you can customize most every tool in the Tools panel: the Crop tool, selection tools, healing brushes, the Type tool, gradients, and so on. The Preset Manager handles loading, saving, and storing your personalized goodies, as well as all the presets (built-ins which you can think of as tool recipes, such as gradients, patterns, and so on) that came with the program. You can open it by choosing Edit→Preset Manager or by clicking the right-facing triangle at the top right of any tool's Preset picker menu in the Options bar, and then choosing Preset Manager. (You can also open a tool's Preset picker by choosing Window→Tool Presets.)
Each group of settings, like a category of brushes, is called a preset library. To see a certain preset library, choose it from the Preset Type pop-up menu at the top of the Preset Manager dialog box (Figure 1-15).
Clicking the button that's circled in Figure 1-15 lets you set the category of presets you're viewing to the factory-fresh settings (choose "Reset [name of category]" and then click OK). You can make these adjustments when you're using the tools themselves, but the Preset Manager gives you a bigger preview space, which makes these organizational chores a little more tolerable.
Note
In CS5, brushes have a brand-spankin' new preset panel of their very own. Flip ahead to Meet the Mixer Brush to see it in action!
Once you've made your own recipes for tools, styles, or what have you, feel free to share them with the masses. You can share them with other computers (which is handy when the whole team needs to use the same color swatches or brushes) and upload them to the Web (for the whole world to download).
Figure 1-15. You can open the Preset Manager panel's menu by clicking the right-facing triangle (circled). This menu lets you change the size of the previews you see in Photoshop's Preset picker menus, as well as reset, replace, and otherwise manage presets for all categories. To save your eyesight, it's a good idea to set the preview size to Large List so you can actually see what your options are.
To create a preset library of your own, open the Preset Manager and click the Save Set button. In the resulting Save dialog box, give your custom library a name. Photoshop automatically saves it in the folders where it stores all custom settings unless you pick a different location on your hard drive (which is handy if you plan on sharing the library with other folks). When everything looks good, click Save.
Tip
If you're saving a custom preset to share with others, save it in a spot that's easy for you to find. For example, if you plan on emailing your preset library, your desktop may be a good option. If you're sharing your presets with coworkers who work in the same office, your local file server works well.
Once you've saved your custom preset library, you can email it to folks or upload it to a website for others to download. If you're uploading to the Web, make sure the file doesn't have any spaces in its name. For example, instead of calling your file "Dragon Scales Brush", name it "DragonScalesBrush".
If you're on the receiving end of a new preset library, open the Preset Manager by choosing Edit→Preset Manager and then click the Load button. Navigate to where the library lives and click Load. The next time you use a tool that has custom presets, you'll see the new library's options in the tool's Preset picker menu.
To add to the fun, you can also rename preset libraries. In the Preset Manager dialog box, select the relevant library from the Preset Type pop-up menu and click Rename; type a new name in the Name field and click OK. To delete a preset library you never use, select it from the Preset Manager's Preset Type pop-up menu and click Delete.
Tip
If you've managed to mess up one of Photoshop's built-in preset libraries by adding items that don't work the way you want, you can easily restore the original libraries: Open the Preset Manager and choose the library you want to reset. From the panel's menu (click the button that's circled in Figure 1-15), choose "Reset [type of preset]". Photoshop asks if you want to replace the current brushes or append (add to) them instead. Click OK to replace the brushes and you'll be back to the factory-fresh settings.
Get Photoshop CS5: The Missing Manual now with the O’Reilly learning platform.
O’Reilly members experience books, live events, courses curated by job role, and more from O’Reilly and nearly 200 top publishers.


