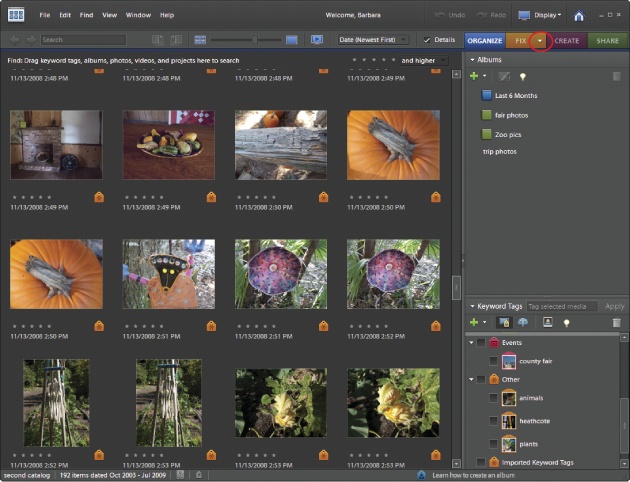
The Organizer is where your photos come into Elements and go out again (when it's time to print or email them). The Organizer stores and catalogs your photos, and you automatically come back to it for any activities that involve sharing your photos, like printing a photo package (Picture Package) or making a slideshow (Slideshows). The Organizer's main window (Figure 1-2), which is sometimes called the Media Browser, lets you view your photos, sort them into albums, and assign keyword labels to them. (In previous versions of Elements it was called the Photo Browser, so you may hear that term, too.)
The Organizer has lots of really cool features you'll learn about throughout this book when they're relevant to the task at hand. The next chapter shows you how to use the Organizer to import and organize your photos, and Appendix A covers all the Organizer's different menu options. What's more, if you sign up for a Photoshop.com account (Photoshop.com), then you can access and organize your photos from any computer, not just at home.
Figure 1-2. The Media Browser is your main Organizer workspace. Click the Create tab and you can choose to start all kinds of new projects with your photos, or click the Share tab for ways to let other people view your images. Click the arrow at the right of the Fix tab (circled) for a menu that gives you a choice of going to Quick Fix, Guided Edit, or Full Edit. The Fix tab gives you access to some quick fixes right in the Organizer, too. The Organizer also gives you another way to look at your photos, Date view, which is explained in Chapter 2.
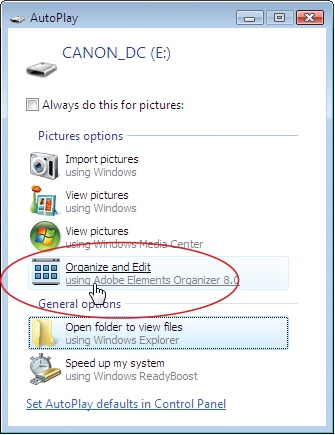
Elements has yet another component, which you may have seen already if you've plugged a camera into your computer after installing Elements: the Photo Downloader (Figure 1-3), which helps get photos straight into the Organizer directly from your camera's memory card.
If you've used older versions of Elements, then you'll be pleased to know that the Downloader is more polite than it used to be. In early versions of Elements, the Downloader ran constantly as a separate program (whether Elements was running or not), racing to be first on the scene whenever it detected any newly connected device that might have photos on it, and popping up its own window before the standard Windows dialog box could appear. For a few people, this was mighty convenient. But for the majority of folks (who didn't want to use the Downloader every time they plugged some photo-bearing device into their computers), it was a big nuisance. If you have an iPod, for instance, then you know how aggravating this was.
Now the Downloader appears as only one of your options in the regular Windows dialog box that you see when you connect a device. If you want to use the Downloader, then just choose it from the list. No more interfering with your iPod, and no extra dialog box to close every time you don't want to use the Downloader. It's a major improvement.
Figure 1-3. Adobe's Photo Downloader is yet another program you get when you install Elements. Its job is to pull photos from your camera (or other storage device) into the Organizer. To use the Downloader, just click "Organize and Edit using Adobe Elements Organizer 8.0" (circled) in Windows Vista's AutoPlay dialog box. (If you use Windows XP, you'll see a dialog box with similar options.) After the Downloader does its thing, you end up in the Organizer.
You can read more about the Downloader in Chapter 2. If you plan to use the Organizer to catalog photos and assign keywords to them, then reading the section on the Downloader can help you avoid hair-pulling moments.
Get Photoshop Elements 8 for Windows: The Missing Manual now with the O’Reilly learning platform.
O’Reilly members experience books, live events, courses curated by job role, and more from O’Reilly and nearly 200 top publishers.


