Chapter 4. The Quick Fix

With Elements’ Quick Fix tools, you can dramatically improve the appearance of a photo with just a click or two. The Quick Fix window gathers easy-to-use tools that help adjust the brightness and color of your photos and make them look sharper. You don’t even need to understand much about what you’re doing—just click a button or slide a pointer, and then decide whether you like how it looks.

Even if you do know what you’re doing, you may still find yourself using the Quick Fix window for things like shadows and highlights because Quick Fix gives you a before-and-after view as you work. Also, the Temperature and Tint sliders can come in very handy for advanced color tweaking, like finessing the overall color of your otherwise finished photo. You also get two tools—the Selection brush and the Quick Selection tool—to help make changes to only a certain area of your photo. Besides making general fixes, do you want to whiten teeth, make the sky more blue, or even make part of a picture black and white? It’s a snap to do any of these in the Quick Fix window. And in Elements 8, Adobe has made it easier to decide just what to do by adding a number of presets to the adjustments; you’ll learn about them on Using presets. You can pick one of the presets as a starting point if you need extra help.

In this chapter, you’ll learn how (and in which order) to use the Quick Fix tools. If you have a newish digital camera, you may find that Quick Fix gives you everything you need to take your photos from pretty darn good to dazzling.

Note

If a whole chapter on Quick Fix is frustratingly slow, you can start off by trying out the ultrafast Auto Smart Fix—a quick-fix tool for the truly impatient. Getting Started in a Hurry tells you everything you need to know. Also, Guided Edit may give you enough help to accomplish what you want to do; Getting Help has the full story.

The Quick Fix Window

Getting to the Quick Fix window from the Editor is easy: Just click the Edit tab’s down arrow and choose EDIT Quick. If you’re in the Organizer, click the Fix tab → Quick Photo Edit.

Note

In Elements 8, Adobe has made it a lot easier to apply many quick fixes right from the Organizer, even in Full Screen view. See the box below for details.

The Quick Fix window looks like a stripped-down version of the Full Edit window (see Figure 4-1).

Your tools are neatly arranged on both sides of the image: On the left, there’s an eight-item toolbox; on the right, there’s a collection of quick-edit panels (Figure 4-2) stored inside the Panel bin. First, you’ll take a quick look at the tools Quick Fix offers. Later in the chapter, you’ll learn how to actually use them.

Tip

If you need extra help, check out Guided Edit (Getting Help), which walks you step by step through a lot of basic editing projects.

The Quick Fix window. If you have several photos open when you launch this window, you can use the Project bin () at the bottom of the window to choose the one you want to edit. Just double-click an image’s thumbnail, and that photo becomes the active image—the one that appears front and center in the Quick Fix preview area. See for a close-up view of the right-side quick-edit panels.
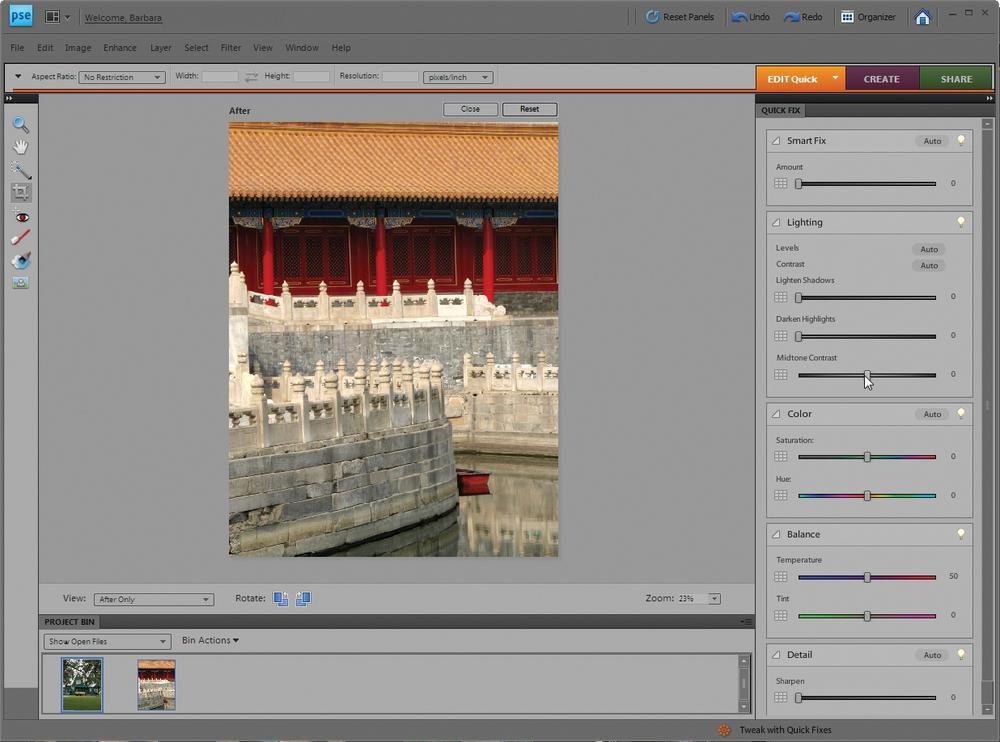
Figure 4-1. The Quick Fix window. If you have several photos open when you launch this window, you can use the Project bin (The Project bin) at the bottom of the window to choose the one you want to edit. Just double-click an image’s thumbnail, and that photo becomes the active image—the one that appears front and center in the Quick Fix preview area. See Figure 4-2 for a close-up view of the right-side quick-edit panels.
A close-up look at all the ways you can enhance your photos with Quick Fix. The left figure shows the top part of the Panel bin; the right, the bottom part. Besides these handy tools, you can also use most of the Full Edit menu commands if you need something more than the Panel bin provides.
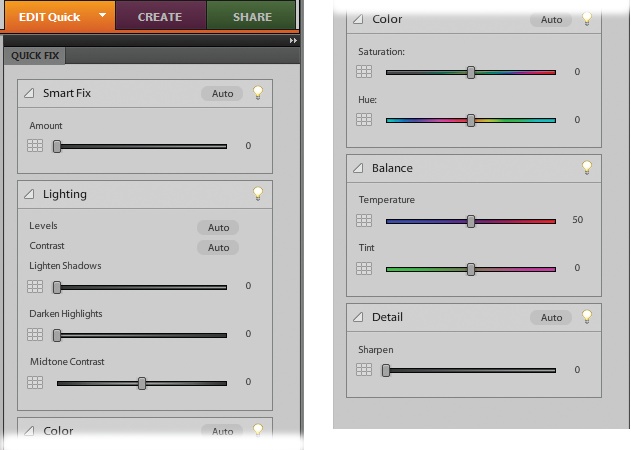
Figure 4-2. A close-up look at all the ways you can enhance your photos with Quick Fix. The left figure shows the top part of the Panel bin; the right, the bottom part. Besides these handy tools, you can also use most of the Full Edit menu commands if you need something more than the Panel bin provides.

The Quick Fix Toolbox

The toolbox holds an easy-to-navigate subset of the Full Edit window’s larger tool collection. All the tools work the same way in both modes, and you can also use the same keystrokes to switch tools here. From top to bottom, here’s what you get:

  • The Zoom tool lets you telescope in and out on your image—perfect for getting a good close look at details or pulling back to see the whole photo. (See The Zoom Tool for more on how this tool works.) You can also zoom by using the Zoom drop-down menu in the lower-right corner of the image preview area.

  • The Hand tool helps move your photo around in the image window—just like grabbing it and moving it with your own five fingers. You can read more about this tool on The Hand Tool.

  • The Quick Selection tool lets you apply Quick Fix commands to select portions of your image. You can also use the regular Elements Selection brush in Quick Fix. To get to the Selection brush, in the toolbox, just click the Quick Selection tool’s icon and hold down your mouse button; then choose the Selection brush from the menu that appears. What’s the difference between the two tools? The Selection brush lets you paint a selection exactly where you want it (or mask out part of your photo to keep it from getting changed), while the Quick Selection tool makes Elements figure out the boundaries of your selection based on your much less precise marks on the image. The Quick Selection tool is much more automatic than the regular Selection brush. You can read more about these brushes beginning on Selecting with a Brush. To get the most out of both these tools, you need to understand the concept of selections. Chapter 5 tells you everything you need to know, including the details of using these brushes.

  • The Crop tool lets you change the size and shape of your photo by cutting off the areas you don’t want (see Free Rotate Layer).

  • The Red Eye tool lets you darken those demonic-looking red flash reflections in people’s eyes. It’s explained on Fixing Red Eye.

Tip

If the contents of your photo need straightening (see Straightening the Contents of an Image), usually it’s easier to do that in Full Edit before bringing it into the Quick Fix window, since the Quick Fix toolbox doesn’t include the Straighten tool. However, there’s a sneaky way to straighten with the Crop tool that you can use in Quick Fix, too—see The Crop Tool.

All the tools just listed are ones you also see in Full Edit, but the bottom part of the Quick Fix toolbox includes three tools you won’t find anywhere else in Elements:

  • Touch Up tools. From top to bottom, these buttons let you whiten teeth, make the sky more blue, or turn part of a photo to black and white. Their icons make it clear which is which, and you’ll learn how to use them beginning on Touch-Ups.

The Quick Fix Panel Bin

When you switch to Quick Fix, the Task panel presents you with the Quick Fix Panel bin. The Panel bin is where you make the majority of your adjustments. Elements helpfully arranges everything into five panels—Smart Fix, Lighting, Color, Balance, and Detail—listed in the order you’ll typically use them. In most cases, it makes sense to start at the top and work your way down until you get the results you want. (See Quick Fix Suggested Workflow for more suggestions on what order to work in.)

Note

There’s one exception to this top-to-bottom order of operations—if you need to fix red-eye problems (Fixing Red Eye). The Red Eye tool is in the toolbox on the left of the window. You may want to jump over there first and use the Red Eye tool before you do your other editing.

The Panel bin always fills the right side of the Quick Fix screen. You can’t drag the panels out of the Panel bin as you can in Standard Edit mode, but you can collapse the bin by clicking the double arrows in its upper-right corner. And you can expand and collapse the individual panels within the bin, as explained in Figure 4-3.

Note

If you go into Quick Fix mode before opening a photo, you won’t see the pointers in the sliders, just empty tracks. Don’t worry—they’ll automatically appear as soon as you open a photo and give them something to work on.

Clicking any of these flippy triangles collapses or expands that section of the Panel bin. If you have a small screen, the Detail section at the bottom of the Panel bin may not show, so you can collapse one of the other sections you’re not using to bring it into view. You can also use the slider on the right to scroll through the panels.
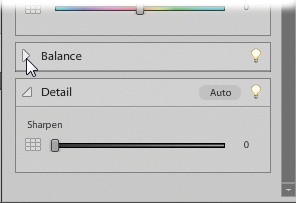
Figure 4-3. Clicking any of these flippy triangles collapses or expands that section of the Panel bin. If you have a small screen, the Detail section at the bottom of the Panel bin may not show, so you can collapse one of the other sections you’re not using to bring it into view. You can also use the slider on the right to scroll through the panels.

Using presets

Elements 8 has a new feature to help the undecided—presets. To the left of the sliders in the Panel bin are little grid-like squares (see Figure 4-4). If you think you need to use a particular slider but you aren’t sure, click its square, and a grid of nine tiny thumbnails appears below the slider. Each thumbnail represents a different preset for that slider. There are presets for all the Quick Fix sliders.

If you don’t have super-micro vision, you probably think these thumbnails are too darn small for you to be able to tell the difference—but not so fast: Run your cursor over a thumbnail, and Elements previews that setting on your image itself, so you can get a view as large as you need. You can even adjust the slider right from the thumbnail as explained in Figure 4-4. Once you like what you see, just click to apply the change to your photo. To reset your image to when you began using the current group of presets, click the thumbnail with the curved arrow on it.

Hover your cursor over any of the thumbnails to see the effect displayed on your photo. To adjust the strength of the effect, just click the thumbnail that’s closest to what you want, and then drag left or right (this is called “scrubbing”) and watch as your image changes. Click the thumbnail with the curved arrow to return your photo to when you opened that preset group.
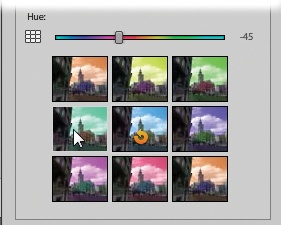
Figure 4-4. Hover your cursor over any of the thumbnails to see the effect displayed on your photo. To adjust the strength of the effect, just click the thumbnail that’s closest to what you want, and then drag left or right (this is called “scrubbing”) and watch as your image changes. Click the thumbnail with the curved arrow to return your photo to when you opened that preset group.

Different Views: After vs. “Before and After”

When you open an image in Quick Fix, your picture first appears by itself in the main window with the word “After” above it to let you know that you’re in After Only view. Elements keeps the Before view—your original photo—tucked out of sight. But you can pick from three other layouts, which you can choose anytime: Before Only, "Before and After—Horizontal”, and “Before and After—Vertical”. Both of the “Before and After” views are especially helpful when you’re trying to figure out if you’re improving your picture—or not—as shown in Figure 4-5. Switch between views by picking the one you want from the View pop-up menu just below your image.
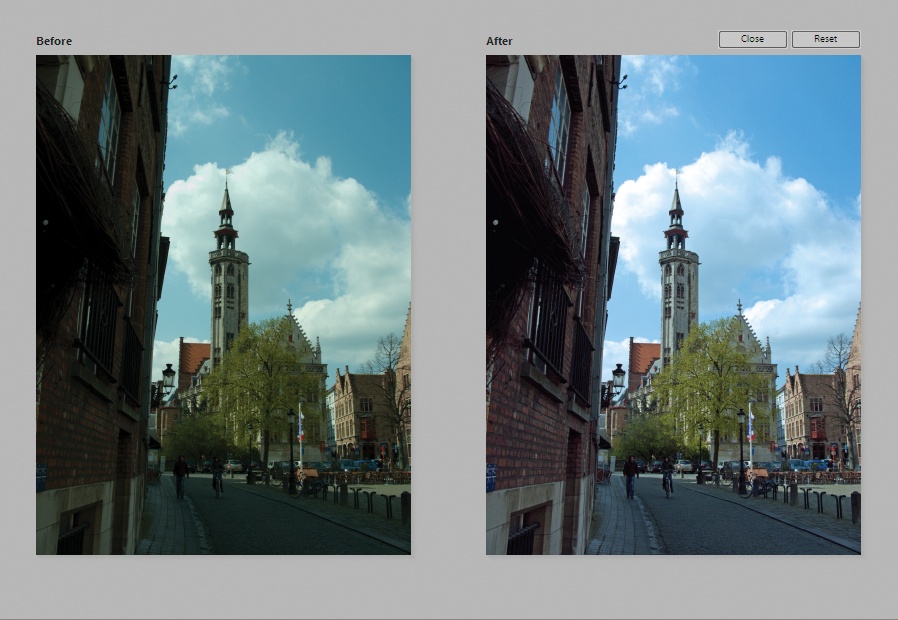
The “Before and After” views in the Quick Fix window make it easy to see how you’re changing your photo. Here you see “Before and After—Horizontal”, which displays the views side by side. To see them one above the other, choose “Before and After—Vertical”. If you want a more detailed view, use the Zoom tool () to focus on just a portion of your picture.
Figure 4-5. The “Before and After” views in the Quick Fix window make it easy to see how you’re changing your photo. Here you see “Before and After—Horizontal”, which displays the views side by side. To see them one above the other, choose “Before and After—Vertical”. If you want a more detailed view, use the Zoom tool (The Zoom Tool) to focus on just a portion of your picture.

Note

Quick Fix limits the amount of screen space available for your image. If you want a larger view while you work, click over to Full Edit.

Editing Your Photos

The tools in the Quick Fix window are pretty easy to use. You can try one or all of them—it’s up to you. And whenever you’re happy with how your photo looks, you can leave Quick Fix and go back to the Full Edit window or the Organizer.

If you want to rotate your photo, click either of the Rotate buttons below the image preview area. (See Rotating and Flipping Options for more about rotating photos.)

Tip

If you click the Reset button just above your image, you’ll return your photo to the way it looked before you started working in Quick Fix. This button undoes all Quick Fix edits, so don’t use it if you want to undo a single action only. For that, just use the regular Undo command: Edit → Undo or Ctrl+Z.

Fixing Red Eye

Everyone who’s ever taken a flash photo has run into the dreaded problem of red eye —those glowing, demonic pupils that make your little cherub look like someone out of an Anne Rice novel. Red eye is even more of a problem with digital cameras than with film, but luckily, Elements has a simple and terrific Red Eye tool for fixing it. All you need to do is click the red spots with the Red Eye Removal tool, and your problems are solved. This tool works the same whether you use it in Quick Fix or Full Edit.

To use the Quick Fix Red Eye tool:

  1. Open a photo.

  2. Zoom in so you can see where you’re clicking.

    Use the Zoom tool to magnify the eyes. You can also switch to the Hand tool if you need to drag the photo so that the eyes are front and center.

  3. Activate the Red Eye tool.

    Click the Red Eye icon in the toolbox or press Y (this keystroke works in Full Edit, too).

  4. Click the red part of the pupil (see Figure 4-6).

    That’s it. Just one click should fix it. If a single click doesn’t fix the problem, you can press Ctrl+Z to undo it, and then try dragging the Red Eye tool over the pupil. Sometimes one method works better than the other. And as explained in a moment, you can also adjust two settings on the Red Eye tool: Darken Amount and Pupil Size.

  5. Click in the other eye.

    Repeat the process on the other eye, and you’re done.

Zoom in when using the Red Eye tool so you get a good look at the pupils. The eye on the left side of the picture has already been fixed. Don’t worry if your photo looks so magnified that it loses definition—just make the red area large enough so you can hit it right in the center. Notice what a good job the Red Eye tool does of keeping the highlights (called catch lights) in the eye that’s been treated.
Figure 4-6. Zoom in when using the Red Eye tool so you get a good look at the pupils. The eye on the left side of the picture has already been fixed. Don’t worry if your photo looks so magnified that it loses definition—just make the red area large enough so you can hit it right in the center. Notice what a good job the Red Eye tool does of keeping the highlights (called catch lights) in the eye that’s been treated.

Note

You can also apply the Organizer’s Auto Red Eye Fix in either the Quick Fix or Full Edit window. In either window, just press Ctrl+R or go to Enhance → Auto Red Eye Fix. In Full Edit you can also activate the Red Eye tool, and click the Auto button in the Options bar. The only tradeoff to using the Auto Red Eye Fix in the Editor is you don’t automatically get a version set (as you do when using the tool from in the Organizer). But you can create a version set when you save your changes, as explained on Saving Your Work.

If you need to adjust how the Red Eye tool works, the Options bar gives you two controls, although 99 percent of the time you can ignore them:

  • Darken Amount. If the result is too light, increase the percentage in this box.

  • Pupil Size. Increase or decrease the number here to tell Elements how much area to consider part of a pupil.

Tip

You can also fix red eye right in the Raw converter (Using the Raw Converter) if you’re dealing with Raw format photos.

Smart Fix

The secret weapon in the Quick Fix window is the Smart Fix command, which automatically adjusts a picture’s lighting, color, and contrast, all with one click. You don’t have to figure anything out. Elements does it all for you.

You’ll find the Smart Fix in the aptly named Smart Fix panel, and it’s about as easy to use as hitting the speed dial button on your phone: Click the Auto button, and if the stars are aligned, your picture will immediately look better. (Figure 4-7 gives you a glimpse of its capabilities. If you want to see for yourself how this fix works, download this photo—iris.jpg —from this book’s Missing CD page at www.missingmanuals.com.)

Tip

You’ll find Auto buttons scattered throughout Elements. The program uses them to make a best-guess attempt to implement whatever change the Auto button is next to (Smart Fix, Levels, Contrast, and so on). It never hurts to at least try clicking these Auto buttons; if you don’t like what you see, you can always perform the magical undo: Edit → Undo or Ctrl+Z.

If you’re happy with Auto Smart Fix’s changes, you can move onto a new photo, or try sharpening your photo a little (see Sharpening) if the focus appears a bit soft. You don’t need to do anything to accept the Smart Fix changes. But if you’re not thrilled with the results, take a good look at your picture. If you like what Auto Smart Fix did but the effect is too strong or too weak, press Ctrl+Z to undo it, and try playing with the Smart Fix Amount slider instead. Or click the little grid to the left of the slider to try out one of the tool’s presets.

The Amount slider does the same thing Auto Smart Fix does, only you control the degree of change. Watch the image as you move the slider to the right. If your computer is slow, there’s a certain amount of lag, so go slowly to give it a chance to catch up. If you happen to overdo it, sometimes it’s easier to click the Reset button above your image and start again. Use the checkmark and X buttons (which appear next to the Smart Fix label; they look like the ones shown in Figure 4-8) to accept or reject your changes.

Tip

Usually you get better results with a lot of little nudges to the Smart Fix slider than with one big sweeping movement.

Top: This photo, taken in the shade, is pretty dark.Bottom: The Auto Smart Fix button improved it significantly with just one click. You might want to use the tools in the Balance section () to really fine-tune the color.
Figure 4-7. Top: This photo, taken in the shade, is pretty dark. Bottom: The Auto Smart Fix button improved it significantly with just one click. You might want to use the tools in the Balance section (Using the Color sliders) to really fine-tune the color.

Incidentally, these are the same Smart Fix commands you see in the Editor’s Enhance menu: Enhance → Auto Smart Fix (Alt+Ctrl+M), and Enhance → Adjust Smart Fix (Shift+Ctrl+M).

When you move a slider in any of the Quick Fix panels, accept and cancel buttons appear in the panel you’re using. Clicking the accept (checkmark) button applies the change to your image, while clicking the cancel (X) button undoes the last change you made. If you make several slider adjustments, the cancel button undoes everything you’ve done since you clicked accept. (Clicking the light bulb icon takes you to the Elements Help Center.)
Figure 4-8. When you move a slider in any of the Quick Fix panels, accept and cancel buttons appear in the panel you’re using. Clicking the accept (checkmark) button applies the change to your image, while clicking the cancel (X) button undoes the last change you made. If you make several slider adjustments, the cancel button undoes everything you’ve done since you clicked accept. (Clicking the light bulb icon takes you to the Elements Help Center.)

Sometimes Smart Fix just isn’t smart enough to do everything you want, and sometimes it does things you don’t want. (It works better on photos that are underexposed than overexposed, for one thing.) Fortunately, you still have several other editing choices, covered in the following sections. If you don’t like the effect Smart Fix has had, undo it before making other changes.

Note

Auto Smart Fix is one of the commands you can apply from within the Organizer, so there’s no need to launch the Editor at all if you want just this tool. See the box on The Quick Fix Window for more about making fixes from the Organizer.

Adjusting Lighting and Contrast

The Lighting panel lets you make sophisticated adjustments to the brightness and contrast of your photo. Sometimes problems you thought stemmed from exposure or even focus can be fixed with these commands.

Levels

If you want to understand how Levels really works, you’re in for a long, technical ride. But if you just want to know what it can do for your photos, the short answer is that it adjusts the brightness of your image by redistributing the color information. Levels changes (and hopefully fixes!) both brightness and color at the same time.

If you’ve never used any photo-editing software before, this may sound rather mysterious, but photo-editing pros will tell you that Levels is one of the most powerful commands for fixing and polishing your pictures. To find out if its magic works for you, click the Auto button next to the word Levels. Figure 4-9 shows what a big difference it can make. Download this photo (ocean.jpg) from the Missing CD page at www.missingmanuals.com if you’d like to try this.

What Levels does is complex. Chapter 7 has loads more details about what’s going on behind the scenes and how you can apply this command much more precisely.

A quick click of the Auto button for Levels can make a dramatic difference.Left: The original photo isn’t bad, and you may not realize that the colors could be better.Right: This image shows how much more effective your photo is once Auto Levels has balanced the colors.
Figure 4-9. A quick click of the Auto button for Levels can make a dramatic difference. Left: The original photo isn’t bad, and you may not realize that the colors could be better. Right: This image shows how much more effective your photo is once Auto Levels has balanced the colors.

Contrast

The main alternative to Auto Levels in Quick Fix is Auto Contrast. Most people find that their images tend to benefit from one or the other of these options. Contrast adjusts the relative darkness and lightness of your image without changing the color, so if Levels made your colors go all goofy, try adjusting the contrast instead. You activate Contrast the same way you do the Levels tool: just click the Auto button next to its name.

Tip

After you use Auto Contrast, look closely at the edges of the objects in your photo. If your camera’s contrast was already high, you may see a halo or a sharp line around the photo’s subject. If you do, the contrast is too high and you need to undo Auto Contrast (Ctrl+Z) and try another fix instead.

Shadows and Highlights

The Shadows and Highlights tools do an amazing job of bringing out details that are lost in the shadows or in bright areas of your photo. Figure 4-10 shows what a difference these tools can make.

The Shadows and Highlights tools are a collection of three sliders, each of which controls a different aspect of your image:

  • Lighten Shadows. Nudge the slider to the right, and you’ll see details emerge from murky black shadows.

  • Darken Highlights. Use this slider to dim the brightness of overexposed areas.

  • Midtone Contrast. After you’ve adjusted your photo’s shadows and highlights, your photo may look flat and not have enough contrast between the dark and light areas. This slider helps you bring a more realistic look back to your photo.

Left: This image has highlights that are too bright and shadows that are much too dark.Right: After a little shadows and highlights adjusting, you can see there’s plenty of detail there. (Use the color sliders—described next—to get rid of the orange tone.)
Figure 4-10. Left: This image has highlights that are too bright and shadows that are much too dark. Right: After a little shadows and highlights adjusting, you can see there’s plenty of detail there. (Use the color sliders—described next—to get rid of the orange tone.)

Tip

You may think you need only lighten shadows in a photo, but sometimes just a smidgen of Darken Highlights may help, too. Don’t be afraid to experiment by using this slider even if you’ve got a relatively dark photo.

Go easy: Getting overenthusiastic with these sliders can give your photos a washed-out, flat look.

Color

The Color panel lets you—surprise, surprise—play around with the colors in your image. In many cases, if you’ve been successful with Auto Levels or Auto Contrast, you won’t need to do anything here.

Auto Color

Once again, there’s another one-click fix available: Auto Color. Actually, in some ways Auto Color should be up in the Lighting section. Like Levels, it simultaneously adjusts color and brightness, but it looks at different information in your photos to decide what to do with them.

When you’re first learning to use Quick Fix, you may want to try all three—Auto Levels, Auto Contrast, and Auto Color—to see which generally works best for your photos. Undo between each change and compare your results. Most people find they like one of the three most of the time.

Auto Color may be just the ticket for your photos, but you may also find that it shifts your colors in strange ways. Click it and see what you think. Does your photo look better or worse? If it’s worse, just click Reset or press Ctrl+Z to undo it, and go back to Auto Levels or Auto Contrast. If they all make your colors look a little wrong, or if you want to tweak the colors in your photo, move on to the Color sliders, explained next.

Using the Color sliders

If you want to adjust the colors in your photo without changing the brightness, check out the Color sliders. For example, your digital camera may produce colors that don’t quite match what you saw when you took the picture; you may have scanned an old print that’s faded or discolored; or you may just want to change the colors in a photo for the heck of it. Whatever the case, the sliders below the Auto Color button are for you.

You get two ways to adjust colors here:

  • Saturation controls the intensity of your image’s color. For example, you can turn a color photo to black and white by moving the slider all the way to the left. Move it too far to the right, and everything glows with so much color that it looks radioactive.

  • Hue changes the color from, say, red to blue or green. If you aren’t looking for realism, you can have fun with your photos by really pushing this slider to create funky color changes.

You probably won’t use both these sliders on a single photo, but you can if you like. Remember to click the accept checkmark that appears in the Color panel if you want to accept your changes. For fine-tuning your color, you may want to move on to the next panel: Balance. In fact, in many cases you’ll only need the Balance sliders.

Tip

If you look at the color of the slider’s track, it shows what happens if you move in that direction. So there’s less and less color as you go left in the Saturation track, and more and more to the right. Looking at the tracks can help you figure out where to move the slider.

Balancing color

Photos often have the right amount of saturation, and moving the Hue slider makes everything look pretty funky, but suppose there’s something about the color balance that just isn’t right. The Balance panel contains two very useful controls for adjusting the overall colors in your image:

  • Temperature lets you adjust colors from cool (bluish) on the left to warm (orangeish) on the right. Use this slider for things like toning down the warm glow you see in photos taken in tungsten lighting, or just for fine-tuning your color balance.

  • Tint adjusts the green/magenta balance of your photo, as shown in Figure 4-11.

Left: The greenish tint in this photo is a typical example of a common problem caused by many digital cameras.Right: A little adjustment of the Tint slider clears it up in a jiffy. It’s not always as obvious as it is here that you need a tint adjustment. If you aren’t sure, the sky can be a dead giveaway: Is it robin’s egg blue like in the left photo here? If so, tint is what you need.
Figure 4-11. Left: The greenish tint in this photo is a typical example of a common problem caused by many digital cameras. Right: A little adjustment of the Tint slider clears it up in a jiffy. It’s not always as obvious as it is here that you need a tint adjustment. If you aren’t sure, the sky can be a dead giveaway: Is it robin’s egg blue like in the left photo here? If so, tint is what you need.

Note

In previous versions of Elements, these sliders were grouped with the Color sliders, since you’ll often use a combination of adjustments from both groups. Chapter 7 has lots more info about how to use the full-blown Editor to really fine-tune your image’s colors.

Sharpening

Now that you’ve finished your other corrections, it’s time to sharpen your photo, so move down to the Detail tab. Sharpening gives the effect of better focus by improving the edge contrast of objects in your photo. Most digital-camera photos need some sharpening because the sharpening the camera applies is deliberately conservative. Once again, a Quick Fix Auto button is at your service: Click the Detail panel’s Auto button to get things started. Figure 4-12 shows what you can expect.

Left: The original image. Like most digital photos, it could stand a little sharpening.Middle: What you get by clicking the Detail panel’s Auto button.Right: The results of using the Sharpen slider to get stronger sharpening than Auto Sharpen applies.
Figure 4-12. Left: The original image. Like most digital photos, it could stand a little sharpening. Middle: What you get by clicking the Detail panel’s Auto button. Right: The results of using the Sharpen slider to get stronger sharpening than Auto Sharpen applies.

The sad truth is that there really isn’t any way to actually improve the focus of a photo once it’s taken. Software sharpening just increases the contrast where the program perceives edges, so using it first can have strange effects on other editing tools you apply later and on their ability to understand your photo.

If you don’t like what Auto Sharpen does (you very well may not), you can undo it (press Ctrl+Z) and try the slider instead. If you thought the Auto button overdid things, go gentle on the slider. Changes vary from photo to photo, but usually Auto’s results fall at around the 30 to 40 percent mark on the slider.

Tip

If you see funny halos around the outlines of objects in your photos, or strange flaky spots (making your photo look like it has eczema), those are artifacts from too much sharpening; reduce the Sharpen settings till they go away.

Always look at the actual pixels (View → Actual Pixels) when you sharpen, because that gives you the clearest idea of what you’re actually doing to your picture. If you don’t like what the button does, undo it, and then try the slider. Zero sharpening is all the way to the left; moving to the right increases the amount of sharpening applied to your photo.

As a general rule, you want to sharpen photos you plan to print more than images for Web use. You can read lots more about sharpening on Sharpening Images.

Note

If you’ve used photo-editing programs before, you may be interested to know that the Auto Sharpen button applies Adjust Sharpness (Adjust Sharpness) to your photo. The difference is that you don’t have any control over the settings, as you would if you applied it from the Enhance menu. But the good news is that if you want it, or if you prefer to use Unsharp Mask (Sharpening Images), you can get this control—even from within Quick Fix. Just go to the Enhance menu and choose the sharpener of your choice.

At this point, all that’s left is cropping your photo, if you’d like to reduce its size. Free Rotate Layer tells you everything you need to know about cropping. However, you can also give your photo a bit more punch by using the Touch Up tools explained in the next section.

Touch-Ups

The bottom section of the Quick Fix toolbox contains four special tools to help improve your photos. You’ve already learned how to use one of them—the Red Eye Removal tool—earlier in this chapter (Fixing Red Eye). Here’s what you can do with the other three:

  • Whiten Teeth. As you probably guessed from the name, use this tool to make teeth look brighter. What’s especially nice is that it doesn’t create a fake, overly white look, as shown in Figure 4-13.

  • Make Dull Skies Blue. It’s a common problem with digital cameras: Your exposure for the subject is perfect, but the sky is all washed-out looking. Unfortunately, if your sky is really gray or blown out (white looking), this tool won’t help much. It should probably have been called “Make Blue Skies Bluer.” It is useful for creating more dramatic skies, though.

    Just a quick swipe across the teeth selects and whitens them, while keeping a realistic look.
    Figure 4-13. Just a quick swipe across the teeth selects and whitens them, while keeping a realistic look.
  • Black and White – High Contrast. You’re probably wondering what the heck that means. It’s Adobe’s way of saying, “Transform the area I choose from color to black and white.” This tool’s a great timesaver when you want to create a photo where only part of the picture is in color. (High Contrast refers to the style of black-and-white conversion this tool uses.)

All three tools work pretty much the same way—just draw a line over the area you want to change, and Elements makes a detailed selection of the area and applies the change for you:

  1. Open a photo and make your other corrections first.

    If you’re an old hand at using Elements, use the Touch Up tools before sharpening. But if you’re a beginner and not comfortable with layers (see Chapter 6), sharpen first. (See the note on Touch-Ups for more about why.)

  2. Click the icon for the tool you want to use.

    Hover your cursor over the icons for pop-up tooltips text if you aren’t sure which is which.

  3. Draw a line over the area you want to change.

    When you click one of the Touch Up tools, your cursor turns to a circle with crosshairs in it. Just drag that over the area you want to change. Elements automatically expands the area to include the entire object it thinks you want. (It works just like the Quick Selection tool, only it also applies the changes to your image. Selecting with a Brush has more about using the Quick Selection tool.) You’ll see the marching ants appear (Cropping with the Marquee Tool) around the area Elements is changing.

  4. If Elements included too much or too little, tweak the size of the selected area.

    In the Options bar, you’ll see three little brush icons. Click the left icon to start another new selection, click the right one and drag over an area you want to remove, or click the middle one and drag to add to the area. You can also just drag to extend your selection, or Alt-drag if Elements covered too much area and you need to remove some of it, without going to the Options bar at all.

  5. Once you’re happy with the area covered by the change, you’re done.

    You can back up by pressing Ctrl+Z to undo your changes step by step. Just keep going to eliminate the change completely if you don’t like it. (Clicking the Reset button doesn’t undo the Touch Up changes.)

The Touch Up tools can be very helpful, but they work based on the colors in your photo, so they may not always give you exactly the results you want, as you can see in Figure 4-14. If you want to use the Color sliders (Using the Color sliders) to adjust things, you’ll need to switch away from the Touch Up tools and use the Selection brush to re-select the area. That’s because the sliders aren’t available when the Touch Up tools are active.

Note

The Touch Up tools create a layered file. If you understand layers, you can also go back to Full Edit and make changes after the fact, like adjusting the opacity or blend mode of the layer. (See Chapter 6 to learn about layers.) You can always discard your Touch Up changes by discarding the layer they’re on. And you can even edit the area affected by the changes by editing the layer mask, as explained on Editing a layer mask, or use the Smart Brush tool (Correcting Part of an Image) in Full Edit. (The one exception is the “Black and White - High Contrast” tool [Touch-Ups]: You can’t change the settings for the adjustments it makes. You just see a weird message telling you that your layer was created in the full version of Photoshop, even though you know it wasn’t.)

Blue Skies can help punch up the sky color in your photos—sometimes.Left: Smog makes the sky in this photo look really dull.Right: One quick drag across the sky with the “Make Dull Skies Blue” tool produces a much more vivid sky—maybe too vivid (and a tad green). Elements used a gradient (see ) to give a more realistic shading to the new sky color.
Figure 4-14. Blue Skies can help punch up the sky color in your photos—sometimes. Left: Smog makes the sky in this photo look really dull. Right: One quick drag across the sky with the “Make Dull Skies Blue” tool produces a much more vivid sky—maybe too vivid (and a tad green). Elements used a gradient (see Applying Gradients) to give a more realistic shading to the new sky color.

Also, if there isn’t enough color to begin with, the Touch Up tools may not produce any visible result in your photo. Whiten Teeth may not do anything if your subject has super white dentures, and Make Dull Skies Blue may prove to be a dud if your sky is solid gray or completely overexposed.

You may find that after using a Touch Up tool, nothing happens when you try to make other changes to your photo. As mentioned above, after you work with one of the Touch Up tools (except for the Red Eye Removal tool), Elements leaves you with a layered file. That isn’t normally a problem, even if you don’t know anything about layers, but once in a while you may find nothing happens when you try to make further changes to your photo. In that case, click the Edit tab at the top of the page, and select EDIT Full to go back to Full Edit. Then find the Layers panel. It should be in the Panel bin unless you’ve removed it. (If you can’t find it, go to Window → Layers to bring it back.)

In the Layers panel, look for the word “Background” and click it. That part of the panel should be a lighter or darker gray (depending on your brightness settings—see The Welcome Screen) than the rest of the panel (the area that says Blue Skies, Pearly Whites, or whatever). If it isn’t, click it again. Then you can go back to the Quick Fix window (click the Edit tab and choose EDIT Quick), and do whatever you want to your photo. However, the part you used the Touch Up tools on may behave differently from the rest of the photo. If that happens and you haven’t closed the photo since using the Touch Up tools, use Undo History (Undo History panel) to back up to before you used the Touch Up tools.

Quick Fix Suggested Workflow

There are no hard-and-fast rules for what order you need to work in when using the Quick Fix tools. As mentioned earlier, Elements lays out the tools in the Panel bin, from top to bottom, in the order that usually makes sense. But you can pick and choose whichever tools you want, depending on what you think your photo needs. If you’re the type of person who likes a set plan for fixing photos, here’s one order in which to apply the commands:

  1. Rotate your photo (if needed).

    Use the buttons below the image preview.

  2. Fix red eye (if needed).

    See Fixing Red Eye.

  3. Crop the image.

    If you know you want to crop your photo, now’s the time. That way, you get rid of any problem areas before they affect other adjustments. For example, say your photo has a lot of overexposed sky that you want to crop out. If you leave it in, that area may skew the effects of the Lighting and Color tools on your image. So if you already know where you want to crop, do it before making other adjustments for more accurate results. (It’s also okay to wait till later to crop if you aren’t sure yet about what you’ll want to trim.)

  4. Try Auto Smart Fix and/or the Smart Fix slider. Undo if necessary.

    Pretty soon you’ll get a good idea of how likely it is that this fix will do a good job on your photos. Some people love it; others think it makes their pictures too grainy.

  5. If Smart Fix didn’t do the trick, work your way down through the other Lighting and Color commands until you like the way your photo looks.

    Read the sections earlier in this chapter to understand what each command does to your photo.

  6. Sharpen.

    Try to make sharpening your last adjustment, because other commands can give you funky results on photos you’ve already sharpened. But if you’re a beginner and not comfortable with layers, you can sharpen before using Whiten Teeth, Make Dull Skies Blue, or “Black and White – High Contrast” in the Touch Up panel. (See Touch-Ups for more about why you’d wait to use these.)

Tip

When you’re in Quick Fix mode, you can switch back to Full Edit at any point if you want tools not available in Quick Fix. If you want to close your photo from the Quick Fix window, use the Close button above the preview area or press Ctrl+W.

Adjusting Skin Tones

If you’re like most amateur photographers, your most important photos are pictures of people: your family, your friends, or even just fascinating strangers. Elements gives you yet another tool for making fast fixes—one that’s designed especially for correcting photos with people in them: The “Adjust Color for Skin Tone” command, available in both the Quick Fix and Full Edit windows.

The name “Adjust Color for Skin Tone” is a bit confusing. What this command actually does is adjust your whole image based on the skin tone of someone in the photo. The idea behind the command is that you may well be much more interested in the way the people in your photos look than in how the background looks. “Adjust Color for Skin Tone” gives the highest priority to creating good skin color. It’s an automatic fix, but there’s a dialog box where you can tweak the results once you’ve previewed Elements’ suggested adjustments. To use the “Adjust Color for Skin Tone” command:

  1. Call up the “Adjust Color for Skin Tone” dialog box.

    In either Quick Fix or Full Edit, go to Enhance → Adjust Color → “Adjust Color for Skin Tone”. The dialog box shown in Figure 4-15 appears. You may need to move it out of the way of your photo so you can see what’s happening.

  2. Show Elements an area of skin to sample for calculating the color adjustments.

    Once the dialog box appears, your cursor turns to an eyedropper. Just find a portion of your photo where your subject’s skin has relatively good color, and click it.

  3. Tweak the results.

    Elements is often a bit overenthusiastic in its adjustments. Use the sliders in the dialog box to get a more pleasing, realistic color. The Ambient Light slider works just like the Temperature slider in the Quick Fix Panel bin (Using the Color sliders). Blush increases the rosiness of the skin as you move the slider to the right and decreases it to the left. Tan increases or decreases the browns and oranges in the skin tones. You may get swell results with your first click, or have to use all the sliders to get a truly realistic result. It all depends on the photo.

    When this dialog box appears, your cursor turns into a little eyedropper when you move it over your photo. Just click the best-looking area of skin you can find. You won’t see any sliders in the tracks until you click. After Elements adjusts the photo based on your click, the sliders appear and you can use them to fine-tune the results. Clicking different spots gives different results, so you may want to experiment by clicking various places.
    Figure 4-15. When this dialog box appears, your cursor turns into a little eyedropper when you move it over your photo. Just click the best-looking area of skin you can find. You won’t see any sliders in the tracks until you click. After Elements adjusts the photo based on your click, the sliders appear and you can use them to fine-tune the results. Clicking different spots gives different results, so you may want to experiment by clicking various places.

    You can preview the changes right in your photo as you work. If you mess up and want to start again, click Reset. If you decide you’d rather be using another tool instead, click Cancel.

    Tip

    The “Adjust Color for Skin Tone” sliders are like the Quick Fix sliders in that you can get an idea of which way to move them by looking at the colors in the sliders’ tracks.

  4. When you like what you see, click OK.

    Elements applies your changes. If you want to undo them, press Ctrl+Z.

“Adjust Color for Skin Tone” seems to work best on fair skin, and not so well on darker skin tones. And it’s most suited for making fairly subtle adjustments, so you may have to reduce the amount of change from what Elements first did.

Also, notice that not just the skin tones change. Elements adjusts all the colors in the photo in sync with the skin tones (Figure 4-16). You may find your image has acquired quite a color cast by the time you’ve got the skin just right (see Removing Unwanted Color). If this bothers you, try a different tool. On the other hand, you can create some very nice late-afternoon light effects with this command.

While “Adjust Color for Skin Tone” is really meant as a kind of alternative fast fix, you may find it’s most useful for making small final adjustments to photos you’ve already edited using other tools.

Tip

If you understand layers (explained in Chapter 6), you may want to make a duplicate layer and apply this command to the duplicate. Then you can adjust the intensity of the result by adjusting the layer’s opacity (see Adjusting Opacity).

Top: This photo has a slight greenish cast, giving the little boy a somewhat unappealing skin tone.Bottom: “Adjust Color for Skin Tone” warms up his skin tones, and even removes the greenish tinge to the bench he’s sitting on.
Figure 4-16. Top: This photo has a slight greenish cast, giving the little boy a somewhat unappealing skin tone. Bottom: “Adjust Color for Skin Tone” warms up his skin tones, and even removes the greenish tinge to the bench he’s sitting on.

Get Photoshop Elements 8 for Windows: The Missing Manual now with the O’Reilly learning platform.

O’Reilly members experience books, live events, courses curated by job role, and more from O’Reilly and nearly 200 top publishers.