Chapter 1. PHP: What, Why, and Where?
PHP is ultimately text, taken by your web server and turned into a set of commands and information for your web browser. And because you’re just working in text, there’s not a lot you have to do to get going as a PHP programmer. You need to get familiar with PHP itself—and the best way to do that is to install PHP on your own computer, even though most of your programs will run on a web server.
Then, you need to run an actual script. Don’t worry; it’s amazingly easy to write your first program in PHP, and you’ll end up writing more than just one program before you hit Chapter 2.
And through it all? You’ll begin taking control. PHP gives you the ability to be an active participant in your web pages. It lets you listen carefully to your users and say something back. So get going; no reason to leave you users with passive HTML pages any longer.
Gathering Your Tools
You’ll need to take just a few steps before you can start with PHP. You can’t build a website without a web browser, and you can’t write PHP without a few tools. But it won’t take long before you’ve got your computer set up with your own customized PHP programming environment.
Although PHP isn’t pre-loaded on every computer like web browsers are, you can easily download PHP from the Internet, get it working on your computer, and get up and running fast…all without spending a dime. On top of that, most of the easiest and best tools for writing PHP code are also free. All you need is your own copy of the PHP language on your computer, plus a plain old text editor. This section shows you where to find them.
PHP on the PC
PCs come with a lot of software pre-installed. Unfortunately, one program that most PCs don’t come with is PHP. That’s okay though: you can get PHP up and running in just a few minutes, as long as you have an Internet connection.
Note
If you have a Mac, you don’t have to go through this installation process. Flip to PHP on the Mac.
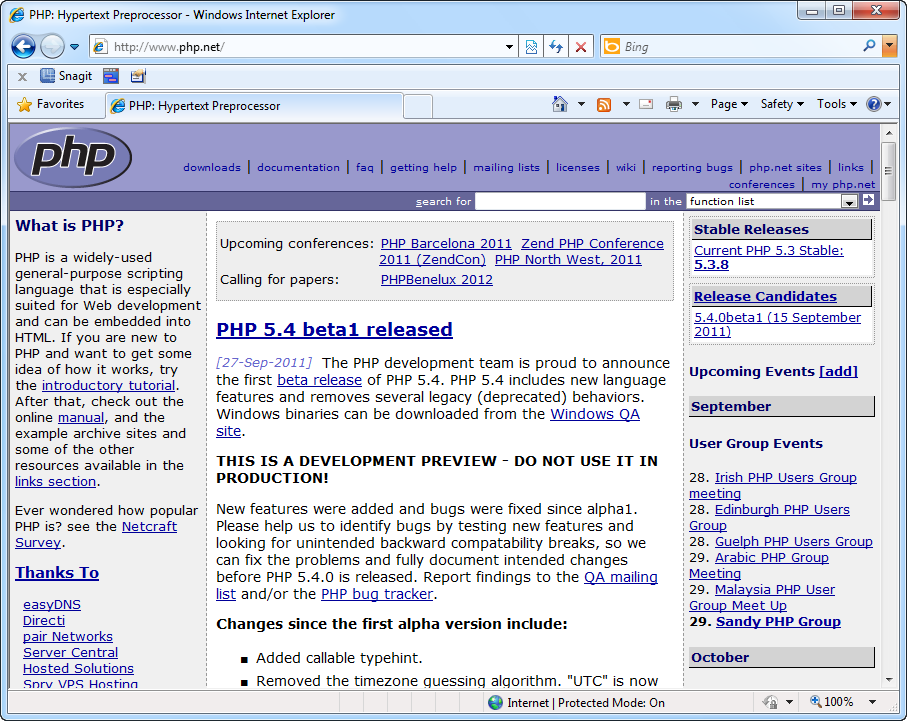
Open up your favorite Web browser and head to www.php.net. This site is PHP’s online home, and it’s where you’ll download your own version of the PHP language, along with all the tools you need to write and run PHP programs. Look along the right side of the PHP home page for the Stable Releases heading; you can see it on the right of Figure 1-1.
Click the link for the version with the highest number. (For more information on what all these versions mean, see the box on the next page.)
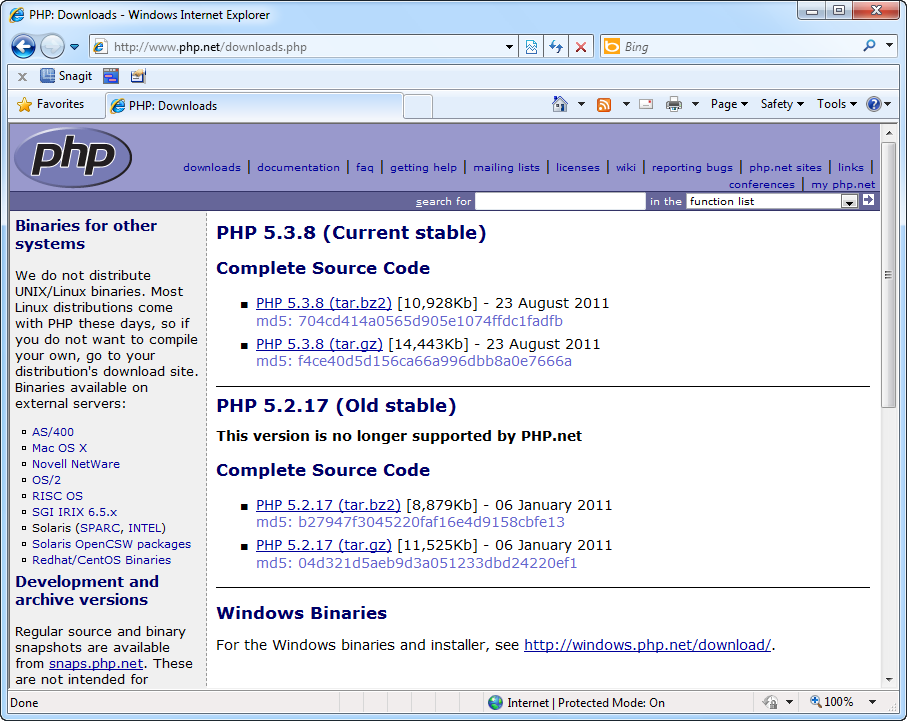
Once you’ve chosen a PHP version link, you’ll see a screen like Figure 1-2, with links for the current version of PHP as well as at least one older version (which will have a lower version number than the most current version).
Before you download PHP, though, take a look further down the page. There’s a heading titled Windows Binaries, and that’s your ticket to getting PHP up and running fast on your Windows machine. Clicking this link takes you to another site, http://windows.php.net/download, which should look something like Figure 1-3.
This page has options for the latest version and well as several older versions. For the newest version, there will be two big gray blocks: the first for the Non Thread Safe version, and the second for the Thread Safe version. You want to download the Non Thread Safe version, since it runs much faster. (For more detail on the difference between these two versions, see the box on PHP on Windows: Fast or Safe?.)
Just look for the Installer option and click the link. The installer is usually a big download, but includes a nice Windows installer that will make getting PHP running a breeze. Click this link and then grab a cup of coffee while you’re waiting for your download to complete.
Note
If you’re thinking you could have just gone directly to http://windows.php.net/download/, then you’re right: You could have. But six months from now, you may forget that longer URL, but remember www.php.net. On top of that, a good old-fashioned Google search for PHP takes you to www.php.net, so it’s a good idea to learn how to get to the Windows installer from the main PHP home page.
Once your download’s done, find the downloaded file and double-click it. When Windows asks for permission to run the installer, click Allow, and then click Next on the pop-up screen to start the installation.
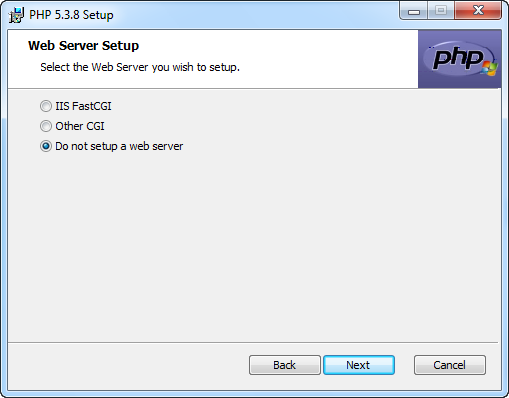
You’ll have to accept a license agreement and then select an installation directory. Go with the suggested C:\Program Files\PHP\, so you can always find PHP with all your other programs. Next, the installer asks about configuring a web server (see Figure 1-4). For now, you’ll be using PHP on your machine to test programs, and then uploading those programs to a web server, so select “Do not setup a web server.” If you want to add a web server later, you can always come back and change this option.
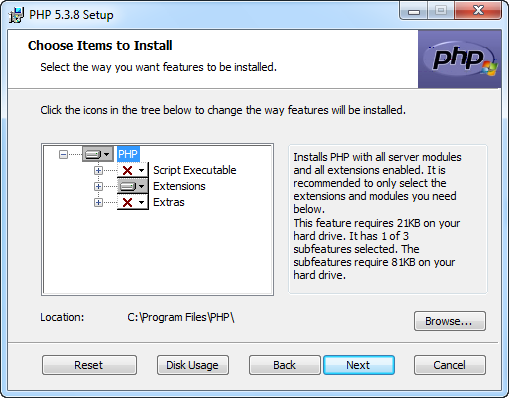
The next screen asks you which items to install. The default options, shown in Figure 1-5, are fine for now. Just click Next to move on.
Finally, click Install and then let your progress indicator march to full. That’s it! You’ve got PHP running on your machine.
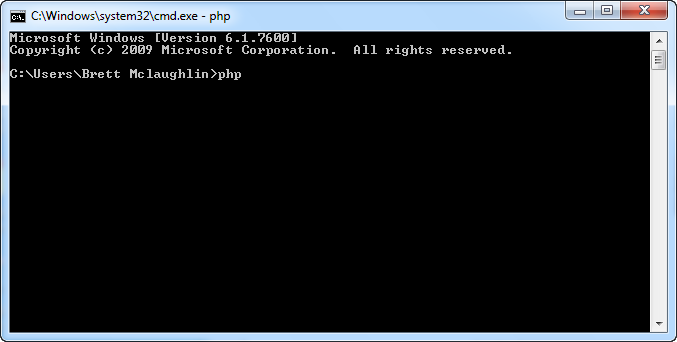
To check out PHP, go to your Start menu and type cmd in the Search box. A command window opens, into which you can type commands like those that run PHP. Go ahead and type php, as you see in Figure 1-6.
Even though it doesn’t look like much, that blank line and empty command prompt mean PHP is installed correctly. Now you’re ready to get into your first program.
PHP on the Mac
There’s something downright sexy about Macs. All that metal and chrome…and, for the programmer, PHP! That’s right, if you’ve got a Mac, you’ve already got PHP pre-installed. To prove it, open the Terminal application on your Mac.
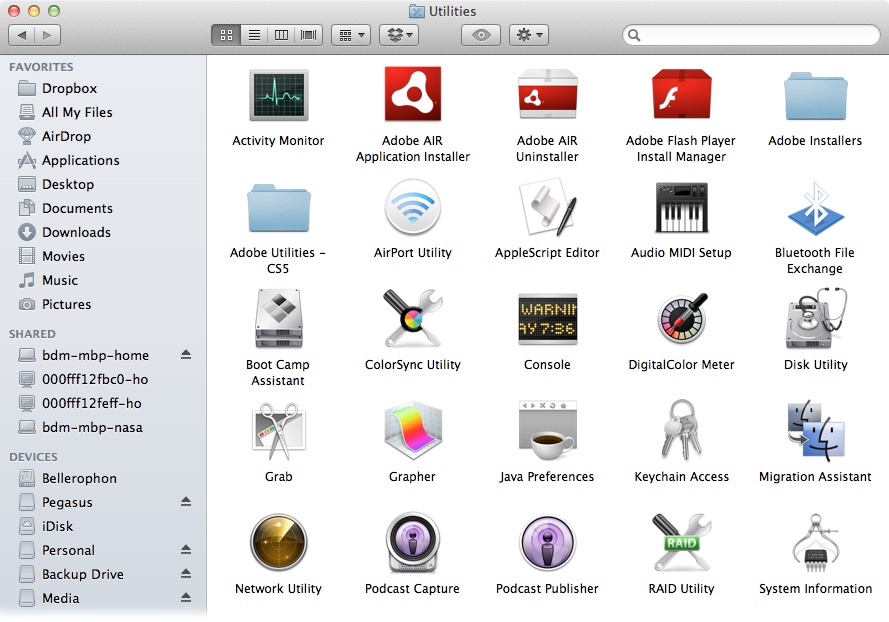
If you’ve never used Terminal, don’t worry; you’ll get used to it quickly and find it’s one of your best friends for working with PHP. Open your Applications folder (you can use Shift-⌘-A as a shortcut), and then look for the Utilities folder, shown in Figure 1-7.
Warning
Shift-⌘-A works only if your desktop or another file folder is active. If you’re currently viewing this book in an e-reader or online, for example, click your desktop and then press Shift-⌘-A.
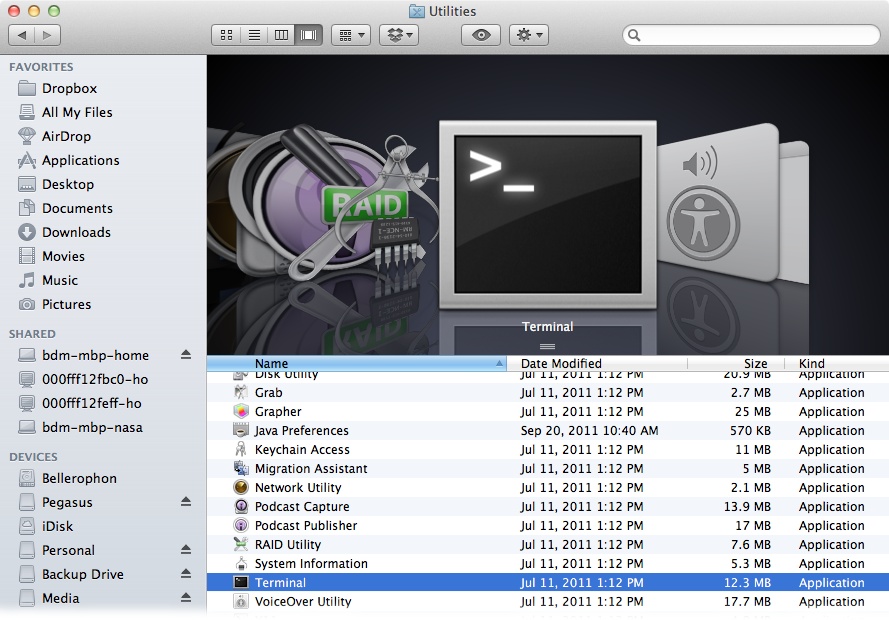
Once you’ve found the Applications folder, open it and find the Terminal application. It looks like a computer monitor with black screen and a little white arrow, as you see in Figure 1-8.
Tip
You’ll often use the Terminal application for testing out your PHP programs before you upload them to your server. To make it easier to launch Terminal, you may want to drag the icon into your dock so you can quickly launch Terminal in the future.
Double-click the Terminal icon, and you’ll see a white rectangular screen with a little black cursor blinking, as in Figure 1-9. That little cursor is going to be one of your best friends on your journey to PHP nirvana.
To make sure PHP is installed on your system, just type php, all in lowercase letters, and hit Enter. Unfortunately, the way to know things are working is if you don’t see anything but that blank cursor, a little further down in Terminal. It won’t even blink at you anymore; it’s just a boring gray dark square.
Hit Control-C to stop that single eye from staying, and you’ll get a blinking cursor again. This time, type which php. The which command tells you where on your computer the program you give it is located—php in this case. You’ll probably get something back that looks like Figure 1-10; here, php is in the /usr/bin directory. You’ll probably get a similar result.
Get Out Your Text Editor
All the programs you’re going to write in PHP are plain old text files. In fact, writing PHP isn’t much different from writing HTML or CSS or JavaScript. You’ll type different things, but these are all just text files saved with a special extension. You use .html for HTML, .css for CSS, .js for JavaScript, and now .php for PHP files.
Since PHP is just text, you’ll want a good text editor to work in. As simple as those programs are, they’re perfect for coding in PHP. If you’re on Windows, then you can use Notepad. If you’re on a Mac, then TextEdit is a great choice. The good news is that each of these programs comes pre-installed on your computer, so you don’t have to download anything, and you don’t have to buy anything. The bad news is that none of these programs knows you’re writing PHP, so you don’t get much help spotting typos or organizing your files.
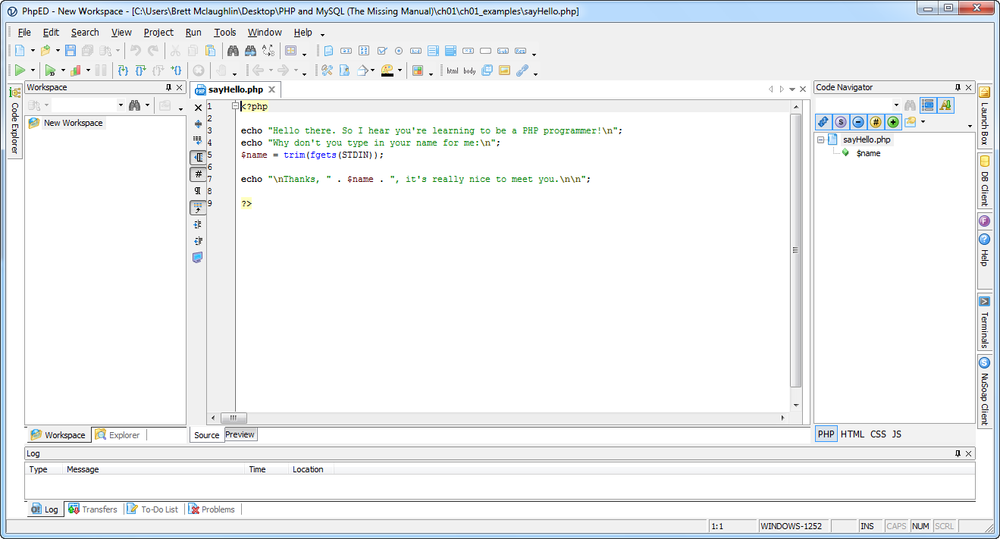
On the other hand, you’ll find quite a few editors out there that are built to specifically handle PHP. For instance, on Windows, you can download NuSphere PhpED (www.nusphere.com/products/phped.htm), shown in Figure 1-11. You’ll pay a bit for a program like NuSphere—usually between $50 and $100—but you’ll get fancy color-coding, help with special language features, and in a lot of cases, some pretty nifty file organization and even the ability to upload your PHP directly to your web server, as discussed on Upload Your HTML, CSS, and PHP.
If you’re on a Mac, then the two leading candidates for editors that do text plus lots of other cool things are BBEdit (www.barebones.com/products/bbedit/index.html) and TextMate (www.macromates.com). Both are Mac-only programs, and both offer similar features to what PhpED offers on Windows: color-coding, file management, help documentation, and support for HTML, CSS, JavaScript, and a lot more. You can see BBEdit in action in Figure 1-12; you’ll need to drop $100 to get going with BBEdit.
You can see what TextMate looks like in Figure 1-13. It looks a little simpler than BBEdit, and if you’ve never used a programming editor, it might be a little easier to begin with. It’s going to cost you about $60, slightly less than BBEdit.
Once you’re comfortable writing PHP code, spend some time playing with different enhanced editors to see which one is best for you. Or you may find that you’re a Notepad or TextEdit programmer at heart after all. There’s no one right option for PHP; all these choices work just fine.
Just starting out, though, try and use a simple text editor—Notepad on Windows or TextEdit on the Mac. You’ll learn a lot more about PHP this way, even if you don’t get all the bells and whistles of one of the editors that offer lots of extra features. Besides, once you really understand PHP and have learned to use its features manually, you’ll appreciate and even be able to use the features of the other editors a lot more effectively.
Note
Once you’ve become familiar with PHP, you can also check out Eclipse PHP (www.eclipse.org/projects/project.php?id=tools.pdt). The Eclipse IDE has long been a favorite for Java developers, and there are now enough plug-ins for PHP that it’s a legitimate option for PHP programmers, too. However, there’s a lot going on in Eclipse—tons of tools and gadgets—so you might want to wait a bit before you dive head first into Eclipse PHP. Come back to it later, though; it’s well worth checking out.
Writing Your First Program
You’ve got PHP; you’ve got a text editor. Now all you need is a PHP program, which you’ll create in the next few minutes. Open up your text editor, and type the following code, exactly as shown:
<?php

echo "Hello there. So I hear you're learning to be a PHP programmer!\n";
echo "Why don't you type in your name for me:\n";
$name = trim(fgets(STDIN));

echo "\nThanks, " . $name . ", it's really nice to meet you.\n\n";

?>
A lot of this code may look weird to you, and that’s OK. You’ll understand every bit of it soon. Right now, just get used to looking at PHP, which is quite a bit different from HTML or JavaScript.
Warning
Some of the editors you might use, like TextEdit, automatically create rich text documents. Rich text lets you use formatting, like bolding and underlining. You don’t want that in your PHP code, so look for the option to use plain text, which doesn’t allow formatting.
If you’re using TextEdit, choose Format→Make Plain Text. You won’t have that option if you’re already typing in plain text. If you’re using Notepad, rich text isn’t an option, so you’ve got nothing to worry about.
Once you’re done, your editor should look something like Figure 1-14.
This program does just a few simple things:
Identifies itself as PHP using <?php
Prints out a welcome message using the echo command
Asks the visitor for his name, again using echo
Gets the visitor’s name and stores it in something called $name
Says hello by printing out a message followed by what’s in $name
Finishes up with the ?> characters
It’s okay if a lot of this doesn’t make sense, but you probably already could have figured out a lot of this, except maybe the weird line beginning with $name =. There are also some strange characters, like \ns and STDIN, that you’ll learn about soon. Just see if you can follow the basic path of things: the opening <?php, the printing, the request for the user’s name, another bit of printing, and the closing ?>.
Now save this program. Name it sayHello.php, and make sure you add that .php extension. Otherwise you’ll have problems down the line. Save the file some place handy, like on your desktop, in your home directory, or in a folder you’re using to keep all your PHP programs in as you’re learning.
Note
Most programs on Windows and the Mac will supply you a default extension, like .txt. Make sure you replace that with .php. Windows especially tends to hide extensions, so make sure your full filename is sayHello.php, not something like sayHello.php.txt.
That’s it; you’ve written your first PHP program!
Running Your First Program
What good is it to get all this code typed in if you can’t see if it works? This particular program isn’t ready to run on the Web yet, so you’ll need to use the command line. You used the command line earlier to make sure PHP was installed correctly (PHP on the PC). Fire up your command line program again. If you’re on a Mac, you’ve already opened up Terminal, and may even have a shortcut in your dock. Open Terminal again.
Now change into the directory in which you saved your program, sayHello.php. You can do a directory listing with dir (on Windows) or ls (on the Mac) to make sure you’re in the right directory. Once you’re in the right directory, type the following into your command line:
php sayHello.php
This tells the php program to run, and gives it your program, sayHello.php, as what to run. Pretty quickly, you should see the welcome message you typed, and then the program asks you for your name. Go ahead and type your name, and then hit Enter. The program should then greet you, just as shown in Figure 1-16.
That’s it! Your first program works, and you’re ready to go deeper into PHP.
Writing Your Second Program
Why wait around before going a little further into PHP? You probably got interested in PHP because you wanted to make your web pages do a little more than is possible with JavaScript. If that’s the case, PHP is a great language, and you need to learn how to get code like you’ve already written onto the Web. And because most PHP programs are accessed by web pages, you’ll often start your PHP programming with an HTML page that will send information to your PHP scripts.
Start with an HTML Page
To get started, open up a new document in your text editor or favorite HTML editor, and create this HTML page:
<html>
 <head>
  <link href="../css/phpMM.css" rel="stylesheet" type="text/css" />
 </head>

 <body>
  <div id="header"><h1>PHP & MySQL: The Missing Manual</h1></div>
  <div id="example">Example 1-1</div>

  <div id="content">
    <h1>Welcome!</h1>
    <p>Hello there. So I hear you're learning to be a PHP programmer!</p>
    <p>Why don't you type in your name for me:</p>
    <form action="scripts/sayHelloWeb.php" method="POST">
      <p>
        <i>Enter your name:</i> <input type="text" name="name" size="20" />
      </p>
      <p><input type="submit" value="Say Hello" /></p>
    </form>
  </div>

  <div id="footer"></div>
 </body>
</html>
Note
You can download this HTML, along with the rest of the book’s sample files, from www.missingmanuals.com/cds/phpmysqlmm. You can also get the CSS and images used by the samples, which let you give your programs a little extra visual pizzazz. Still, especially as you’re just getting started, you’ll learn a lot more if you’ll type in the PHP code for these programs yourself.
Almost nothing about this page should be new to you. All it does is reference an external CSS style sheet, provide a text greeting like sayHello.php did, and then define a form into which users can type their names.
The only thing that should have caught your attention is this line, in the form definition:
<form action="scripts/sayHelloWeb.php" method="POST">
This code means that your form is going to submit its information to a program called sayHelloWeb.php, a new PHP program you’re about to write. Once the form is submitted, sayHelloWeb.php takes over and prints out the welcome message.
Write a PHP Script
Now that you’ve got an HTML page sending information to sayHelloWeb.php, you need to actually write that code. When you write PHP to run on the Web, it’s not much different from the program you’ve already written (Writing Your First Program). You have to get information a little differently, because there’s no command line that a user can type into. But other than that, things stay pretty much the same.
Open up a new text editor and type the PHP code shown here; it should look sort of like an HTML-ized version of the sayHello.php program:
<html>
 <head>
  <link href="../../css/phpMM.css" rel="stylesheet" type="text/css" />
 </head>

 <body>
  <div id="header"><h1>PHP & MySQL: The Missing Manual</h1></div>
  <div id="example">Example 1-1</div>

  <div id="content">
    <h1>Hello, <?php echo $_REQUEST['name']; ?></h1>
    <p>Great to meet you. Welcome to the beginning of your PHP programming
odyssey.</p>
    </form>
  </div>

  <div id="footer"></div>
 </body>
</html>
Save this program as sayHelloWeb.php, and be sure you’ve got your file in plain text with the right extension.
The first thing you probably noticed here is that this file looks a whole lot like HTML. In fact, compared to sayHello.php, the first PHP program you wrote, this version might look like a style of programming that’s a lot easier to learn. That’s because once you’re using PHP to work and interact with web pages, a lot of what your PHP programs will do is insert data into existing web pages, which means you’ll be working with HTML a lot. Of course, that’s great news, because you already know HTML, so you’ll be adding to what you know, rather than learning something completely new from scratch.
Once you realize that a lot of this program is just HTML, you can probably already guess what a lot of this program does. Here’s a section-by-section breakdown:
The page starts out with a normal html element and head section.
The body section begins, and sets up the page heading and example number, just like the regular HTML page, sayHello.html.
The page defines a heading with h1, and prints “Hello,.”
The <?php tells the browser some PHP code is coming. Then, then $_REQUEST variable is accessed, and a property called name within that variable is printed using echo.
The end of the PHP code is indicated with ?>.
The rest of the HTML is output, just as in sayHello.html.
This program, like most PHP programs you’ll write, accepts its input from a web page, either from one built in HTML like the pages you’ve created before, or from another PHP program. It’s the job of that web page—sayHello.html in your case—to get the user to enter her information, and then send that information on to this program. The information from that HTML page is stored in $_REQUEST, which is a special variable in PHP.
Variables Vary
A variable in PHP, or any other programming language, is something that stores a value. Variables have names, and in PHP, those names can be almost anything you want. You can tell that something is a variable in PHP because the name starts with a $. So $myHeight is a variable called “myHeight,” and $_REQUEST is a variable called “_REQUEST.”
Note
Technically, the name of a PHP variable does not include the $, but most PHP programmers consider that $ a part of the variable itself. So you’ll hear PHP programmers say things like “dollar my height” instead of just “myHeight” to refer to $myHeight.
Variables are not just names, though. They also have a value. So the value of $myHeight might be the number 68 (for 68 inches) or the text “68 inches.” In PHP, though, you’re not stuck with that value forever. You can change the value of a variable, which is where the word variables actually comes from: a variable varies, or changes.
In sayHelloWeb.php, you’re using the special PHP variable $_REQUEST to get the user’s name, which he entered into the form you built in sayHello.html. PHP gives you the ability to get to anything a user entered into a form using $_REQUEST and the name of the form entry field—in this case, “name.” So $_REQUEST[‘name’] returns the information a user put into a web form, specifically into an input field called “name.” If the user also entered in their phone number, say, into a form field called “phoneNumber,” you could get that value in PHP with $_REQUEST[‘phoneNumber’].
Note
It’s okay if you’re still a little fuzzyon the details of how variables and $_REQUEST work. You’ll learn a lot more about variables and in particular special variables in PHP like $_REQUEST in the next few chapters.
Once your PHP program grabs the value from the “name” form field, it prints that value out using echo, something you’ve already used in your first PHP program. That value gets dropped right into the HTML sent back to the browser…something you’ll want to check out for yourself by running your new program.
Upload Your HTML, CSS, and PHP
When you’re running a PHP program on your own machine, using the command line, as soon as you’ve saved your PHP you can run it. But when you’re working with web pages and web applications, things are a bit trickier.
When you’re building a web page, you have to upload your HTML, CSS, and any JavaScript you’ve written to your own web server. Then, you access those files with a browser, through a web address like www.yellowtagmedia.com/sayHello.html. Typing that web address into your browser causes your server to supply your HTML to whatever web browser requested the page.
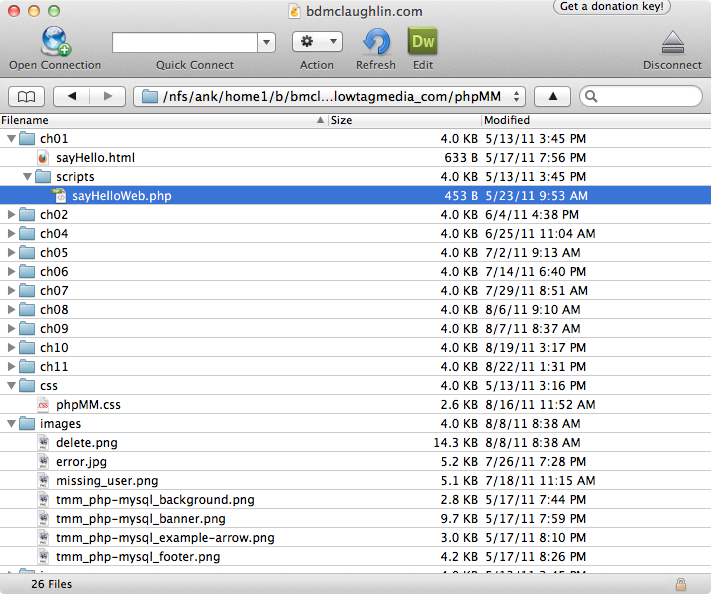
PHP works the same way. Once you’ve written your PHP programs, you upload them onto your web server with your HTML and CSS. Typically, you’ll end up with files and directories like the following:
Root or home directory (/). Your web root, where you put all your HTML. This usually is the location referenced by a URL like yellowtagmedia.com/, without any specific file after the web server name.
CSS directory (css/). The directory where all your site’s CSS is stored.
JavaScript directory (js/). Your JavaScript files go here. You’ll often see this directory also called scripts/, but since PHP programs are also called scripts, it’s a good idea to be more explicit in your naming.
PHP directory (scripts/). Here’s where you put all your PHP programs. Again, you could call this something more specific like php/ or phpScripts/, but more often than not, websites use scripts/ for this directory, so following that lead is a good habit to get into.
Examples directory (ch01/, ch02/, and so forth). As you’re working through the examples, you’re going to end up with a lot of PHP programs, and fast. To keep everything organized, you should have a separate directory for each chapter. So when you upload sayHello.html and sayHelloWeb.php, upload them into ch01/sayHello.html and ch01/scripts/sayHelloWeb.php.
Note
You don’t have to organize things this way, but if you do, all the examples you download for this book will work without any changes. If you do change this directory structure, you’ll need to change all the references in your HTML and PHP to CSS, JavaScript, and other PHP programs.
Now that you’ve got your HTML and PHP ready, you need to upload those files to the right directories on your web server. You should also download phpMM.css from the book’s website at www.missingmanuals.com/cds/phpmysqlmm, and get the CSS in the right place as well.
Once you’ve got everything in place, your web server directory structure should look something like Figure 1-17.
Running Your Second Program
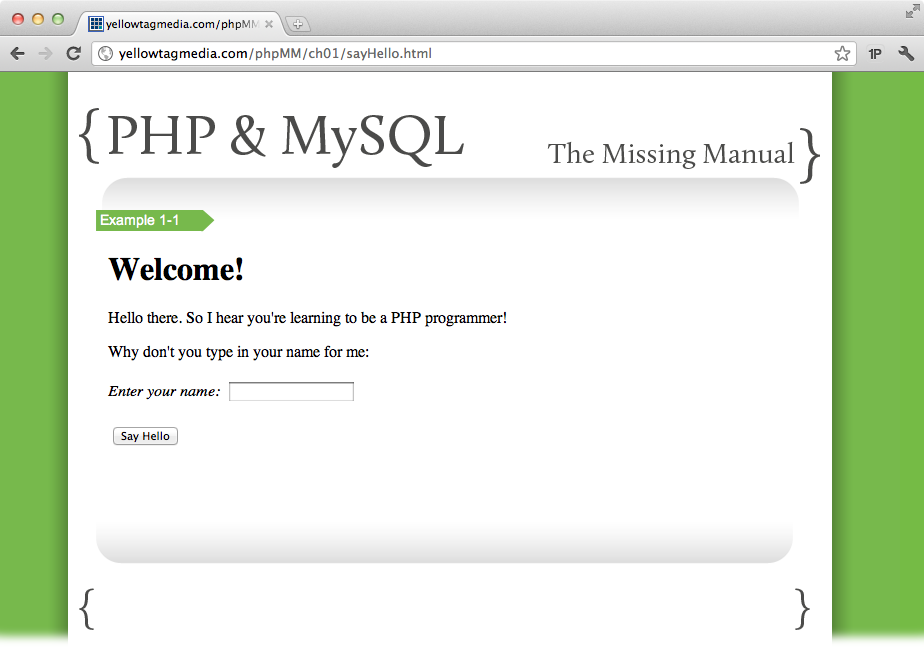
You’ve got your HTML and CSS in the right place, and your HTML form has your PHP program set as its action. You also should have sayHelloWeb.php in your ch01/scripts/ directory. All that’s left is to take your PHP for a spin. Open up a web browser and go to your web server, and then add ch01/sayHello.html to your server name. You should see the HTML you created in sayHello.html, just like in Figure 1-18.
Type your name, and then click the Submit button. The page sends your name as part of the form to the form’s action, your sayHelloWeb.php program. That program runs on your web server, and then you should get a response back, something like Figure 1-19.
It may seem like you’ve done a lot of work just to have a web browser tell you your name. In fact, you could probably write the same program in JavaScript if you wanted. But now that you’ve created a few PHP programs, you should already see how easy it is to write this sort of code.
And before you know it, you’ll be doing a lot more than telling users their names. You’ll be talking to a database, doing advanced calculations, making decisions based on information the user gave you and what you have stored in a database, and more. But it all begins with a little HTML, a PHP program like the ones you’ve just written, and the directory structure you’ve got in place.
Get PHP & MySQL: The Missing Manual now with the O’Reilly learning platform.
O’Reilly members experience books, live events, courses curated by job role, and more from O’Reilly and nearly 200 top publishers.
