Chapter 1. Files in the Depot
This chapter describes how Perforce stores files and directories in its repository, the depot. It starts by introducing the syntax that allows you to work with depot files and follows with examples of how to browse the depot and get information. Finally, it touches on file properties and their effect on how Perforce handles file content internally.
Tip
You may be happiest using a GUI (graphical user interface) for your day-to-day work. This book, however, bases most of its examples on P4, the Perforce Command-Line Client. One reason we stick with P4 is simply that it’s easier to create and write about text examples than it is to create and write about screenshots. So don’t take our bias toward P4 as a snub of the Perforce GUI programs. In fact, we’ll point out some P4V features that show you at a glance what P4 would take thousands of lines of output to tell you. On the other hand, the GUIs are somewhat limited—only P4 offers the complete lexicon of Perforce commands. So, while you are encouraged to use a GUI, expect to use the command line from time to time to do the things the GUIs don’t do.
The Perforce Filespec Syntax
Perforce is widely used partly because it is so portable, and part of that portability comes from the platform-independent file syntax it provides. While native platform syntax can be used to refer to workspace files, Perforce provides its own uniform syntax for referring to workspace and depot contents. This syntax is known as a file specifier, or “filespec.” A filespec can refer to a single file or a collection of files, to a specific revision or a range of revisions, and to depot files or workspace files. More importantly, the filespec syntax applies to all operating systems; Perforce converts filespecs to native file references for local operations.
The depot hierarchy
Depots, where Perforce keeps master file content, and workspaces, where users work on files, are hierarchical structures of directories and files. A filespec uses "//" to indicate the root of the hierarchy, and "/" as a directory path and file name separator. For example:
//depot/projectA/doc/index.html
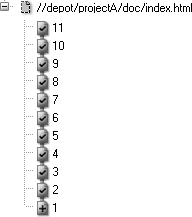
Although we often refer to an entire repository as “the depot”, there can be multiple depots in a Perforce repository. The filespec root identifies the name of the depot. The filespec //depot/projectA/doc/index.html refers to a depot named “depot” (Figure 1-1.)
A filespec can express a relative path as well as an absolute path. An unrooted filespec is a relative reference to the current directory (if you’re using a command shell) or the current folder (if you’re using a GUI). Depending on the context, doc/index.html or even just index.html could indicate the same file. In the chapter 2 section "Local Syntax, Wildcard Expansion, and Special Characters" you’ll find out how to use relative references to files and directories.
Wildcards and file collections
When filespecs contain wildcards , they define entire collections of files instead of single files. For example, the "*" wildcard matches characters in filenames at a directory level. Depending on what files are actually present, a filespec like projectA/d*/*.html, for example, can define a collection of files like:
projectA/dev/index.html
projectA/doc/diagnostics.html
projectA/doc/index.html
The "..." wildcard (pronounced “dot-dot-dot”) matches filename characters at or below a directory level. A filespec that ends in /..., in other words, is a succinct reference to the complete collection of files in a directory hierarchy. For example, projectA/... refers to the files in the projectA directory. Depending on what’s in the directory, the filespec projectA/... might represent the following files:
projectA/bin/win32/app.exe
projectA/bin/win32/app.dll
projectA/dev/index.html
projectA/dev/main.cpp
projectA/doc/app/index.html
projectA/doc/app/reference.html
projectA/doc/diagnostics.html
projectA/doc/index.html
Views and mappings
A filespec is a special case of the Perforce construct called a view. The Perforce database stores views for a variety of uses, including access permissions, labels, branching, triggers, and change reviews. The scope of every Perforce operation is constrained by the views that affect it.
Some of the views involved—filespec views, or workspace views, for example—are evident to users. Some views, however, like those that define access permissions, are not. For example, consider the P4 command that shows the history of changes to HTML files in the //depot path:
p4 changes //depot/.../*.html
Change 1386 on 2005/06/10 ... 'New page for promo...'
Change 1375 on 2005/06/05 ... 'Fix links on sign-up...'
Change 1369 on 2005/05/29 ... 'Add press releases...'
This command is affected by two views. The first is the filespec you see on the command line. The second is a view you don’t see: the set of depot files you have permission to access. If, for instance, the access permission view is:
//depot/projectA/...
//depot/projectB/...
the net effect is that you will see the history of the files in the intersection of the two views. In other words, you will see the history of the set of files defined by this view:
//depot/projectA/.../*.html
//depot/projectB/.../*.html
Views are also used to map files to each other. Client workspace views, for example, map depot files to workspace files, as you’ll see in Chapter 2. In Chapter 4 you’ll see how view mapping comes into play to relate branches to one another.
File and directory revisions
Perforce stores file versions in a sequence of numbered revisions. Figure 1-2 illustrates the revisions of //depot/projectA/doc/index.html. A filespec can refer to an absolute, numbered file revision, prefixed with #. For example, index.html#10 is the 10th revision of index.html.
Filespecs can also refer to dates and labels, prefixed with @. For example, index.html@2004/11/21 is the revision of index.html as of November 21, 2004.
You can refer to directories by date as well. The filespec //depot/projectA/...@2004/11/21 refers to the collection of files that made up the //depot/projectA directory as of November 21, 2004.
Two kinds of revision specifiers can be used in Perforce. One kind is the absolute revision. For instance, in this filespec:
doc/index.html#14
the #14 is a an absolute revision. It refers to the fourteenth revision of the file named doc/index.html.
Absolute revisions can’t be used with directories. (A filespec like doc/...#14 refers to the fourteenth revision of each and every file in the doc directory, not to the fourteenth revision of the directory.) However, you can use any of the symbolic revisions with both files and directories. For example, #head is a symbolic revision that refers to the newest, most up-to-date revision of a file or directory. For example:
doc/...#head
Perforce’s reserved-word symbolic revisions are delimited by the character "#". Other symbolic revisions are delimited by "@". Dates, as you saw previously, are an example of the latter:
doc/...@2004/01/04
Labels can also be used as symbolic revisions. (You’ll see how to create labels in Chapter 5.) A label can be used to refer to file revisions to which it has been applied:
doc/...@Good2Go
There are also symbolic revisions you can use to refer to files in a workspace, as you’ll see in Chapter 2.
Changes and changelists
Perforce uses changelists to track changes submitted to the depot. Changelists are numbered; when a changelist number is used as a symbolic revision, it refers to revisions that were newest at the moment the change occured. For example,
doc/...@3405
refers to the head revisions of the doc directory files at the moment changelist 3405 was submitted.
You’ll notice in the preceding examples that the rightmost element of the filespec—exclusive of the revision specifier—is a filename, or a wildcard that matches a set of file names. Perforce’s filespecs always refer to files, not directories. In fact there are no Perforce commands that operate on directories. This is not to say you can’t organize your files into directories, or restore older versions of directories, or get the history of a directory. After all, when a Perforce command operates on the collection of files in a directory, it is in fact updating a directory. But in Perforce you don’t explicitly create or version directories; it just happens automatically.[*]
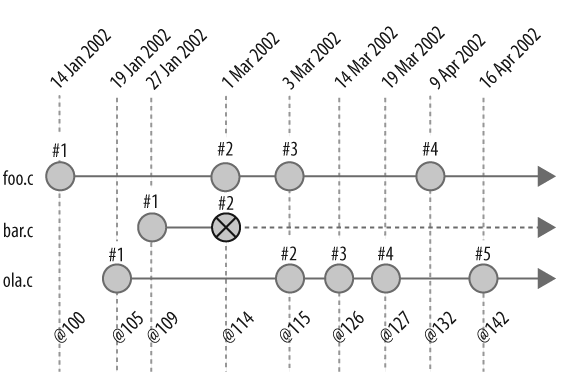
In Perforce, a directory’s revision (and its very existence, in fact) is construed from the file revisions it contains. You saw how file revisions can be identified by dates and changelists as well as by absolute revision numbers. Actually, you can refer to any file in the depot with any changelist number. Changelists represent points in time at which users submitted files. If you plot file changes over time, left to right, you’ll see that changelist numbers slice file collections vertically—every changelist number is associated with a unique state of the collection.
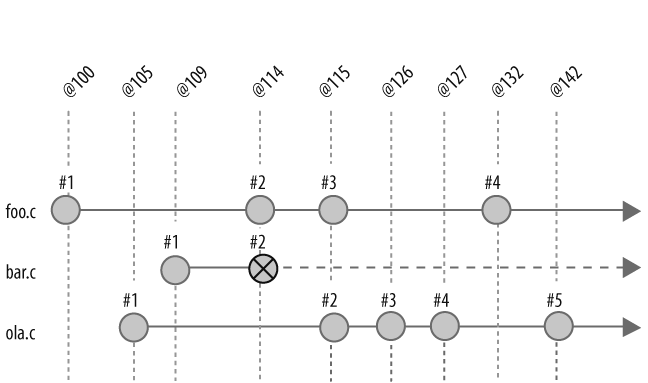
Consider the collection of files shown in Figure 1-3, for example. Here we see that in changelist @100, foo.c was added, creating foo.c#1. In changelist @114, foo.c was updated, creating @foo.c#2, and bar.c was deleted, creating bar.c#2 (a deleted revision). ola.c, which was created in changelist @105, was unaffected by changelist @114. Therefore, revision @114 refers to this collection of files:
foo.c#2
bar.c#2
ola.c#1
Note that labeling the time axis in a diagram like this with both dates and changelist numbers is redundant. Because changelists can’t overlap—each marks a unique point in time—the sequence of Perforce changelists is a representation of time. It often makes just as much sense (and less clutter) to simply chart file evolution along the changelist axis, as we see in Figure 1-4.
The sequence of changelists associated with file revisions in a collection is, in fact, a history of the collection. And when a collection is a directory, the sequence of changelists associated with it is the history of the directory. If the projectA directory contains only the files shown in Figure 1-3, for example, collapsing the diagram into a single timeline would show the history of projectA. We see this in Figure 1-5.
In the next section you’ll see how to list and compare directory revisions. Later chapters will show how directory revisions can be used for populating workspaces and in branching and merging operations.
Browsing Depot Files
You can do extensive browsing in a Perforce depot without having to set up a workspace of your own. In fact, there is very little reason to reproduce depot files locally just to see their contents. You can explore the depot hierarchy, peruse file history, read change descriptions, examine file content, and compare depot files, all without going to the trouble of setting up a workspace.
Tip
Many of the examples that follow are from the Perforce Public Depot. You, too, can browse the Public Depot by connecting to public.perforce.com:1666. (See Appendix A). However, some of the outputs shown here have been somewhat abridged to shorten line lengths and reduce clutter. If you connect to the Public Depot and try these commands for yourself, you’ll get more verbose results.
Navigating the file tree
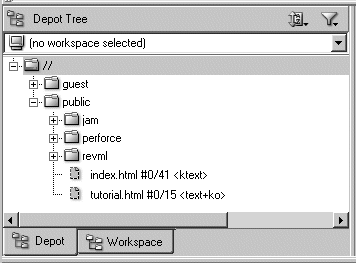
The depot is a file tree, and the easiest way to navigate it is with a GUI. With P4V, for example, all you have to do is point and click to step down the tree and expand its subdirectories (or folders, as they’re called in P4V). A P4V depot tree is shown in Figure 1-6.
However, you can also navigate from the command line, using P4. To list the topmost levels of the tree, for example, use this dirs command:
p4 dirs "//*"
//guest
//public
Notice that the dirs argument is quoted—that’s so the command shell won’t expand the asterisk before passing it to the p4 command.
Another way to show the top level of the depot hierarchy is with the depots command:
p4 depots
Depot guest  'Depot for guest users. '
Depot public 'Perforce's open source depot. '
Listing directories
The dirs command can be used at any level of the depot tree to list the subdirectories at that level. For example:
p4 dirs "//public/*"
//public/jam
//public/perforce
//public/revml
Listing directory history
The changes command shows the history of a directory, listing the most recent changes first:
p4 changes -m5 //public/revml/...
Change 4971 on 2005/05/21 ... '- Added test to make sure big_r'
Change 4970 on 2005/05/21 ... '- Allow sdbm files to handle la'
Change 4969 on 2005/05/21 ... '- Added a special command line '
Change 4968 on 2005/05/21 ... '- Use module name instead of lo'
Change 4967 on 2005/05/21 ... '- Removed "-d", leaving only "-'
(The -m5 flag restricts the output to the five most recent changes. Each change is identified with a changelist number and the first 30-odd characters of a description. If you want to see entire descriptions, use changes -l.)
In P4V you can use Folder History to see the history of a directory, as Figure 1-7 shows.
What’s in a changelist?
In addition to marking points in time, changelists also record the files that were changed and the user who changed them. You can show the details of a changelist with the describe command:
p4 describe -s 4417
Change 4417 by barrie on 2004/08/19 20:11:50
  - Adapt to "estimated values" messages
  - Adapt to more accurate test suite
Affected files ...
... //public/revml/bin/gentrevml#56 edit
... //public/revml/lib/VCP/TestUtils.pm#65 edit
... //public/revml/t/91cvs2revml.t#16 edit
... //public/revml/t/91vss2revml.t#7 edit
... //public/revml/t/95cvs2p4.t#30 edit
(The -s flag suppresses diff output. If you use describe without it, you’ll get a diff of every file in the changelist!)
You can list the files in a directory with the files command:
p4 files "//public/revml/*"
//public/revml/CHANGES#81 - edit change 3640 (text)
//public/revml/MANIFEST#45 - edit change 4234 (text)
//public/revml/ui.png#1 - add change 3671 (binary)
//public/revml/ui.ps#1 - add change 3671 (text)
Each line of output gives a bit of information about the file revision shown. For example, //public/revml/CHANGES#81 is a text file, last edited in change 3640.
You can list files in subdirectories recursively, using ... with the files command:
p4 files //public/revml/...
//public/revml/CHANGES#81 - edit change 3640 (text)
//public/revml/MANIFEST#45 - edit change 4234 (text)
//public/revml/bin/analyze_profile#2 - edit change 2679 (xtext)
//public/revml/bin/compile_dtd#1 - add change 2454 (xtext)
//public/revml/dist/vcp.exe#10 - edit change 4233 (xbinary)
//public/revml/dist/vcp.pl#4 - add change 4235 (xtext)
(Note that the dirs command, by contrast, has no recursive form.)
Finding files
As you can see, the files command has the potential to yield thousands of lines of output. If you’re looking for a particular file, you can use wildcards to pare down the results. For example, here we’re looking for files named index.html:
p4 files "//public/revml/.../index.html"
//public/revml/docs/html/index.html#2 - edit change 2307 (text)
//public/revml/product/release/0.90/html/index.html#1 - add change 4344 (text)
//public/revml/product/release/1.0.0/html/index.html#1 - add change 4311 (text)
Perusing file history and file origins
You can use either changes or filelog to see a file’s history. The output of changes is the same for a file as for a directory:
p4 changes //public/revml/dist/vcp.pl
Change 4235 on 2004/03/18 by barrie '- experimental dist/vcp.pl'
Change 4023 on 2003/12/11 by barrie '- Remove outdated "fat"'
Change 1859 on 2002/05/24 by barrie 'fat script version '
Change 1738 on 2002/04/30 by barrie 'Add "fat" script '
The filelog output, by comparison, shows file revision numbers and the action (add, delete, etc.) that took place at each revision:
p4 filelog //public/revml/dist/vcp.pl
//public/revml/dist/vcp.pl
... #4 change 4235 add    'experimental dist/vcp.pl'
... #3 change 4023 delete 'Remove outdated "fat" '
... #2 change 1859 edit   'fat script version '
... #1 change 1738 add    'Add "fat" script '
(You’ll also see date, user, and file type information in filelog output. They’ve been removed here to make lines fit on the page.)
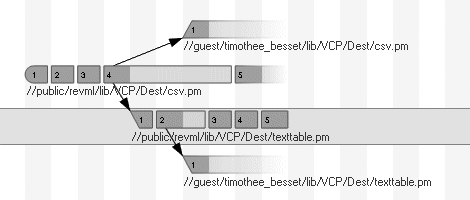
Normally changes and filelog limit their scope to the file you specify. However, files that have been renamed, cloned, or branched from other files inherit the history of their ancestors. You can use -i flag with changes and filelog to show inherited[*] history:
p4 filelog -i //public/revml/lib/VCP/Dest/texttable.pm
//public/revml/lib/VCP/Dest/texttable.pm
... #5 change 4506 edit   '- testtable handled undef field'
... #4 change 4496 edit   '- minor POD cleanups to prevent'
... #3 change 4488 edit   '- BFD and Text::Table no longer'
... #2 change 4037 edit   '- VCP::Dest::texttable function'
... ... branch into //guest/timothee_besset/lib/VCP/Dest/texttable.pm#1
... #1 change 4036 branch '- VCP::Dest::texttable created.'
... ... branch from //public/revml/lib/VCP/Dest/csv.pm#1,#4
//public/revml/lib/VCP/Dest/csv.pm
... #4 change 4021 edit   '- Remove all phashes and all ba'
... ... branch into //guest/timothee_besset/lib/VCP/Dest/csv.pm#1
... ... branch into //public/revml/lib/VCP/Dest/texttable.pm#1
... #3 change 4012 edit   '- Remove dependance on pseudoha'
... #2 change 3946 edit   '- VCP::Source::vss now parses h'
... #1 change 3828 add    '- VCP::Dest::csv dumps rev meta'
P4V’s Revision Graph gives you a bird’s-eye view of a file’s inherited history, as you can see in Figure 1-8.
Perusing file content
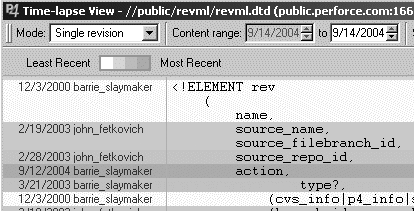
P4V offers a nice content browsing tool for files. If you select a text file in P4V and click Time-lapse View you’ll see the file’s current content, along with a sliding control that changes the display to its content at any previous point in time. Other controls can be used to highlight the age of lines in the file, users who changed the lines, and the diffs for each revision. The black-and-white screenshot you see in Figure 1-9 doesn’t begin to do justice to the usefulness of this tool.
P4V’s Time-lapse View is generated from the output of the annotate command, among others. You can get annotated file content in text form as well. For example, to see each line of a file annotated with a changelist number: you would use:
p4 annotate -c //public/revml/revml.dtd | more
//public/revml/revml.dtd#19 - edit change 4514 (text)
...
467: <!ELEMENT rev
467:     (
467:         name,
2743:         source_name,
2743:         source_filebranch_id,
2802:         source_repo_id,
...
To see plain, unadulterated file content, use the print command:
p4 print //public/revml/revml.dtd | more
//public/revml/revml.dtd#19 - edit change 4514 (text)
...
<!ELEMENT rev
    (
        name,
         source_name,
         source_filebranch_id,
         source_repo_id,
...
Saving informal copies of files
The print command is also useful for saving informal copies of files. Simply redirect its output to a local file:
p4 print -q //public/revml/revml.dtd > revml.dtd(The -q option suppresses the one-line header that print normally outputs.)
Comparing depot files
To compare any two depot files, use the diff2 command. For example:
p4 diff2 //public/jam/README //guest/dick_dunbar/jam/README
=  ==  = //public/jam/README#2 (text) -
     //guest/dick_dunbar/jam/README#1 (text) =  ==  = identical
(This output has been edited to fit on the page.)
The same command can be used to compare any two revisions of a depot file:
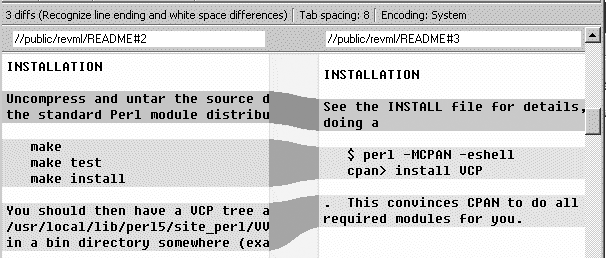
p4 diff2 //public/revml/README#2 //public/revml/README#3
=  ==  = //public/revml/README#2 (text) -
     //public/revml/README#3 (text) =  ==  = content
...
45,47c45,46
<    make
<    make test
<    make install
---
>    $ perl -MCPAN -eshell
>    cpan> install VCP
...
In P4V the Tools → Diff files command can be used to diff any two files or revisions. Figure 1-10 shows an example of a graphical diff in P4V:
Comparing depot directories
You can also compare any two directories in the depot. For example, to compare //public/revml to //guest/timothee_besset:
p4 diff2 -q //public/revml/... //guest/timothee_besset/...
=  ==  = ... bin/gentrevml#56 - ... bin/gentrevml#1 =  ==  = content
=  ==  = ... lib/VCP.pm#19 - ... lib/VCP.pm#1 =  ==  = content
=  ==  = <none> - lib/VCP/Dest/ab.pm#1 =  ==  =
This shows us that there’s a revision of bin/gentrevml in both directories, but their contents do not match. Same with lib/VCP.pm. And the lib/VCP/Dest/ab.pm file appears in the //guest/timothee_besset directory but not the //public/revml directory. (The -q flag is used on the diff2 command to suppress line-by-line text diffs. Note that the output shown here has been drastically edited to fit the page.)
The same command can be used to compare any two revisions of a directory. For example:
p4 diff2 -q //public/revml/...@3660 //public/revml/...@4498
=  ==  = .../dist/packages.mball#1 - <none> =  ==  =
=  ==  = <none> - .../dist/vcp-rh8#4 =  ==  =
=  ==  = <none> - .../dist/vcp.exe#10 =  ==  =
=  ==  = .../dist/vcp.pl#2 - .../dist/vcp.pl#4 =  ==  = content
This shows us that between revisions @3660 and @4498 of the //public/revml directory, the dist/packages.mball file has been deleted, dist/vcp-rh8 and dist/vcp.exe have been added, and dist/vcp.pl has been modified.
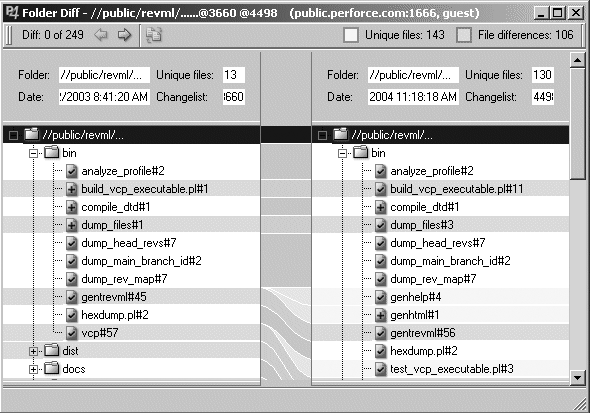
P4V gives you the same directory comparisons in a much nicer display, as you can see in Figure 1-11. You can use Tools → Diff files to launch it, or just select Folder History on a folder and drag one folder revision to another.
File Types at a Glance
Perforce does most of the hard work for you when it comes to storing and managing file content. However, there are some aspects of file storage and behavior that you can control. These aspects are a factor of a file’s type; in this section we’ll take a brief look at the common file types and their properties. In the next chapter we’ll see examples of how to set and change file types.
Perforce supports several types of file content, text and binary being the most common. A file’s content type dictates how Perforce will handle it in future operations:
- Text files
Text files are stored in the depot as deltas. That is, a revision of a file is not stored in its entirety; only the lines that have changed are stored. Consequently, umpteen revisions of a very large text file don’t take much depot space if only a small part of the file changes at each revision. Delta storage is completely transparent to the user, of course—the server takes care of constructing a specific file revision from deltas when you synchronize your workspace.
As it transfers text files to and from workspaces, Perforce translates them so that their line-end delimeters match the local filesystem’s format. If your workspace is on Unix, for example, Perforce makes sure lines in text files end with the LF character. If you workspace is on Windows, Perforce makes sure lines end with the CR/LF character pair.
- Binary files
Binary files are stored in the depot their entirety. Each revision is stored as a compressed copy of the file. The Perforce client program gets the file revision you need and uncompresses it when you synchronize your workspace. Other than compression, no modification is made to binary files when they are transferred between workspace and server.
Tip
Perforce can compare and merge text files. It can’t do that with binary files, beyond simply pointing out that the files are different and letting you choose one or the other. (If you have programs that can compare and merge binary files, however, Perforce can invoke them for you. In Chapter 3 we’ll take a closer look at this.)
- Unicode files
Perforce assumes your text files are ASCII. However, there’s another text file type Perforce supports, called “unicode.” If your Perforce Server is configured as an internationalized server unicode files will be translated to your local character set when they’re copied to your workspace. And when you submit unicode files, they’ll be translated from your local character set to UTF8. To find out about internationalizing your server, see Tech Note 66, Internationalization Support in Perforce, on the Perforce Software web site.
Although you can use the unicode file type to store files as UTF8 even with a non-internationalized Perforce Server, your local editor and other tools are more likely to corrupt these files than not. Moreover, unicode files can’t be mixed with text files in Perforce commands that compare and merge files.
Perforce also supports OS-specific file types, including Unix symbolic links and Macintosh files and resource forks. To find out more about these file types, run:
p4 help filetypesType modifiers
The content type of a file—text or binary, for example—is considered its base type. In addition to a base type, files in Perforce can have type modifiers that specify how they will behave in workspaces and in the depot. When you list files with Perforce, you may see file types like text+k and binary+lw—these are the modified file types. Some of the most commonly used file type modifiers are:
|
Modifier |
Behavior |
|
+x |
The workspace file is executable. (On Unix, the file’s execute bit is set.) |
|
+w |
The file is writable as soon as it’s copied to the workspace. (Normally you have to open files to make them writable.) |
|
+k |
RCS-like keywords in the file are expanded when the file is copied to the workspace. |
|
+l |
The file is exclusively locked when opened so that only one person can have it open at a time. |
|
+m |
The file’s modification time is propagated with the file so that it shows up in the timestamp of synchronized copies. |
|
+S |
Only one revision (the head revision) of the file is stored in the depot. (This is useful for files generated and submitted by nightly builds, for example.) |
To see the complete inventory of file type modifiers, run the help filetypes command.
What kind of file is this?
In P4, you can list a file’s content type with a number of commands, including files, opened, and filelog. For example:
p4 files *
//depot/projectA/www/index.html ... (text)
//depot/projectA/www/logo.gif ... (binary+l)
P4V shows file content types in its navigation trees; you saw an example of this in Figure 1-6.
[*] Yes, this is a bit of a challenge to the Perforce plug-ins. They bend over backward to support applications that think repository directories have to be created before new files can be added.
[*] It’s only coincidence that -i is the flag that makes changes and filelog show inherited history. The i really stands for integration; you’ll see why later in the book.
Get Practical Perforce now with the O’Reilly learning platform.
O’Reilly members experience books, live events, courses curated by job role, and more from O’Reilly and nearly 200 top publishers.

