Chapter 1. Your Toolkit
This chapter shows you how to install the Android software development kit (SDK) and all the related software you’re likely to need. By the end, you’ll be able to run a simple “Hello World” program on an emulator. Windows, Mac OS X, and Linux systems can all be used for Android application development. We will load the software, introduce you to the tools in the SDK, and point you to sources of example code.
Throughout this book, and especially in this chapter, we refer to instructions available on various websites for installing and updating the tools you will use for creating Android programs. The most important place to find information and links to tools is the Android Developers site:
| http://developer.android.com |
Our focus is on guiding you through installation, with explanations that will help you understand how the parts of Android and its developer tools fit together, even as the details of each part change.
The links cited in this book may change over time. Descriptions and updated links are posted on this book’s website. You can find a link to the website on this book’s catalog page. You may find it convenient to have the book’s website open as you read so that you can click through links on the site rather than entering the URLs printed in this book.
Installing the Android SDK and Prerequisites
Successfully installing the Android SDK requires two other software systems that are not part of the Android SDK: the Java Development Kit (JDK) and the Eclipse integrated development environment (IDE). These two systems are not delivered as part of the Android SDK because you may be using them for purposes outside of Android software development, or because they may already be installed on your system, and redundant installations of these systems can cause version clashes.
The Android SDK is compatible with a range of recent releases of the JDK and the Eclipse IDE. Installing the current release of each of these tools will usually be the right choice. The exact requirements are specified on the System Requirements page of the Android Developers site: http://developer.android.com/sdk/requirements.html.
One can use IDEs other than Eclipse in Android software development, and information on using other IDEs is provided in the Android documentation at http://developer.android.com/guide/developing/other-ide.html. We chose Eclipse as the IDE covered in this book because Eclipse supports the greatest number of Android SDK tools and other plug-ins, and Eclipse is the most widely used Java IDE, but IntelliJ IDEA is an alternative many Java coders prefer.
The Java Development Kit (JDK)
If your system has an up-to-date JDK installed, you won’t need to install it again. The JDK provides tools, such as the Java compiler, used by IDEs and SDKs for developing Java programs. The JDK also contains a Java Runtime Environment (JRE), which enables Java programs, such as Eclipse, to run on your system.
If you are using a Macintosh running a version of Mac OS X supported by the Android SDK, the JDK is already installed.
If you are using Ubuntu Linux, you can install the JDK using the package manager, through the following command:
sudo apt-get install sun-java6-jdk
Caution
If this command reports that the JDK package is not available, you may need to enable the “partner” repositories using the Synaptic Package Manager utility in the System→Administration menu. The “partner” repositories are listed on the Other Software tab after you choose Settings→Repositories.
This is one of the very few places in this chapter where you will see a version number, and it appears here only because it can’t be avoided. The version number of the JDK is in the package name. But, as with all other software mentioned in this chapter, you should refer to up-to-date online documentation to determine the version you will need.
If you are a Windows user, or you need to install the JDK from Oracle’s site for some other reason, you can find the JDK at http://www.oracle.com/technetwork/java/javase/downloads/index.html.
The Downloads page will automatically detect your system and offer to download the correct version. The installer you download is an executable file. Run the executable installer file to install the JDK.
To confirm that the JDK is installed correctly, issue this command from the command line (Terminal on Linux and Mac; Command Prompt on Windows):
javac -version
Caution
If the javac command is not in your PATH, you may need to add the bin directory in the JDK to your path
manually.
It should display the version number corresponding to the version of the JDK you installed. If you installed revision 20 of the Java 6 JDK, the command would display:
javac 1.6.0_20
Depending on the current version of the JDK available when you read this, version numbers may differ from what you see here.
The Eclipse Integrated Development Environment (IDE)
Eclipse is a general-purpose technology platform. It has been applied to a variety of uses in creating IDEs for multiple languages and in creating customized IDEs for many specialized SDKs, as well as to uses outside of software development tools, such as providing a Rich Client Platform (RCP) for Lotus Notes and a few other applications.
Eclipse is usually used as an IDE for writing, testing, and debugging software, especially Java software. There are also several derivative IDEs and SDKs for various kinds of Java software development based on Eclipse. In this case, you will take a widely used Eclipse package and add a plug-in to it to make it usable for Android software development. Let’s get that Eclipse package and install it.
Eclipse can be downloaded from http://www.eclipse.org/downloads.
You will see a selection of the most commonly used Eclipse packages on this page. An Eclipse “package” is a ready-made collection of Eclipse modules that make Eclipse better suited for certain kinds of software development. Usually, Eclipse users start with one of the Eclipse packages available for download on this page and customize it with plug-ins, which is what you will do when you add the Android Development Tools (ADT) plug-in to your Eclipse installation. The System Requirements article on the Android Developers site lists three choices of Eclipse packages as a basis for an Eclipse installation for Android software development:
Any of these will work, though unless you are also developing Eclipse plug-ins, choosing either Classic or the Java Developers package (EE or Standard) makes the most sense. The authors of this book started with the Java EE Developers package (“EE” stands for Enterprise Edition), and screenshots of Eclipse used in this book reflect that choice.
The Eclipse download site will automatically determine the available system-specific downloads for your system, though you may have to choose between 32 and 64 bits to match your operating system. The file you download is an archive. To install Eclipse, open the archive and copy the eclipse folder to your home folder. The executable file for launching Eclipse on your system will be found in the folder you just extracted from the archive.
Caution
We really mean it about installing Eclipse in your home folder (or another folder you own), especially if you have multiple user accounts on your system. Do not use your system’s package manager. Your Eclipse installation is one of a wide range of possible groupings of Eclipse plug-ins. In addition, you will probably further customize your installation of Eclipse. And Eclipse plug-ins and updates are managed separately from other software in your system.
For these reasons, it is very difficult to successfully install and use Eclipse as a command available to all users on your system, even if your system can do this from its package manager. To successfully complete an installation as it is described here, you must install Eclipse in a folder managed by one user, and launch it from this location.
If you are using Ubuntu or another Linux distribution, you should not install Eclipse from your distribution’s repositories, and if it is currently installed this way, you must remove it and install Eclipse as described here. The presence of an “eclipse” package in the Ubuntu repositories is an inheritance from the Debian repositories on which Ubuntu is based. It is not a widely used approach to installing and using Eclipse, because most of the time, your distribution’s repositories will have older versions of Eclipse.
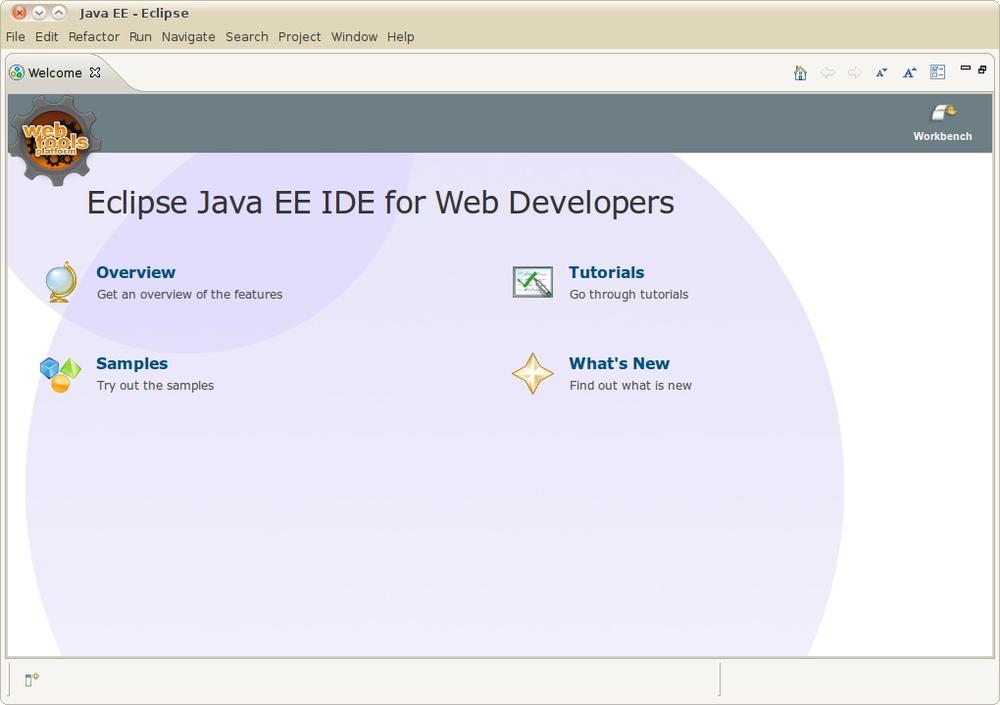
To confirm that Eclipse is correctly installed and that you have a JRE that supports Eclipse, launch the executable file in the Eclipse folder. You may want to make a shortcut to this executable file to launch Eclipse more conveniently. You should see the Welcome screen shown in Figure 1-1.
Eclipse is implemented in Java and requires a JRE. The JDK you previously installed provides a JRE. If Eclipse does not run, you should check that the JDK is correctly installed.
The Android SDK
With the JDK and Eclipse installed, you have the prerequisites for the Android SDK, and are ready to install the SDK. The Android SDK is a collection of files: libraries, executables, scripts, documentation, and so forth. Installing the SDK means downloading the version of the SDK for your platform and putting the SDK files into a folder in your home directory.
To install the SDK, download the SDK package that corresponds to your system from http://developer.android.com/sdk/index.html.
The download is an archive. Open the archive and extract the folder in the archive to your home folder.
Warning
If you are using a 64-bit version of
Linux, you may need to install the ia32-libs package.
To check whether you need this package,
try running the adb command
(~/android-sdk-linux_*/platform-tools/adb).
If your system reports that adb cannot be found (despite being
right there in the platform-tools directory) it likely
means that the current version of adb, and possibly other tools,
will not run without the ia32-libs package installed. The command
to install the ia32-libs
package is:
sudo apt-get install ia32-libs
The SDK contains one or two folders for tools: one named
tools and, starting in version
8 of the SDK, another called platform-tools. These folders need to be
on your path, which is a list of folders your system searches for
executable files when you invoke an executable from the command
line. On Macintosh and Linux systems, setting the PATH environment variable is done in the
.profile (Ubuntu) or .bash_profile (Mac OS X) file in your
home directory. Add a line to that file that sets the PATH environment
variable to include the tools
directory in the SDK (individual entries in the list are separated
by colons). For example, you could use the following line (but
replace both instances of ~/android-sdk-
with the full path to your Android SDK install):ARCH
export PATH=$PATH:~/android-sdk-ARCH/tools:~/android-sdk-ARCH/platform-tools
On Windows systems, click Start→right-click Computer, and choose Properties. Then click Advanced System Settings, and click the Environment Variables button. Double-click the path system variable, and add the path to the folders by going to the end of this variable’s value (do not change anything that’s already there!) and adding the two paths to the end, separated by semicolons with no space before them. For example:
;C:\android-sdk-windows\tools;C:\android-sdk-windows\platform-tools
After you’ve edited your path on
Windows, Mac, or Linux, close and reopen any Command Prompts or
Terminals to pick up the new PATH
setting (on Ubuntu, you may need to log out and log in unless your
Terminal program is configured as a login shell).
Adding Build Targets to the SDK
Before you can build an Android application, or even create a project that would try to build an Android application, you must install one or more build targets. To do this, you will use the SDK and AVD Manager. This tool enables you to install packages in the SDK that will support multiple versions of the Android OS and multiple API levels.
Once the ADT plug-in is installed in Eclipse, which we describe in the next section, the SDK and AVD Manager can be invoked from within Eclipse. It can also be invoked from the command line, which is how we will do it here. To invoke the SDK and AVD Manager from the command line, issue this command:
android
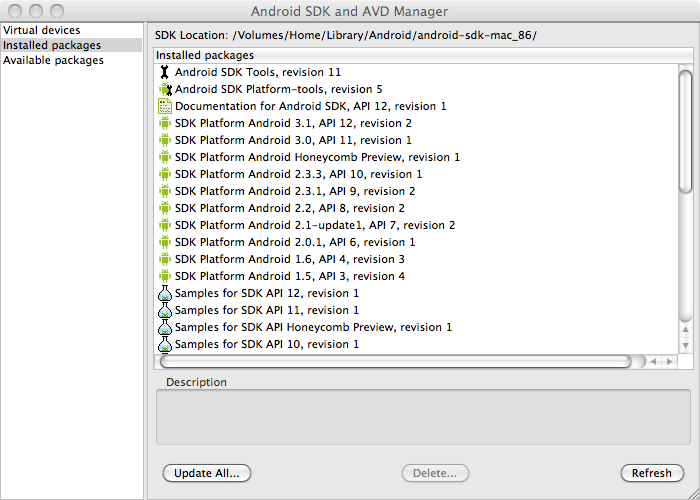
The screenshot in Figure 1-2 shows the SDK and AVD Manager, with all the available SDK versions selected for installation.
The packages labeled “SDK platform” support building applications compatible with different Android API levels. You should install, at a minimum, the most recent (highest numbered) version, but installing all the available API levels, and all the Google API add-on packages, is a good choice if you might someday want to build applications that run on older Android versions. You should also install, at a minimum, the most recent versions of the example applications package. You must also install the Android SDK Platform-Tools package.
The Android Development Toolkit (ADT) Plug-in for Eclipse
Now that you have the SDK files installed, along with Eclipse and the JDK, there is one more critical part to install: the Android Developer Toolkit (ADT) plug-in. The ADT plug-in adds Android-specific functionality to Eclipse.
Software in the plug-in enables Eclipse to build Android applications, launch the Android emulator, connect to debugging services on the emulator, edit Android XML files, edit and compile Android Interface Definition Language (AIDL) files, create Android application packages (.apk files), and perform other Android-specific tasks.
Using the Install New Software Wizard to download and install the ADT plug-in
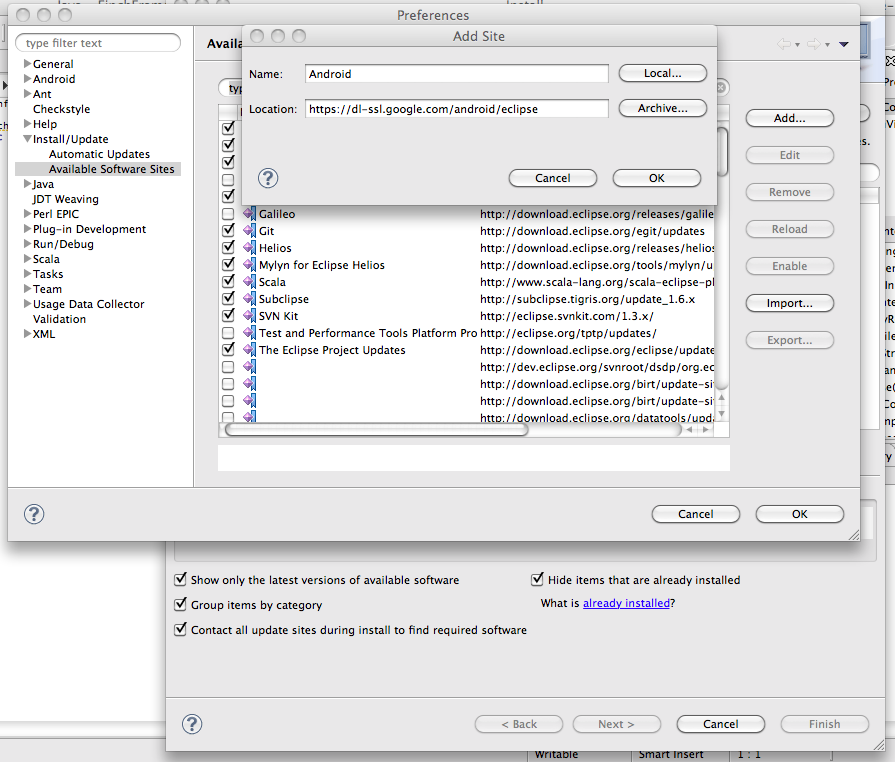
You start the Install New Software
Wizard by selecting Help→Install New Software (Figure 1-3). To install
the ADT plug-in, type this URL into the Work With field and press
Return or Enter: https://dl-ssl.google.com/android/eclipse/
(see Figure 1-4).
Note
More information on installing the ADT plug-in using the Install New Software Wizard can be found on the Android Developers site, at http://developer.android.com/sdk/eclipse-adt.html#downloading.
Eclipse documentation on this wizard can be found on the Eclipse documentation site, at http://help.eclipse.org/galileo/index.jsp?topic=/org.eclipse.platform.doc.user/tasks/tasks-124.htm.
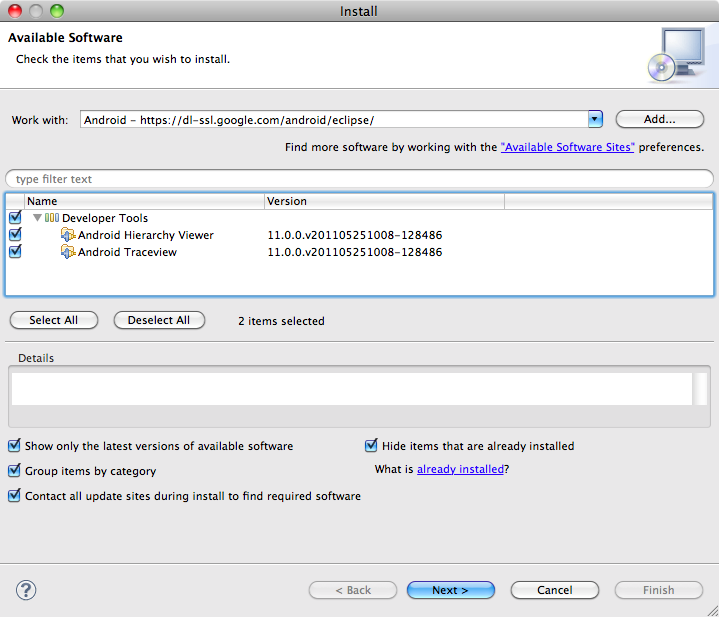
Once you have added the URL to the list of sites for acquiring new plug-ins, you will see an entry called Developer Tools listed in the Available Software list.
Select the Developer Tools item by clicking on the checkbox next to it, and click on the Next button. The next screen will ask you to accept the license for this software. After you accept and click Finish, the ADT will be installed. You will have to restart Eclipse to complete the installation.
Configuring the ADT plug-in
One more step, and you are done installing. Once you have installed the ADT plug-in, you will need to configure it. Installing the plug-in means that various parts of Eclipse now contain Android software development-specific dialogs, menu commands, and other tools, including the dialog you will now use to configure the ADT plug-in. Start the Preferences dialog using the Window→Preferences (Linux and Windows) or Eclipse→Preferences (Mac) menu option. Click the item labeled Android in the left pane of the Preferences dialog.
Note
The first time you visit this section of the preferences, you’ll see a dialog asking if you want to send some usage statistics to Google. Make your choice and click Proceed.
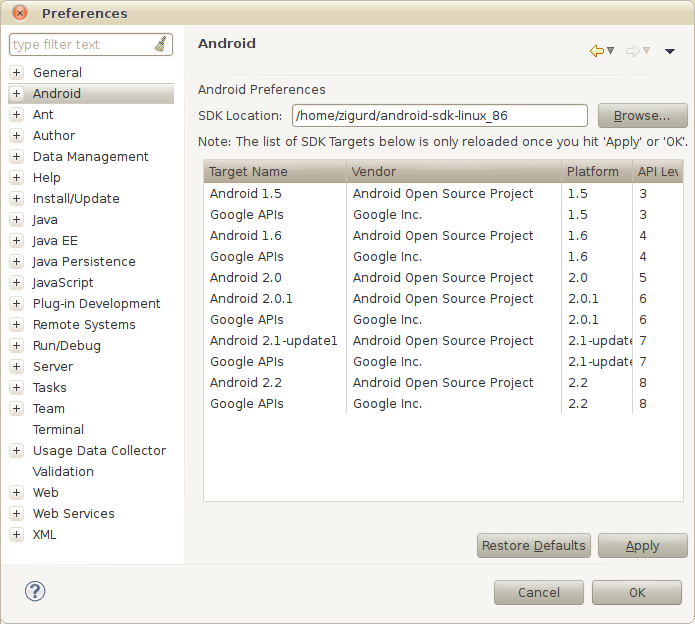
A dialog with the Android settings is displayed next. In this dialog, a text entry field labeled “SDK location” appears near the top. You must enter the path to where you put the SDK, or you can use the file browser to select the directory, as shown in Figure 1-5. Click Apply. Note that the build targets you installed, as described in Adding Build Targets to the SDK, are listed here as well.
Test Drive: Confirm That Your Installation Works
If you have followed the steps in this chapter, and the online instructions referred to here, your installation of the Android SDK is now complete. To confirm that everything you installed so far works, let’s create a simple Android application.
Making an Android Project
The first step in creating a simple Android application is to create an Android project. Eclipse organizes your work into “projects,” and by designating your project as an Android project, you tell Eclipse that the ADT plug-in and other Android tools are going to be used in conjunction with this project.
Note
Reference information and detailed online instructions for creating an Android project can be found at http://developer.android.com/guide/developing/eclipse-adt.html.
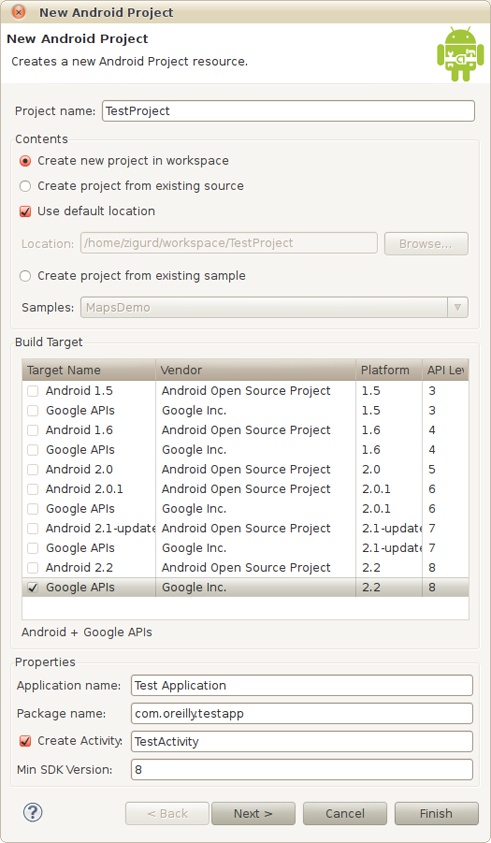
Start your new project with the File→New→Android Project menu command. Locate the Android Project option in the New Project dialog (it should be under a section named Android). Click Next, and the New Project dialog appears as shown in Figure 1-6.
To create your Android project, you will provide the following information:
- Project name
This is the name of the project (not the application) that appears in Eclipse. Type
TestProject, as shown in Figure 1-6.- Workspace
A workspace is a folder containing a set of Eclipse projects. In creating a new project, you have the choice of creating the project in your current workspace, or specifying a different location in the filesystem for your project. Unless you need to put this project in a specific location, use the defaults (“Create new project in workspace” and “Use default location”).
- Target name
The Android system images you installed in the SDK are shown in the build target list. You can pick one of these system images, and the corresponding vendor, platform (Android OS version number), and API level as the target for which your application is built. The platform and API level are the most important parameters here: they govern the Android platform library that your application will be compiled with, and the API level supported—APIs with a higher API level than the one you select will not be available to your program. For now, pick the most recent Android OS version and API level you have installed.
- Application name
This is the application name the user will see. Type
Test Application.- Package name
The package name creates a Java package namespace that uniquely identifies packages in your application, and must also uniquely identify your whole Android application among all other installed applications. It consists of a unique domain name—the application publisher’s domain name—plus a name specific to the application. Not all package namespaces are unique in Java, but the conventions used for Android applications make namespace conflicts less likely. In our example we used com.oreilly.testapp, but you can put something appropriate for your domain here (you can also use com.example.testapp, since example.com is a domain name reserved for examples such as this one).
- Activity
An activity is a unit of interactive user interface in an Android application, usually corresponding to a group of user interface objects occupying the entire screen. Optionally, when you create a project you can have a skeleton activity created for you. If you are creating a visual application (in contrast with a service, which can be “headless”—without a visual UI), this is a convenient way to create the activity the application will start with. In this example, you should create an activity called TestActivity.
- Minimum SDK version
The field labeled Min SDK Version should contain an integer corresponding to the minimum SDK version required by your application, and is used to initialize the
uses-sdkattribute in the application’s manifest, which is a file that stores application attributes. See The Android Manifest Editor. In most cases, this should be the same as the API level of the build target you selected, which is displayed in the rightmost column of the list of build targets, as shown in Figure 1-6.
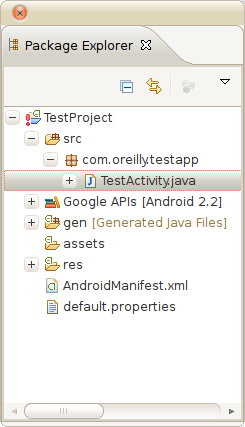
Click Finish (not Next) to create your Android project, and you will see it listed in the left pane of the Eclipse IDE as shown in Figure 1-7.
If you expand the view of the project
hierarchy by clicking the “+” (Windows) or triangle (Mac and Linux)
next to the project name, you will see the various parts of an
Android project. Expand the src
folder and you will see a Java package with the name you entered in
the wizard. Expand that package and you will see the Activity class
created for you by the wizard. Double-click that, and you will see
the Java code of your first Android program:
package com.oreilly.demo.pa.ch01.testapp;

import android.app.Activity;
import android.os.Bundle;
import com.oreilly.demo.pa.ch01.R;

public class TestActivity extends Activity {
    /** Called when the activity is first created. */
    @Override
    public void onCreate(Bundle savedInstanceState) {
        super.onCreate(savedInstanceState);
        setContentView(R.layout.main);
    }
}If you’ve been following along and see the same thing on your computer, your SDK installation is probably working correctly. But let’s make sure, and explore the SDK just a bit further, by running your first program in an emulator and on an Android device if you have one handy.
Making an Android Virtual Device (AVD)
The Android SDK provides an emulator, which emulates a device with an ARM CPU running an Android operating system (OS), for running Android programs on your PC. An Android Virtual Device (AVD) is a set of parameters for this emulator that configures it to use a particular system image—that is, a particular version of the Android operating system—and to set other parameters that govern screen size, memory size, and other emulated hardware characteristics. Detailed documentation on AVDs is available at http://developer.android.com/guide/developing/tools/avd.html, and detailed documentation on the emulator is found here: http://developer.android.com/guide/developing/tools/emulator.html.
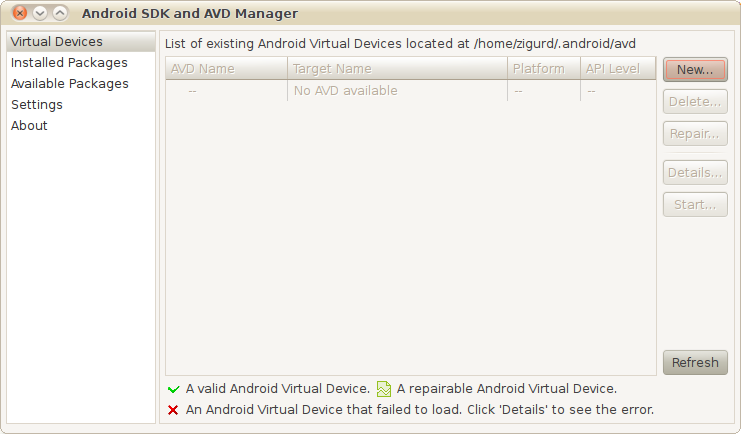
Because we are just validating that your SDK installation works, we won’t go into depth on AVDs, much less details of the emulator, just yet. Here, we will use the Android SDK and AVD Manager (see Figure 1-8) to set up an AVD for the purpose of running the program we just created with the New Android Project Wizard.
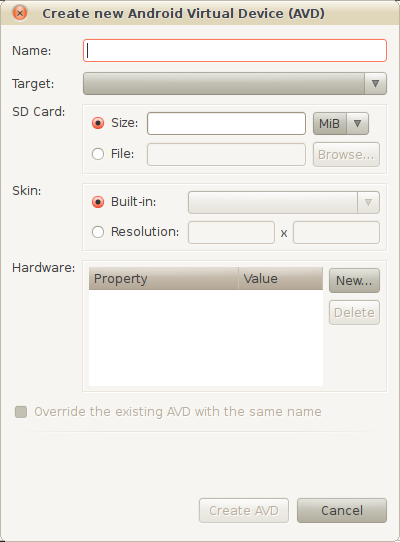
You will need to create an AVD with a system image that is no less recent than the target specified for the project you created. Click the New button. You will now see the Create New Android Virtual Device (AVD) dialog, shown in Figure 1-9, where you specify the parameters of your new AVD.
This screen enables you to set the parameters of your new AVD:
- Name
This is the name of the AVD. You can use any name for an AVD, but a name that indicates which system image it uses is helpful.
- Target
The Target parameter sets which system image will be used in this AVD. It should be the same as, or more recent than, the target you selected as the build target for your first Android project.
- SD Card
Some applications require an SD card that extends storage beyond the flash memory built into an Android device. Unless you plan to put a lot of data in SD card storage (media files, for example) for applications you are developing, you can create a small virtual SD card of, say, 100 MB in size, even though most phones are equipped with SD cards holding several gigabytes.
- Skin
The “skin” of an AVD mainly sets the screen size. You won’t need to change the default for the purpose of verifying that your SDK installation works, but a variety of emulators with different screen sizes is useful to check that your layouts work across different devices.
- Hardware
The Hardware field of an AVD configuration enables you to set parameters indicating which optional hardware is present. You won’t need to change the defaults for this project.
Fill in the Name, Target, and SD Card fields, and create a new AVD by clicking the Create AVD button. If you have not created an AVD with a system image that matches or is more recent than the target you specified for an Android project, you won’t be able to run your program.
Running a Program on an AVD
Now that you have a project that builds an application, and an AVD with a system image compatible with the application’s build target and API level requirements, you can run your application and confirm that the SDK produced, and is able to run, an Android application.
To run your application, right-click on the project you created and, in the context menu that pops up, select Run As→Android Application.
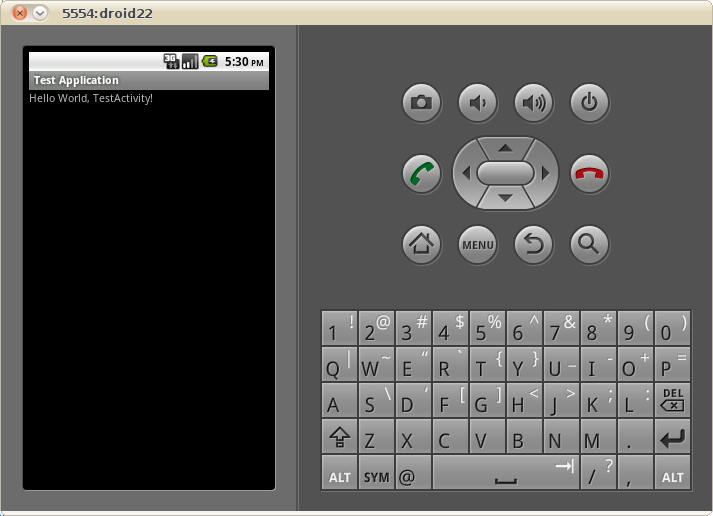
If the AVD you created is compatible with the application you created, the AVD will start, the Android OS will boot on the AVD, and your application will start. You should see your application running in the AVD, similarly to what is shown in Figure 1-10.
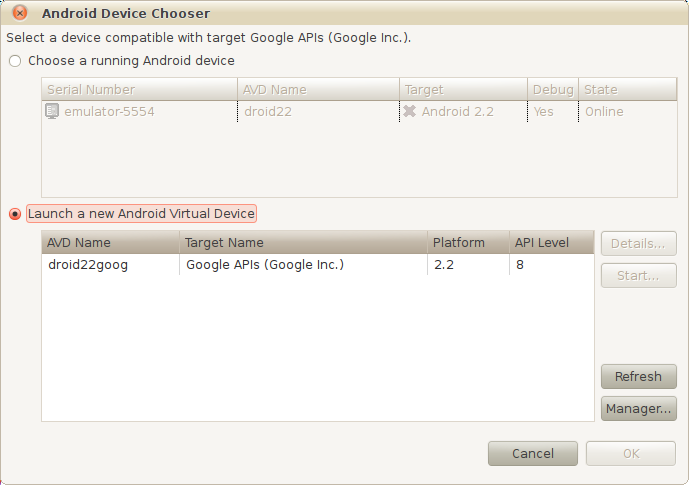
If you have more than one compatible AVD configured, the Android Device Chooser dialog will appear and ask you to select among the AVDs that are already running, or among the Android devices attached to your system, if any, or to pick an AVD to start. Figure 1-11 shows the Android Device Chooser displaying one AVD that is running, and one that can be launched.
Running a Program on an Android Device
You can also run the program you just created on most Android devices.
You will need to connect your device to your PC with a USB cable, and, if needed, install a driver, or set permissions to access the device when connected via USB.
System-specific instructions for Windows, along with the needed driver, are available at http://developer.android.com/sdk/win-usb.html.
If you are running Linux, you will need to create a “rules” file for your Android device.
If you are running Mac OS X, no configuration is required.
Detailed reference information on USB debugging is here: http://developer.android.com/guide/developing/device.html.
You will also need to turn on USB debugging in your Android device. In most cases, you will start the Settings application, select Applications and then Development, and then you will see an option to turn USB debugging on or off.
If an AVD is configured or is running, the Android Device Chooser will appear, displaying both the Android device you have connected and the AVD.
Select the device, and the Android application will be loaded and run on the device.
Troubleshooting SDK Problems: No Build Targets
If you are unable to make a new project or import an example project from the SDK, you may have missed installing build targets into your SDK. Reread the instructions in Adding Build Targets to the SDK and make sure the Android pane in the Preferences dialog lists build targets as installed in your SDK, as shown in Figure 1-5.
Components of the SDK
The Android SDK is made of mostly off-the-shelf components, plus some purpose-built components. In many cases, configurations, plug-ins, and extensions adapt these components to Android. The Android SDK is a study in the efficient development of a modern and complete SDK. Google took this approach in order to bring Android to market quickly. You will see this for yourself as you explore the components of the Android SDK. Eclipse, the Java language, QEMU, and other preexisting platforms, tools, and technologies comprise some of the most important parts of the Android SDK.
In creating the simple program that confirms that your SDK installation is correct, you have already used many of the components of the SDK. Here we will identify and describe the components of the SDK involved in creating your program, and other parts you have yet to use.
The Android Debug Bridge (adb)
adb is a program that enables you to control both emulators and devices, and to run a shell in order to execute commands in the environment of an emulator or device. adb is especially handy for installing and removing programs from an emulator or device. Documentation on adb can be found at http://developer.android.com/guide/developing/tools/adb.html.
The Dalvik Debug Monitor Server (DDMS)
The Dalvik Debug Monitor Server (DDMS) is a traffic director between the single port that Eclipse (and other Java debuggers) looks for to connect to a Java Virtual Machine (JVM) and the several ports that exist for each Android device or virtual device, and for each instance of the Dalvik virtual machine (VM) on each device. The DDMS also provides a collection of functionality that is accessible through a standalone user interface or through an interface embedded in Eclipse via the ADT plug-in.
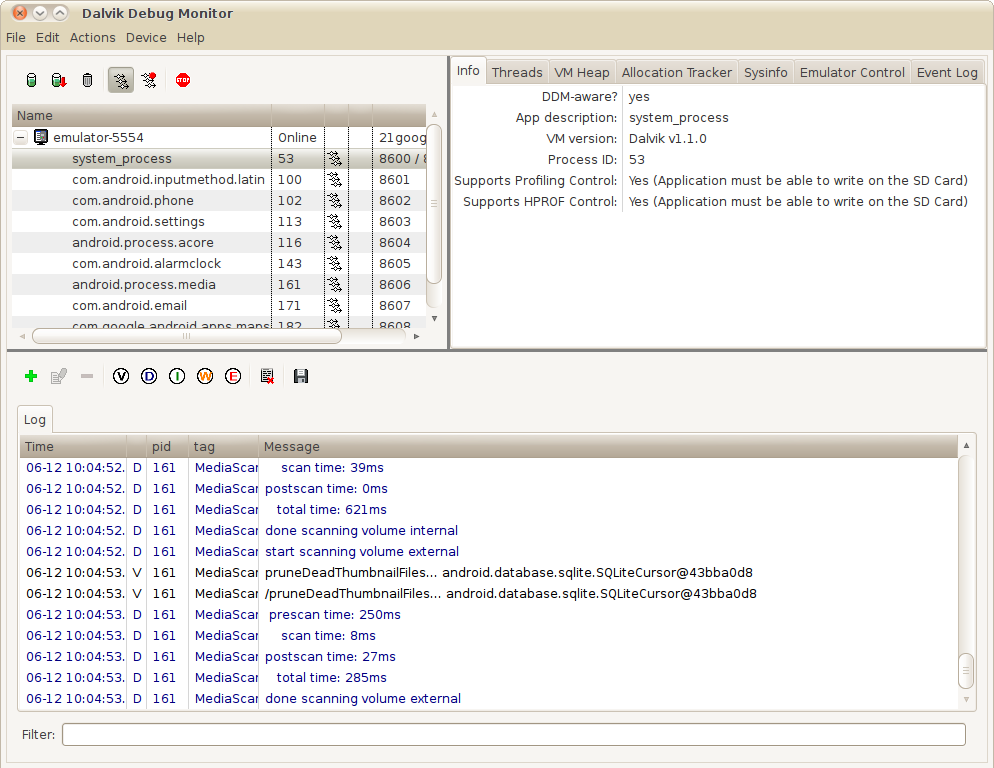
When you invoke the DDMS from the command line, you will see something similar to the window shown in Figure 1-12.
The DDMS’s user interface provides access to the following:
- A list of devices and virtual devices, and the VMs running on those devices
In the upper-left pane of the DDMS window, you will see listed the Android devices you have connected to your PC, plus any AVDs you have running. Listed under each device or virtual device are the tasks running in Dalvik VMs.
- VM information
Selecting one of the Dalvik VMs running on a device or virtual device causes information about that VM to be displayed in the upper-right pane.
- Thread information
Information for threads within each process is accessed through the “Threads” tab in the upper-right pane of the DDMS window.
- Filesystem explorer
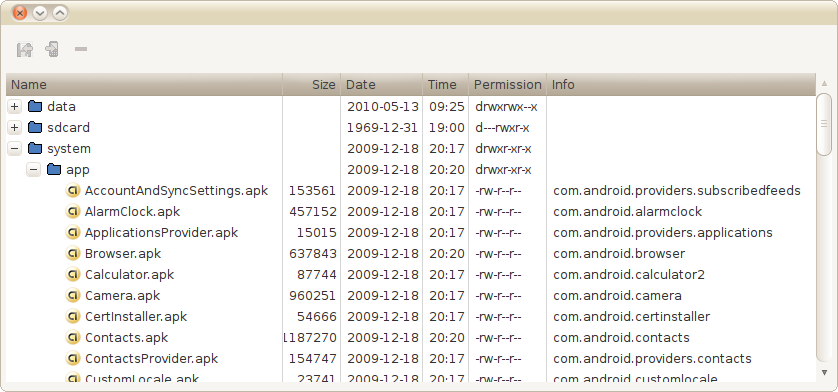
You can explore the filesystem on a device or virtual device using the DDMS filesystem explorer, accessible through the “File explorer” menu item in the Devices menu. It displays the file hierarchy in a window similar to the one shown in Figure 1-13.
- Simulating phone calls
The Emulator Control tab in the upper-right pane of the DDMS window enables you to “fake” a phone call or text message in an emulator.
- Screen capture
The “Screen capture” command in the Device menu fetches an image of the current screen from the selected Android device or virtual device.
- Logging
The bottom pane of the DDMS window displays log output from processes on the selected device or virtual device. You can filter the log output by selecting a filter from among the buttons on the toolbar above the logging pane.
- Dumping state for devices, apps, and the mobile radio
A set of commands in the Device menu enables you to command the device or virtual device to dump state for the whole device, an app, or the mobile radio.
Detailed documentation on the DDMS is available at http://developer.android.com/guide/developing/tools/ddms.html.
Components of the ADT Eclipse Plug-in
Eclipse enables you to create specific project types, including several kinds of Java projects. The ADT plug-in adds the ability to make and use Android projects. When you make a new Android project, the ADT plug-in creates the project file hierarchy and all the required files for the minimal Android project to be correctly built. For Android projects, the ADT plug-in enables Eclipse to apply components of the ADT plug-in to editing, building, running, and debugging that project.
In some cases, components of the SDK can be used with Eclipse or in a standalone mode. But, in most of the Android application development cases covered in this book, the way these components are used in or with Eclipse will be the most relevant.
The ADT plug-in has numerous separate components, and, despite the connotations of a “plug-in” as a modest enhancement, it’s a substantial amount of software. Here we will describe each significant part of the ADT plug-in that you will encounter in using Eclipse for developing Android software.
The Android Layout Editor
Layouts for user interfaces in Android applications can be specified in XML. The ADT plug-in adds a visual editor that helps you to compose and preview Android layouts. When you open a layout file, the ADT plug-in automatically starts this editor to view and edit the file. Tabs along the bottom of the editing pane enable you to switch between the visual editor and an XML editor.
In earlier versions of the Android SDK, the Android Layout Editor was too limited to be of much use. Now, though, you should consider using visual editing of Android layouts as a preferred way of creating layouts. Automating the specification of layouts makes it more likely that your layouts will work on the widest range of Android devices.
The Android Manifest Editor
In Android projects, a manifest file is included with the project’s software and resources when the project is built. This file tells the Android system how to install and use the software in the archive that contains the built project. The manifest file is in XML, and the ADT plug-in provides a specialized XML editor to edit the manifest.
Other components of the ADT Eclipse plug-in, such as the application builders, can also modify the manifest.
XML editors for other Android XML files
Other Android XML files that hold information such as specifications for menus, or resources such as strings, or that organize graphical assets of an application, have specialized editors that are opened when you open these files.
Building Android apps
Eclipse projects are usually built automatically. That means you will normally not encounter a separate step for turning the source code and resources for a project into a deployable result. Android requires Android-specific steps to build a file you can deploy to an Android emulator or device, and the ADT plug-in provides the software that executes these steps. For Android projects, the result of building the project is an .apk file. You can find this file for the test project created earlier in this chapter in the bin subfolder of the project’s file hierarchy in your Eclipse workspace.
The Android-specific builders provided in the ADT plug-in enable you to use Java as the language for creating Android software while running that software on a Dalvik VM that processes its own bytecodes.
Running and debugging Android apps
When you run or debug an Android project from within Eclipse, the .apk file for that project is deployed and started on an AVD or Android device, using the ADB and DDMS to communicate with the AVD or device and the Dalvik runtime environment that runs the project’s code. The ADT plug-in adds the components that enable Eclipse to do this.
The DDMS
In The Dalvik Debug Monitor Server (DDMS) we described the Dalvik Debug Monitor and how to invoke the DDMS user interface from the command line. The DDMS user interface is also available from within Eclipse. You can access it by using the Window→Open Perspective→DDMS command in the Eclipse menu. You can also access each view that makes up the DDMS perspective separately by using the Window→Show View menu and selecting, for example, the LogCat view.
Android Virtual Devices
AVDs are made up of QEMU-based emulators that emulate the hardware of an Android device, plus Android system images, which consist of Android software built to run on the emulated hardware. AVDs are configured by the SDK and AVD Manager, which sets parameters such as the size of emulated storage devices and screen dimensions, and which enables you to specify which Android system image will be used with which emulated device.
AVDs enable you to test your software on a broader range of system characteristics than you are likely to be able to acquire and test on physical devices. Because QEMU-based hardware emulators, system images, and the parameters of AVDs are all interchangeable parts, you can even test devices and system images before hardware is available to run them.
QEMU
QEMU is the basis of AVDs. But QEMU is a very general tool that is used in a wide range of emulation systems outside the Android SDK. While you will configure QEMU indirectly, through the SDK and AVD Manager, you may someday need to tweak emulation in ways unsupported by the SDK tools, or you may be curious about the capabilities and limitations of QEMU. Luckily, QEMU has a large and vibrant developer and user community, which you can find at http://www.qemu.org.
The SDK and AVD Manager
QEMU is a general-purpose emulator system. The Android SDK provides controls over the configuration of QEMU that make sense for creating emulators that run Android system images. The SDK and AVD Manager provides a user interface for you to control QEMU-based Android virtual devices.
Other SDK Tools
In addition to the major tools you are likely to use in the normal course of most development projects, there are several other tools in the SDK, and those that are used or invoked directly by developers are described here. Still more components of the SDK are listed in the Tools Overview article in the Android documentation found at http://developer.android.com/guide/developing/tools/index.html.
Hierarchy Viewer
The Hierarchy Viewer displays and enables analysis of the view hierarchy of the current activity of a selected Android device. This enables you to see and diagnose problems with your view hierarchies as your application is running, or to examine the view hierarchies of other applications to see how they are designed. It also lets you examine a magnified view of the screen with alignment guides that help identify problems with layouts. Detailed information on the Hierarchy Viewer is available at http://developer.android.com/guide/developing/tools/hierarchy-viewer.html.
Layoutopt
Layoutopt is a static analyzer that operates on XML layout files and can diagnose some problems with Android layouts. Detailed information on Layoutopt is available at http://developer.android.com/guide/developing/tools/layoutopt.html.
Monkey
Monkey is a test automation tool that runs in your emulator or device. You invoke this tool using another tool in the SDK: adb. Adb enables you to start a shell on an emulator or device, and Monkey is invoked from a shell, like this:
adb shell monkey --wait-dbg -p your.package.name 500This invocation of Monkey sends 500 random events to the specified application (specified by the package name) after waiting for a debugger to be attached. Detailed information on Monkey can be found at http://developer.android.com/guide/developing/tools/monkey.html.
sqlite3
Android uses SQLite as the database system for many system
databases and provides APIs for applications to make use of
SQLite, which is convenient for data storage and presentation.
SQLite also has a command-line interface, and the sqlite3 command enables developers to
dump database schemas and perform other operations on Android
databases.
These databases are, of course, in an
Android device, or they are contained in an AVD, and therefore the
sqlite3 command is available in
the adb shell. Detailed directions for how to access the sqlite3 command line from inside the adb
shell are available at http://developer.android.com/guide/developing/tools/adb.html#shellcommands.
We introduce sqlite3 in Example Database Manipulation Using sqlite3.
keytool
keytool generates encryption keys, and is used by the ADT
plug-in to create temporary debug keys with which it signs code
for the purpose of debugging. In most cases, you will use this
tool to create a signing certificate for releasing your
applications, as described in Creating a self-signed certificate.
Zipalign
Zipalign enables optimized access to data for production releases of Android applications. This optimization must be performed after an application is signed for release, because the signature affects byte alignment. Detailed information on Zipalign is available at http://developer.android.com/guide/developing/tools/zipalign.html.
Draw9patch
A 9 patch is a special kind of Android resource, composed of nine images, and useful when you want, for example, buttons that can grow larger without changing the radius of their corners. Draw9patch is a specialized drawing program for creating and previewing these types of resources. Details on draw9patch are available at http://developer.android.com/guide/developing/tools/draw9patch.html.
android
The command named android can
be used to invoke the SDK and AVD Manager from the command line, as we described in the SDK
installation instructions in The Android SDK.
It can also be used to create an Android project from the command
line. Used in this way, it causes all the project folders, the
manifest, the build properties, and the ant script for building
the project to be generated. Details on this use of the android command can be found at http://developer.android.com/guide/developing/other-ide.html#CreatingAProject.
Keeping Up-to-Date
The JDK, Eclipse, and the Android SDK each come from separate suppliers. The tools you use to develop Android software can change at a rapid pace. That is why, in this book, and especially in this chapter, we refer you to the Android Developers site for information on the latest compatible versions of your tools. Keeping your tools up-to-date and compatible is a task you are likely to have to perform even as you learn how to develop Android software.
Windows, Mac OS X, and Linux all have system update mechanisms that keep your software up-to-date. But one consequence of the way the Android SDK is put together is that you will need to keep separate software systems up-to-date through separate mechanisms.
Keeping the Android SDK Up-to-Date
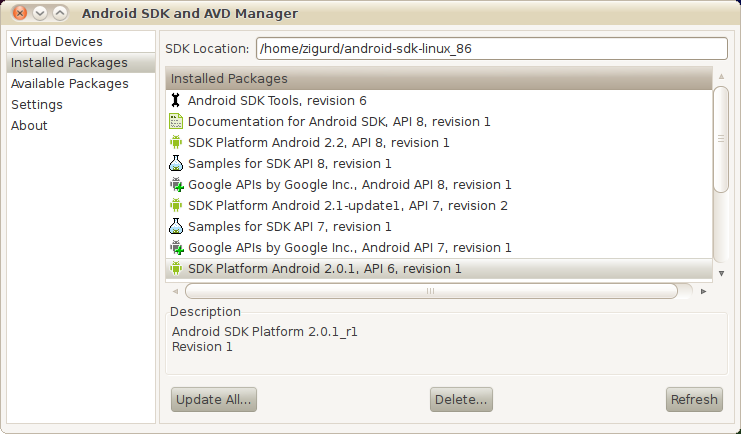
The Android SDK isn’t part of your desktop OS, nor is it part of the Eclipse plug-in, and therefore the contents of the SDK folder are not updated by the OS or Eclipse. The SDK has its own update mechanism, which has a user interface in the SDK and AVD Manager. As shown in Figure 1-14, select Installed Packages in the left pane to show a list of SDK components installed on your system. Click on the Update All button to start the update process, which will show you a list of available updates.
Keeping Eclipse and the ADT Plug-in Up-to-Date
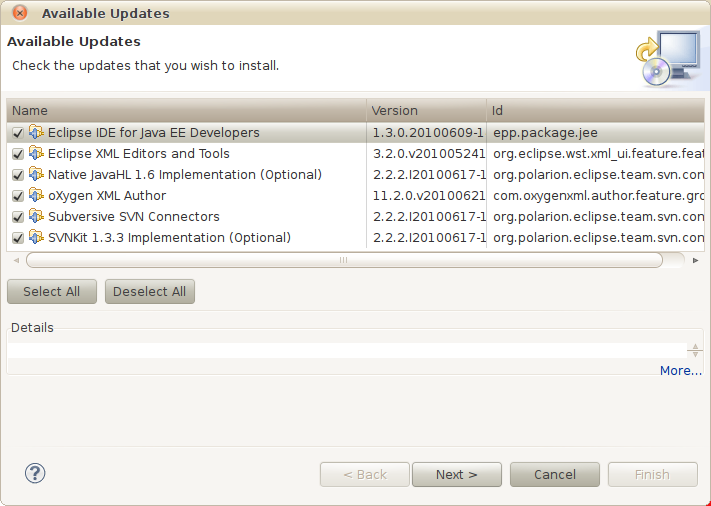
While the SDK has to be updated outside of both your operating system and Eclipse, the ADT plug-in, and all other components of Eclipse, are updated using Eclipse’s own update management system. To update all the components you have in your Eclipse environment, including the ADT plug-in, use the “Check for Updates” command in the Help menu. This will cause the available updates to be displayed, as shown in Figure 1-15.
Normally, you will want to use the Select All button to install all available updates. The updates you see listed on your system depend on what Eclipse modules you have installed and whether your Eclipse has been updated recently.
Keeping the JDK Up-to-Date
You won’t be updating Java as much as the SDK, ADT plug-in, and other Eclipse plug-ins. Even if Java 7 has not been released by the time you read this, it is likely to happen soon enough to matter to Android developers. Before choosing to update the JDK, first check the System Requirements page of the Android Developers site at http://developer.android.com/sdk/requirements.html.
If an update is needed and you are using a Mac or Linux system, check the available updates for your system to see if a new version of the JDK is included. If the JDK was installed on your system by the vendor, or if you installed it from your Linux distribution’s repositories, updates will be available through the updates mechanism on your system.
Example Code
Having installed the Android SDK and tested that it works, you are ready to explore. Even if you are unfamiliar with the Android Framework classes and are new to Java, exploring some example code now will give you further confidence in your SDK installation, before you move on to other parts of this book.
SDK Example Code
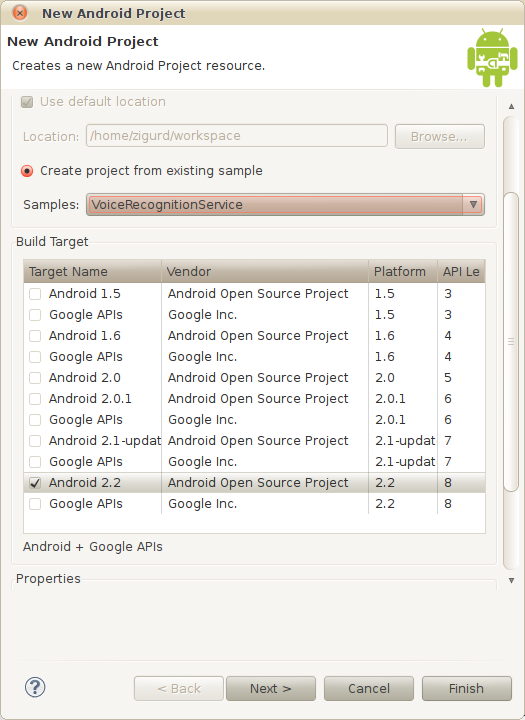
The most convenient sample code comes with the SDK. You can create a new project based on the SDK samples, as shown in Figure 1-16. The sample you select appears in the left pane of the Eclipse window, where you can browse the files comprising the sample and run it to see what it does. If you are familiar with using IDEs to debug code, you may want to set some breakpoints in the sample code to see when methods get executed.
Caution
In the dialog pictured in Figure 1-16, you must pick a build target before you pick a sample. Samples are organized by API level, and if you have not picked a build target, the drop-down list will be empty.
Each sample application that comes with the SDK corresponds to an article on the Android Developers site. More information about each sample can be found there. All of the samples are listed on the documentation page at http://developer.android.com/resources/samples/index.html.
There are more than a dozen applications, one of which—the API demos application—is a sprawling exploration of most of the Android APIs. Creating a few projects based on these code samples will give you familiarity with how these programs work, and will help you understand what you will read in the upcoming chapters of this book, even if you don’t fully understand what you are looking at yet.
Example Code from This Book
Example code from this book can be downloaded from the book’s website at http://oreilly.com/catalog/0636920010364.
On Reading Code
Good coders read a lot of code. The example code provided by the authors of this book is intended to be both an example of good Java coding and an example of how to use capabilities of the Android platform.
Some examples you will read fall short of what you will need for creating the best possible extensible and maintainable commercial software. Many example applications make choices that make sense if the coder’s goal is to create an example in a single Java class. In many cases, Android applications are overgrown versions of example code, and they end up unreadable and unmaintainable. But that does not mean you should avoid reading examples that are more expedient than a large application should be.
The next chapter will explore the Java language, with the goal of giving you the ability to evaluate example code with good engineering and design practices in mind. We want you to be able to take examples and make them better, and to apply the ideas in examples to code you engineer to create high-quality products.
Get Programming Android now with the O’Reilly learning platform.
O’Reilly members experience books, live events, courses curated by job role, and more from O’Reilly and nearly 200 top publishers.
