Filtering Based on Security
In Chapter 12, we covered the creation of login accounts and roles. In the next example, we’ll use that information combined with the navigation tools we’ve also already covered to make aspects of the navigation aids visible and accessible to users in specific roles.
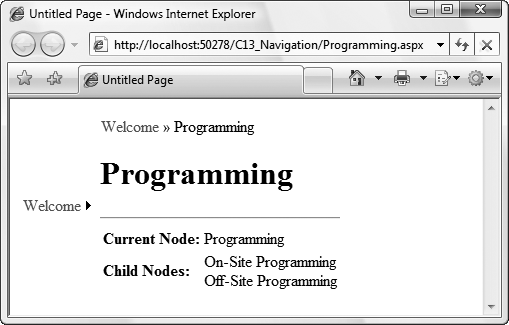
Figure 13-26. Accessing the current node’s properties
To get started, copy the C12_Security website folder and all its contents to a new folder called C13_SecureNavigation, and then open that website in VS2008. To recap, in the preceding chapter, this website demonstrated the creation of user accounts and user roles and then used both code-behind files in individual pages and the web.config file to restrict access to pages and directories based on either the user identity or the role in which the user was grouped.
Table 13-4 lists the users and roles set up in the membership database for C12_Security. You may have created others, but for the purposes of this chapter, this is what will be assumed. Feel free to follow along using the users and roles you created, or use the download.
Table 13-4. Users and roles defined for C13_SecureNavigation
User ID | Password | Role |
|---|---|---|
Dan | Dan@123 | Admins, Member |
Jane | Jane@123 | |
Jesse | Jesse@123 | Member |
Two pages have access restricted to them: one by user ID (Restricted.aspx) and the other by role (RoleRestricted.aspx). You should also create two new folders within the site, one called ...
Get Programming ASP.NET 3.5, 4th Edition now with the O’Reilly learning platform.
O’Reilly members experience books, live events, courses curated by job role, and more from O’Reilly and nearly 200 top publishers.

