Chapter 1. Introducing C#
The C# programming language (pronounced “see sharp”) is used for many kinds of applications, including websites, cloud-based systems, IoT devices, machine learning, desktop applications, embedded controllers, mobile apps, games, and command-line utilities. C#, along with the supporting runtime, libraries, and tools known collectively as .NET, has been center stage for Windows developers for almost two decades, but in recent years, it has also made inroads into other platforms. In June 2016, Microsoft released version 1.0 of .NET Core, a cross-platform version of .NET, enabling web apps, microservices, and console applications written in C# to run on macOS and Linux, as well as on Windows.
This push into other platforms has gone hand in hand with Microsoft’s embrace of open source development. In C#’s early history, Microsoft guarded all of its source code closely,1 but today, pretty much everything surrounding C# is developed in the open, with code contributions from outside of Microsoft being welcome. New language feature proposals are published on GitHub, enabling community involvement from the earliest stages. In 2014, the .NET Foundation (https://dotnetfoundation.org/) was created to foster the development of open source projects in the .NET world, and many of Microsoft’s most important C# and .NET projects are now under the foundation’s governance (in addition to many non-Microsoft projects). This includes Microsoft’s C# compiler, which is at https://github.com/dotnet/roslyn, and also .NET Core, which can be found at https://github.com/dotnet/core, comprising the runtime, class library, and tools for creating .NET projects.
Why C#?
Although there are many ways you can use C#, other languages are always an option. Why might you choose C# over them? It will depend on what you need to do, and what you like and dislike in a programming language. I find that C# provides considerable power, flexibility, and performance, and works at a high enough level of abstraction that I don’t expend vast amounts of effort on little details not directly related to the problems my programs are trying to solve.
Much of C#’s power comes from the range of programming techniques it supports. For example, it offers object-oriented features, generics, and functional programming. It supports both dynamic and static typing. It provides powerful list- and set-oriented features, thanks to Language Integrated Query (LINQ). It has intrinsic support for asynchronous programming.
More recently, C# has gained flexibility around memory management. The runtime has always provided a garbage collector (GC) that frees developers from much of the work associated with recovering memory that the program is no longer using. A GC is a common feature in modern programming languages, and while it is a boon for most programs, there are some specialized scenarios where its performance implications are problematic, so C# 7.2 (released in 2017) added various features that enable more explicit memory management, giving you the option to trade ease of development for runtime performance, but all without the loss of type safety. This enables C# to move into certain performance-critical applications that for years were the preserve of less safe languages such as C and C++.
Of course, languages do not exist in a vacuum—high-quality libraries with a broad range of features are essential. Some elegant and academically beautiful languages are glorious right up until you want to do something prosaic, such as talking to a database or determining where to store user settings. No matter how powerful a set of programming idioms a language offers, it also needs to provide full and convenient access to the underlying platform’s services. C# is on very strong ground here, thanks to its runtime, the class library, and extensive third-party library support.
.NET encompasses both the runtime and the main class library that C# programs use. The runtime part is called the Common Language Runtime (usually abbreviated to CLR) because it supports not just C#, but any .NET language. Microsoft also offers Visual Basic, F#, and .NET extensions for C++, for example. The CLR has a Common Type System (CTS) that enables code from multiple languages to interoperate freely, which means that .NET libraries can normally be used from any .NET language—F# can consume libraries written in C#, C# can use Visual Basic libraries, and so on.
In addition to the runtime, there is an extensive class library. This library provides wrappers for many features of the underlying operating system (OS), but it also provides a considerable amount of functionality of its own, such as collection classes or JSON processing.
The class library built into .NET is not the whole story—many other systems provide their own .NET libraries. For example, there are extensive libraries that enable C# programs to use popular cloud services. As you’d expect, Microsoft provides comprehensive .NET libraries for working with services in its Azure cloud platform. Likewise, Amazon provides a fully featured SDK for using Amazon Web Services (AWS) from C# and other .NET languages. And libraries do not have to be associated with frameworks. There’s a large ecosystem of .NET libraries, some commercial and some free and open source, including mathematical utilities, parsing libraries, and user interface (UI) components, to name just a few. Even if you get unlucky and need to use an OS feature that doesn’t have any .NET library wrappers, C# offers various mechanisms for working with other kinds of APIs, such as the C-style APIs available in Win32, macOS, and Linux, or APIs based on the Component Object Model (COM) in Windows.
Finally, with .NET having been around for about two decades, many organizations have invested extensively in technology built on this platform. So C# is often the natural choice for reaping the rewards of these investments.
In summary, with C# we get a strong set of abstractions built into the language, a powerful runtime, and easy access to an enormous amount of library and platform functionality.
C#’s Defining Features
Although C#’s most superficially obvious feature is its C-family syntax, perhaps its most distinctive feature is that it was the first language designed to be a native in the world of the CLR. As the name suggests, the CLR is flexible enough to support many languages, but there’s an important difference between a language that has been extended to support the CLR, and one that puts it at the center of its design. The .NET extensions in Microsoft’s C++ compiler illustrate this—the syntax for using those features is visibly different from standard C++, making a clear distinction between the native world of C++ and the outside world of the CLR. But even without different syntax,2 there would still be friction when two worlds have different ways of working. For example, if you need a dynamically resizable collection of numbers, should you use a standard C++ collection class such as vector<int>, or one from .NET such as List<int>? Whichever you choose, it will be the wrong type some of the time: C++ libraries won’t know what to do with a .NET collection, while .NET APIs won’t be able to use the C++ type.
C# embraces .NET, both the runtime and the class library, so these dilemmas do not arise. In the scenario just discussed, List<int> has no rival. There is no friction when using .NET’s class library because it is built for the same world as C#.
The first version of C# presented a programming model that was very closely related to the underlying CLR’s model. C# has gradually added its own abstractions over the years, but these have been designed to fit well with the CLR. This gives C# a distinctive feel. It also means that if you want to understand C#, you need to understand the CLR and the way in which it runs code.
Managed Code and the CLR
For years, the most common way for a compiler to work was to process source code, and to produce output in a form that could be executed directly by the computer’s CPU. Compilers would produce machine code—a series of instructions in whatever binary format was required by the kind of CPU the computer had. Many compilers still work this way, but the C# compiler does not. Instead, it uses a model called managed code.
With managed code, the compiler does not generate the machine code that the CPU executes. Instead, the compiler produces a form of binary code called the intermediate language (IL). The executable binary is produced later, usually, although not always, at runtime. The use of IL enables features that are hard or even impossible to provide under the more traditional model.
Perhaps the most visible benefit of the managed model is that the compiler’s output is not tied to a single CPU architecture. You can write a .NET component that can run on the 32-bit x86 architecture that PCs have used for decades, but that will also work well in the newer 64-bit update to that design (x64), and even on completely different architectures such as ARM. (For example, .NET Core introduced the ability to run on ARM-based devices such as the Raspberry Pi.) With a language that compiles directly to machine code, you’d need to build different binaries for each of these. But with .NET, you can compile a single component that can run on any of them, and it would even be able to run on platforms that weren’t supported at the time you compiled the code if a suitable runtime became available in the future. More generally, any kind of improvement to the CLR’s code generation—whether that’s support for new CPU architectures, or just performance improvements for existing ones—is instantly of benefit to all .NET languages. For example, older versions of the CLR did not take advantage of the vector processing extensions available on modern x86 and x64 processors, but the current versions will now often exploit these when generating code for loops. All code running on current versions of .NET Core benefits from this, including code that was written years before this enhancement was added.
The exact moment at which the CLR generates executable machine code can vary. Typically, it uses an approach called just-in-time (JIT) compilation, in which each individual function is compiled the first time it runs. However, it doesn’t have to work this way. There are various ways in which .NET code can be compiled ahead of time (AoT). There’s a tool called NGen which can do this as a post-installation step. Windows Store Apps built for the Universal Windows Platform (UWP) use the .NET Native build tools, which do this earlier, as part of the build. .NET Core 3.0 adds a new tool called crossgen, which enables any .NET Core application (not just UWP apps) to use build-time native code generation. However, generation of executable code can still happen at runtime even when you use these tools3—the runtime’s tiered compilation feature may choose to recompile a method dynamically to optimize it better for the ways it is being used at runtime. (It can do this whether you’re using JIT or AoT.) The virtualized nature of managed execution is designed to make such things possible in a way that’s invisible to your code, although it can occasionally make its presence felt through more than just performance. For example, virtualized execution leaves some latitude for when and how the runtime performs certain initialization work, and you can sometimes see the results of its optimizations causing things to happen in a surprising order.
Managed code has ubiquitous type information. The file formats dictated by the CLI require this to be present, because it enables certain runtime features. For example, .NET offers various automatic serialization services, in which objects can be converted into binary or textual representations of their state, and those representations can later be turned back into objects, perhaps on a different machine. This sort of service relies on a complete and accurate description of an object’s structure, something that’s guaranteed to be present in managed code. Type information can be used in other ways. For example, unit test frameworks can use it to inspect code in a test project and discover all of the unit tests you have written. This relies on the CLR’s reflection services, which are the topic of Chapter 13.
Although C#’s close connection with the runtime is one of its main defining features, it’s not the only one. There’s a certain philosophy underpinning C#’s design.
Prefer Generality to Specialization
C# favors general-purpose language features over specialized ones. Over the years, Microsoft has expanded C# several times, and the language’s designers always have specific scenarios in mind for new features. However, they have always tried hard to ensure that each new element they add is useful beyond these primary scenarios.
For example, a few years ago Microsoft decided to add features to C# to make database access feel well integrated with the language. The resulting technology, Language Integrated Query (LINQ, described in Chapter 10), certainly supports that goal, but Microsoft achieved this without adding any direct support for data access to the language. Instead, Microsoft introduced a series of quite diverse-seeming capabilities. These included better support for functional programming idioms, the ability to add new methods to existing types without resorting to inheritance, support for anonymous types, the ability to obtain an object model representing the structure of an expression, and the introduction of query syntax. The last of these has an obvious connection to data access, but the rest are harder to relate to the task at hand. Nonetheless, these can be used collectively in a way that makes certain data access tasks significantly simpler. But the features are all useful in their own right, so as well as supporting data access, they enable a much wider range of scenarios. For example, these additions (which arrived in C# 3.0) made it very much easier to process lists, sets, and other groups of objects, because the new features work for collections of things from any origin, not just databases.
One illustration of this philosophy of generality was a language feature that was prototyped for C#, but which its designers ultimately chose not to go ahead with. The feature would have enabled you to write XML directly in your source code, embedding expressions to calculate values for certain bits of content at runtime. The prototype compiled this into code that generated the completed XML at runtime. Microsoft Research demonstrated this publicly, but this feature didn’t ultimately make it into C#, although it did later ship in another of Microsoft’s .NET languages, Visual Basic, which also got some specialized query features for extracting information from XML documents. Embedded XML expressions are a relatively narrow facility, only useful when you’re creating XML documents. As for querying XML documents, C# supports this functionality through its general-purpose LINQ features, without needing any XML-specific language features. XML’s star has waned since this language concept was mooted, having been usurped in many cases by JSON (which will doubtless be eclipsed by something else in years to come). Had embedded XML made it into C#, it would by now feel like a slightly anachronistic curiosity.
The new features added in subsequent versions of C# continue in the same vein. For example, the deconstruction and pattern matching features added in C# versions 7 and 8 are aimed at making life easier in subtle but useful ways, and are not limited to any particular application area.
C# Standards and Implementations
Before we can get going with some actual code, we need to know which implementation of C# and the runtime we are targeting. There are specifications that define language and runtime behavior for all C# implementations, as the next sidebar, “C#, the CLR, and Standards”, describes. This has made it possible for multiple implementations of C# and the runtime to emerge. At the time of writing, there are three in widespread use: .NET Framework, .NET Core, and Mono. Somewhat confusingly, Microsoft is behind all three of these, although it didn’t start out that way.
The Mono project was launched in 2001, and did not originate from Microsoft. (This is why it doesn’t have .NET in its name—it can use the name C# because that’s what the standards call the language, but .NET is a Microsoft brand name.) Mono started out with the goal of enabling Linux desktop application development in C#, but it went on to add support for iOS and Android. That crucial move helped Mono find its niche, because it is now mainly used to create cross-platform mobile device applications in C#. It was open source from the start, and has been supported by a variety of companies over its existence. At the time of writing this, Mono is under the stewardship of a company called Xamarin, and has been since 2011. Microsoft acquired Xamarin in 2016, and for now retains it as a distinct brand, positioning its Mono runtime as the way to run C# code on mobile devices.
So what about the other two implementations, both of which seem to be called .NET?
Many Microsoft .NETs (Temporarily)
For about seven years, there was only one current version of .NET at any given time, but since 2008 the picture has been less clear. This was due at first to specialized variants of .NET associated with various UI platforms coming and going, including Silverlight, several Windows Phone variants, and Windows 8’s introduction of Store Applications. Though some of these are still supported, they’re all dead ends except for Store Applications, which turned into Universal Windows Platform (UWP) apps. UWP has moved on to .NET Core, so these other .NET lineages are obsolete.
But even ignoring those effectively defunct forks of .NET, as I write this Microsoft still ships two current versions of .NET: the .NET Framework (Windows only, closed-source) and .NET Core (cross-platform, open source). In May of 2019, Microsoft announced that it intends to revert to a single current version in November 2020. In the long run this will reduce confusion, but in the near term it complicates matters further by introducing yet another version to be aware of.
One slightly baffling aspect of this is the minor variations in naming across the different .NETs. For the first 15 years or so, .NET Framework meant the combination of two things: a runtime and the class library. Its runtime was called the CLR. The class library went by various names including Base Class Library (BCL; a confusing name, because the ECMA specifications define the term “BCL” as something much narrower), or the Framework Class Library.
Today, we also have .NET Core. Its runtime is called the .NET Core Common Language Runtime (or just CoreCLR), which is a straightforward enough name: we can talk about the .NET Core CLR or the .NET Framework CLR, and it’s obvious which one we mean. And throughout this book, when I talk about the CLR or the runtime without any particular qualification, it’s because I’m saying something that applies to both implementations. Unfortunately, .NET Core calls its class library the .NET Core Framework (or CoreFX). This is unhelpful, because before .NET Core, the Framework was the combination of the CLR and the library. And just to muddy the waters further, many people at Microsoft now refer to the .NET Framework as the “desktop” framework to make it clear that they’re not talking about .NET Core. (This was always confusing because plenty of people use this “desktop” version for server applications. Moreover, the first ever release of .NET Core was for the UWP, supporting only Windows applications. A year went by before Microsoft released a supported version that could do anything else.4 And now that .NET Core 3.0 has added support on Windows for the two .NET desktop UI frameworks—Windows Presentation Foundation (WPF) and Windows Forms—most new desktop applications will target .NET Core, not the so-called .NET “desktop”.) Just in case that’s not all crystal clear, Table 1-1 summarizes the current situation.
| Platform | Runtime | Class library |
|---|---|---|
.NET Framework (aka .NET desktop) |
.NET CLR |
.NET Framework Class Library |
.NET Core |
.NET Core CLR |
.NET Core Framework |
In 2020, assuming Microsoft sticks to its plan, the names will all adjust again, with both .NET Core and .NET Framework being superseded by plain “.NET”. Microsoft has not settled on definitive names for the corresponding runtime and library parts at the time of writing.
But until that time, we have two “current” versions. Each can do things the other cannot, which is why both ship concurrently. .NET Framework only runs on Windows, whereas .NET Core supports Windows, macOS, and Linux. Although this makes the .NET Framework less widely usable, it means it can support some Windows-specific features. For example, there is a section of the .NET Framework Class Library dedicated to working with Windows speech synthesis and recognition services. This isn’t possible on .NET Core because it might be running on Linux, where equivalent features either don’t exist or are too different to be presented through the same .NET API.
The .NET due to ship in 2020 is essentially the next version of .NET Core, just with a snappier name. .NET Core is where most of the new development of .NET has occurred for the last few years. .NET Framework is still fully supported, but is already falling behind. For example, version 3.0 of Microsoft’s web application framework, ASP.NET Core, will only run on .NET Core, and not .NET Framework. So .NET Framework’s retirement, and .NET Core’s promotion to the one true .NET, is the inevitable conclusion of a process that has been underway for a few years.
Targeting Multiple .NET Versions with .NET Standard
The multiplicity of runtimes, each with their own different versions of the class libraries, presents a challenge for anyone who wants to make their code available to other developers. There’s a package repository for .NET components at http://nuget.org, which is where Microsoft publishes all of the .NET libraries it produces that are not built into .NET itself, and it is also where most .NET developers publish libraries they’d like to share. But which version should you build for? This is a two-dimensional question: there is the specific implementation (.NET Core, .NET Framework, Mono), and also the version (e.g., .NET Core 2.2 or 3.0, .NET Framework 4.7.2 or 4.8). And there are the older .NET variants, such as Windows Phone or Silverlight—Microsoft still supports many of these, which includes ongoing support through various libraries on NuGet. Many authors of popular open source packages distributed through NuGet also support a plethora of older framework types and versions.
Initially, people dealt with multiple versions by building multiple variants of their libraries. When you distribute .NET libraries via NuGet, you can embed multiple sets of binaries in the package targeting different flavors of .NET. However, one major problem with this is that as new forms of .NET have appeared over the years, existing libraries wouldn’t run on all newer runtimes. A component written for .NET Framework 4.0 would work on all subsequent versions of .NET Framework, but not on .NET Core. Even if the component’s source code was entirely compatible with .NET Core, you would need a separate version compiled to target that platform. And if the author of a library that you use hadn’t provided explicit support for .NET Core, that would stop you from using it. This was bad for everyone. Component authors found themselves on a treadmill of having to churn out new variants of their component, and since that relies on those authors having the inclination and time to do this work, component consumers might find that not all of the components they want to use are available on the platform they want to use.
To avoid this, Microsoft introduced .NET Standard, which defines common subsets of the .NET class library’s API surface area. If a NuGet package targets, say, .NET Standard 1.0, this guarantees that it will be able to to run on .NET Framework versions 4.5 or later, .NET Core 1.0 or later, or Mono 4.6 or later. And critically, if yet another variant of .NET emerges, then as long as it too supports .NET Standard 1.0, existing components will be able to run without modification, even though that new platform didn’t even exist when they were written.
.NET libraries published on NuGet will target the lowest version of .NET Standard that they can if they want to ensure the broadest reach. Versions 1.1 through 1.6 gradually added more functionality in exchange for supporting a smaller range of targets. (E.g., if you want to use a .NET Standard 1.3 component on .NET Framework, it needs to be .NET Framework 4.6 or later.) .NET Standard 2.0 was a larger leap forward, and marks an important point in .NET Standard’s evolution: according to Microsoft’s current plans, this will be the highest version number able to run on .NET Framework. Versions of .NET Framework from 4.7.2 onward fully support it, but .NET Standard 2.1 will not run on any version of .NET Framework now or in the future. It will run on .NET Core 3.0 and .NET (i.e., future versions of .NET Core). Future versions of Xamarin’s Mono runtime are also likely to support it, but this is the end of the road for the classic .NET Framework.
What does this all mean for C# developers? If you are writing code that will never be used outside of a particular project, you will normally just target the latest version of .NET Core or, if you need some Windows-specific feature it doesn’t offer, you might target .NET Framework, and you will be able to use any NuGet package that targets .NET Standard, up to and including v2.0 (which means the overwhelming majority of what’s on NuGet will be available to you). If you are writing libraries that you intend to share, you should target .NET Standard instead. Microsoft’s development tools choose .NET Standard 2.0 by default for new class libraries, which is a reasonable choice—you could open your library up to a wider audience by dropping to a lower version, but today, the versions of .NET that support .NET Standard 2.0 are widely available, so you would only contemplate targeting older versions if you want to support developers still using older .NET Frameworks. (Microsoft does this in most of its NuGet libraries, but you don’t necessarily have to tie yourself to the same regime of support for older versions.) If you want to use certain newer features (such as the memory-efficient types described in Chapter 18), you may need to target a more recent version of .NET Standard. In any case, the development tools will ensure that you only use APIs available in whichever version of .NET Standard you declare support for.
Microsoft provides more than just a language and the various runtimes with its associated class libraries. There are also development environments that can help you write, test, debug, and maintain your code.
Visual Studio and Visual Studio Code
Microsoft offers three desktop development environments: Visual Studio, Visual Studio for Mac, and Visual Studio Code. All three provide the basic features—such as a text editor, build tools, and a debugger—but Visual Studio provides the most extensive support for developing C# applications, whether those applications will run on Windows or other platforms. It has been around the longest—for as long as C#—so it comes from the pre-open source days, and has not moved over to open source development. The various editions available range from free to eye-wateringly expensive.
Visual Studio is an Integrated Development Environment (IDE), so it takes an “everything included” approach. In addition to a fully featured text editor, it offers visual editing tools for UIs. There is deep integration with source control systems such as git, and with online systems providing source repositories, issue tracking, and other Application Lifecycle Management (ALM) features such as GitHub and Microsoft’s Azure DevOps system. Visual Studio offers built-in performance monitoring and diagnostic tools. It has various features for working with applications developed for and deployed to Microsoft’s Azure cloud platform. Its Live Share feature offers a convenient way for remote developers to work together to aid pairing or code review. It has the most extensive set of refactoring features out of the three environments described here.
In 2017 Microsoft released Visual Studio for Mac. This is not a port of the Windows version. It grew out of a product called Xamarin, a Mac-based development environment specializing in building mobile apps in C# that run on the Mono runtime. Xamarin was originally an independent product, but when, as discussed earlier, Microsoft acquired the company that wrote it, Microsoft integrated various features from the Windows version of Visual Studio when it moved the product under the Visual Studio brand.
Visual Studio Code (often shortened to VS Code) was first released in 2015. It is open source and cross platform, supporting Linux as well as Windows and Mac. It is based on the Electron platform and is written predominantly in TypeScript. (This means it really is the same program on all operating systems.) VS Code is a more lightweight product than Visual Studio: a basic installation of VS Code has little more than text editing support. However, as you open up files, it will discover downloadable extensions that, if you choose to install them, can add support for C#, F#, TypeScript, PowerShell, Python, and a wide range of other languages. (The extension mechanism is open, so anyone who wants to can publish an extension.) So although in its initial form it is less of an Integrated Development Environment (IDE) and more like a simple text editor, its extensibility model makes it pretty powerful. The wide range of extensions has led to VS Code becoming remarkably popular outside of the world of Microsoft languages, and this in turn has encouraged a virtuous cycle of even greater growth in the range of extensions.
Visual Studio offers the most straightforward path to getting started in C#—you don’t need to install any extensions or modify any configuration to get up and running. So I’ll start with a quick introduction to working in Visual Studio.
Tip
You can download the free version of Visual Studio, called Visual Studio Community, from https://www.visualstudio.com/.
Any nontrivial C# project will have multiple source code files, and in Visual Studio, these will belong to a project. Each project builds a single output, or target. The build target might be as simple as a single file—a C# project could produce an executable file or a library, for example—but some projects produce more complicated outputs. For instance, some project types build websites. A website will normally contain multiple files, but collectively, these files represent a single entity: one website. Each project’s output will be deployed as a unit, even if it consists of multiple files.
Note
Executables typically have an .exe file extension in Windows, while libraries use .dll (historically short for dynamic link library). .NET Core, however, puts all generated code in .dll files. Starting with .NET Core 3.0, it can generate a bootstrapping executable (with an .exe extension on Windows), but this just starts the runtime and then loads the .dll containing the main compiled output. .NET Framework compiles the application directly into a self-bootstrapping .exe (with no separate .dll). In either case, the only difference between the main compiled output of an application and a library is that the former specifies an application entry point. Both file types can export features to be consumed by other components. These are both examples of assemblies, the subject of Chapter 12.
Project files usually have extensions ending in proj. For example, most C# projects have a .csproj extension, while C++ projects use .vcxproj. If you examine these files with a text editor, you’ll find that they usually contain XML. (That’s not always true. Visual Studio is extensible, and each type of project is defined by a project system that can use whatever format it likes, but the built-in languages use XML.) These files describe the contents of the project and configure how it should be built. The XML format that Visual Studio uses for C# project files can also be processed by the msbuild tool, and also by the dotnet command-line tool if you’ve installed the .NET Core SDK, which enables you to build projects from the command line. VS Code can also work with these files.
You will often want to work with groups of projects. For example, it is good practice to write tests for your code, but most test code does not need to be deployed as part of the application, so you would typically put automated tests into separate projects. And you may want to split up your code for other reasons. Perhaps the system you’re building has a desktop application and a website, and you have common code you’d like to use in both applications. In this case, you’d need one project that builds a library containing the common code, another producing the desktop application executable, another to build the website, and three more projects containing the unit tests for each of the main projects.
Visual Studio helps you work with multiple related projects through what it calls a solution. A solution is simply a collection of projects, and while they are usually related, they don’t have to be—a solution is really just a container. You can see the currently loaded solution and all of its projects in Visual Studio’s Solution Explorer. Figure 1-1 shows a solution with two projects. (I’m using Visual Studio 2019 here, which is the latest version at the time of writing.) Solution Explorer shows a tree view, in which you can expand each project to see its constituent files. This panel is normally open at the top right of Visual Studio, but it can be hidden or closed. You can reopen it with the View→Solution Explorer menu item.
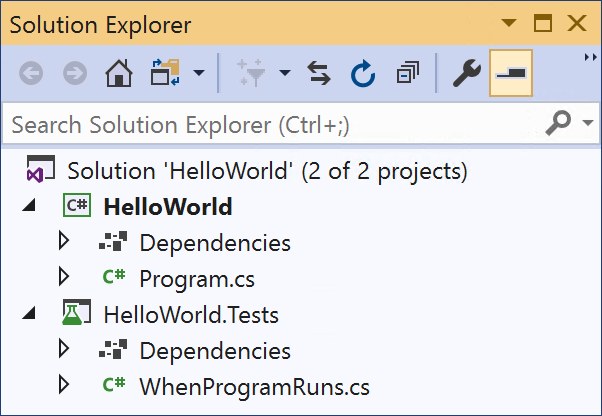
Figure 1-1. Solution Explorer
Visual Studio can load a project only if it is part of a solution. When you create a brand-new project, you can add it to an existing solution, but if you don’t, Visual Studio will create one for you. If you try to open an existing project file, Visual Studio will look for an associated solution, and if it can’t find one, it will create one. That’s because lots of operations in Visual Studio are scoped to the currently loaded solution. When you build your code, it’s normally the solution that you build. Configuration settings, such as a choice between Debug and Release builds, are controlled at the solution level. Global text searches can search all the files in the solution.
A solution is just another text file, with an .sln extension. Curiously, it’s not an XML file—solution files use their own text-based format, although it’s one that msbuild understands, as does VS Code. If you look at the folder containing your solution, you might also notice a .vs folder. (Visual Studio marks this as hidden, but if you have configured Windows File Explorer to show hidden files, as developers often do, you’ll see it.) This contains user-specific settings, such as a record of which files you have open, and which project or projects to launch when starting debug sessions. That ensures that when you open a project, everything is more or less where you left it when you last worked on the project. Because these are per-user settings, you do not normally put .vs folders into source control.
A project can belong to more than one solution. In a large codebase, it’s common to have multiple .sln files with different combinations of projects. You would typically have a master solution that contains every single project, but not all developers will want to work with all the code all of the time. Someone working on the desktop application in our hypothetical example will also want the shared library, but probably has no interest in loading the web project.
I’ll show how to create a new project and solution, and I’ll then walk through the various features Visual Studio adds to a new C# project as an introduction to the language. I’ll also show how to add a unit test project to the solution.
Note
This next section is intended for developers who are new to Visual Studio. This book is aimed at experienced developers, but does not assume any prior experience in C# or Visual Studio, so if you are already familiar with Visual Studio’s basic operation, you might want to skim through this next section quickly.
Anatomy of a Simple Program
If you’re using Visual Studio 2019, the simplest way to create a new project is through the “Get started” window that opens when you run it, as shown in Figure 1-2.
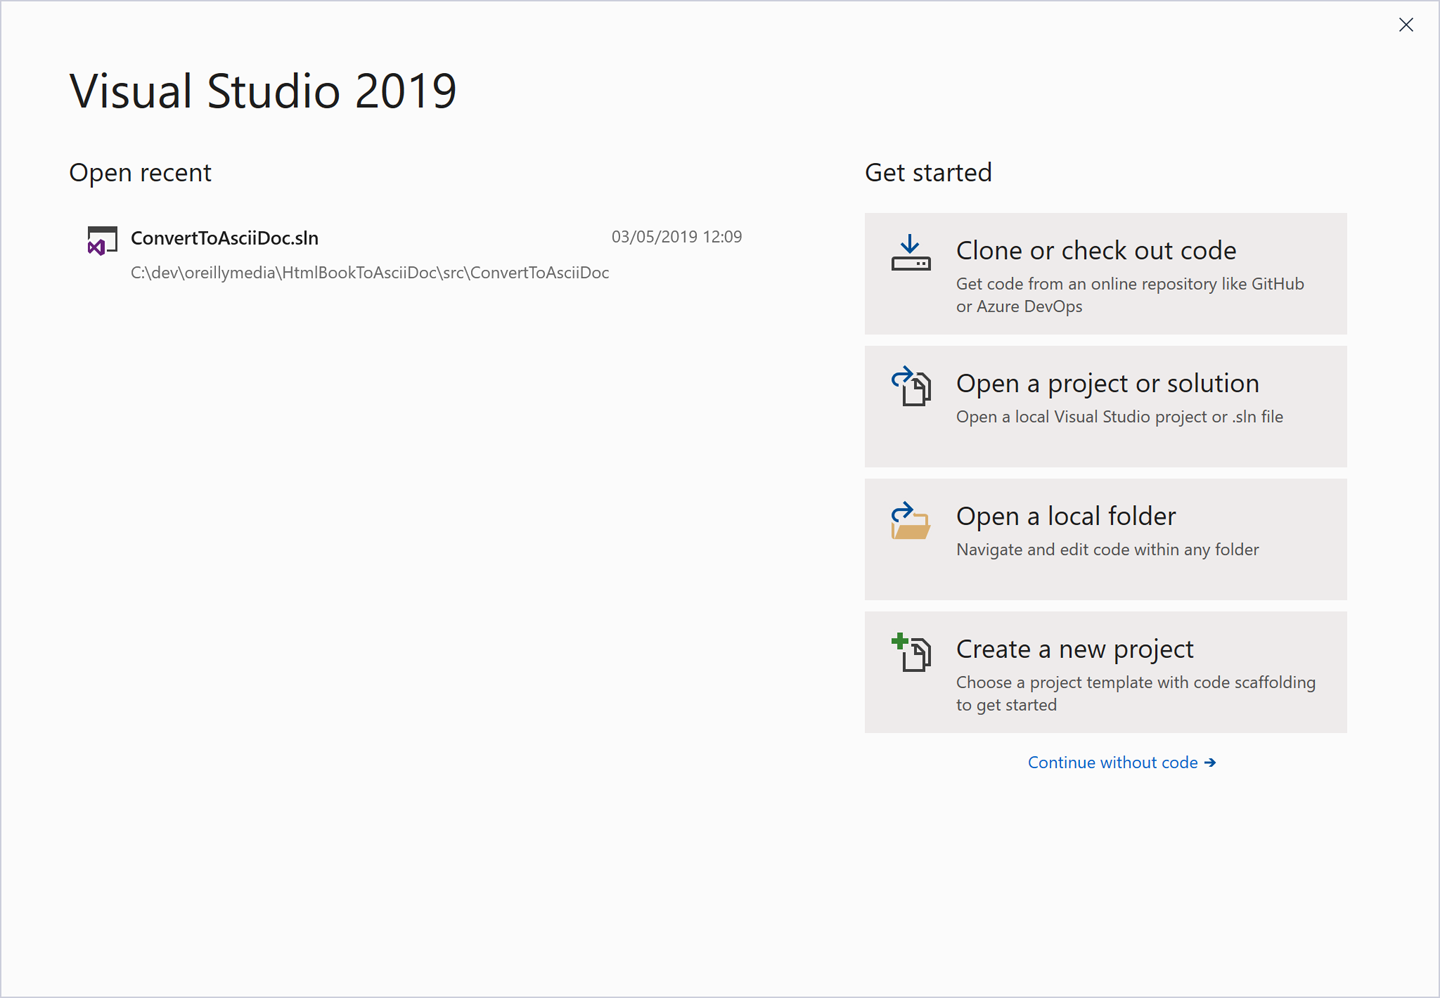
Figure 1-2. The Get started window
If you click the “Create a new project” button at the bottom right, it will open the new project dialog. Alternatively, if Visual Studio is already running (or if you’re using an older version that doesn’t show this “Get started” window), you can use Visual Studio’s File→New→Project menu item, or if you prefer keyboard shortcuts, type Ctrl-Shift-N. Any of these actions opens the “Create a new project” dialog, shown in Figure 1-3.
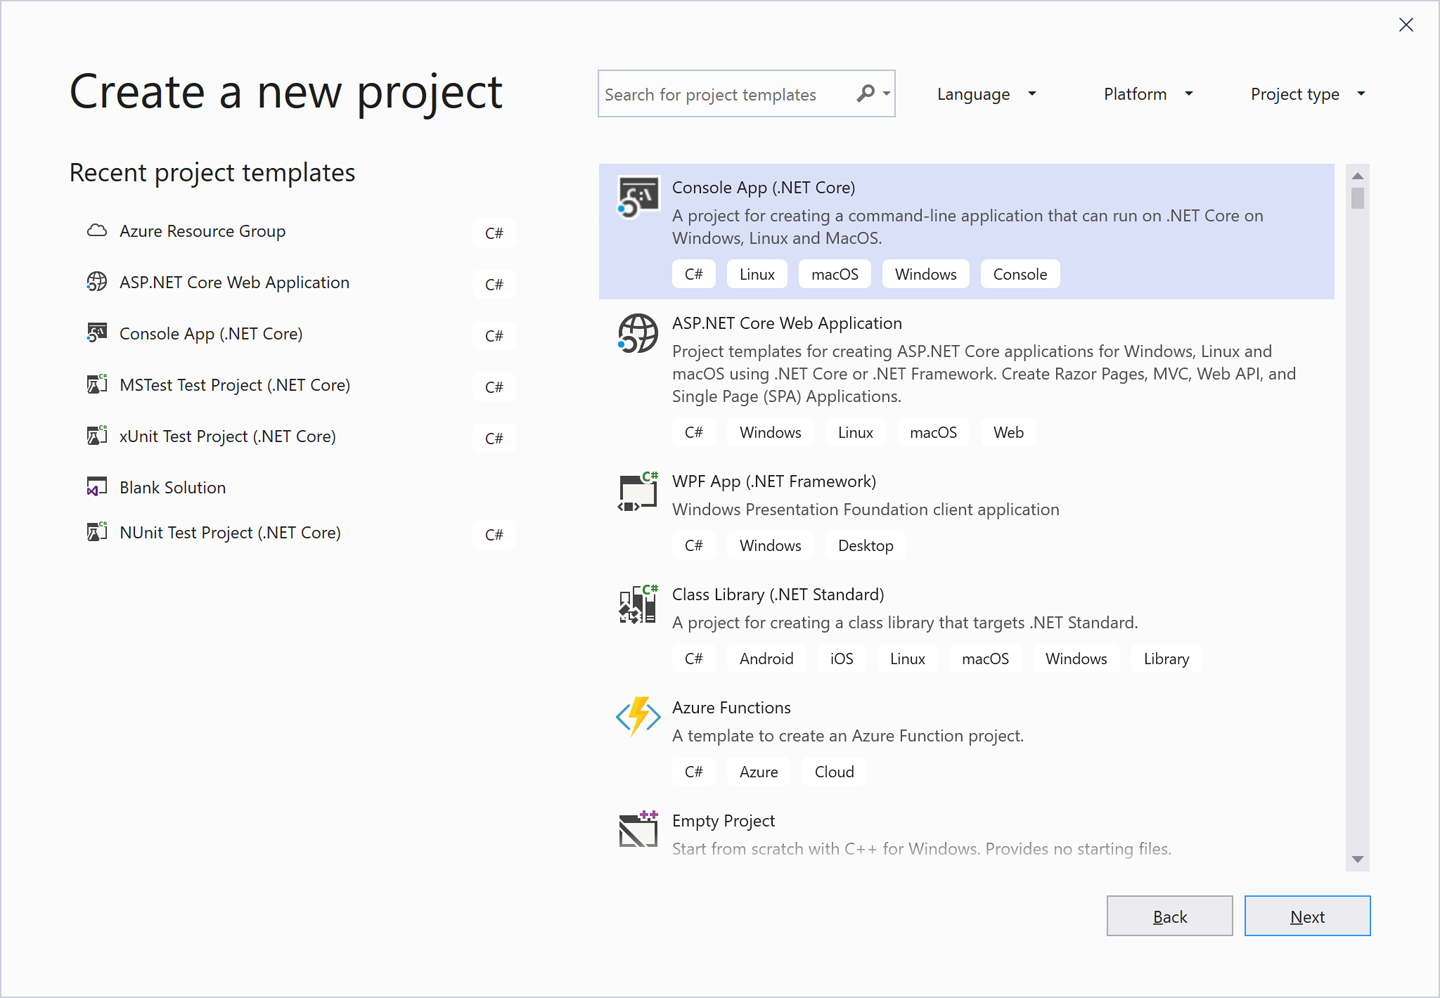
Figure 1-3. The Create a new project dialog
This window offers a list of application types. The exact set will depend on what edition of Visual Studio you have installed, and also which development workloads you chose during installation. As long as you have installed at least one of the workloads that includes C#, you should see the option to create a Console App (.NET Core). If you select this and click Next, you will see the “Configure your new project” dialog, shown in Figure 1-4.
This lets you choose a name for your new project, and also for its containing solution (which defaults to the same name). You can also choose the location on disk for the project. The Project name field affects three things. It controls the name of the .csproj file on disk. It also determines the filename of the compiled output. Finally, it sets the default namespace for newly created code, which I’ll explain when I show the code. (You can change any of these later if you wish.)
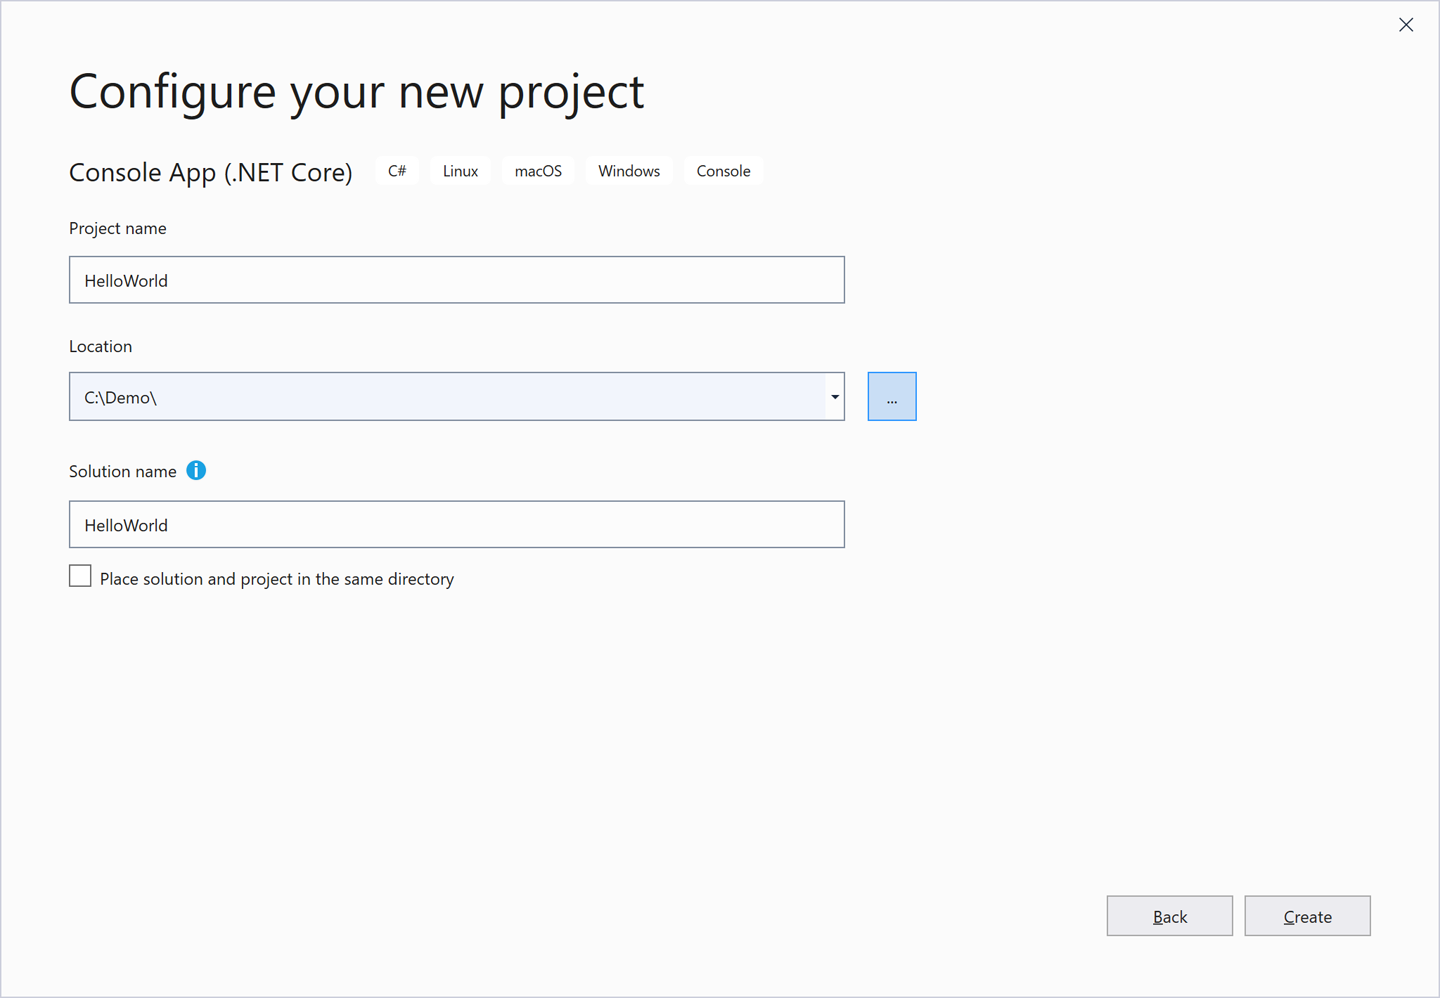
Figure 1-4. The Configure your new project dialog
Visual Studio offers a “Place solution and project in the same directory” checkbox that lets you decide how the associated solution is created. If you check it, the project and solution will have the same name and will live in the same folder on disk. But if you plan to add multiple projects to your new solution, you will typically want the solution to be in its own folder, with each project stored in a subfolder. If you leave this checkbox unchecked, Visual Studio will set things up that way, and also enable the “Solution name” text box so you can give the solution a different name from the first project, if necessary. I’m intending to add a unit test project to the solution as well as the program, so I’ve left the checkbox unchecked. I’ve set the project name to HelloWorld, and Visual Studio has set the solution name to match, which I’m happy with here. Clicking Create creates my new C# project. So I currently have a solution with a single project in it.
Adding a Project to an Existing Solution
To add a unit test project to the solution, I can go to the Solution Explorer panel, right-click on the solution node (the one at the very top), and choose Add→New Project. This opens a dialog almost identical to the one in Figure 1-3, but with the title showing “Add a new project” instead. I want to add a test project. I could scroll through the list of project types, but there are faster ways. I could type “Test” into the search box at the top of the dialog. Or, I could click on the “Project type” button at the top right, and select Test from its drop-down. Either approach will show several different test project types. If you see ones for languages other than C#, click the Language button next to the search box to filter down to just C#. Even then you’ll see a few project types, because Visual Studio supports several different test frameworks. I’ll choose MSTest Test Project (.NET Core).
Clicking Next opens the “Configure your new project” dialog again. This new project will contain tests for my HelloWorld project, so I’ll call it HelloWorld.Tests. (Nothing demands that naming convention, by the way—I could have called it anything.) When I click OK, Visual Studio creates a second project, and both are now listed in Solution Explorer, which will look similar to Figure 1-1.
The purpose of this test project will be to ensure that the main project does what it’s supposed to. I happen to prefer the style of development where you write your tests before you write the code being tested, so we’ll start with the test project. To be able to do its job, my test project will need access to the code in the HelloWorld project. Visual Studio does not attempt to guess which projects in a solution may depend on which other projects. While there are only two here, even if it were capable of guessing, it would most likely guess wrong, because HelloWorld will produce an executable program, while unit test projects happen to produce a library. The most obvious guess would be that the program would depend on the library, but here we have the somewhat unusual requirement that our library (which is actually a test project) needs access to the code in our application.
Referencing One Project from Another
To tell Visual Studio about the relationship between these two projects, I right-click on the HelloWorld.Test project’s Dependencies node in Solution Explorer and select the Add Reference menu item. This opens the Reference Manager dialog, which you can see in Figure 1-5. On the left, you choose the sort of reference you want—in this case, I’m setting up a reference to another project in the same solution, so I have expanded the Projects section and selected Solution. This lists all the other projects in the middle, and there is just one in this case, so I check the HelloWorld item and click OK.
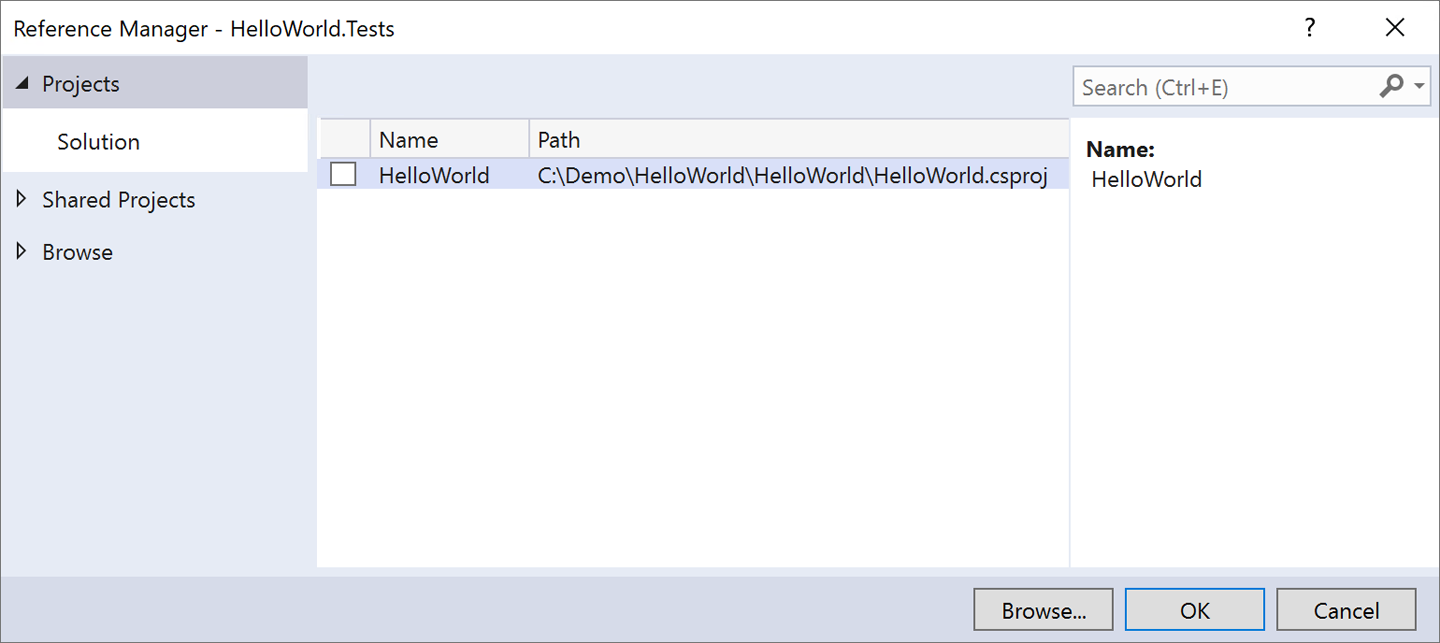
Figure 1-5. The Reference Manager dialog
Referencing External Libraries
Extensive though the .NET class library may be, it does not cover all eventualities. There are thousands of useful libraries available for .NET, many of them free. Microsoft is shipping more and more libraries separately from the main .NET class library. Visual Studio supports adding references using the NuGet system mentioned earlier. In fact, the example is already using it—although we chose Microsoft’s own “MSTest” test framework that’s not built into .NET. (You generally don’t need unit testing services at runtime, so there’s no need to build them into the class library that ships with the platform.) If you expand the Dependencies node for the HelloWorld.Tests project in Solution Explorer, and then expand the NuGet child node, you’ll see various NuGet packages, as Figure 1-6 shows. (You might see higher version numbers if you try this, as these libraries are under constant development.)
You can see four test-related packages, all added for us as part of Visual Studio’s test project template. NuGet is a package-based system, so rather than adding a reference to a single DLL, you add a reference to a package that may contain multiple DLLs, and any other files that may be needed to use the library.
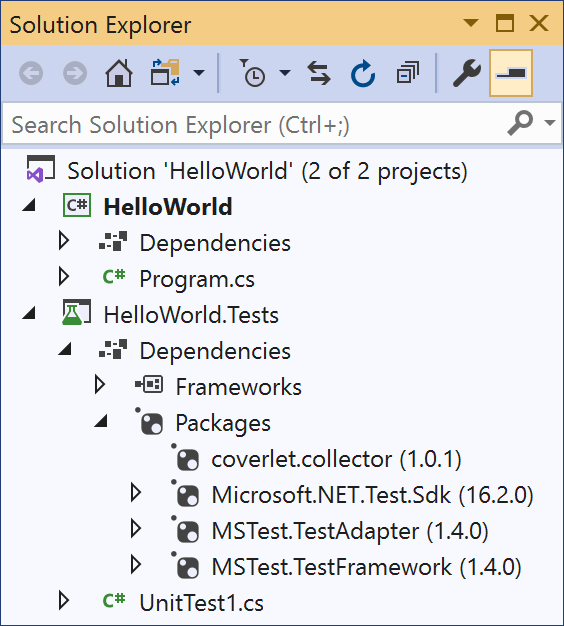
Figure 1-6. NuGet references
The public repository of packages that Microsoft runs on the http://nuget.org website hosts copies of all of the libraries that Microsoft does not include directly in the .NET class library, but which it nonetheless fully supports. (The testing framework used here is one example. The ASP.NET Core web framework is another.) This central NuGet repository is not just for Microsoft. Anyone can make packages available on this site, so this is where you will find the vast majority of free .NET libraries.
Visual Studio can search in the main NuGet repository. If you right-click on a project, or on its Dependencies node, and select Manage NuGet Packages, it will open the NuGet Package Manager window, shown in Figure 1-7. On the left is a list of packages from the NuGet repository. If you select Installed at the top, it will show just the packages you are already using. If you click Browse, it shows popular available packages by default, but it also provides a text box with which you can search for specific libraries.
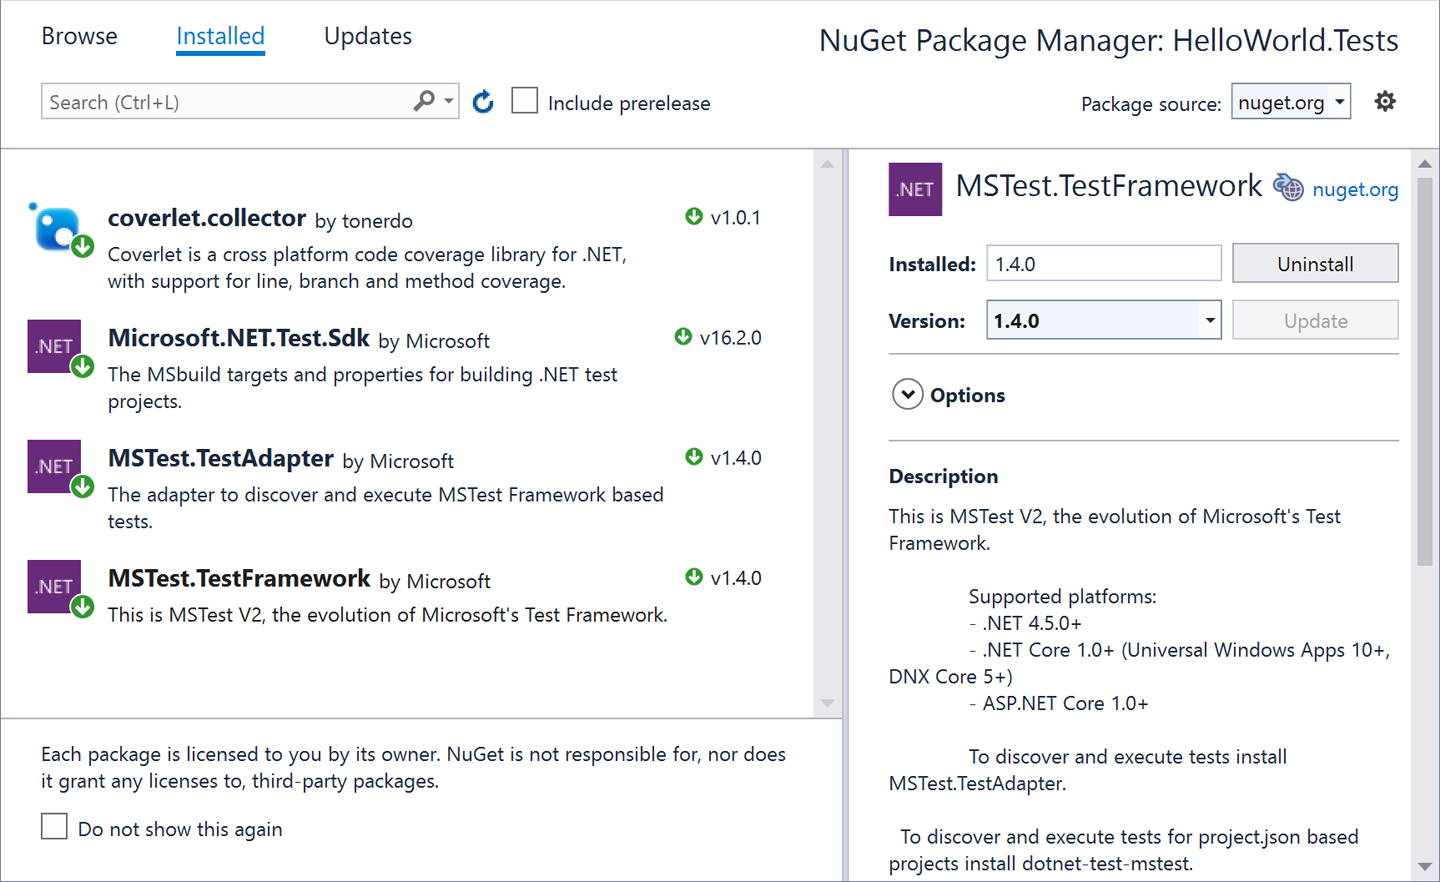
Figure 1-7. NuGet Package Manager
It is also possible to host your own NuGet repositories. For example, many companies run repositories behind their firewalls to make internally developed packages available to other employees, without having to make them publicly available. The https://myget.org site specializes in online hosting, and private package hosting is a feature of Microsoft’s Azure DevOps and also GitHub. Or you can just host a repository on a locally accessible filesystem. You can configure NuGet to search any number of repositories in addition to the main public one.
One very important feature of NuGet packages is that they can specify dependencies on other packages. For example, if you look at the Microsoft.NET.Test.Sdk package in Figure 1-6, you can see from the little triangle next to it that its treeview node is expandable. Expanding it reveals that it depends on some other packages, including Microsoft.CodeCoverage. Because packages describe their dependencies, Visual Studio can automatically fetch all of the packages you require.
Writing a Unit Test
Now I need to write a test. Visual Studio has provided me with a test class to get me started, in a file called UnitTest1.cs. I want to pick a more informative name. There are various schools of thought as to how you should structure your unit tests. Some developers advocate one test class for each class you wish to test, but I like the style where you write a class for each scenario in which you want to test a particular class, with one method for each of the things that should be true about your code in that scenario. As you’ve probably guessed from the project names I’ve chosen, my program will only have one behavior: it will display a “Hello, world!” message when it runs. So I’ll rename the UnitTest1.cs source file to WhenProgramRuns.cs. This test should verify that the program shows the required message when it runs. The test itself is very simple, but unfortunately, getting to the point where we can run this particular test is a bit more involved. Example 1-1 shows the whole source file; the test is near the end, in bold.
Example 1-1. A unit test class for our first program
usingSystem;usingMicrosoft.VisualStudio.TestTools.UnitTesting;namespaceHelloWorld.Tests{[TestClass]publicclassWhenProgramRuns{privatestring_consoleOutput;[TestInitialize]publicvoidInitialize(){varw=newSystem.IO.StringWriter();Console.SetOut(w);Program.Main(newstring[0]);_consoleOutput=w.GetStringBuilder().ToString().Trim();}[TestMethod]publicvoidSaysHelloWorld(){Assert.AreEqual("Hello, world!",_consoleOutput);}}}
I will explain each of the features in this file once I’ve shown the program itself. For now, the most interesting part of this example is the SaysHelloWorld method, which defines some behavior we want our program to have. The test states that the program’s output should be the “Hello, world!” message. If it’s not, this test will report a failure. The test itself is pleasingly simple, but the code that sets things up for the test is a little awkward. The problem here is that the obligatory first example that all programming books are required by law to show isn’t very amenable to unit testing of individual classes or methods, because you can’t really test anything less than the whole program. We want to verify that the program writes a particular message to the console. In a real application, you might devise some sort of abstraction for output, and your unit tests would provide a fake version of that abstraction for test purposes. But I want my application (which Example 1-1 merely tests) to keep to the spirit of the standard “Hello, world!” example. To avoid overcomplicating the main program, I’ve made my test intercept console output so that I can check that the program displayed what was intended. (Chapter 15 will describe the features I’m using from the System.IO namespace to achieve this.)
There’s a second challenge. Normally, a unit test will, by definition, test some isolated and usually small part of the program. But in this case, the program is so simple that there is only one feature of interest, and that feature executes when we run the program. This means my test will need to invoke the program’s entry point. I could have done that by launching my HelloWorld program in a whole new process, but capturing its output would have been rather more complex than the in-process interception done by Example 1-1. Instead, I’m just invoking the program’s entry point directly. In a C# application, the entry point is usually a method called Main defined in a class called Program. Example 1-2 shows the relevant line from Example 1-1, passing an empty array to simulate running the program with no command-line arguments.
Example 1-2. Calling a method
Program.Main(newstring[0]);
Unfortunately, there’s a problem with that. A program’s entry point is typically only accessible to the runtime—it’s an implementation detail of your program, and there’s not normally any reason to make it publicly accessible. However, I’ll make an exception here, because that’s where the only code in this example will live. So to get the code to compile, we’ll need to make a change to our main program. Example 1-3 shows the relevant code from the Program.cs file in the HelloWorld project. (I’ll show the whole thing shortly.)
Example 1-3. Making the program entry point accessible
publicclassProgram{publicstaticvoidMain(string[]args){...
I’ve added the public keyword to the start of two lines to make the code accessible to the test, enabling Example 1-1 to compile. There are other ways I could have achieved this. I could have left the class as it is, made the method internal, and then applied the InternalsVisibleToAttribute to my program to grant access just to the test suite. But internal protection and assembly-level attributes are topics for later chapters (Chapters 3 and 14, respectively), so I decided to keep it simple for this first example. I’ll show the alternative approach in Chapter 14.
I’m now ready to run my test. To do this, I open Visual Studio’s Unit Test Explorer panel with the Test→Windows→Test Explorer menu item. Next, I build the project with the Build→Build Solution menu. Once I’ve done that, the Unit Test Explorer shows a list of all the unit tests defined in the solution. It finds my SaysHelloWorld test, as you can see in Figure 1-8. Clicking on the Run All button (the double arrow at the top left) runs the test, which fails because we’ve only written the test so far—we’ve not done anything to our main program. You can see the error at the bottom of Figure 1-8. It says it was expecting a “Hello, world!” message, but the actual console output was different. (Not by much, admittedly—Visual Studio did in fact add code to my console application that shows a message. But it does not have the comma my test requires, and the w has the wrong case.)
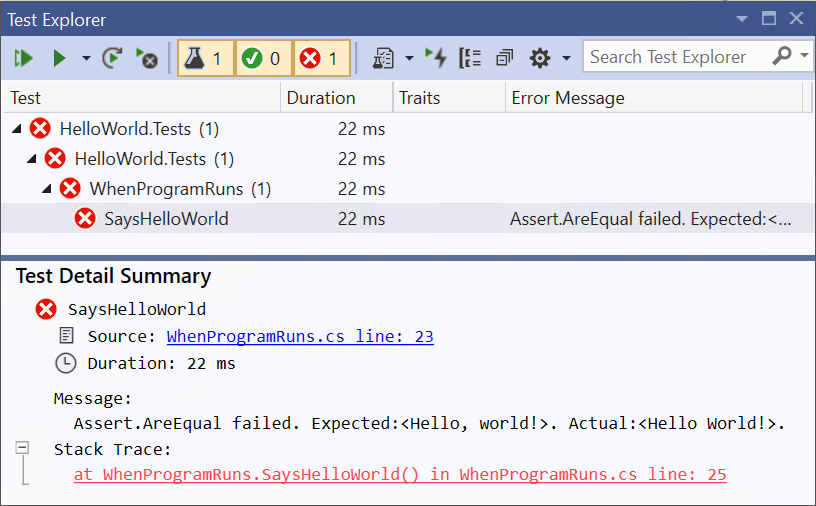
Figure 1-8. Unit Test Explorer
So it’s time to look at our HelloWorld program and correct the code. When I created the project, Visual Studio generated various files, including Program.cs, which contains the program’s entry point. Example 1-4 shows this file, including the modifications I made in Example 1-3. I will explain each element in turn, as it provides a useful introduction to some important elements of C# syntax and structure.
Example 1-4. Program.cs
usingSystem;namespaceHelloWorld{publicclassProgram{publicstaticvoidMain(string[]args){Console.WriteLine("Hello World!");}}}
The file begins with a using directive. This is optional, but almost all source files contain one or more, and they tell the compiler which namespaces we’d like to use, raising the obvious question: what’s a namespace?
Namespaces
Namespaces bring order and structure to what would otherwise be a horrible mess. The .NET class library contains a large number of classes, and there are many more classes out there in third-party libraries, not to mention the classes you will write yourself. There are two problems that can occur when dealing with this many named entities. First, it becomes hard to guarantee uniqueness unless either everything has a very long name, or the names include sections of random gibberish. Second, it can become challenging to discover the API you need; unless you know or can guess the right name, it’s difficult to find what you need from an unstructured list of many thousands of things. Namespaces solve both of these problems.
Most .NET types are defined in a namespace. Microsoft-supplied types have distinctive namespaces. When the types are part of .NET, the containing namespaces start with System, and when they’re part of some Microsoft technology that is not a core part of .NET, they usually begin with Microsoft. Libraries from other vendors tend to start with the company name, while open source libraries often use their project name. You are not forced to put your own types into namespaces, but it’s recommended that you do. C# does not treat System as a special namespace, so nothing’s stopping you from using that for your own types, but unless you’re writing a contribution to the .NET class library that you will be submitting as a pull request to https://github.com/dotnet/corefx, then it’s a bad idea because it will tend to confuse other developers. You should pick something more distinctive for your own code, such as your company or project name.
The namespace usually gives a clue as to the purpose of the type. For example, all the types that relate to file handling can be found in the System.IO namespace, while those concerned with networking are under System.Net. Namespaces can form a hierarchy. So the framework’s System namespace doesn’t just contain types. It also holds other namespaces, such as System.Net, and these often contain yet more namespaces, such as System.Net.Sockets and System.Net.Mail. These examples show that namespaces act as a sort of description, which can help you navigate the library. If you were looking for regular expression handling, for example, you might look through the available namespaces, and notice the System.Text namespace. Looking in there, you’d find a System.Text.RegularExpressions namespace, at which point you’d be pretty confident that you were looking in the right place.
Namespaces also provide a way to ensure uniqueness. The namespace in which a type is defined is part of that type’s full name. This lets libraries use short, simple names for things. For example, the regular expression API includes a Capture class that represents the results from a regular expression capture. If you are working on software that deals with images, the term capture is more commonly used to mean the acquisition of some image data, and you might feel that Capture is the most descriptive name for a class in your own code. It would be annoying to have to pick a different name just because the best one is already taken, particularly if your image acquisition code has no use for regular expressions, meaning that you weren’t even planning to use the existing Capture type.
But in fact, it’s fine. Both types can be called Capture, and they will still have different names. The full name of the regular expression Capture class is effectively System.Text.RegularExpressions.Capture, and likewise, your class’s full name would include its containing namespace (e.g., SpiffingSoftworks.Imaging.Capture).
If you really want to, you can write the fully qualified name of a type every time you use it, but most developers don’t want to do anything quite so tedious, which is where the using directive at the start of Example 1-4 comes in. While this simple example has just one, it’s common to see a list of directives here. These state the namespaces of the types a source file intends to use. You will normally edit this list to match your file’s requirements. In this example, Visual Studio added using System; when I created the project. It chooses different sets in different contexts. If you add a class representing a UI element, for example, Visual Studio would include various UI-related namespaces in the list.
With using declarations like these in place, you can just use the short, unqualified name for a class. The line of code that enables my HelloWorld example to do its job uses the System.Console class, but because of the first using directive, I can refer to it as just Console. In fact, that’s the only class I’ll be using, so there’s no need to add any other using directives in my main program.
Note
Earlier, you saw that a project’s References describe which libraries it uses. You might think that References are redundant—can’t the compiler work out which external libraries we are using from the namespaces? It could if there was a direct correspondence between namespaces and either libraries or packages, but there isn’t. There is sometimes an apparent connection—the popular Newtonsoft.Json NuGet package contains a Newtonsoft.Json.dll file that contains classes in the Newtonsoft.Json namespace, for example. But often there’s no such connection—the .NET Framework’s version of the class library includes a System.Core.dll file, but there is no System.Core namespace. So it is necessary to tell the compiler which libraries your project depends on, as well as saying which namespaces any particular source file uses. We will look at the nature and structure of library files in more detail in Chapter 12.
Even with namespaces, there’s potential for ambiguity. You might use two namespaces that both happen to define a class of the same name. If you want to use that class, then you will need to be explicit, referring to it by its full name. If you need to use such classes a lot in the file, you can still save yourself some typing: you only need to use the full name once because you can define an alias. Example 1-5 uses aliases to resolve a clash that I’ve run into a few times: .NET’s UI framework, the Windows Presentation Foundation (WPF), defines a Path class for working with Bézier curves, polygons, and other shapes, but there’s also a Path class for working with filesystem paths, and you might want to use both types together to produce a graphical representation of the contents of a file. Just adding using directives for both namespaces would make the simple name Path ambiguous if unqualified. But as Example 1-5 shows, you can define distinctive aliases for each.
Example 1-5. Resolving ambiguity with aliases
usingSystem.IO;usingSystem.Windows.Shapes;usingIoPath=System.IO.Path;usingWpfPath=System.Windows.Shapes.Path;
With these aliases in place, you can use IoPath as a synonym for the file-related Path class, and WpfPath for the graphical one.
Going back to our HelloWorld example, directly after the using directives comes a namespace declaration. Whereas using directives declare which namespaces our code will consume, a namespace declaration states the namespace in which our own code lives. Example 1-6 shows the relevant code from Example 1-4. This is followed by an opening brace ({). Everything between this and the closing brace at the end of the file will be in the HelloWorld namespace. By the way, you can refer to types in your own namespace without qualification, without needing a using directive. That’s why the test code in Example 1-1 doesn’t have a using HelloWorld; directive—it implicitly has access to that namespace because its code is inside a namespace HelloWorld.Tests declaration.
Example 1-6. Namespace declaration
namespaceHelloWorld{
Visual Studio generates a namespace declaration with the same name as your project in the source files it adds when you create a new project. You’re not required to keep this—a project can contain any mixture of namespaces, and you are free to edit the namespace declaration. But if you do want to use something other than the project name consistently throughout your project, you should tell Visual Studio, because it’s not just the first file, Program.cs, that gets this generated declaration. By default, Visual Studio adds a namespace declaration based on your project name every time you add a new file. You can tell it to use a different namespace for new files by editing the project’s properties. If you right-click on the project node in Solution Explorer and select Properties, this opens the properties for the project, and if you go to the Application tab, there’s a “Default namespace” text box. It will use whatever you put in there for namespace declarations of any new files. (It won’t change the existing files, though.) This adds a <RootNamespace> property to the .csproj file.
Nested namespaces
As you’ve already seen, the .NET class library nests its namespaces, and sometimes quite extensively. Unless you’re creating a trivial example, you will typically nest your own namespaces. There are two ways you can do this. You can nest namespace declarations, as Example 1-7 shows.
Example 1-7. Nesting namespace declarations
namespaceMyApp{namespaceStorage{...}}
Alternatively, you can just specify the full namespace in a single declaration, as Example 1-8 shows. This is the more commonly used style.
Example 1-8. Nested namespace with a single declaration
namespaceMyApp.Storage{...}
Any code you write in a nested namespace will be able to use types not just from that namespace, but also from its containing namespaces without qualification. Code in Examples 1-7 or 1-8 would not need explicit qualification or using directives to use types either in the MyApp.Storage namespace or the MyApp namespace.
When you define nested namespaces, the convention is to create a matching folder hierarchy. If you create a project called MyApp, as you’ve seen, by default Visual Studio will put new classes in the MyApp namespace when you add them to the project. But if you create a new folder in the project (which you can do in Solution Explorer) called, say, Storage, Visual Studio will put any new classes you create in that folder into the MyApp.Storage namespace. Again, you’re not required to keep this—Visual Studio just adds a namespace declaration when creating the file, and you’re free to change it. The compiler does not need the namespace to match your folder hierarchy. But since the convention is supported by Visual Studio, life will be easier if you follow it.
Classes
Inside the namespace declaration, my Program.cs file defines a class. Example 1-9 shows this part of the file (which includes the public keywords I added earlier). The class keyword is followed by the name, and of course the full name of the type is effectively HelloWorld.Program, because this code is inside the namespace declaration. As you can see, C# uses braces ({}) to delimit all sorts of things—we already saw this for namespaces, and here you can see the same thing with the class, as well as the method it contains.
Example 1-9. A class with a method
publicclassProgram{publicstaticvoidMain(string[]args){Console.WriteLine("Hello World!");}}
Classes are C#’s mechanism for defining entities that combine state and behavior, a common object-oriented idiom. But this class contains nothing more than a single method. C# does not support global methods—all code has to be written as a member of some type. So this particular class isn’t very interesting—its only job is to act as the container for the program’s entry point. We’ll see some more interesting uses for classes in Chapter 3.
Program Entry Point
By default, the C# compiler will look for a method called Main and use that as the entry point automatically. If you really want to, you can tell the compiler to use a different method, but most programs stick with the convention. Whether you designate the entry point by configuration or convention, the method has to meet certain requirements, all of which are evident in Example 1-9.
The program entry point must be a static method, meaning that it is not necessary to create an instance of the containing type (Program, in this case) in order to invoke the method. It is not required to return anything, as signified by the void keyword here, although if you wish you can return int instead, which allows the program to return an exit code that the operating system will report when the program terminates. (It can also return either Task or Task<int>, enabling you to make it an async method, as described in Chapter 17.) And the method must either take no arguments at all (which would be denoted by an empty pair of parentheses after the method name) or, as in Example 1-9, it can accept a single argument: an array of text strings containing the command-line arguments.
Note
Some C-family languages include the filename of the program itself as the first argument, on the grounds that it’s part of what the user typed at the command prompt. C# does not follow this convention. If the program is launched without arguments, the array’s length will be 0.
The method declaration is followed by the method body, which in this case contains code that is very nearly what we want. We’ve now looked at everything that Visual Studio generated for us in this file, so all that remains is to modify the code inside the braces delimiting the method body. Remember, our test is failing because our program fails to meet its one requirement: to write out a certain message to the console. This requires the single line of code shown in Example 1-10, inside the method body. This is almost exactly what’s already there, it just features an extra comma and a lowercase w.
Example 1-10. Displaying a message
Console.WriteLine("Hello, world!");
With this in place, if I run the tests again, the Unit Test Explorer shows a checkmark by my test and reports that all tests have passed. So apparently the code is working. And we can verify that informally by running the program. You can do that from Visual Studio’s Debug menu. The Start Debugging option runs the program in the debugger. If you run the program this way (which you can also do with the F5 keyboard shortcut), a console window will open, and you’ll see it display the traditional message.
Unit Tests
Now that the program is working, I want to return to the first code I wrote, the test, because that file illustrates some C# features that the main program does not. If you go back to Example 1-1, it starts in a pretty similar way to the main program: we have some using directives and then a namespace declaration, the namespace being HelloWorld.Tests this time, matching the test project name. But the class looks different. Example 1-11 shows the relevant part of Example 1-1.
Example 1-11. Test class with attribute
[TestClass]publicclassWhenProgramRuns{
Immediately before the class declaration is the text [TestClass]. This is an attribute. Attributes are annotations you can apply to classes, methods, and other features of the code. Most of them do nothing on their own—the compiler records the fact that the attribute is present in the compiled output, but that is all. Attributes are useful only when something goes looking for them, so they tend to be used by frameworks. In this case, I’m using Microsoft’s unit testing framework, and it goes looking for classes annotated with this TestClass attribute. It will ignore classes that do not have this annotation. Attributes are typically specific to a particular framework, and you can define your own, as we’ll see in Chapter 14.
The two methods in the class are also annotated with attributes. Example 1-12 shows the relevant excerpts from Example 1-1. The test runner will execute any methods marked with [TestInitialize] once for every test the class contains, and will do so before running the actual test method itself. And, as you have no doubt guessed, the [TestMethod] attribute tells the test runner which methods represent tests.
Example 1-12. Annotated methods
[TestInitialize]publicvoidInitialize()...[TestMethod]publicvoidSaysHelloWorld()...
There’s one more feature in Example 1-1: the class contents begin with a field, shown again in Example 1-13. Fields hold data. In this case, the Initialize method stores the console output that it captures while the program runs in this _consoleOutput field, where it is available for test methods to inspect. This particular field has been marked as private, indicating that it is for its containing class’s own use. The C# compiler will permit only code that lives in the same class to access this data.
Example 1-13. A field
privatestring_consoleOutput;
And with that, we’ve examined every element of a program and the test project that verifies that it works as intended.
Summary
You’ve now seen the basic structure of C# programs. I created a solution containing two projects, one for tests and one for the program itself. This was a simple example, so each project had only one source file of interest. Both were of similar structure. Each began with using directives indicating which types the file uses. A namespace declaration stated the namespace that the file populates, and this contained a class containing one or more methods or other members, such as fields.
We will look at types and their members in much more detail in Chapter 3, but first, Chapter 2 will deal with the code that lives inside methods, where we express what we want our programs to do.
1 This was true of Microsoft’s previous cross-platform .NET offering. In 2008, Microsoft shipped Silverlight 2.0, which enabled C# to run inside browsers on Windows and macOS. Silverlight fought a losing battle against the improving capabilities and universal reach of HTML5 and JavaScript, but its closed source nature may not have helped its cause.
2 Microsoft’s first set of .NET extensions for C++ resembled ordinary C++ more closely. It turned out to be confusing to use the existing syntax for something quite different from ordinary C++, so Microsoft deprecated the first system (Managed C++) in favor of the newer, more distinctive syntax, which is called C++/CLI.
3 .NET Native is an exception: it does not support runtime JIT, so it does not offer tiered compilation.
4 Strangely, this first, UWP-supporting release in 2015 apparently never received an official version number. The .NET Core 1.0 release is dated June 2016, about a year later.
Get Programming C# 8.0 now with the O’Reilly learning platform.
O’Reilly members experience books, live events, courses curated by job role, and more from O’Reilly and nearly 200 top publishers.

